
The third article in the series about SQL Server backup and restore will take us through the database restore process and demonstrate the two main principles of database restore available in Microsoft.
To start with, let me remind you that in the first and the second articles, we reviewed the basics of the SQL Server backup process, main backup types, and the approaches to performing an auto backup.
Database Recovery Types
As this article deals with the data restore process, let me present the three main types of database recovery:
- A full database recovery suggests that the entire database reverts to the previous state and is restored. Note that the database is in offline mode during the revert and restore operations.
- A database file recovery suggests that a data file or a file set reverts to its original state and is restored. During the file restoration process, all file groups that contain the processed files are switched to offline mode for the time of restore. Any attempts to use the offline files and filegroups cause errors.
- A data page recovery allows restoring separate databases when using the full restore model or the incomplete logging model. The page restore applies to any database, no matter the number of filegroups.
I suggest we explore each restore type in greater detail. Hence, let’s start with the basic types – a simple recovery model and a full recovery model.
Simple Recovery Model
You can perform the database restore from the full backup under the simple recovery model using the following script:
USE [master]
RESTORE DATABASE [JobEmplDB]
FROM DISK = N'\\Shared\Backup\Full\JobEmplDB_Full_backup_2020_07_19_13_20_55.bak' WITH FILE = 1,
     MOVE N'JobEmplDB' TO N'D:\Program Files\Microsoft SQL Server\MSSQL15.MSSQLSERVER\MSSQL\DATA\JobEmplDB.mdf',
     MOVE N'JobEmplDB_log' TO N'D:\Program Files\Microsoft SQL Server\MSSQL15.MSSQLSERVER\MSSQL\DATA\JobEmplDB_log.ldf',
	 NOUNLOAD,
	 REPLACE,
	 STATS = 5;
GO
As a result, we restore the JobEmplDB database from the JobEmplDB_Full_backup_2020_07_19_14_21_57.bak backup by overwriting the existing files and the JobEmplDB database and transferring the files to D:\Program Files\Microsoft SQL Server\MSSQL15.MSSQLSERVER\MSSQL\DATA.
Restore SQL Server Database using SSMS
Alternatively, you can carry out the same restore in the SSMS interface. For that, right-click the database and choose the Restore Database option:
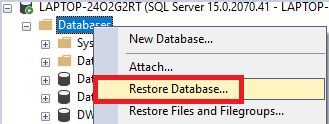
Img. 1. Choosing the database restore in SSMS
Next, on the General tab, select the path to the backup file and the destination to which you need to restore it (there is also an option of creating a new database):
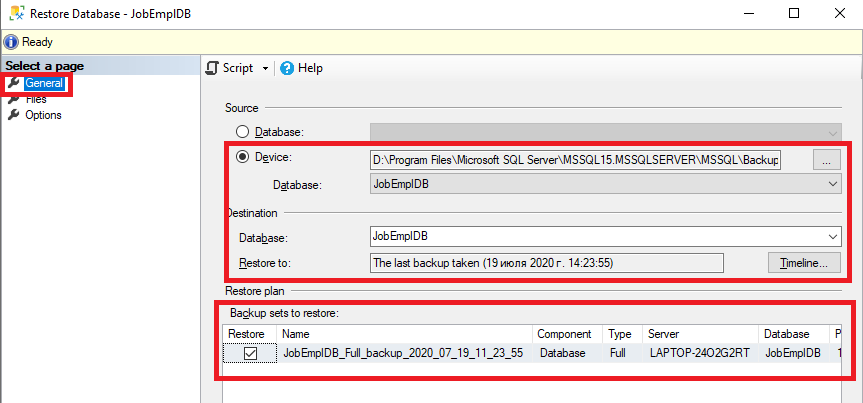
Img. 2. General tab settings in SSMS
Note that the Restore plan section provides detailed information about the backup file. Among other things, it shows the contents and backup types present in the file.
After that, on the Files tab, specify where to you need to relocate the restored database files:
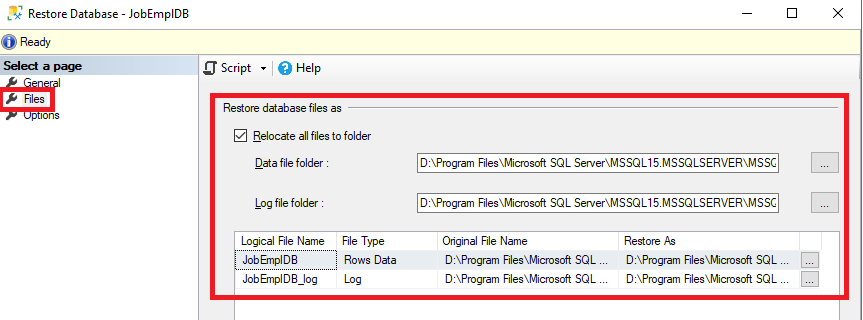
Img. 3. The Files tab settings in SSMS
On the Options tab, enable the Overwrite the existing database option:
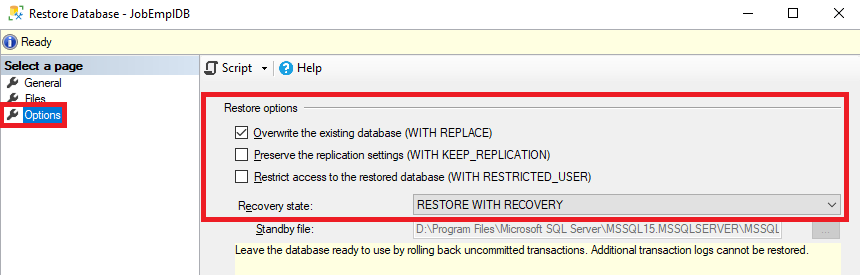
Img. 4. The Options tab settings in SSMS
Full Recovery Model
As for the full recovery model, you will need to take the following steps.
First, restore the database from a full backup and switch the database to the RESTORE WITH NORECOVERY mode:
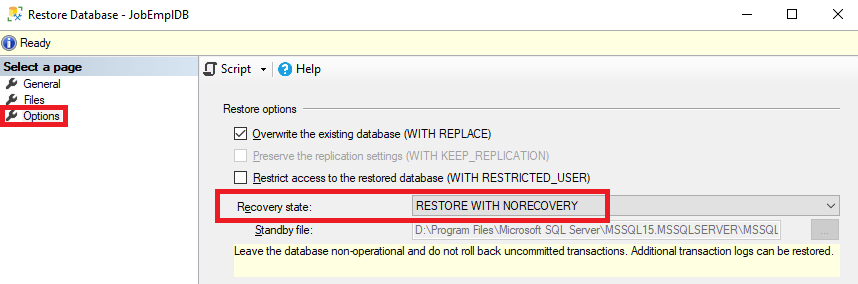
Img. 5. Restoring the database from a full backup under the full recovery model
The data restore script under the simple recovery model will look as follows:
USE[master]
RESTORE DATABASE[JobEmplDB]
FROM DISK = N '\\Shared\Backup\Full\JobEmplDB_Full_backup_2020_07_19_13_20_55.bak'
WITH FILE = 1,
    MOVE N 'JobEmplDB'
TO N 'D:\Program Files\Microsoft SQL Server\MSSQL15.MSSQLSERVER\MSSQL\DATA\JobEmplDB.mdf',
    MOVE N 'JobEmplDB_log'
TO N 'D:\Program Files\Microsoft SQL Server\MSSQL15.MSSQLSERVER\MSSQL\DATA\JobEmplDB_log.ldf',
    NORECOVERY,
    NOUNLOAD,
    REPLACE,
    STATS = 5;
GO
Second, restore the last differential backup and switch the database to the RESTORE WITH NORECOVERY mode:
USE [master]
RESTORE DATABASE [JobEmplDB]
FROM DISK = N'\\Shared\Backup\Full\JobEmplDB_Full_backup_2020_07_19_13_20_55.bak' WITH FILE = 1,
     MOVE N'JobEmplDB' TO N'D:\Program Files\Microsoft SQL Server\MSSQL15.MSSQLSERVER\MSSQL\DATA\JobEmplDB.mdf',
     MOVE N'JobEmplDB_log' TO N'D:\Program Files\Microsoft SQL Server\MSSQL15.MSSQLSERVER\MSSQL\DATA\JobEmplDB_log.ldf',
	 NORECOVERY,
	 NOUNLOAD,
	 REPLACE,
	 STATS = 5;

RESTORE DATABASE [JobEmplDB]
FROM DISK = ‘N\\Shared\Backup\Diff\JobEmplDB_Diff_backup_2020_07_19_13_21_29.bak' WITH FILE = 1,
     MOVE N'JobEmplDB' TO N'D:\Program Files\Microsoft SQL Server\MSSQL15.MSSQLSERVER\MSSQL\DATA\JobEmplDB.mdf',
     MOVE N'JobEmplDB_log' TO N'D:\Program Files\Microsoft SQL Server\MSSQL15.MSSQLSERVER\MSSQL\DATA\JobEmplDB_log.ldf',
	 NORECOVERY,
	 NOUNLOAD,
	 REPLACE,
	 STATS = 5;
GO
The visual interface allows restoring the differential backup only if it is located in the same file as the corresponding full backup file:
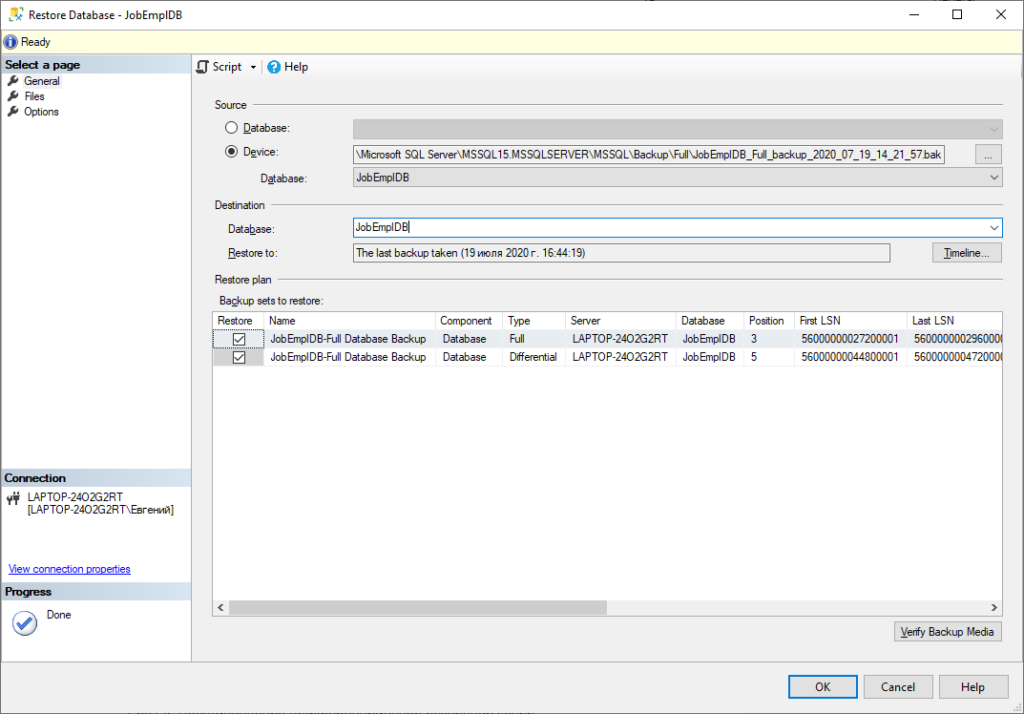
Img. 6. The differential backup restore in SSMS
In our case, we got the below query:
USE [master]
RESTORE DATABASE [JobEmplDB]
FROM DISK = N'\\Shared\Backup\Full\JobEmplDB_Full_backup_2020_07_19_14_21_57.bak' WITH FILE = 3,
     MOVE N'JobEmplDB' TO N'D:\Program Files\Microsoft SQL Server\MSSQL15.MSSQLSERVER\MSSQL\DATA\JobEmplDB.mdf',
	 MOVE N'JobEmplDB_log' TO N'D:\Program Files\Microsoft SQL Server\MSSQL15.MSSQLSERVER\MSSQL\DATA\JobEmplDB_log.ldf',
	 NORECOVERY,
	 NOUNLOAD,
	 REPLACE,
	 STATS = 5;

RESTORE DATABASE [JobEmplDB]
FROM DISK = N'\\Shared\Backup\Full\JobEmplDB_Full_backup_2020_07_19_14_21_57.bak' WITH FILE = 5,
     NORECOVERY,
	 NOUNLOAD,
	 REPLACE,
	 STATS = 5;
GO
That is, the JobEmplDB_Full_backup_2020_07_19_14_21_57.bak file contains the full backup on the 3rd position (FILE = 3) and the differential backup is on the 5th position (FILE = 5).
Third, restore all the transaction logs created after the completion of the last differential backup one by one:
RESTORE LOG [JobEmplDB]
   FROM DISK = N'\\Shared\Backup\Log\JobEmplDB_Log_backup_2020_07_19_17_04_54.trn'
   WITH NORECOVERY,
	    NOUNLOAD,
	    REPLACE,
	    STATS = 5;
GO
RESTORE LOG [JobEmplDB]
FROM DISK = N'\\Shared\Backup\Log\JobEmplDB_Log_backup_2020_07_19_17_04_56.trn'
WITH RECOVERY,
NOUNLOAD,
REPLACE,
STATS = 5;
GOImportantly, the graphical interface allows us to restore the database from the transaction log backup only if this backup is located in the same file containing the full backup:
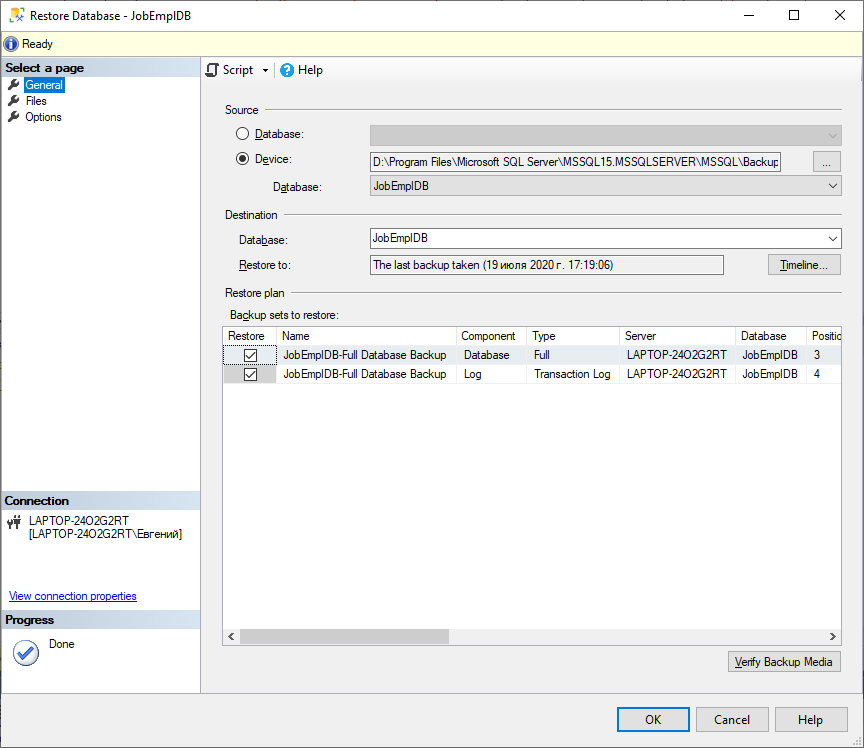
Img. 7. The transaction log backup restore
In our case, we got the following query:
USE [master]
RESTORE DATABASE [JobEmplDB]
FROM DISK = N'\\Shared\Backup\Full\JobEmplDB_Full_backup_2020_07_19_14_04_25.bak' WITH FILE = 3,
MOVE N'JobEmplDB' TO N'D:\Program Files\Microsoft SQL Server\MSSQL15.MSSQLSERVER\MSSQL\DATA\JobEmplDB.mdf',
MOVE N'JobEmplDB_log' TO N'D:\Program Files\Microsoft SQL Server\MSSQL15.MSSQLSERVER\MSSQL\DATA\JobEmplDB_log.ldf',
NORECOVERY,
NOUNLOAD,
REPLACE,
STATS = 5;
RESTORE LOG [JobEmplDB]
FROM DISK = N'\\Shared\Backup\Full\JobEmplDB_Full_backup_2020_07_19_14_04_25.bak' WITH FILE = 4,
NOUNLOAD,
STATS = 5;
GOFinally, we get the final script below for the full restore of JobEmplDB:
USE [master]
--Restoring full backup
RESTORE DATABASE [JobEmplDB]
FROM DISK = N'\\Shared\Backup\Full\JobEmplDB_Full_backup_2020_07_19_14_04_25.bak' WITH FILE = 1,
MOVE N'JobEmplDB' TO N'D:\Program Files\Microsoft SQL Server\MSSQL15.MSSQLSERVER\MSSQL\DATA\JobEmplDB.mdf',
MOVE N'JobEmplDB_log' TO N'D:\Program Files\Microsoft SQL Server\MSSQL15.MSSQLSERVER\MSSQL\DATA\JobEmplDB_log.ldf',
NORECOVERY,
NOUNLOAD,
REPLACE,
STATS = 5;
GO
--restoring the last differential backup for the respective full backup
RESTORE DATABASE [JobEmplDB]
FROM DISK = N'\\Shared\Backup\Diff\JobEmplDB_Diff_backup_2020_07_19_14_04_44.bak' WITH FILE = 1,
MOVE N'JobEmplDB' TO N'D:\Program Files\Microsoft SQL Server\MSSQL15.MSSQLSERVER\MSSQL\DATA\JobEmplDB.mdf',
MOVE N'JobEmplDB_log' TO N'D:\Program Files\Microsoft SQL Server\MSSQL15.MSSQLSERVER\MSSQL\DATA\JobEmplDB_log.ldf',
NORECOVERY,
NOUNLOAD,
REPLACE,
STATS = 5;
GO
-- restoring the sequence of transaction log backups after the last differential backup creation
RESTORE LOG [JobEmplDB]
FROM DISK = N'\\Shared\Backup\Log\JobEmplDB_Log_backup_2020_07_19_17_04_54.trn'
WITH NORECOVERY,
NOUNLOAD,
REPLACE,
STATS = 5;
GO
RESTORE LOG [JobEmplDB]
   FROM DISK = N'\\Shared\Backup\Log\JobEmplDB_Log_backup_2020_07_19_17_04_56.trn'
   WITH RECOVERY,
	    NOUNLOAD,
	    REPLACE,
	    STATS = 5;
GORestoring Database Files and Filegroups
Apart from that, we can restore a particular database file with the following script:
RESTORE DATABASE [JobEmplDB] FILE = N'JobEmplDB'
FROM DISK = N'\\Shared\Backup\Full\JobEmplDB_2020_07_19_17_27_01.bak' WITH FILE = 1,
     NOUNLOAD,
	 REPLACE,
	 STATS = 10;
GO
Here, we restore the JobEmplDB file. While restoring it, we can set WITH NORECOVERY for the sequence of the transaction log backups for the pre-set file.
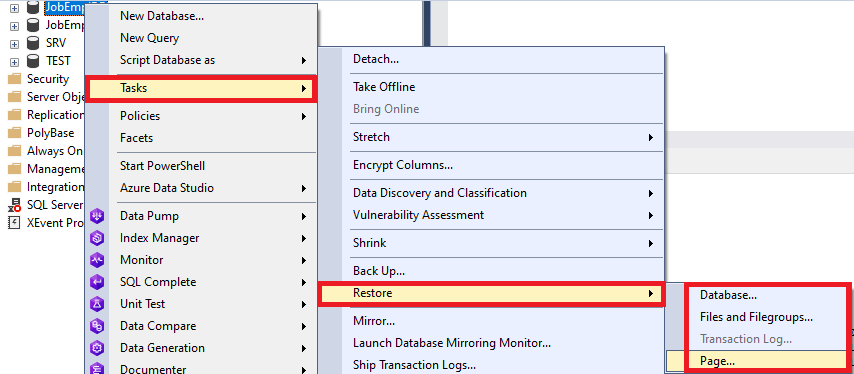
In the same way, we can restore the filegroup and restore a partial backup. To do this via SSMS, right-click the Databases and select the Restore Files and Filegroups option:

Img. 8. Restoring files and filegroups in SSMS
On the General tab, we select the destination to restore and the source for restoring (a file of the partial backup, and which elements to restore):
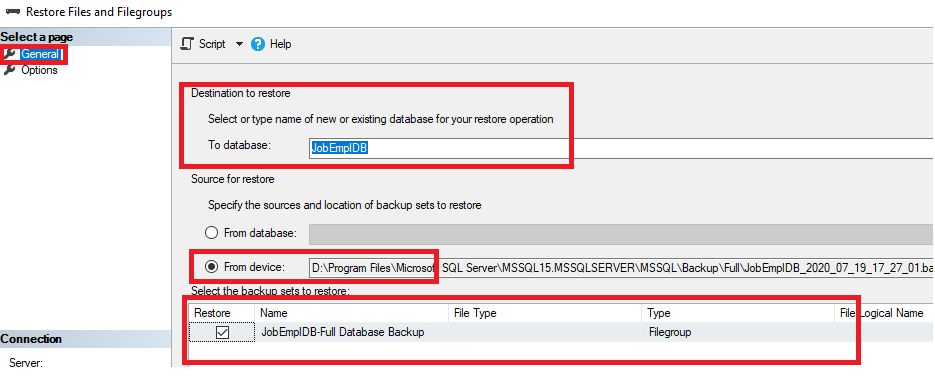
Img. 9. The General tab settings in SSMS
Then, on the Options tab, we need to configure the necessary settings:
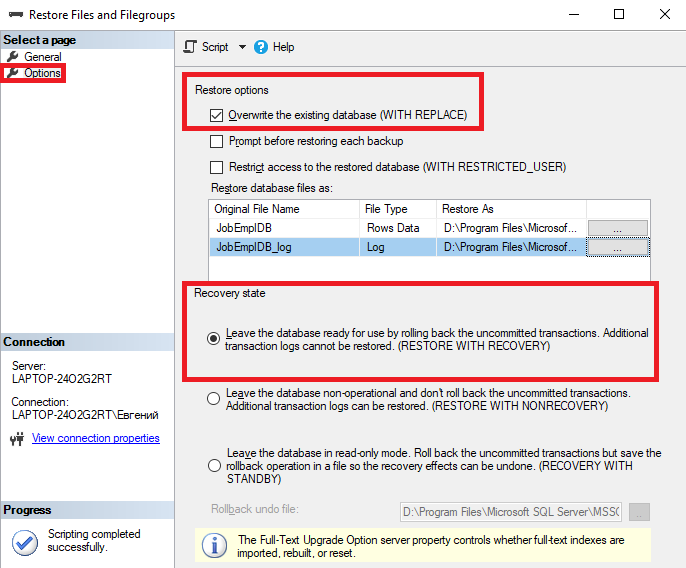
Img. 10. The Options tab settings in SSMS
The database itself has the same shortcut menu:
Img. 11. The Restore context menu of the database in SSMS
Note that it is possible to restore the transaction log backup only if the database is in the NORECOVERY or STANDBY mode. That’s why this option is not available on the screenshot above.
Also, it is possible to restore the page. For instance, the example below demonstrates restoring pages with the following identifiers: 1:57, 1:202, 1:916, and 1:1016:
RESTORE DATABASE [JobEmplDB] PAGE='1:57, 1:202, 1:916, 1:1016'
   FROM DISK = '\\Shared\Backup\Full\JobEmplDB_Full_backup_2020_07_19_14_04_25.bak'
   WITH NORECOVERY;
RESTORE LOG [JobEmplDB] FROM DISK = '\\Shared\Backup\Log\JobEmplDB_Log_backup_2020_07_19_17_04_56.trn'
   WITH NORECOVERY;
RESTORE LOG [JobEmplDB] FROM DISK = '\\Shared\Backup\Log\JobEmplDB_Log_backup_2020_07_19_17_04_56.trn'
   WITH NORECOVERY;
BACKUP LOG [JobEmplDB] TO DISK = '\\Shared\Backup\Log\JobEmplDB_Log_backup_2020_07_19_17_04_58.trn';
RESTORE LOG [JobEmplDB] FROM DISK = '\\Shared\Backup\Log\JobEmplDB_Log_backup_2020_07_19_17_04_58.trn' WITH RECOVERY;
GO
If you wish to learn more on the subject, read about restoring pages.
Implementing the Restore Process
As we have already considered the basics of restoring, let’s proceed to implement the process.
It is essential to understand that the routine restoring aimed at checking the backups is usually performed on a different server. The database location and the location of where the database will be restored are two different servers.
Hence, it is crucial to name the backup file so that it clearly defines the backup, which database it belongs to, and the order of the restore. The latter means that we need to define the most recent full backup, the last differential backup, and the transaction log backup chain.
The current article examines the implementation of the restoration process and its automation. However, it does not consider all the points clarified above. In particular, it does not explore the full recovery process. Hence, we will need to improve the methods.
First, we create the srv schema in the corresponding database unless that schema was created before. Then, we create the [srv].[RestoreSettings] table to write which databases are subject to restore:
CREATE TABLE [srv].[RestoreSettings](
	[DBName] [nvarchar](255) NOT NULL,
	[FullPathRestore] [nvarchar](255) NOT NULL,
	[DiffPathRestore] [nvarchar](255) NOT NULL,
	[LogPathRestore] [nvarchar](255) NOT NULL,
	[InsertUTCDate] [datetime] NOT NULL,
 CONSTRAINT [PK_RestoreSettings_1] PRIMARY KEY CLUSTERED
(
	[DBName] ASC
)WITH (PAD_INDEX = OFF, STATISTICS_NORECOMPUTE = OFF, IGNORE_DUP_KEY = OFF, ALLOW_ROW_LOCKS = ON, ALLOW_PAGE_LOCKS = ON, FILLFACTOR = 95, OPTIMIZE_FOR_SEQUENTIAL_KEY = OFF) ON [PRIMARY]
) ON [PRIMARY]
GO

ALTER TABLE [srv].[RestoreSettings] ADD  CONSTRAINT [DF_RestoreSettings_InsertUTCDate]  DEFAULT (getutcdate()) FOR [InsertUTCDate]
GO
Where:
- DBName is the database name.
- FullPathRestore is the full path to the location of full backups to be restored.
- DiffPathRestore is the full path to the location of differential backups to be restored.
- LogPathRestore is the full path to the location of transaction backups.
- InsertUTCDate is the date and time of the entry creation in the UTC format.
Now, we add our JobEmplDB database into the [srv].[BackupSettings] table created, using the below script:
INSERT INTO [srv].[RestoreSettings]
           ([DBName]
           ,[FullPathRestore]
           ,[DiffPathRestore]
           ,[LogPathRestore])
     SELECT
           N'JobEmplDB',
		   '\\Shared\Backup\Full\',
		   '\\Shared\Backup\Diff\',
		   '\\Shared\Backup\Log\';
GO
Following that, we create the [srv].[RestoreSettingsDetail] table for detailed settings of the databases’ restoration:
CREATE TABLE [srv].[RestoreSettingsDetail](
	[Row_GUID] [uniqueidentifier] NOT NULL,
	[DBName] [nvarchar](255) NOT NULL,
	[SourcePathRestore] [nvarchar](255) NOT NULL,
	[TargetPathRestore] [nvarchar](255) NOT NULL,
	[Ext] [nvarchar](255) NOT NULL,
	[InsertUTCDate] [datetime] NOT NULL,
 CONSTRAINT [PK_RestoreSettingsDetail_1] PRIMARY KEY CLUSTERED
(
	[Row_GUID] ASC
)WITH (PAD_INDEX = OFF, STATISTICS_NORECOMPUTE = OFF, IGNORE_DUP_KEY = OFF, ALLOW_ROW_LOCKS = ON, ALLOW_PAGE_LOCKS = ON, FILLFACTOR = 95, OPTIMIZE_FOR_SEQUENTIAL_KEY = OFF) ON [PRIMARY]
) ON [PRIMARY]
GO
ALTER TABLE [srv].[RestoreSettingsDetail] ADD CONSTRAINT [DF_RestoreSettingsDetail_Row_GUID] DEFAULT (newid()) FOR [Row_GUID]
GOALTER TABLE [srv].[RestoreSettingsDetail] ADD CONSTRAINT [DF_RestoreSettingsDetail_InsertUTCDate] DEFAULT (getutcdate()) FOR [InsertUTCDate]
GOHere, let me clarify:
- Row_GUID is the row ID in the table.
- DBName is the database name.
- SourcePathRestore is the full name of the source file.
- TargetPathRestore is the full name of the target file.
- Ext is the file extension.
- InsertUTCDate is the date and time of the entry creation, in UTC format.
Note that the location of the SourcePathRestore and the TargetPathRestore destination must be set for each database file during the restore process.
Now, we add the detailed restore data of the JobEmplDB database files into the [srv].[BackupSettingsDetail] table, using the following script:
INSERT INTO [srv].[RestoreSettingsDetail]
           ([DBName]
           ,[SourcePathRestore]
           ,[TargetPathRestore]
           ,[Ext])
     SELECT
			N'JobEmplDB',
			N'JobEmplDB',
			N'D:\Program Files\Microsoft SQL Server\MSSQL15.MSSQLSERVER\MSSQL\DATA\JobEmplDB2',
			N'mdf'
	 UNION ALL
	 SELECT
			N'JobEmplDB',
			N'JobEmplDB_log',
			N'D:\Program Files\Microsoft SQL Server\MSSQL15.MSSQLSERVER\MSSQL\DATA\JobEmplDB2_log',
			N'ldf';
GO
After that, we need to enable the parameter сonfigurations for the MS SQL Server instance to execute the xp_cmdshell stored procedure. To do this, we will use the following script:
-- To allow advanced options to be changed.
EXECUTE sp_configure 'show advanced options', 1;
GO
-- To update the currently configured value for advanced options.
RECONFIGURE;
GO
-- To enable the feature.
EXECUTE sp_configure 'xp_cmdshell', 1;
GO
-- To update the currently configured value for this feature.
RECONFIGURE;
GO
This way, the [srv].[RunFullRestoreDB] stored procedure has been completely changed so that it can now define which backups and how to restore. On the condition that the backup name format is as follows:
<database_name>_<backup_type(Full, Diff,Log)>_backup_YYYY_MM_DD_HH_MM_SS.<bak or trn>
The full call of the [srv].[RunFullRestoreDB] stored procedure is as follows:
EXEC [srv].[RunFullRestoreDB]
	 @OnlyDBName=NULL,
	 @IsNameAddRestore=1;
Here, the @OnlyDBName parameter defines which database to restore, and the IsNameAddRestore parameter sets the necessity of adding the _Restore line at the end of the restored databases and their file names.
The definition of the [srv].[RunFullRestoreDB] stored procedure shows that we first get all the necessary information related to the databases from the [srv].[RestoreSettings] and [srv].[RestoreSettingsDetail] tables.
After that, we read the full paths to full, differential, and transaction log backups for each database. For each path, we read the files located there, without reference to the subdirectories.
Finally, we define the necessary files among those files according to the file name format, the database belonging, and the backup type. The restore scripts are generated based on the data retrieved.
The general principle of the [srv].[RunFullRestoreDB] stored procedure work is as follows:
- Find the most recent full backup.
- Find the most recent differential backup created later than the most recent full backup copy.
- Find the sequence of transaction log backups created later than the most recent differential backup.
- Restore the database according to the found backups in the strict direct order: beginning from the last full backup and finishing with the last transaction log backup.
If there are no transaction logs created after the latest differential backup creation, the restore process ends with the differential backup restore.
If differential backups are absent, the restore process starts with the full backup and proceeds with the sequence of all transaction log backups created not earlier than the latest full backup creation.
If there only is a full backup available, the database restores strictly from it. If there is no full backup, the database won’t be included in the restore process.
The database restore involves only the files with names that match the below format:
<database_name>_<backuo_type(Full, Diff,Log)>_backup_YYYY_MM_DD_HH_MM_SS.<bak or trn>
Those files must match the backup type and the database name. Sure enough, it is better to create a separate subdirectory for each database to improve productivity. Thus, instead of the following paths:
\\Shared\Backup\Full\
\\Shared\Backup\Diff\
\\Shared\Backup\Log\
You had better use:
\\Shared\Backup\Full\JobEmplDB\
\\Shared\Backup\Diff\JobEmplDB\
\\Shared\Backup\Log\JobEmplDB\
To sum up, we have examined the implementation of the restore process from the main backup types:
- Full.
- Differential.
- Transaction log.
You can call these stored procedures according to the specific schedule via the Agent tasks or any third-party methods and tools.
Restoring can also be parallelized via the dynamic creation of the Agent tasks with the help of the [inf].[RunAsyncExecute] stored procedure. This procedure defines the four parameters:
- @sql is the T-SQL code for execution in the Agent task.
- @jobname is the name of the Agent’s task, which we add GUID to (optional).
- @database is the name of the database for which the query set in the @sql parameter is executed.
- @owner suggests which login executes the Agent’s task (if not set, then sa will be used).
To speed up the restore process, you can utilize dbForge Studio for SQL Server, which offers a helpful dbForge Restore Wizard and allows you to protect your database against data loss with a powerful SQL backup tool.
Conclusion
The article presents the essential basics of the SQL Server database restore process and demonstrates how to implement restoring the database backup by means of SSMS and T-SQL scripts considering all the main backup types. As for the next article in the series, you will learn how to carry out the process of SQL Server database backup and restore via a comprehensive database management and administration tool, dbForge Studio for SQL Server.
