
In the previous articles, we studied the basic rules of SQL database design, created a database schema diagram for a recruitment service, and filled the newly-created database with test data on employees.
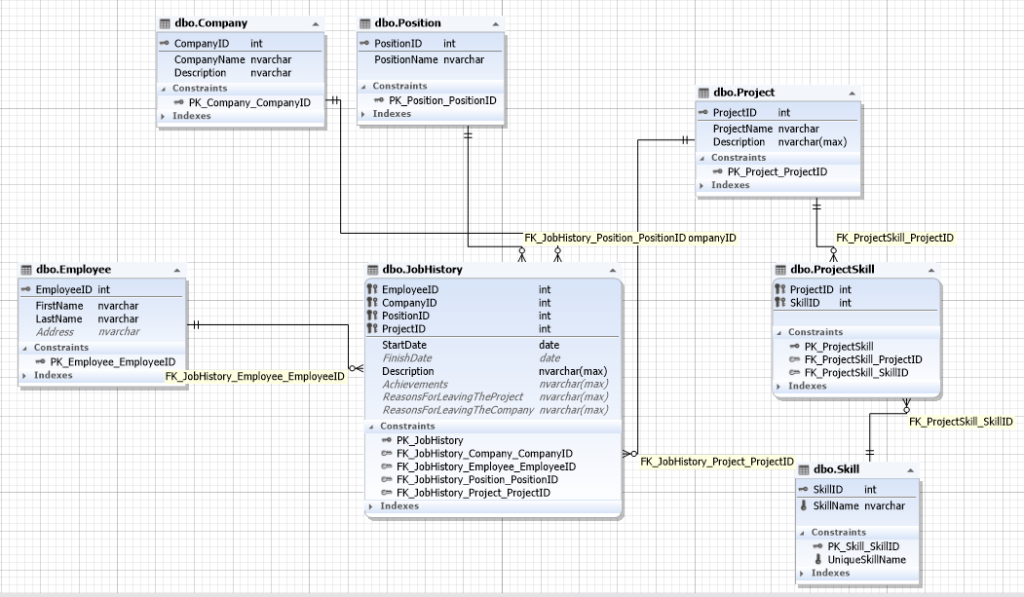
Img.1. The database structure diagram for a recruitment service
The database contains the following entities:
- Employee
- Company
- Position
- Project
- Skill
This time, let’s consider the ways to transfer data from one SQL Server database to another one through export and import. This can come in handy when the management system of the client database is an older version than the data source. Meaning, when it is impossible to use a backup copy or when only a part of data has to be transferred, as all data weighs too much.
Export data from SQL Server to JSON tables
Firstly, the functionality for data export is available in dbForge Studio for SQL Server as well as dbForge Data Pump. When it comes to filling SQL databases with external source data and migrating data between systems, Data Pump is the add-in that is always of great help.
Let us first consider its use in SSMS.
To begin with, let us perform data export.
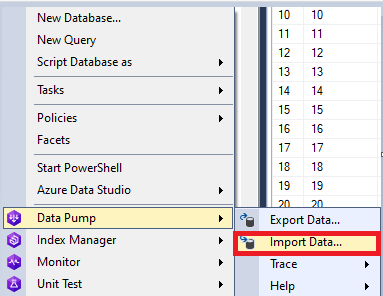
To do this, in SSMS, right-click on the database you need, and in the drop-down menu, select the Data Pump\ Export Data… command:
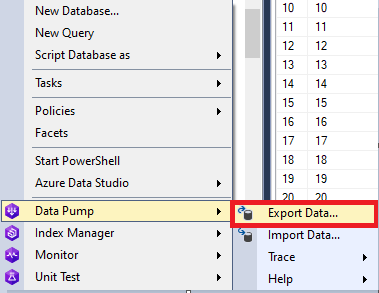
Img.2. SQL Data export using Data Pump
The export settings window will then appear. On the “Export format” tab, you can select different formats. We select JSON format in our case, to transfer data and import it into another database. Let’s then press the “Next” button:
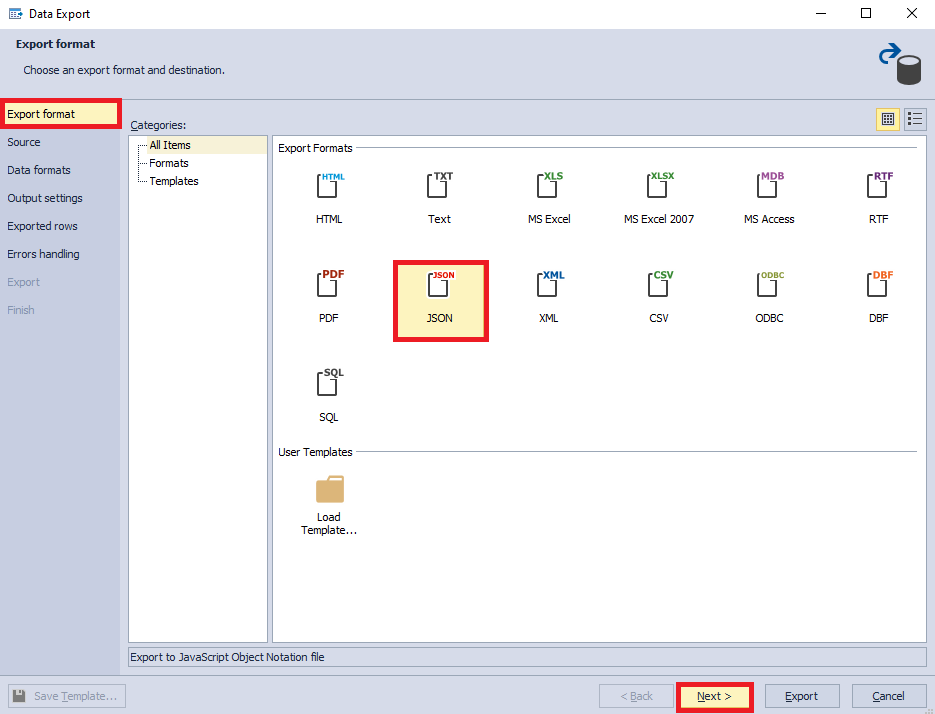
Img.3. Setting the “Export format” tab
Next, on the “Source” tab, you need to select the necessary tables for export. In this case, we select all user tables and press the “Next” button:
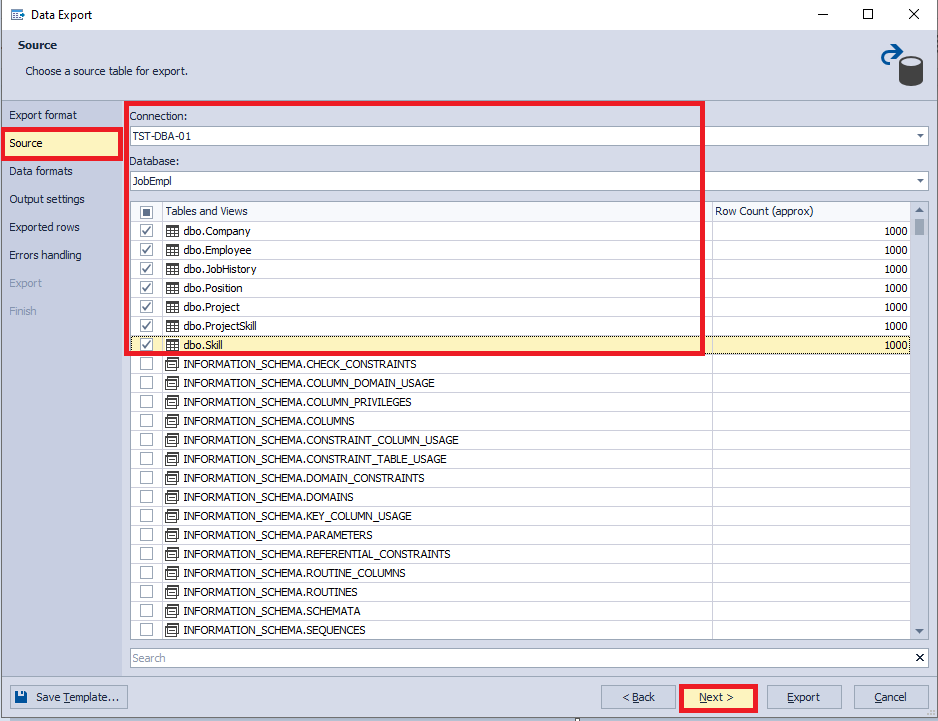
Img.4. Setting the “Source” tab
Following that, on the “Data formats” tab, you need to select the required columns on the “Columns” tab and setup data formats on the “Formats” tab. In the present case, we choose all columns and leave settings of the “Formats” at their defaults. Then, press the “Next” button:
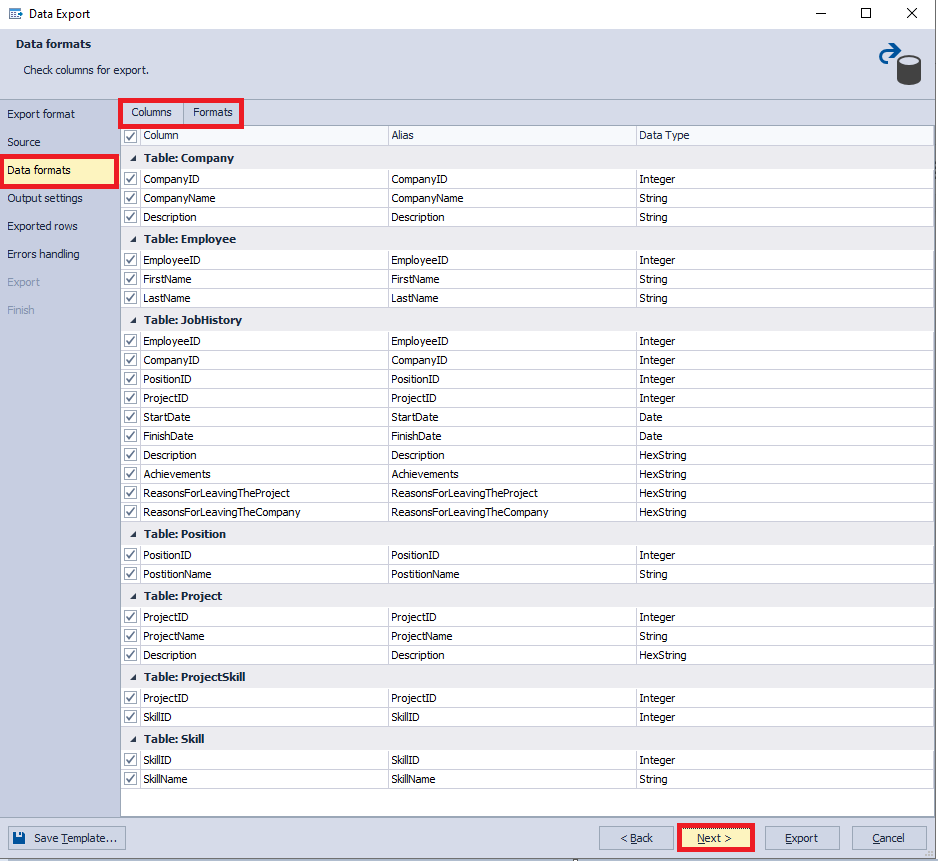
Img.5. Setting the “Data formats” tab
On the “Output settings” tab, we need to configure the output parameters of the exported data. Here, we leave the default settings and click on the “Next” button:
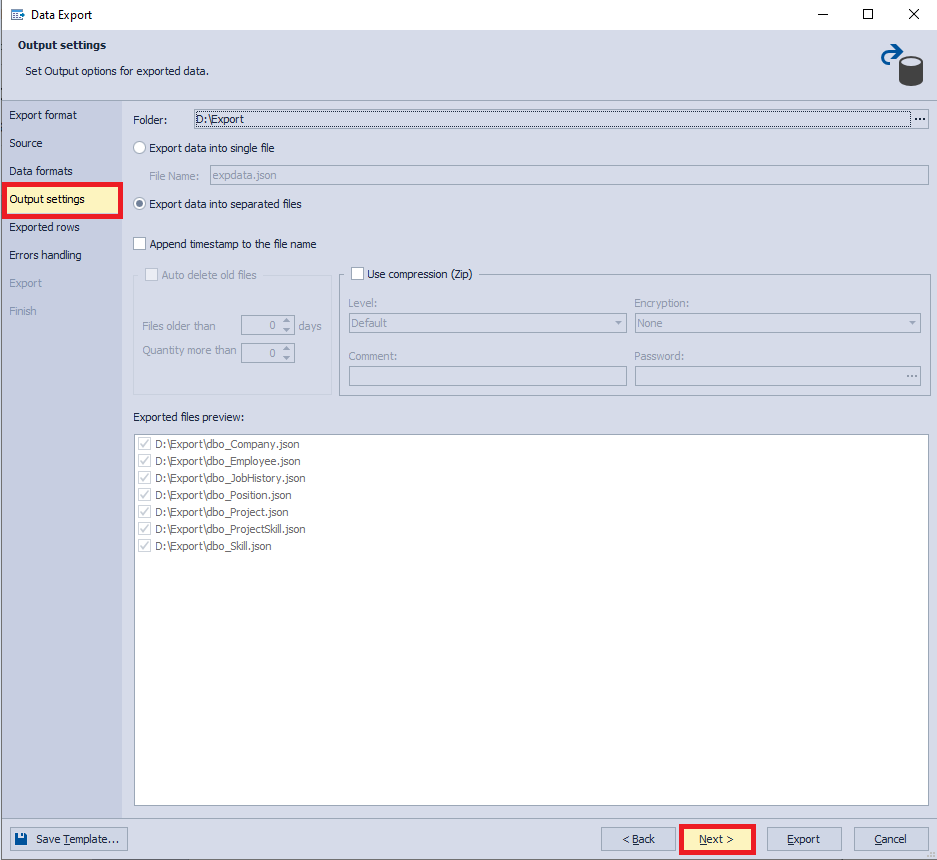
Img.6. The “Output settings” tab
On the “Exported rows” tab, you can configure the number of exported rows, depending on whether you need to export all rows or only a certain part of them. In this case, we leave the settings as default, that is, we will export rows. Now press the “Next” button:
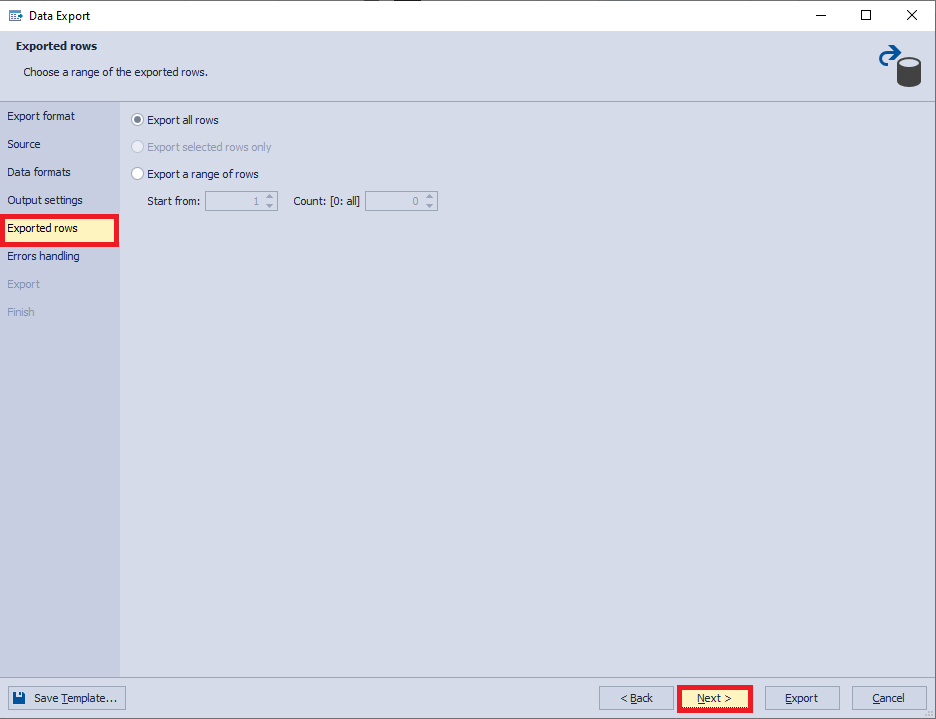
Img.7. Setting the “Exported rows” tab
Next, on the “Errors handling” tab, you can specify the settings for the output of runtime errors during export. Leave the settings as default. Note that for later use, you can save all the specified settings as a template by clicking the “Save Template…” button in the left bottom corner. Now, you should press the “Export” button to start data export:
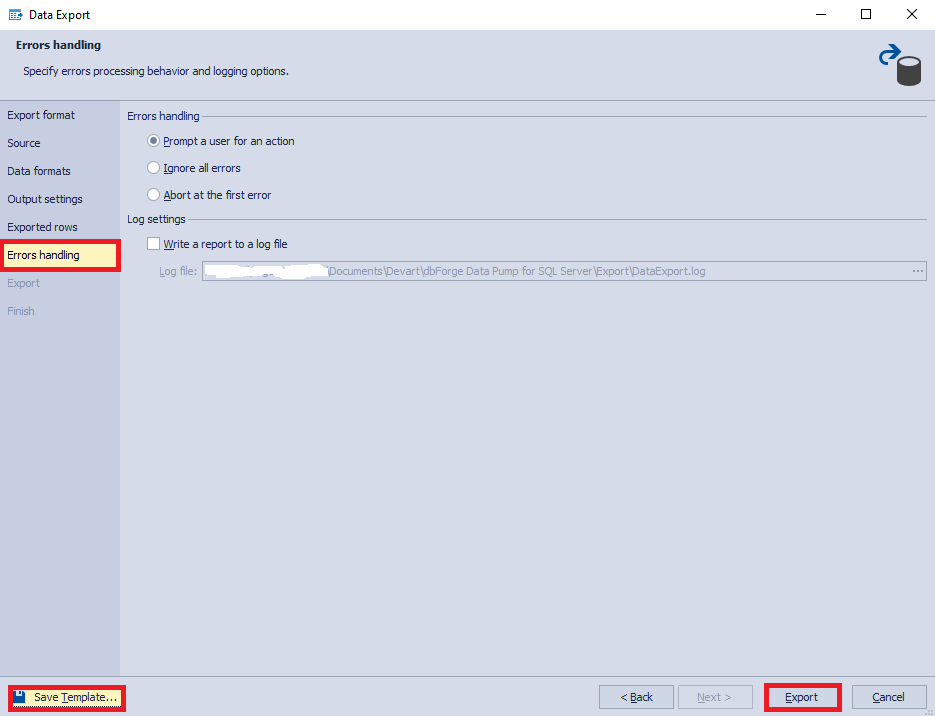
Img.8. Setting the “Errors handling” tab
While export is running, you can view the process of data extraction on the “Export” tab.
Upon the completion, you will see the “Finish” tab, where you can either close the window by pressing the “Finish” button or immediately go to the folder that contains generated files by pressing the “Open result folder…” button:
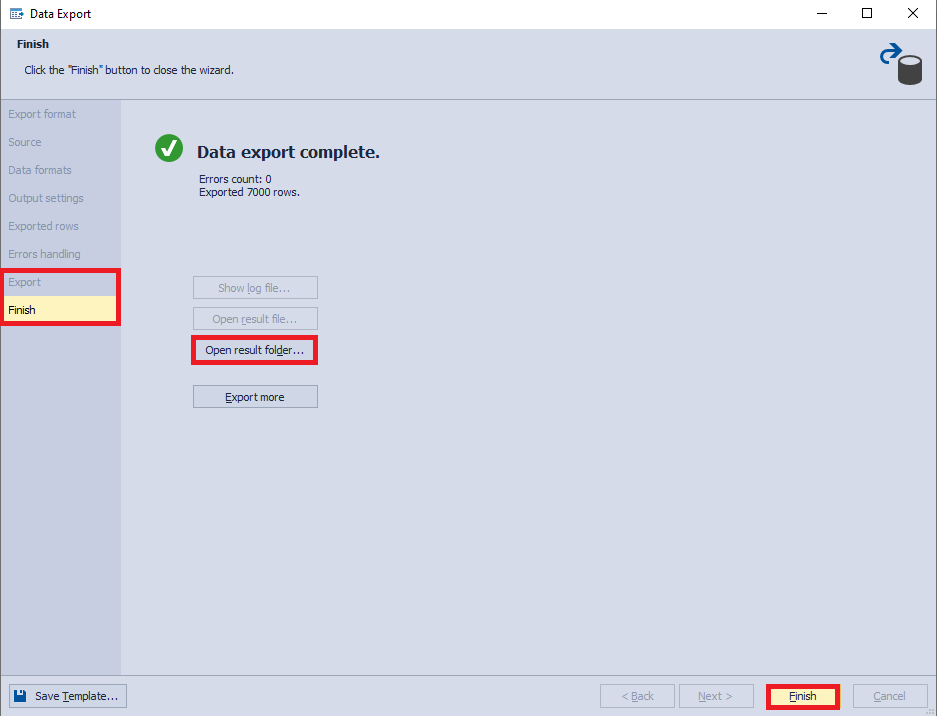
Img.9. The result of data export
Finally, you can see the folder with generated SQL database data in JSON files:
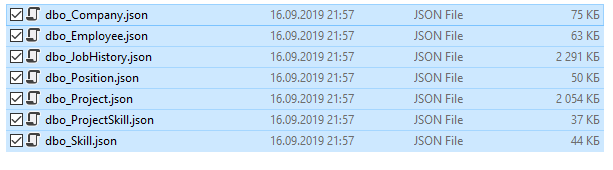
Img.10. The folder with resulting data files
Let’s open the contents of the dbo_Employee file:
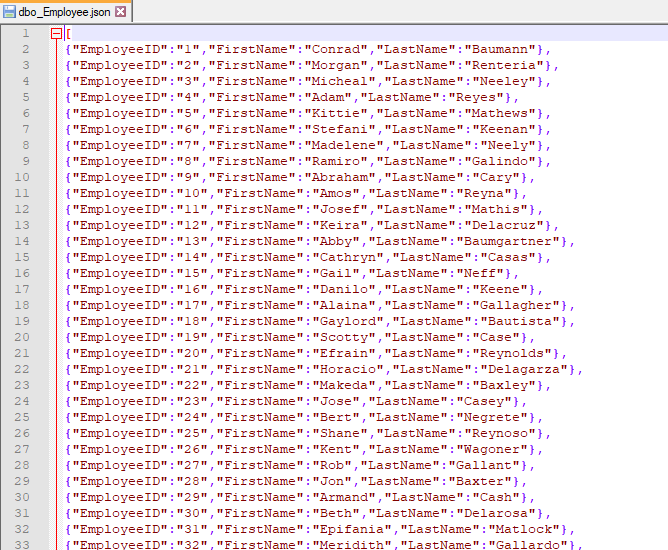
Img.11. The contents of the dbo_Employee file
To sum up, we exported the data of the new database to files with JSON format.
Note that export can be useful when exchanging data between two types of database management systems.
It is also quite handy to export data in Excel, to provide some data for analysts to research.
Import JSON data to a SQL Server database
Now, let us copy the resulting data to the necessary server and restore the JobEmpl2 database there.
To do this, we need to create a new database, JobEmpl2, with the same schema as the JobEmpl using the following script:
SET CONCAT_NULL_YIELDS_NULL, ANSI_NULLS, ANSI_PADDING, QUOTED_IDENTIFIER, ANSI_WARNINGS, ARITHABORT, XACT_ABORT ON
SET NUMERIC_ROUNDABORT, IMPLICIT_TRANSACTIONS OFF
GO

USE [JobEmpl2]
GO

IF DB_NAME() <> N'JobEmpl2' SET NOEXEC ON
GO

--
-- Start Transaction
--
BEGIN TRANSACTION
GO

--
-- Create table [dbo].[Skill]
--
CREATE TABLE [dbo].[Skill] (
  [SkillID] [int] IDENTITY,
  [SkillName] [nvarchar](255) NOT NULL,
  CONSTRAINT [PK_Skill_SkillID] PRIMARY KEY CLUSTERED ([SkillID])
)
ON [PRIMARY]
GO
IF @@ERROR<>0 OR @@TRANCOUNT=0 BEGIN IF @@TRANCOUNT>0 ROLLBACK SET NOEXEC ON END
GO

--
-- Create table [dbo].[Project]
--
CREATE TABLE [dbo].[Project] (
  [ProjectID] [int] IDENTITY,
  [ProjectName] [nvarchar](255) NOT NULL,
  [Description] [nvarchar](max) NOT NULL,
  CONSTRAINT [PK_Project_ProjectID] PRIMARY KEY CLUSTERED ([ProjectID])
)
ON [PRIMARY]
TEXTIMAGE_ON [PRIMARY]
GO
IF @@ERROR<>0 OR @@TRANCOUNT=0 BEGIN IF @@TRANCOUNT>0 ROLLBACK SET NOEXEC ON END
GO

--
-- Create table [dbo].[ProjectSkill]
--
CREATE TABLE [dbo].[ProjectSkill] (
  [ProjectID] [int] NOT NULL,
  [SkillID] [int] NOT NULL,
  CONSTRAINT [PK_ProjectSkill] PRIMARY KEY CLUSTERED ([ProjectID], [SkillID])
)
ON [PRIMARY]
GO
IF @@ERROR<>0 OR @@TRANCOUNT=0 BEGIN IF @@TRANCOUNT>0 ROLLBACK SET NOEXEC ON END
GO

--
-- Create foreign key [FK_ProjectSkill_ProjectID] on table [dbo].[ProjectSkill]
--
ALTER TABLE [dbo].[ProjectSkill] WITH NOCHECK
  ADD CONSTRAINT [FK_ProjectSkill_ProjectID] FOREIGN KEY ([ProjectID]) REFERENCES [dbo].[Project] ([ProjectID])
GO
IF @@ERROR<>0 OR @@TRANCOUNT=0 BEGIN IF @@TRANCOUNT>0 ROLLBACK SET NOEXEC ON END
GO

--
-- Create foreign key [FK_ProjectSkill_SkillID] on table [dbo].[ProjectSkill]
--
ALTER TABLE [dbo].[ProjectSkill] WITH NOCHECK
  ADD CONSTRAINT [FK_ProjectSkill_SkillID] FOREIGN KEY ([SkillID]) REFERENCES [dbo].[Skill] ([SkillID])
GO
IF @@ERROR<>0 OR @@TRANCOUNT=0 BEGIN IF @@TRANCOUNT>0 ROLLBACK SET NOEXEC ON END
GO

--
-- Create table [dbo].[Position]
--
CREATE TABLE [dbo].[Position] (
  [PositionID] [int] IDENTITY,
  [PostitionName] [nvarchar](255) NOT NULL,
  CONSTRAINT [PK_Position_PositionID] PRIMARY KEY CLUSTERED ([PositionID])
)
ON [PRIMARY]
GO
IF @@ERROR<>0 OR @@TRANCOUNT=0 BEGIN IF @@TRANCOUNT>0 ROLLBACK SET NOEXEC ON END
GO

--
-- Create table [dbo].[Employee]
--
CREATE TABLE [dbo].[Employee] (
  [EmployeeID] [int] IDENTITY,
  [FirstName] [nvarchar](255) NOT NULL,
  [LastName] [nvarchar](255) NOT NULL,
  CONSTRAINT [PK_Employee_EmployeeID] PRIMARY KEY CLUSTERED ([EmployeeID])
)
ON [PRIMARY]
GO
IF @@ERROR<>0 OR @@TRANCOUNT=0 BEGIN IF @@TRANCOUNT>0 ROLLBACK SET NOEXEC ON END
GO

--
-- Create table [dbo].[Company]
--
CREATE TABLE [dbo].[Company] (
  [CompanyID] [int] IDENTITY,
  [CompanyName] [nvarchar](255) NOT NULL,
  [Description] [nvarchar](255) NOT NULL,
  CONSTRAINT [PK_Company_CompanyID] PRIMARY KEY CLUSTERED ([CompanyID])
)
ON [PRIMARY]
GO
IF @@ERROR<>0 OR @@TRANCOUNT=0 BEGIN IF @@TRANCOUNT>0 ROLLBACK SET NOEXEC ON END
GO

--
-- Create table [dbo].[JobHistory]
--
CREATE TABLE [dbo].[JobHistory] (
  [EmployeeID] [int] NOT NULL,
  [CompanyID] [int] NOT NULL,
  [PositionID] [int] NOT NULL,
  [ProjectID] [int] NOT NULL,
  [StartDate] [date] NOT NULL,
  [FinishDate] [date] NULL,
  [Description] [nvarchar](max) NOT NULL,
  [Achievements] [nvarchar](max) NULL,
  [ReasonsForLeavingTheProject] [nvarchar](max) NULL,
  [ReasonsForLeavingTheCompany] [nvarchar](max) NULL,
  CONSTRAINT [PK_JobHistory] PRIMARY KEY CLUSTERED ([EmployeeID], [CompanyID], [PositionID], [ProjectID])
)
ON [PRIMARY]
TEXTIMAGE_ON [PRIMARY]
GO
IF @@ERROR<>0 OR @@TRANCOUNT=0 BEGIN IF @@TRANCOUNT>0 ROLLBACK SET NOEXEC ON END
GO

--
-- Create foreign key [FK_JobHistory_Company_CompanyID] on table [dbo].[JobHistory]
--
ALTER TABLE [dbo].[JobHistory] WITH NOCHECK
  ADD CONSTRAINT [FK_JobHistory_Company_CompanyID] FOREIGN KEY ([CompanyID]) REFERENCES [dbo].[Company] ([CompanyID])
GO
IF @@ERROR<>0 OR @@TRANCOUNT=0 BEGIN IF @@TRANCOUNT>0 ROLLBACK SET NOEXEC ON END
GO

--
-- Create foreign key [FK_JobHistory_Employee_EmployeeID] on table [dbo].[JobHistory]
--
ALTER TABLE [dbo].[JobHistory] WITH NOCHECK
  ADD CONSTRAINT [FK_JobHistory_Employee_EmployeeID] FOREIGN KEY ([EmployeeID]) REFERENCES [dbo].[Employee] ([EmployeeID])
GO
IF @@ERROR<>0 OR @@TRANCOUNT=0 BEGIN IF @@TRANCOUNT>0 ROLLBACK SET NOEXEC ON END
GO

--
-- Create foreign key [FK_JobHistory_Position_PositionID] on table [dbo].[JobHistory]
--
ALTER TABLE [dbo].[JobHistory] WITH NOCHECK
  ADD CONSTRAINT [FK_JobHistory_Position_PositionID] FOREIGN KEY ([PositionID]) REFERENCES [dbo].[Position] ([PositionID])
GO
IF @@ERROR<>0 OR @@TRANCOUNT=0 BEGIN IF @@TRANCOUNT>0 ROLLBACK SET NOEXEC ON END
GO

--
-- Create foreign key [FK_JobHistory_Project_ProjectID] on table [dbo].[JobHistory]
--
ALTER TABLE [dbo].[JobHistory] WITH NOCHECK
  ADD CONSTRAINT [FK_JobHistory_Project_ProjectID] FOREIGN KEY ([ProjectID]) REFERENCES [dbo].[Project] ([ProjectID])
GO
IF @@ERROR<>0 OR @@TRANCOUNT=0 BEGIN IF @@TRANCOUNT>0 ROLLBACK SET NOEXEC ON END
GO

--
-- Commit Transaction
--
IF @@TRANCOUNT>0 COMMIT TRANSACTION
GO

--
-- Set NOEXEC to off
--
SET NOEXEC OFF
GO
This script can be obtained in a number of ways. For instance, using the Compare Bundle for SQL Server tool.
Right-click on it and in the drop-down menu, select the Data Pump\ “Import Data…” command:
Img.12. Data import command in Data Pump
Similarly to export, on the “Source file” tab, select the JSON format and the file itself. Then press the “Next” button:
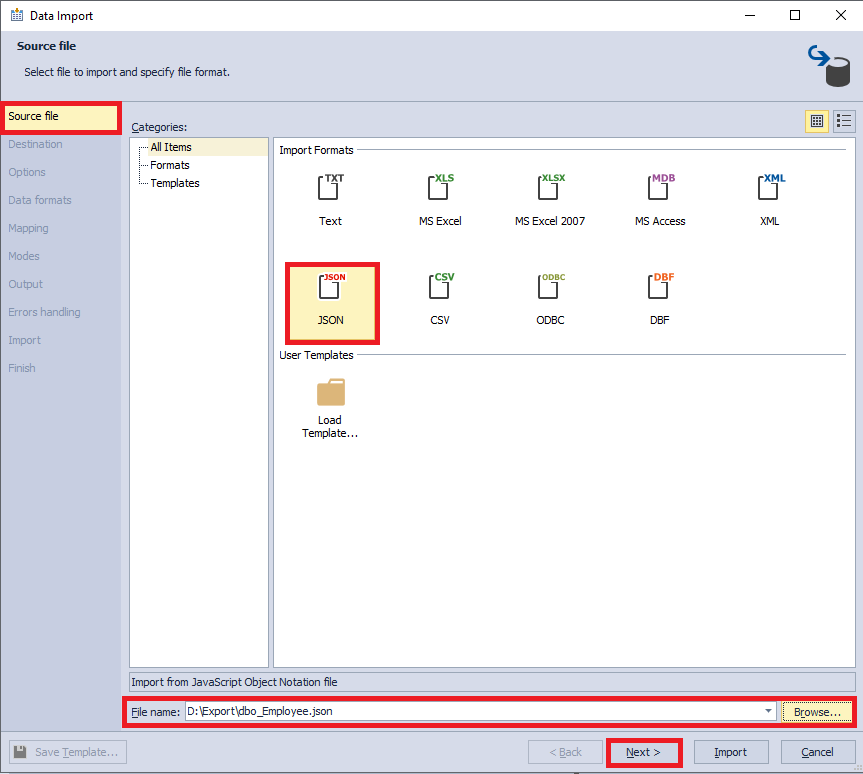
Img.13. Setting the “Source file” tab
On the “Destination” tab, pick the existing Employee table in the dbo schema of JobEmpl2 database and then press “Next”:
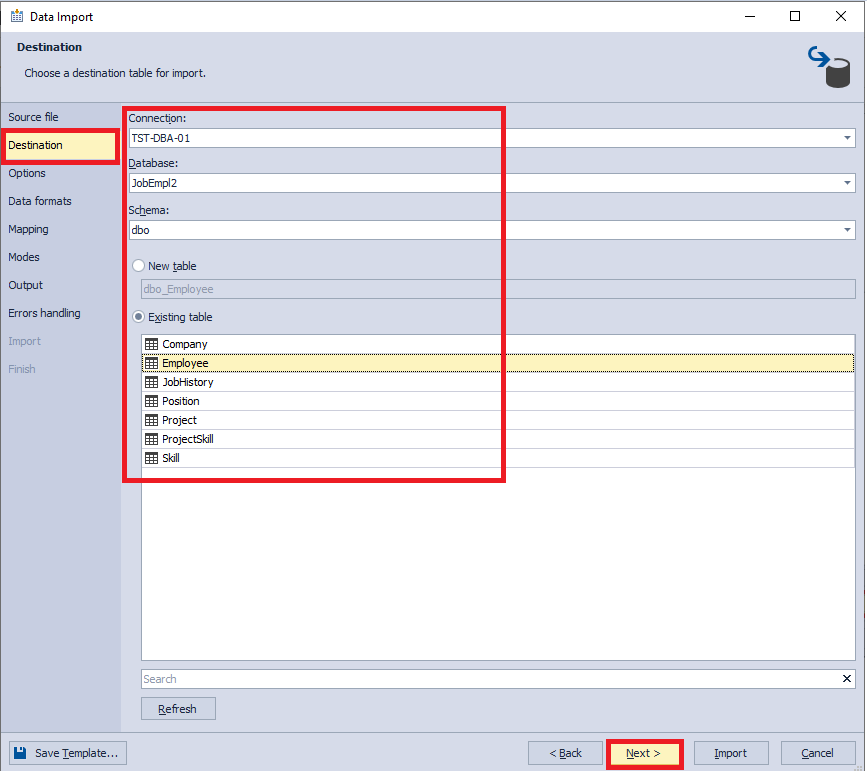
Img.14. Setting the “Destination” tab
Next, on the “Options” tab, you can set encoding and see what the inserted data will look like. Leave the settings at their defaults and press the “Next” key:
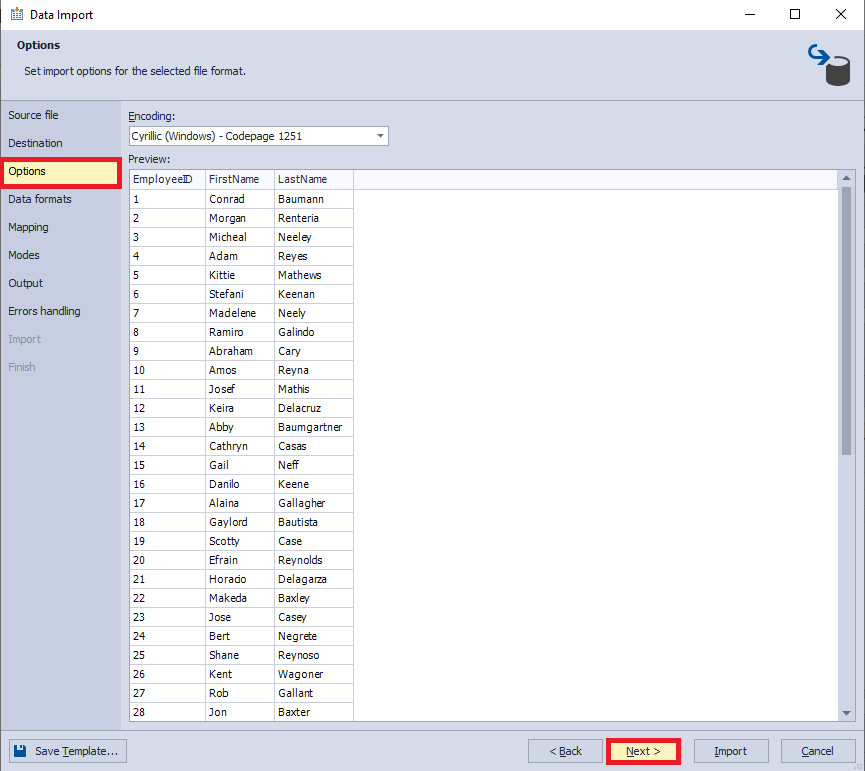
Img.15.Setting the “Options” tab
On the “Data formats” tab, you can configure the format of inserted data. Here, we leave the default values and press the “Next” button:
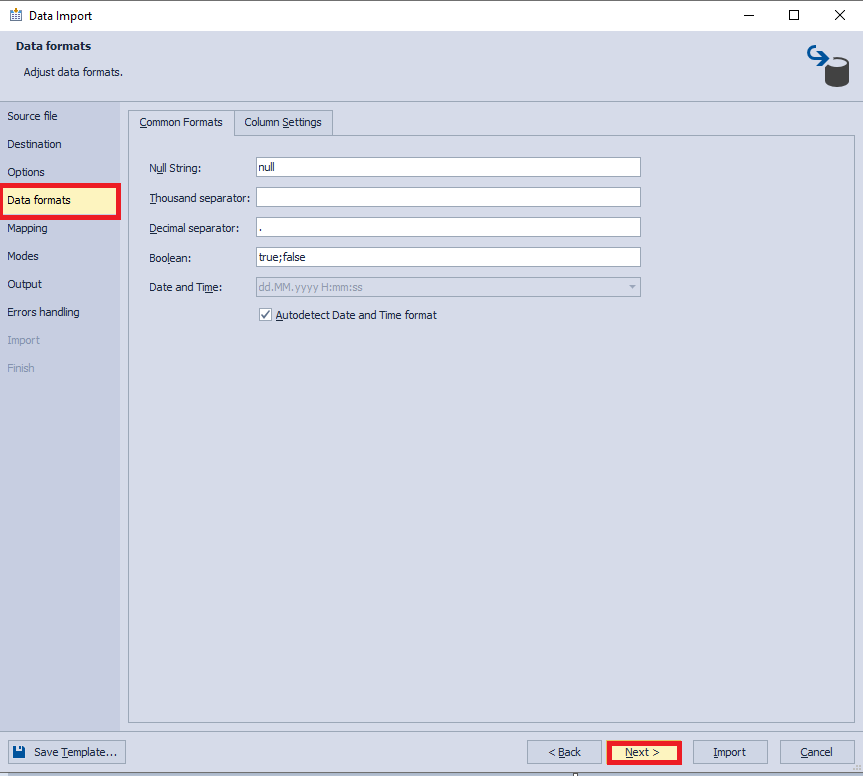
Img.16. Setting the “Data formats” tab
On the “Mapping” tab, you can configure the mapping of the source and target fields. Let’s leave everything as it is and press the “Next” button:
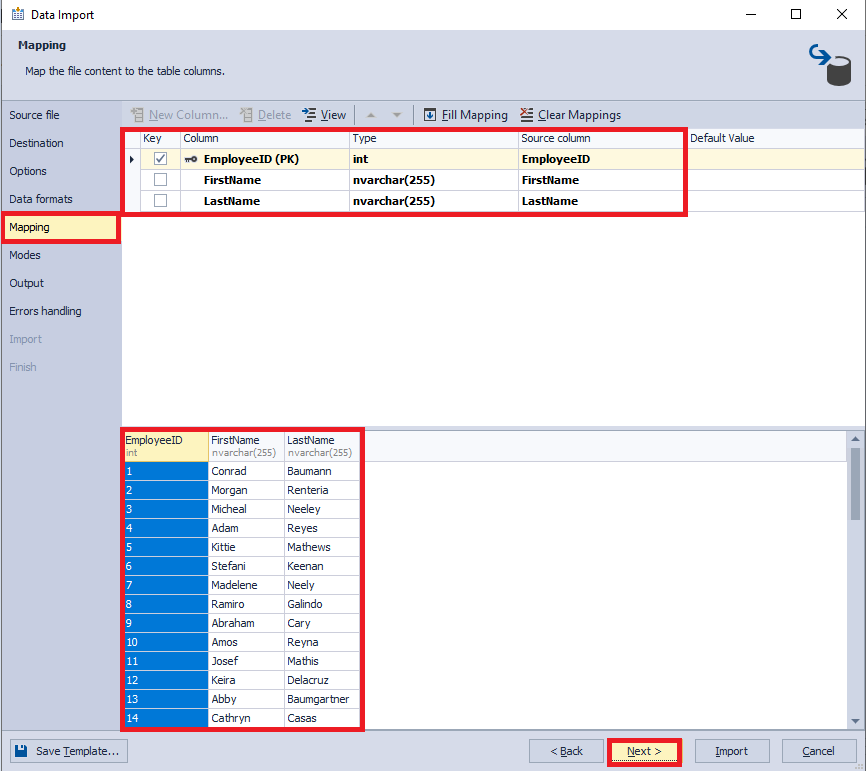
Img.17. Setting the “Mapping” tab
Following that, on the “Modes” tab, you can set the data import mode. In our case, we leave adding data without deleting the existing data by means of the bulk insert. Then, press “Next”:
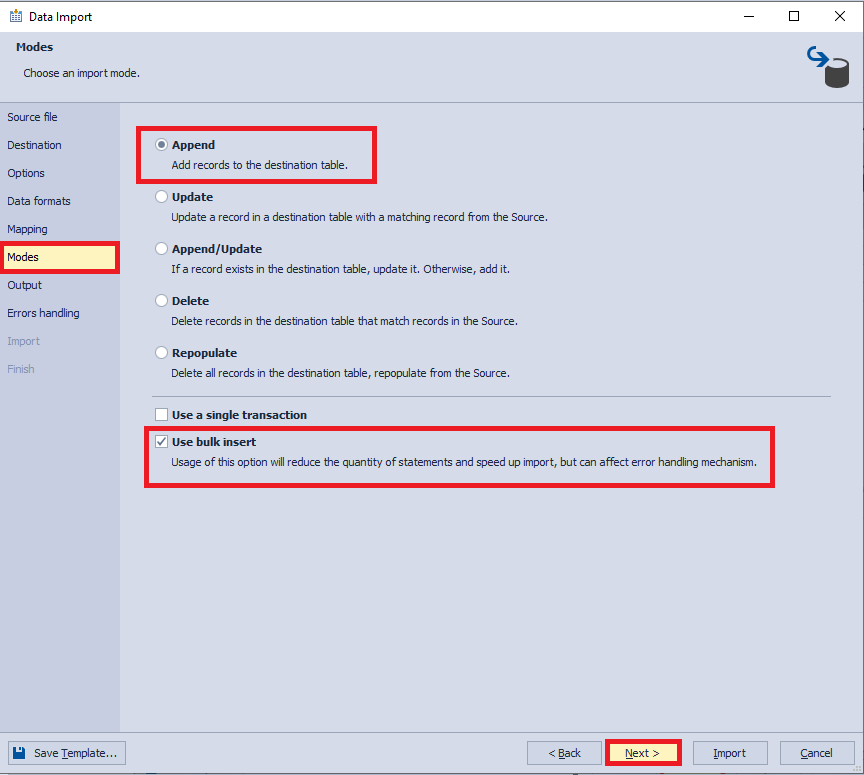
Img.18. Setting the “Modes” tab
On the “Output” tab, you can configure the target place for the data to be imported. In this case, select import data directly to the database and click “Next”:

Img.19. Setting the “Output” tab
Thereafter, on the “Errors handling” tab, you can configure the output of runtime errors during the import process. You can also save the previous settings as a template by clicking on the “Save Template…” button situated in the left bottom corner. We leave the default settings and press the “Import” button to start import:
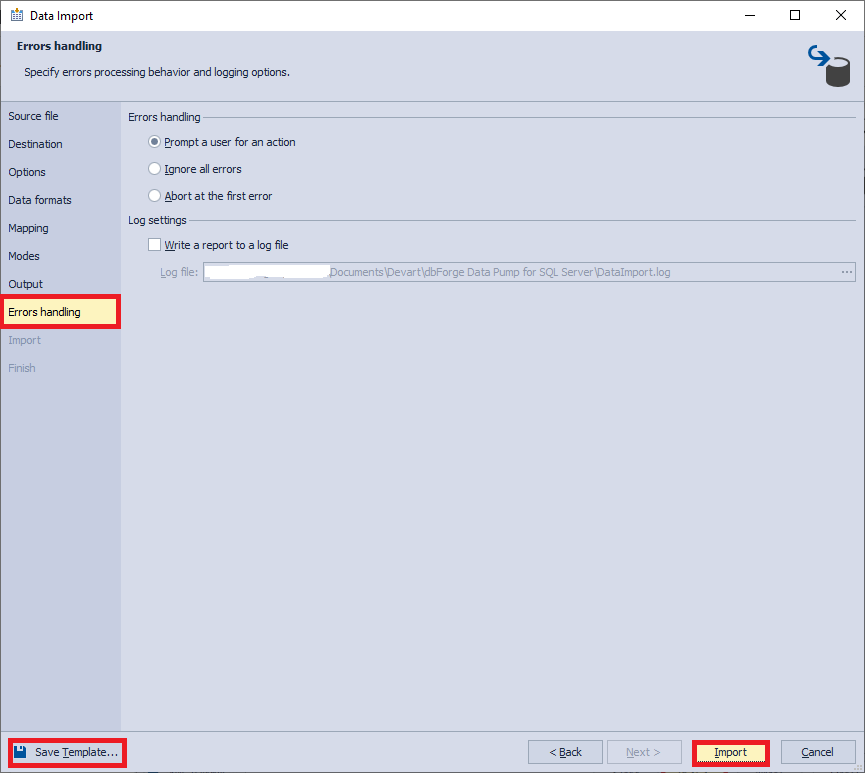
Img.20. Setting the “Errors handling” tab
During the import process, on the “Import” tab, you can track the execution progress. As soon as the import is complete, the result is displayed on the “Finish” tab. Press the “Finish” button to close the window:
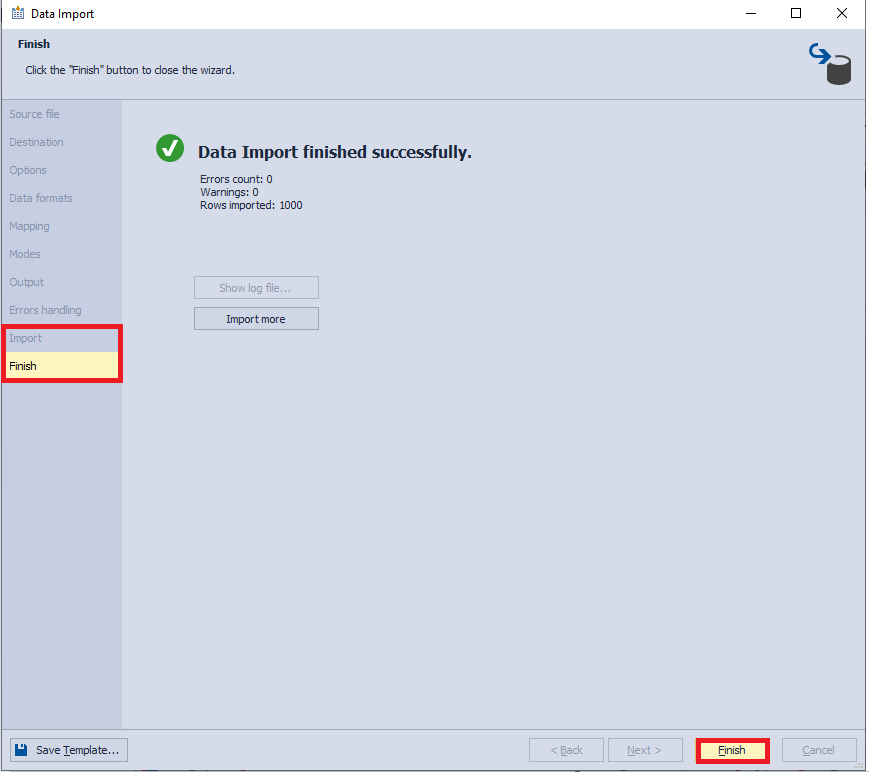
Img.21. The data import result
When you query the destination database, you can make sure that the data was successfully imported to the Employee table:
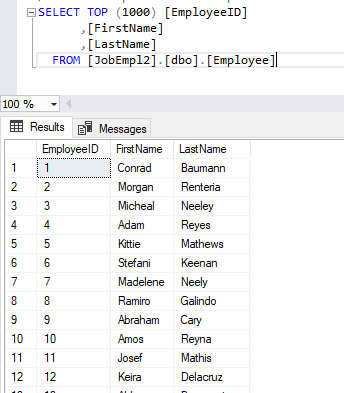
Img.22. The imported data to the Employee table
By the same token, you can import the remaining files to the corresponding tables.
You can perform data export and import with the help of standard functionality of SSMS by right-clicking on the necessary database and selecting the corresponding command in the drop-down menu:
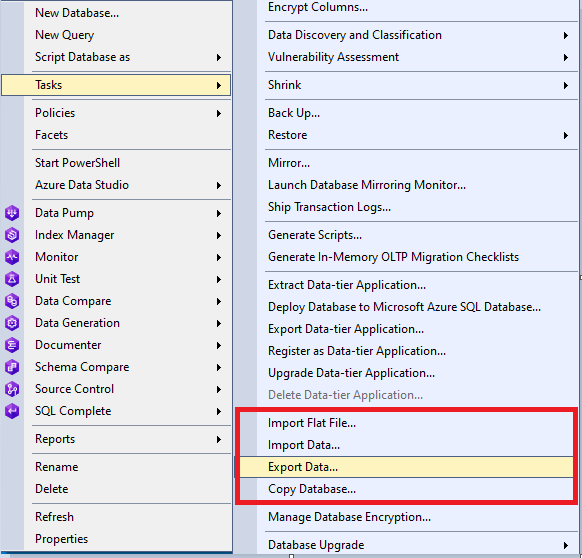
Img.23. Data export and import with the standard SSMS tools
Conclusion
To put it briefly, data export and import allow not only to move data between databases and to provide data in a convenient form for subsequent processing but also to import the part of the necessary data into the required database.
In the next part, we will examine how to conduct the object and data search in the created database.
