We all need to refer to temporary tables quite often. They are necessary to deal with interim aggregations or outputting intermediate results. However, it is also essential to delete temporary tables after using them.
In this article, we’ll examine the basics of temporary tables and define how they differ from table variables. Then, we’ll learn how to delete temporary tables correctly, and we’ll create a stored procedure for deleting temporary tables in a current session.
A brief overview of temporary tables in SQL Server
First, let’s define what a temporary table is. A temporary table in SQL Server is a database table that exists for a short term on the database server. It can come in handy when you need some workspace to store and process an intermediate result set temporarily.
For instance, you have a huge number of records in a table and constantly need to access some of those records. To avoid unnecessary data filtering and repetitive querying, you can create a temporary table and store the data there.
Temporary (temp) tables in SQL Server mostly apply to temporary aggregations and output of interim values. Such tables are created in the tempdb system database, and they exist until we delete them or till the session that created them is closed.
We create temporary tables in the same way as usual tables. The only difference is that we need to use the “#” sign for the local temp table names. For global temporary tables, we use two such signs in a row: “##”.
There are two types of temporary tables:
- Local tables that are visible only to the session that created them.
- Global tables that are visible to all sessions that have the permission to read the tempdb system database.
The primary difference between global and local temporary tables is that the former are visible to all sessions with the permission to read the tempdb system database, and the latter are visible to the session that created them only. Thus, we’ll analyze local tables in more detail.
Local temporary tables overview
Further on, we are going to talk about how to create and drop local temporary tables using the necessary commands.
Create local temporary tables using CREATE TABLE statement
We create local temporary tables with the following syntax:
CREATE TABLE #<table_name> …In the following code fragment, we create a MyLocalTempTable local temporary table. It has a primary key for the ID field and a non-clustered index for the InsertUTCDate field.
CREATE TABLE #MyLocalTempTable (
  [ID] INT PRIMARY KEY,
  [Value] NVARCHAR(255),
  [Ind] INT,
  [InsertUTCDate] DATE DEFAULT(GETUTCDATE())
);

CREATE NONCLUSTERED INDEX ix_InsertUTCDate ON #MyLocalTempTable ([InsertUTCDate]);
Let’s add some test data into the created local temp table:
INSERT INTO #MyLocalTempTable ([ID], [Value], [Ind])
SELECT 1, N'177', 1
UNION ALL
SELECT 2, N'355', 1
UNION ALL
SELECT 3, N'777 ID', 2;
Now, let’s execute the following query:
SELECT *
FROM #MyLocalTempTable
WHERE [Ind]=1;
Have a look at the actual execution plan for this query:
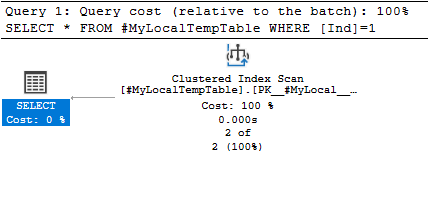
Img. 1-1. Actual query execution plan
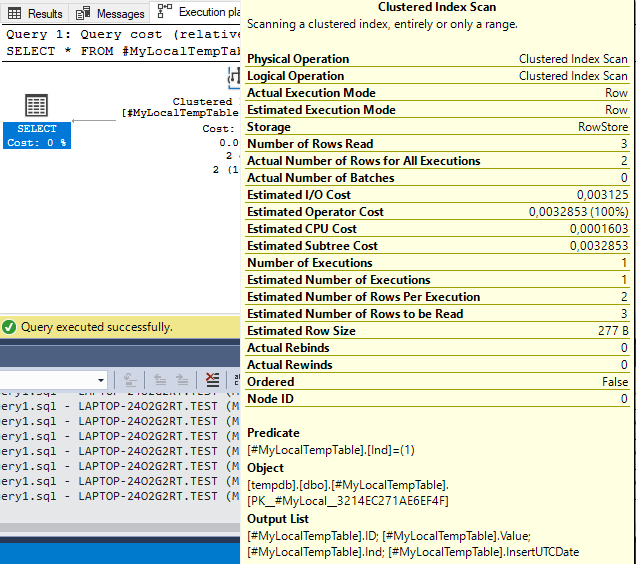
Img. 1-2. Actual query execution plan
As we can see from the query plan, the scanning of the clustered index for the ID field is underway.
We can also see that the Actual Number of Rows Read and the Estimated Number of Rows to be Read values are identical. Similarly, Actual Number of Rows for All Executions and the Estimated Number of Rows Per Execution values are also identical.
This means that the row count is correct, and the statistics for the local temp table are relevant. Consequently, local temporary tables have statistics.
Now, we add an index for the Ind field of the newly created local temp table:
CREATE NONCLUSTERED INDEX ix_Ind ON #MyLocalTempTable ([Ind]);Run the query again:
SELECT *
FROM #MyLocalTempTable
WHERE [Ind]=1;
Have a look at the query execution plan:
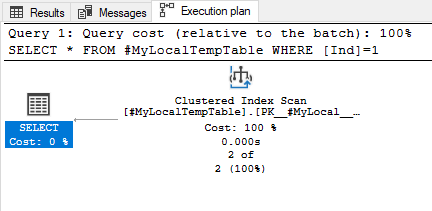
Img. 2-1. Actual query execution plan
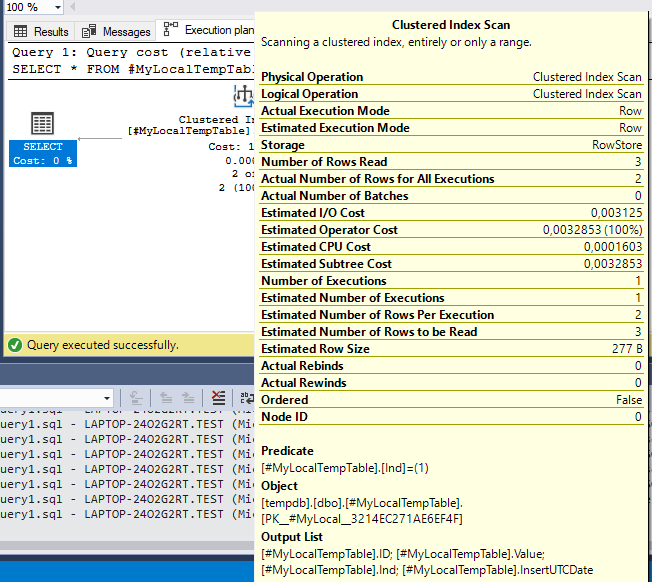
Img. 2-2. Actual query execution plan
The actual execution plan remains unchanged. Now, let’s change the query so that it would output only the fields that are present in the ix_Ind index:
SELECT [Ind]
FROM #MyLocalTempTable
WHERE [Ind]=1;
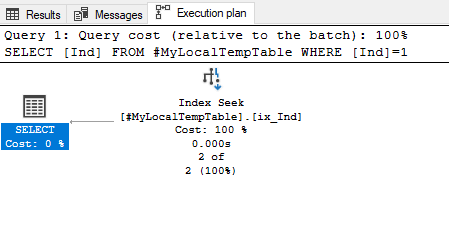
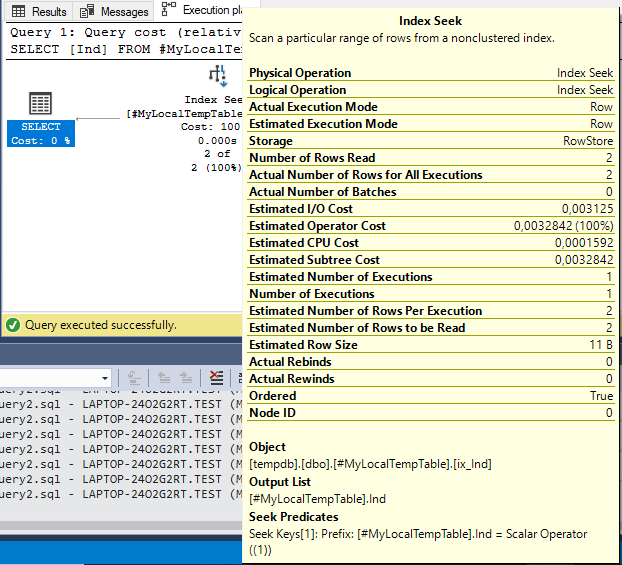
The actual execution plan for this query is as follows:
Img. 3-1. Actual execution plan for query #2
Img. 3-2. Actual execution plan for query #2
Now we can see the changes in the plan. Instead of scanning for the clustered index, it uses Index Seek for the non-clustered ix_Ind index for the Ind field.
Furthermore, the following four-parameter values are identical:
- Actual Number of Rows Read
- Estimated Number of Rows to be Read
- Actual Number of Rows for All Executions
- Estimated Number of Rows Per Execution
Therefore, the plan is optimal.
Let’s delete the previously created ix_Ind index for the Ind field in the following way:
DROP INDEX ix_Ind ON #MyLocalTempTable;Now, define the ix_Ind index the same as before, but including the Value field:
CREATE NONCLUSTERED INDEX ix_Ind ON #MyLocalTempTable ([Ind]) INCLUDE ([Value]);Execute the following query:
SELECT [Ind], [Value]
FROM #MyLocalTempTable
WHERE [Ind]=1;
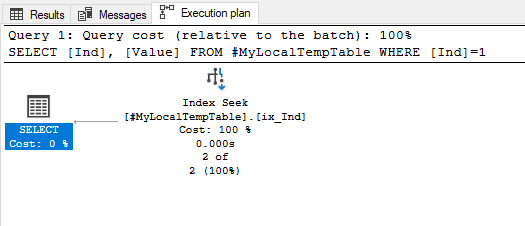
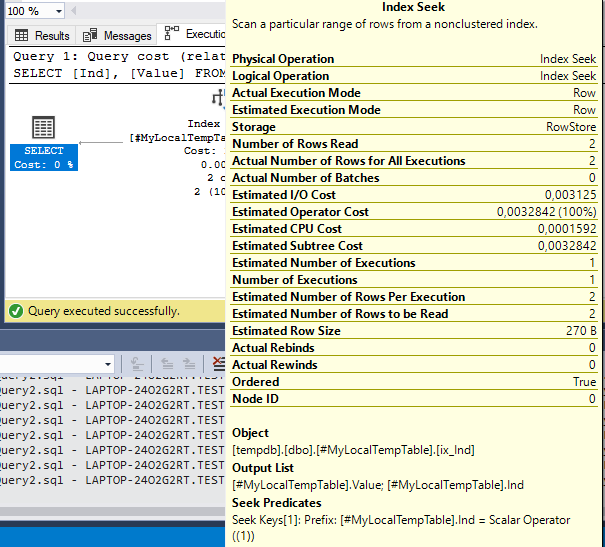
Review the next query execution plan:
Img. 4-1. Actual execution plan for query #3
Img. 4-2. Actual execution plan for query #3
We can see that the actual query execution plan differs from the previous one by the Estimated Row Size value only. This confirms that the execution plan is optimal.
Now check the transaction-related of the local temp tables. Execute the following code fragment:
SELECT [Ind], [Value]
FROM #MyLocalTempTable
WHERE [Ind]=1;

BEGIN TRAN

	UPDATE #MyLocalTempTable
	SET [Value]=NULL
	WHERE [Ind]=1;

	SELECT [Ind], [Value]
	FROM #MyLocalTempTable
	WHERE [Ind]=1;

ROLLBACK TRAN

SELECT [Ind], [Value]
FROM #MyLocalTempTable
WHERE [Ind]=1;
The output is as follows:
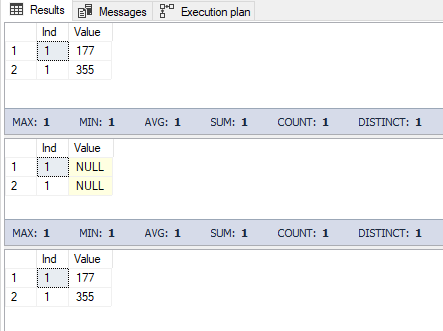
Img. 4-3. Behavior of the local temp table in the transaction
Let’s recap. First, we output all the local temp table rows that have Ind=1. Then, in the transaction, we replace the values of the Value fields with NULL for all the rows having Ind=1. Then, once more, we output all the local temp table rows with Ind=1. After that, we roll the transaction back and once again output all the local temp table rows having Ind=1.
This means that if a transaction gets rolled back, all related changes in the local temporary table also get rolled back.
Now we can see that dealing with statistics, indexes, and plans assigned to local temporary tables is the same as with usual tables. The behavior of local temp tables in transactions is also the same as that of usual tables.
Drop Local temporary tables using the DROP TABLE statement
To delete the MyLocalTempTable local temporary table, execute the following script:
IF (OBJECT_ID('tempdb..#MyLocalTempTable') IS NOT NULL) DROP TABLE #MyLocalTempTable;Therefore, the final T-SQL code for the local temp table usage in our example will be as follows:
IF (OBJECT_ID('tempdb..#MyLocalTempTable') IS NOT NULL) DROP TABLE #MyLocalTempTable;

CREATE TABLE #MyLocalTempTable (
  [ID] INT PRIMARY KEY,
  [Value] NVARCHAR(255),
  [Ind] INT,
  [InsertUTCDate] DATE DEFAULT(GETUTCDATE())
);

CREATE NONCLUSTERED INDEX ix_InsertUTCDate ON #MyLocalTempTable ([InsertUTCDate]);

CREATE NONCLUSTERED INDEX ix_Ind ON #MyLocalTempTable ([Ind]) INCLUDE ([Value]);

INSERT INTO #MyLocalTempTable ([ID], [Value], [Ind])
SELECT 1, N'177', 1
UNION ALL
SELECT 2, N'355', 1
UNION ALL
SELECT 3, N'777 ID', 2;

SELECT [Ind], [Value]
FROM #MyLocalTempTable
WHERE [Ind]=1;

BEGIN TRAN

	UPDATE #MyLocalTempTable
	SET [Value]=NULL
	WHERE [Ind]=1;

	SELECT [Ind], [Value]
	FROM #MyLocalTempTable
	WHERE [Ind]=1;

ROLLBACK TRAN

SELECT [Ind], [Value]
FROM #MyLocalTempTable
WHERE [Ind]=1;
Note: To format the code, we used the SQL Complete tool.
We work with global temporary tables in the same way.
Global temporary tables overview
We create global temporary tables with the following syntax:
CREATE TABLE ##<table_name> …The following code fragment creates a global MyGlobalTempTable temporary table with a primary key for the ID field and a non-clustered index for the InsertUTCDate field:
CREATE TABLE ##MyGlobalTempTable (
  [ID] INT PRIMARY KEY,
  [Value] NVARCHAR(255),
  [Ind] INT,
  [InsertUTCDate] DATE DEFAULT(GETUTCDATE())
);

CREATE NONCLUSTERED INDEX ix_InsertUTCDate ON ##MyGlobalTempTable ([InsertUTCDate]);

Add some test data into the created global temporary table:

INSERT INTO ##MyGlobalTempTable ([ID], [Value], [Ind])
SELECT 1, N'177', 1
UNION ALL
SELECT 2, N'355', 1
UNION ALL
SELECT 3, N'777 ID', 2;

Execute the following query:

SELECT *
FROM ##MyGlobalTempTable
WHERE [Ind]=1;
Have a look at the actual execution plan for this query:
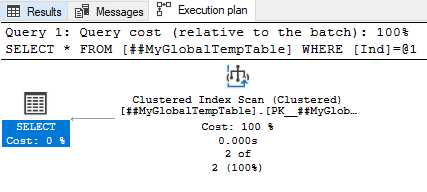
Img. 5-1. Actual query execution plan
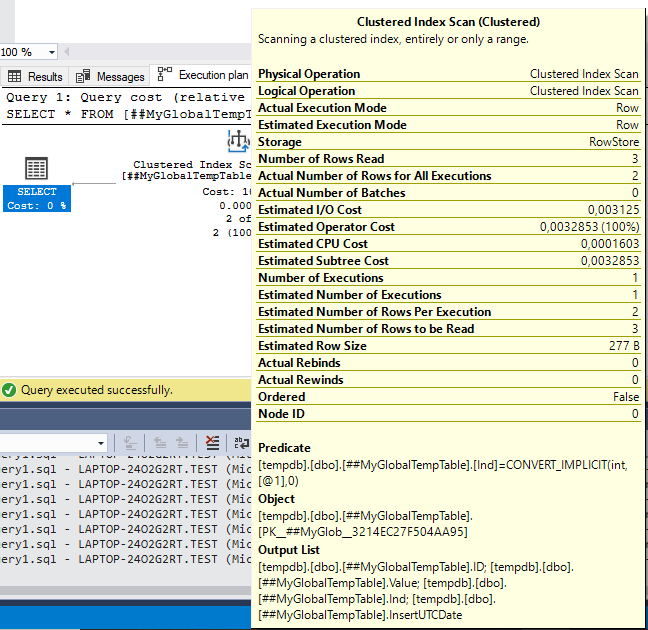
Img. 5-2. Actual query execution plan
As we can see from the query plan, the scanning of the clustered index for the ID field is underway. We can also see that the Actual Number of Rows Read and the Estimated Number of Rows to be Read values are identical. Similarly, the Actual Number of Rows for All Executions and the Estimated Number of Rows Per Execution values are also identical.
Therefore, the row count is correct, and the global temporary table statistics are relevant. Consequently, global temporary tables have statistics.
Now, we add an index for the Ind field of our newly created global temp table:
CREATE NONCLUSTERED INDEX ix_Ind ON ##MyGlobalTempTable ([Ind]);Execute the query once more:
SELECT *
FROM ##MyGlobalTempTable
WHERE [Ind]=1;
Have a look at the query execution plan:
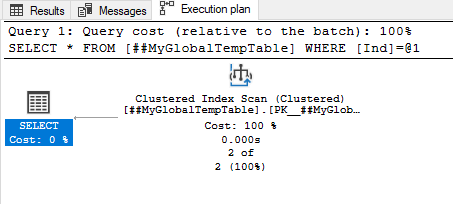
Img. 6-1. Actual query execution plan
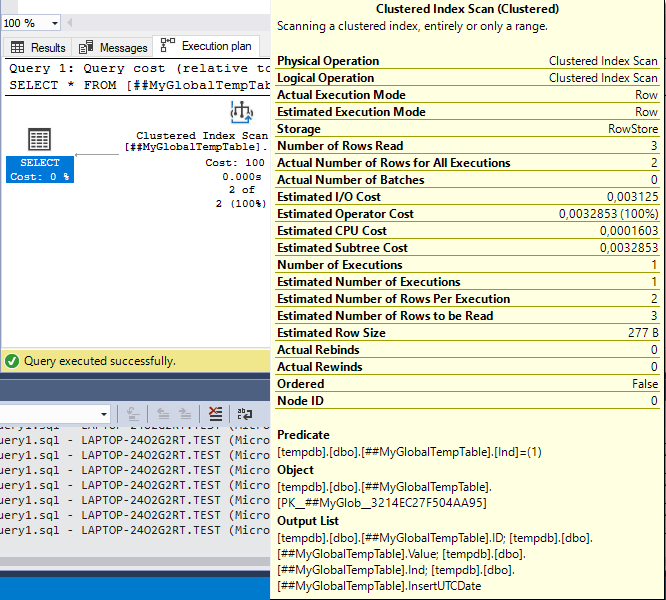
Img. 6-2. Actual query execution plan
We see that the actual execution plan remains unchanged.
Now, let’s change the query so that it would output only the fields that are present in the ix_Ind index:
SELECT [Ind]
FROM ##MyGlobalTempTable
WHERE [Ind]=1;
The actual execution plan for this query is as follows:
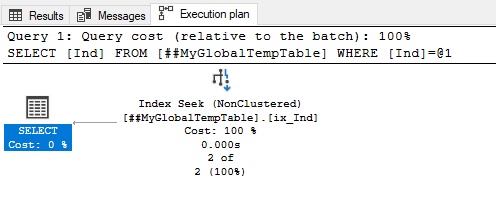
Img. 7-1. Actual execution plan for query #2
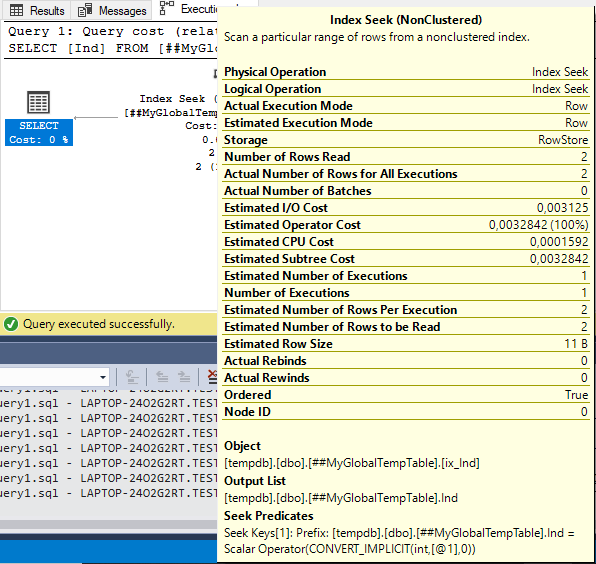
Img. 7-2. Actual execution plan for query #2
This time we can see the changes in the plan. Instead of scanning according to the clustered index, it uses Index Seek for the ix_Ind non-clustered index for the Ind field.
Still, the following four-parameter values are identical:
- Actual Number of Rows Read
- Estimated Number of Rows to be Read
- Actual Number of Rows for All Executions
- Estimated Number of Rows Per Execution
Therefore, the plan is optimal.
Let’s delete the previously created ix_Ind index for the Ind field:
DROP INDEX ix_Ind ON ##MyGlobalTempTable;Then, define the ix_Ind index the same as before, but including the Value field:
CREATE NONCLUSTERED INDEX ix_Ind ON ##MyGlobalTempTable ([Ind]) INCLUDE ([Value]);Execute the following query:
SELECT [Ind], [Value]
FROM ##MyGlobalTempTable
WHERE [Ind]=1;
View the query execution plan:
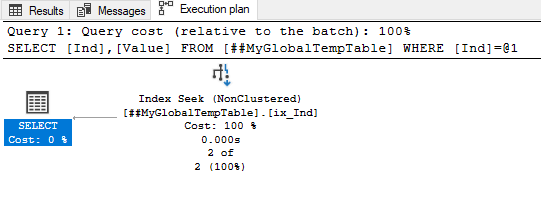
Img. 8-1. Actual execution plan for query #3
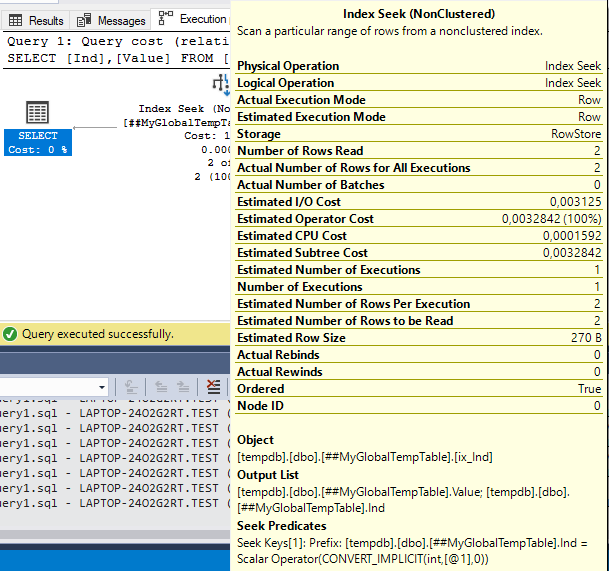
Img. 8-2. Actual execution plan for query #3
We can see that the actual query execution plan differs from the previous one by the Estimated Row Size value only. It confirms that the execution plan is optimal.
Now check the transaction-related behavior of global temporary tables. Execute the following code fragment:
SELECT [Ind], [Value]
FROM ##MyGlobalTempTable
WHERE [Ind]=1;

BEGIN TRAN

	UPDATE #MyLocalTempTable
	SET [Value]=NULL
	WHERE [Ind]=1;

	SELECT [Ind], [Value]
	FROM ##MyGlobalTempTable
	WHERE [Ind]=1;

ROLLBACK TRAN

SELECT [Ind], [Value]
FROM ##MyGlobalTempTable
WHERE [Ind]=1;
The output is as follows:
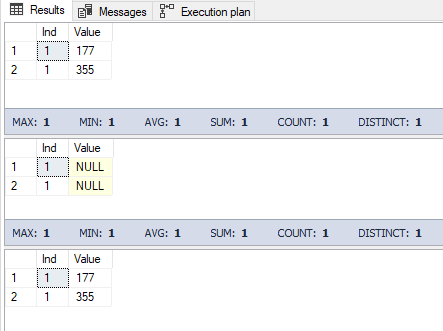
Img. 8-3. Behavior of the global temp table in the transaction
Let’s recap. First, we output all the global temp table rows that have Ind=1. Then, in the transaction, we replace the values of the Value fields with NULL for all the rows having Ind=1. Then, once more, we output all the global temp table rows with Ind=1. After that, we roll the transaction back and once more output all the global temp table rows having Ind=1.
This means that if a transaction gets rolled back, all related changes in the global temporary table also get rolled back.
Now we can see that dealing with statistics, indexes, and plans assigned to global temporary tables is the same as with usual tables. The behavior of global temp tables in transactions is also the same as that of usual tables.
To delete the MyGlobalTempTable global temporary table, execute the following script:
IF (OBJECT_ID('tempdb..##MyGlobalTempTable') IS NOT NULL) DROP TABLE ##MyGlobalTempTable;Therefore, the final T-SQL code for the global temp table usage in our example will be as follows:
IF (OBJECT_ID('tempdb..##MyGlobalTempTable') IS NOT NULL) DROP TABLE ##MyGlobalTempTable;

CREATE TABLE ##MyGlobalTempTable (
  [ID] INT PRIMARY KEY,
  [Value] NVARCHAR(255),
  [Ind] INT,
  [InsertUTCDate] DATE DEFAULT(GETUTCDATE())
);

CREATE NONCLUSTERED INDEX ix_InsertUTCDate ON ##MyGlobalTempTable ([InsertUTCDate]);

CREATE NONCLUSTERED INDEX ix_Ind ON ##MyGlobalTempTable ([Ind]) INCLUDE ([Value]);

INSERT INTO ##MyGlobalTempTable ([ID], [Value], [Ind])
SELECT 1, N'177', 1
UNION ALL
SELECT 2, N'355', 1
UNION ALL
SELECT 3, N'777 ID', 2;

SELECT [Ind], [Value]
FROM ##MyGlobalTempTable
WHERE [Ind]=1;

BEGIN TRAN

	UPDATE #MyLocalTempTable
	SET [Value]=NULL
	WHERE [Ind]=1;

	SELECT [Ind], [Value]
	FROM ##MyGlobalTempTable
	WHERE [Ind]=1;

ROLLBACK TRAN

SELECT [Ind], [Value]
FROM ##MyGlobalTempTable
WHERE [Ind]=1;

IF (OBJECT_ID('tempdb..##MyGlobalTempTable') IS NOT NULL) DROP TABLE ##MyGlobalTempTable;
It is important to delete the global temporary table eventually if it is required.
Note: To format the code, we used the SQL Complete tool.
What’s more, to tune the performance of your query, you can apply a SQL Query Profiler tool from dbForge Studio for SQL Server. The tool allows visualizing an execution plan of a query and easily detect any bottlenecks and resource-hungry operations.
Comparing local and global temporary tables
We have reviewed local and global temporary tables and compared them in the table below:
| Comparison | Local Temporary Table | Global Temporary Table |
| Creation | CREATE TABLE #<table_name>… or INSERT INTO #<table_name> |
CREATE TABLE ##<table_name>… or INSERT INTO ##<table_name> |
| Availability | Available only in the session that created it | Available in all sessions that have the permission to read the tempdb system database |
| Deletion | By means of closing the session that created the table or via the instruction: DROP TABLE #<table_name>; |
By means of closing the session that created the table or via the instruction: DROP TABLE ##<table_name>; |
| Change of definition | Supported | Supported |
| Limitations | Supported | Supported |
| Indexes | Supported | Supported |
| Name | Must be unique for the session that created the table | Must be unique for all sessions and the entire tempdb system database |
| Storage | The tempdb system database | The tempdb system database |
| Transaction | Supported (rollback of changes) | Supported (rollback of changes) |
| Statistics | Supported | Supported |
Note: You cannot use temporary tables to create Views.
Conclusion
In a nutshell, we use temporary tables when there is a need to work with a subset of data from a usual table within a short period of time. In this article, we defined the two main types of temporary tables, drew a distinction between them, and described the mechanisms of temporary table creation and deletion.


