Restoring a database backup directly from a newer version of SQL Server to an older one fails or causes incompatibility errors. For example, a backup created on SQL Server 2019 cannot typically be restored on a SQL Server 2017 instance. Since a direct downgrade isn’t possible, we’ll demonstrate alternative methods to migrate a SQL Server database from 2019 to 2017.
In this article, we’ll explore alternative ways for downgrading a SQL Server 2019 backup to transfer data to a 2017 instance easily and without errors using SQL scripts and dbForge tools, such as SQL Server backup software.
Contents
- Why you can’t restore a SQL Server 2019 backup on SQL Server 2017 directly
- Alternative methods for downgrading a SQL Server database from 2019 to 2017
- Using dbForge tools
- Generating scripts for schema and data
- Using the Generate Schema Script Wizard in dbForge Studio
- Exporting data using SQL Server Management Studio (SSMS)
- Why some downgrade methods may not be possible
- Common pitfalls and how to avoid them
Why you can’t restore a SQL Server 2019 backup on SQL Server 2017 directly
The main reason for why it is impossible to restore a database backup created on a higher SQL Server version to a lower version is compatibility limitations. Each new SQL Server release often introduces updated internal structures and storage formats that older versions don’t support. As a result, backups from a newer version cannot be backward-compatible with older ones.
As a workaround, scripts or export/import tools can be used to transfer data from a higher server version to a lower one.
Alternative methods for downgrading a SQL Server database from 2019 to 2017
Instead of a direct restore process, you can use alternatives to downgrade the database from SQL Server 2019 to 2017. Choosing the best method for you will depend on your specific project requirements, recovery time, database size, performance optimization, storage capacity, etc.
Let us look at the following methods we want to discuss in this article:
- dbForge Schema and Data Compare, as parts of dbForge SQL Tools, which allow you to generate a schema and data backup stored in a .sql file.
- Generate Script As feature available in dbForge Studio for SQL Server, which lets you create scripts and then reproduce the selected database structure and data on another server.
- Generate Scripts Wizard built into dbForge Studio for SQL Server, which allows you to generate scripts to create a full database backup or migrate database structure and data between SQL Server instances.
Using dbForge tools
dbForge SQL Tools is a suite of 15 tools for performing database-related tasks on SQL Server and Azure SQL databases. It simplifies different SQL Server workflows, including database creation, management, and maintenance, allowing database administrators, developers, and analysts to improve efficiency, ensure data accuracy, and enhance productivity.
dbForge Schema Compare and Data Compare are parts of the SQL Tools pack. These advanced tools let users compare and synchronize database schemas and data between two SQL Server databases and generate synchronization scripts to keep data consistent across different environments.
You can download dbForge SQL Tools, including Schema Compare and Data Compare, from the website and install them on the computer.
The workflow of migrating a database structure and data from SQL Server 2019 to 2017 would be as follows:
- Transferring a database structure using dbForge Schema Compare
- Copying the data to the database using dbForge Data Compare
Transferring a database structure using dbForge Schema Compare
- Open the Schema Compare tool.
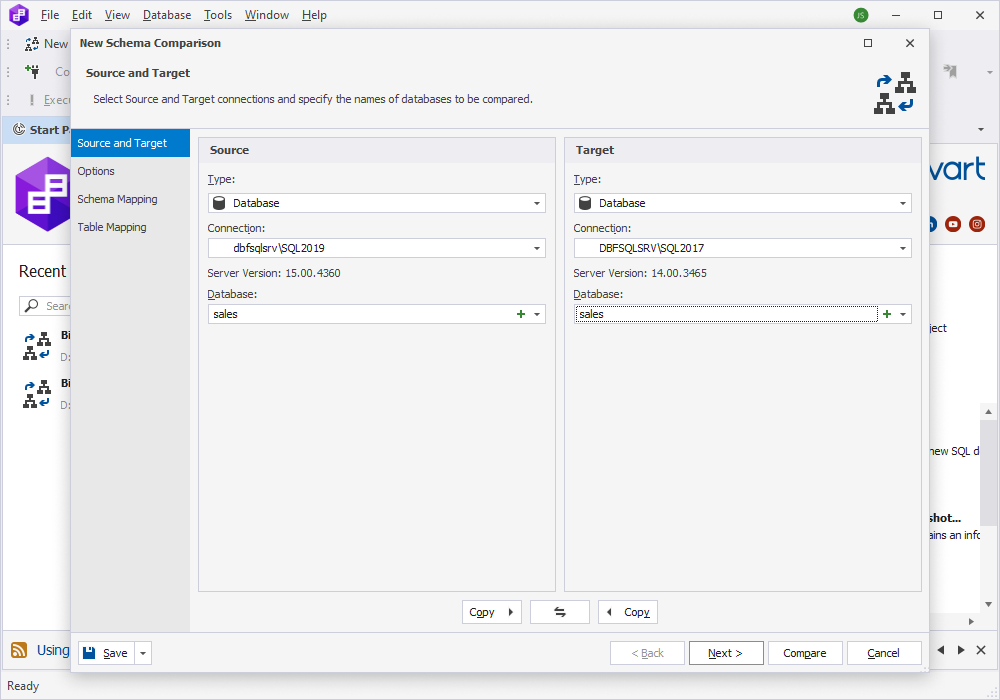
- On the toolbar, select New Schema Comparison to open the New Schema Comparison wizard.
- On the Source and Target page of the wizard, select the source and target server connections and databases you want to compare. You can also select schema comparison options and customize schema and table mapping on the corresponding pages of the wizard.
- To proceed, select Compare.
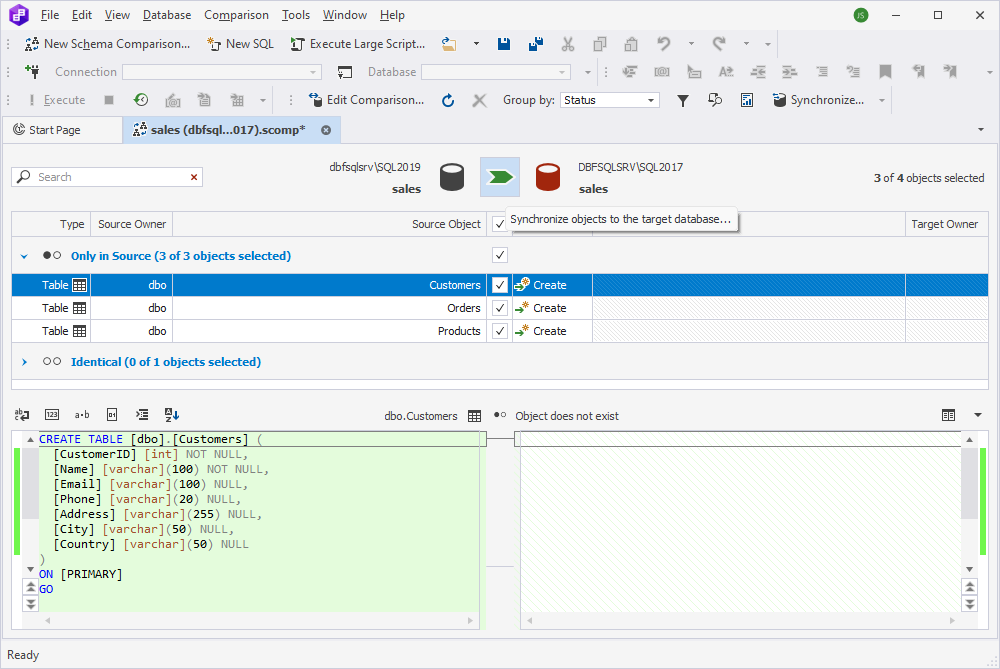
This will open the schema comparison document, showing the database objects selected for schema synchronization. At the top of the document, select Synchronize objects to the target database.
The Schema Synchronization wizard appears, displaying the Output page on which the output options to generate a synchronization script are available. To proceed, select the Execute the script directly against the target database option and then select Synchronize. The structure of the sales database from SQL Server 2019 will be copied to SQL Server 2017.
Copying the data to the database using dbForge Data Compare
- Open the Data Compare tool.
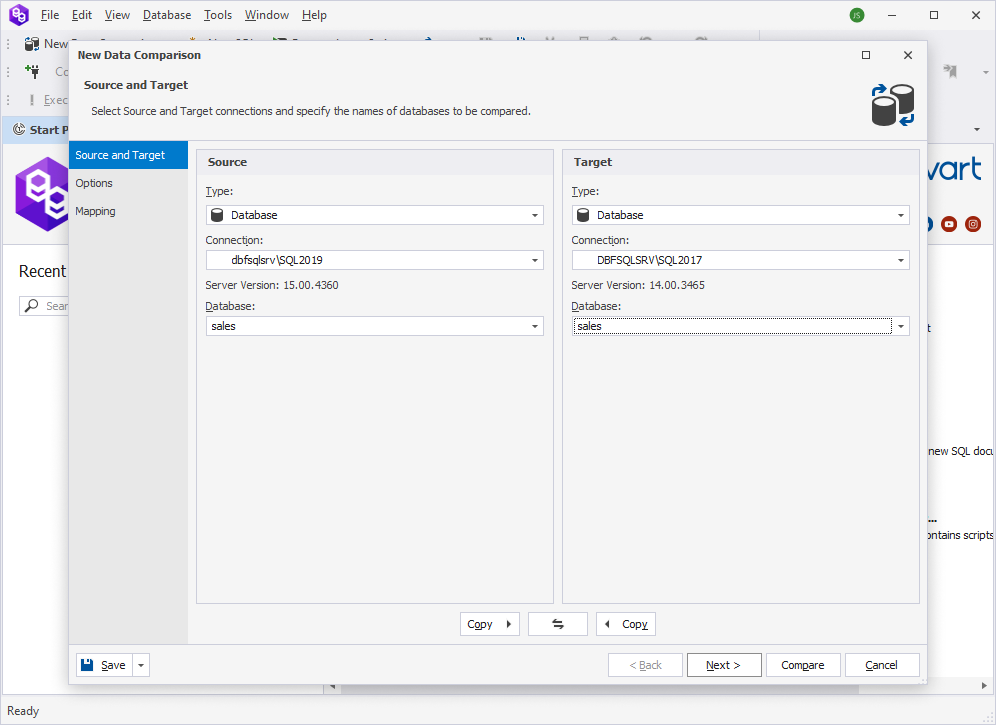
- On the toolbar, select New Data Comparison to open the New Data Comparison wizard.
- In the wizard, select the source and target server connections and databases to be compared, set up comparison options, and then select Compare.
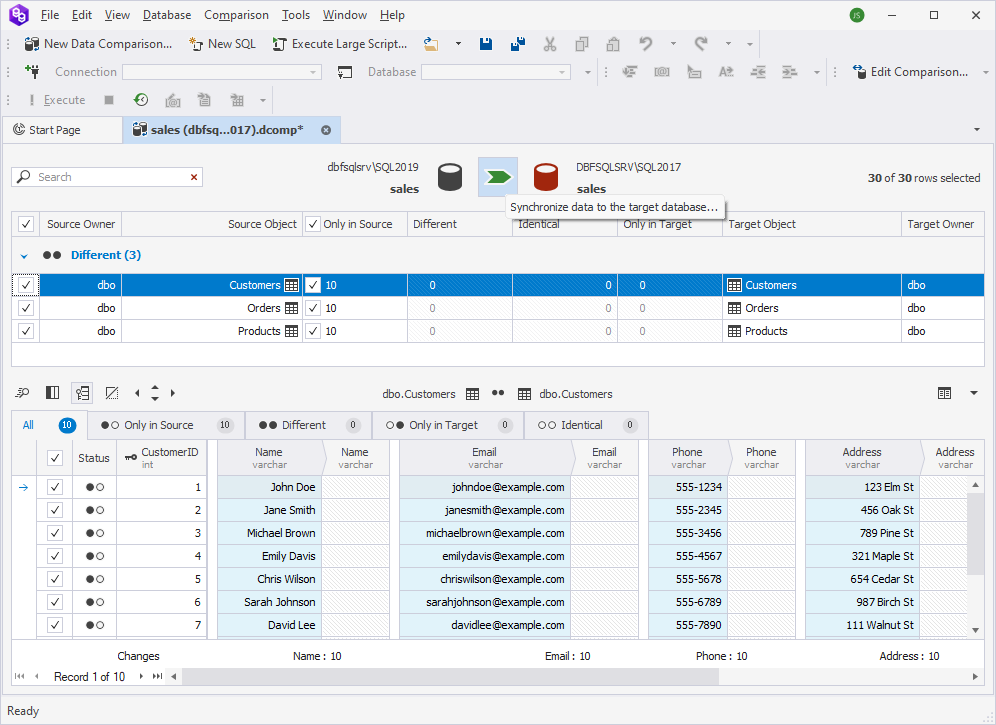
In the Data Comparison document that opens, all the database objects for data synchronization are also included in the synchronization by default. To proceed, select Synchronize data to the target database.
In the Data Synchronization Wizard, select the Execute the script directly against the target database option and select Synchronize. The data of the sales database from SQL Server 2019 will be copied to SQL Server 2017.
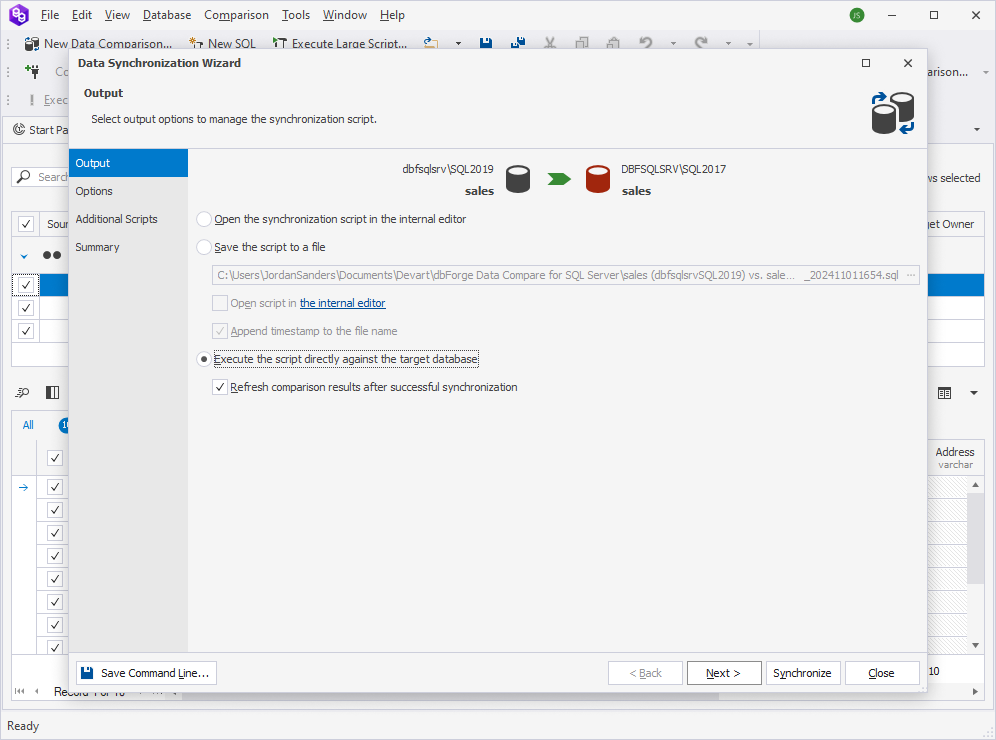
As you can see, using these Schema and Data Compare tools can be highly effective for synchronizing SQL Server databases of different versions and for creating synchronization scripts to downgrade database versions.
Let us now consider benefits and drawbacks they have and the best-use scenarios.
Benefits:
- Ease of use: The tools provide a visual and user-friendly interface that simplifies the comparison and synchronization database schemas and data, which makes it accessible for users of all skill levels.
- Detailed comparison: They help control which database objects, such as tables, views, indexes, etc., and data to compare.
- Error-free synchronization: The tools automatically generate synchronization scripts to ensure the consistency of the target database and minimize the risk of errors during the change deployment.
- Efficiency: They speed up migration or downgrade processes by automating the comparison and synchronization steps and save time over manual scripting.
- Thorough analysis: The tools offer insights into specific schema and data discrepancies that can help identify potential issues or requirements before synchronizing.
Drawbacks:
- Accidental data modification: During the data synchronization, data may be modified or deleted in the destination database. Therefore, before schema and data synchronization, ensure you have made a backup copy of the target database.
- Potential performance impact: Running detailed comparisons, particularly on large databases, may require substantial system resources and may impact performance.
This method is best for migrating databases between SQL Server versions, especially when downgrading from a newer to an older version. In addition, you can prefer this method over others if you want to keep schemas and data in sync and ensure consistency across development, staging, and production environments. When you need to migrate only specific tables, views, or procedures rather than the entire database, the Schema/Data Compare tools are ideal to use.
Generating scripts for schema and data
Another way to restore the data from SQL Server 2019 to 2017 is to generate SQL scripts based on existing database objects. This can be achieved using the Generate Script As feature in dbForge Studio for SQL Server. It is the ultimate tool for generating SQL scripts to recreate database objects and insert data.
For example, we want to restore the orders database created on the SQL Server 2019 instance to the SQL Server 2017 instance.
The target SQL Server 2017 instance must contain the database to which you want to copy the database objects and data from the source SQL Server 2019 instance.
As a prerequisite, we created a sample orders database on the SQL Server 2017 instance.
The workflow would be as follows:
- Generating the CREATE script for the database table
- Executing the generated CREATE script on the SQL Server 2017 instance
- Generating the INSERT script for the data
- Executing the created INSERT script on the destination database on the SQL Server 2017 instance
We have marked the server connections with different colors so you can easily distinguish which server you are connected to. For more information about tabs coloring, see How to manage database connections.
To begin, open the Studio and connect to the SQL Server 2019 instance.
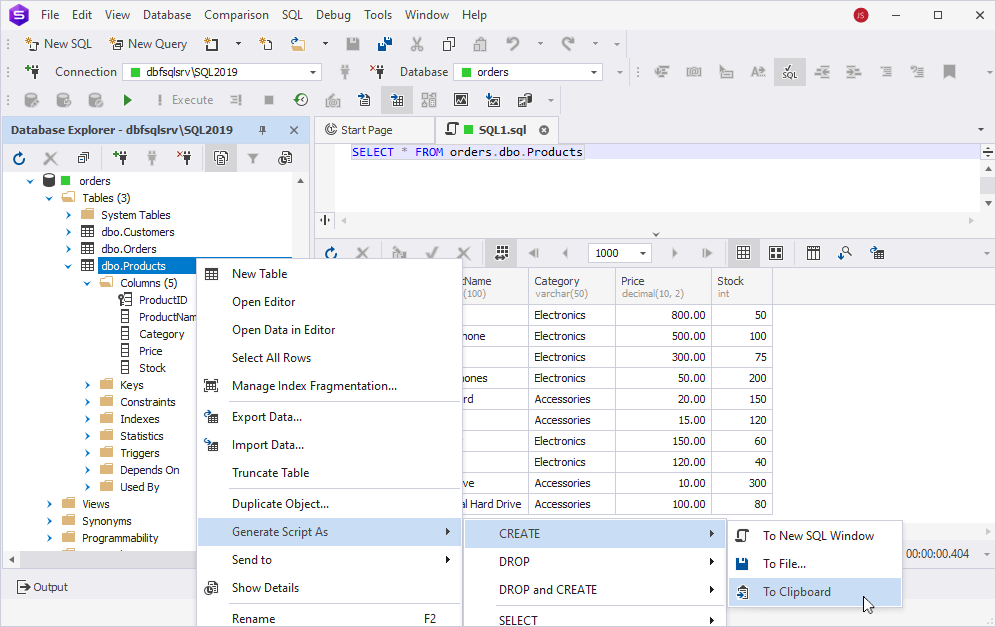
In Database Explorer, right-click the dbo.Products table under the orders database and select Generate Script As > CREATE > To Clipboard. Wait until the script is generated.
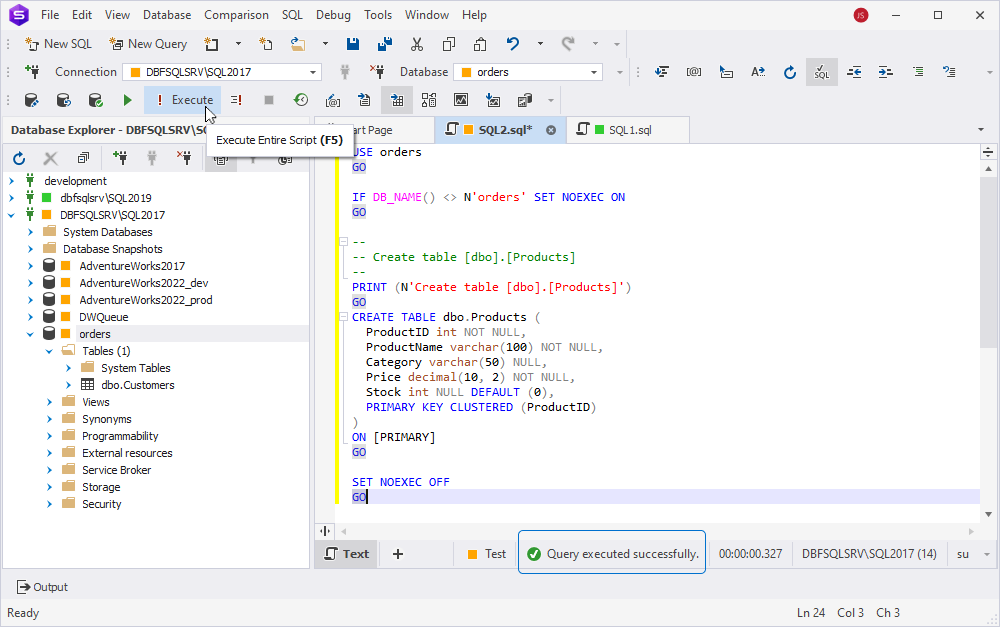
Then, connect to the SQL Server 2017 instance. In Database Explorer, right-click the orders database and select New SQL. In the Code Editor that opens, paste the copied CREATE script and then run the query by selecting Execute on the standard toolbar. The status bar at the bottom of the Code Editor shows that the query has been executed without errors.
Next, return to the SQL Server 2019 instance and execute the SELECT query to retrieve the data from the dbo.Products table.
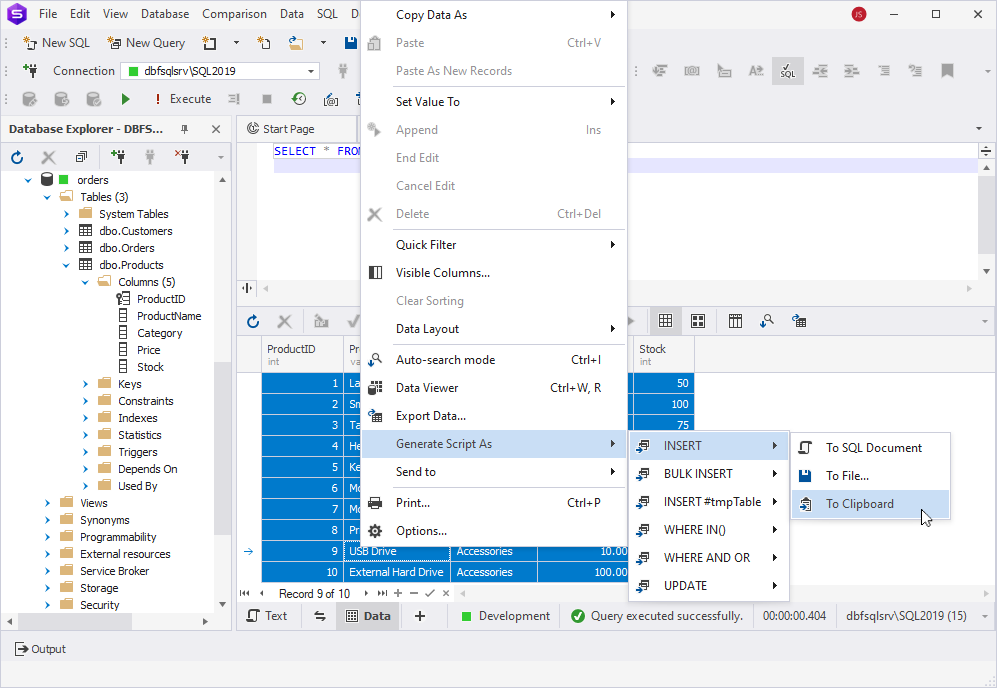
In the results grid, select the records you want to add to the table on the target server. To select all rows, select within the results grid and then press Ctrl + A. If you want to select only specific rows, start by clicking the first cell in the top-left corner of the grid, then press and hold Shift. While holding Shift, click the last cell in the range to highlight only those specific rows.
Then, right-click the selected data in the grid and select Generate Script As > INSERT > To Clipboard.
Switch to the Code Editor of the SQL Server 2017 instance. Then, paste the generated INSERT script and execute it. At the status bar, you’ll see that the query has been successfully executed.
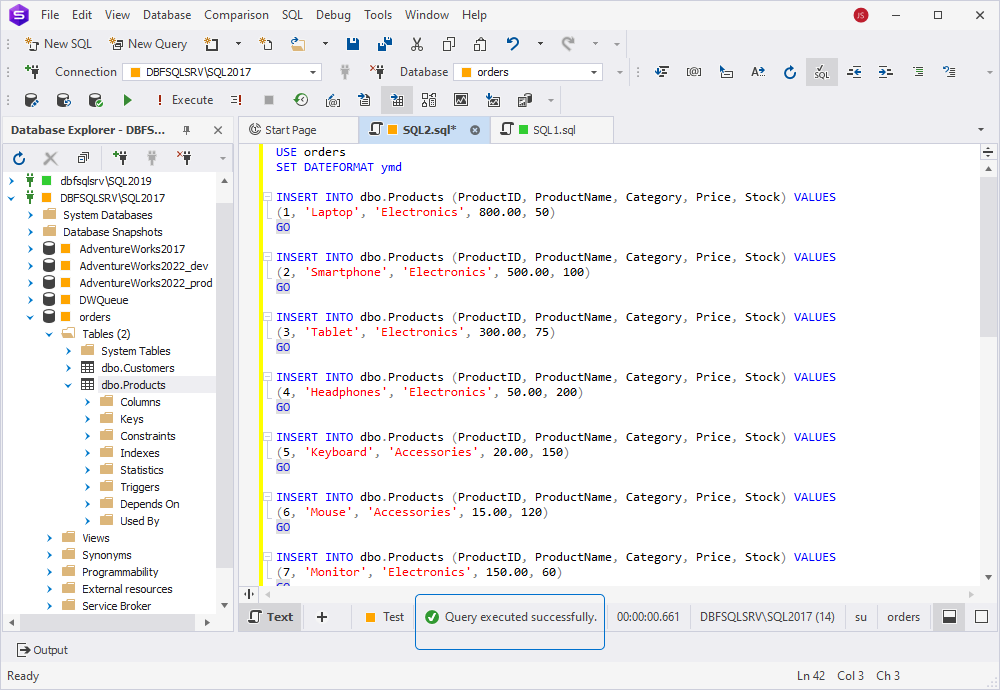
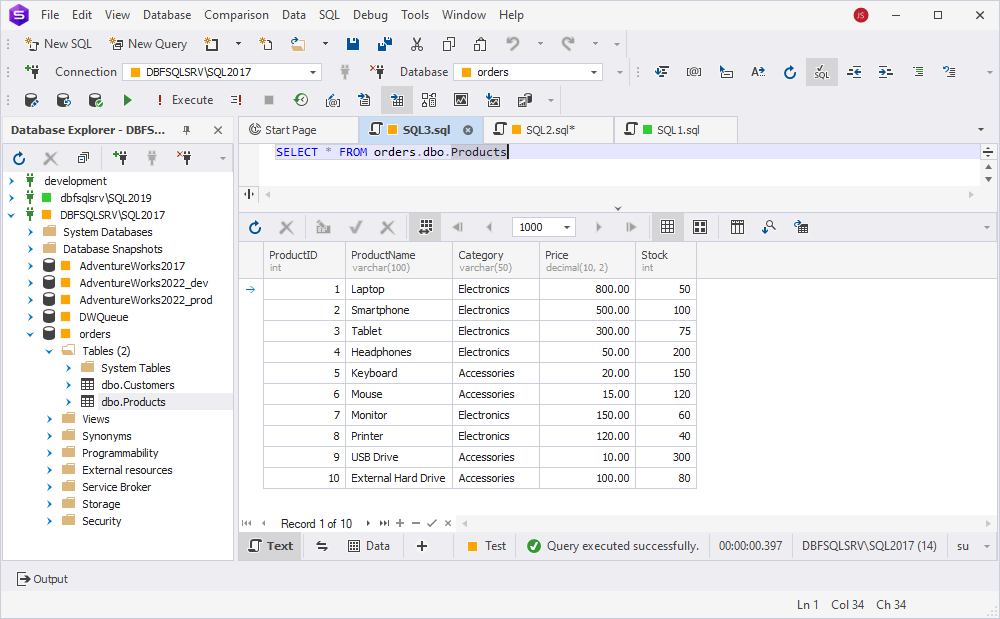
To validate that the data has been copied to the dbo.Products table of the orders database on the SQL Server 2017 instance, run the SELECT query.
As you can see, the table now contains the data transferred from the orders database on the SQL 2019 server instance.
Using the Generate Schema Scripts Wizard in dbForge Studio
Unlike the previous method, which is suitable for transferring specific tables one by one, the Generate Scripts Wizard functionality allows for migrating a database structure and/or data in bulk. This method is ideal for copying a database and its data to a lower version of a SQL Server instance.
Benefits of using the Generate Scripts Wizard
- Generating compatible scripts for older versions, such as SQL Server 2017, even when created on higher versions, for example, SQL Server 2019
- Configuring which objects and data to include in the script
- Generating scripts for the database structure or both the structure and its data
Still, there might be the following limitations when working with the Generate Scripts Wizard:
- Generating and executing scripts for large databases can take significant time.
- Extensive databases may cause high memory usage, especially if you create scripts for both schema and data. This may affect system performance and may lead to script generation interruptions.
- Reviewing and manually editing the generated script might be necessary to ensure compatibility with versions and make sure that the elements of the script will work as expected. For example, the path to the database files is correct, etc.
Now, it is time to learn how to generate scripts for schema and data using the Generate Scripts Wizard available in dbForge Studio for SQL Server. We’ll use the orders database.
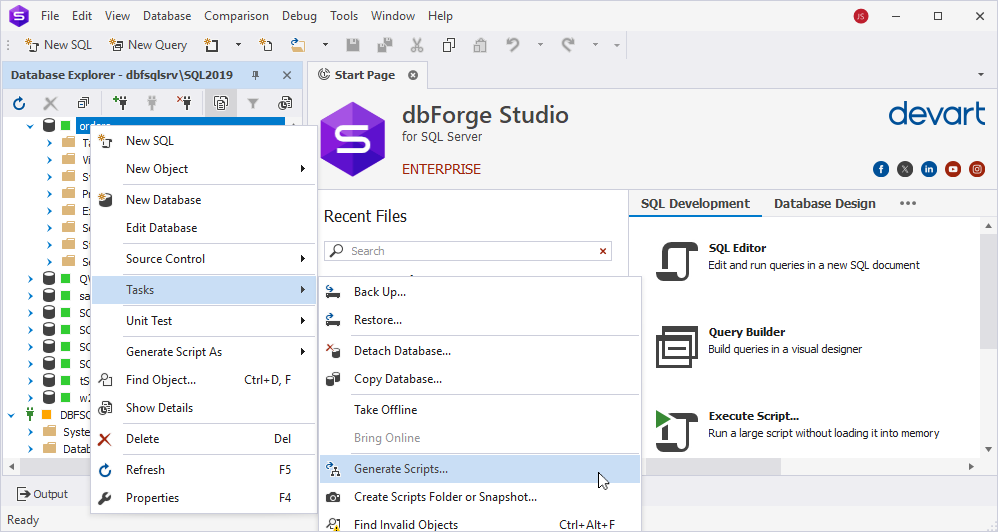
To open the wizard, in Database Explorer, right-click the database whose structure and data you want to copy and select Tasks > Generate Scripts.
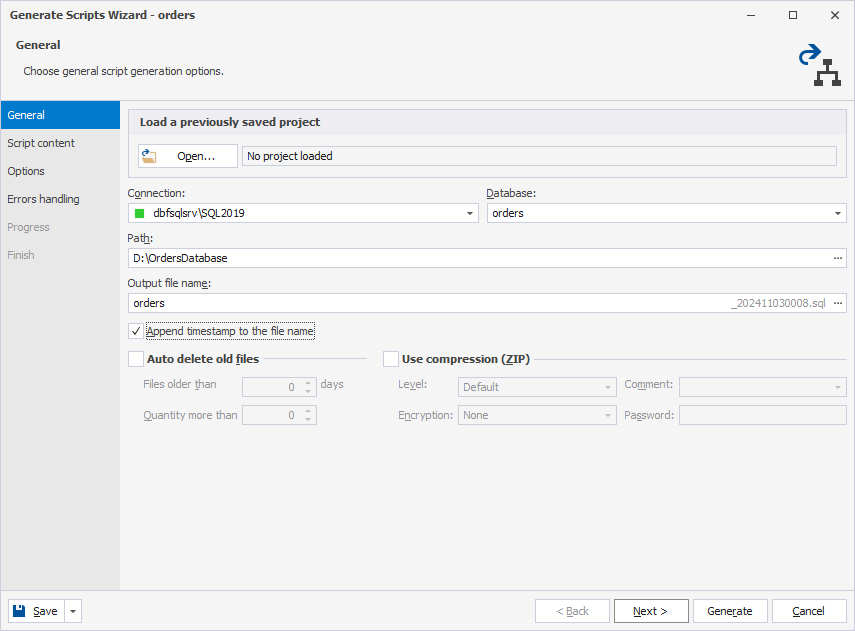
On the General page of the wizard, specify the output file name and choose where to save the script as a .sql file. Then, select Next.
On the Script content page, all database objects and their data are selected by default. If you want to exclude some objects from data migration, clear the corresponding checkboxes. Here you can also customize the default way the script creation should be performed by selecting the necessary options on the Options page. You can handle error processing and logging options on the Errors handling page if required.
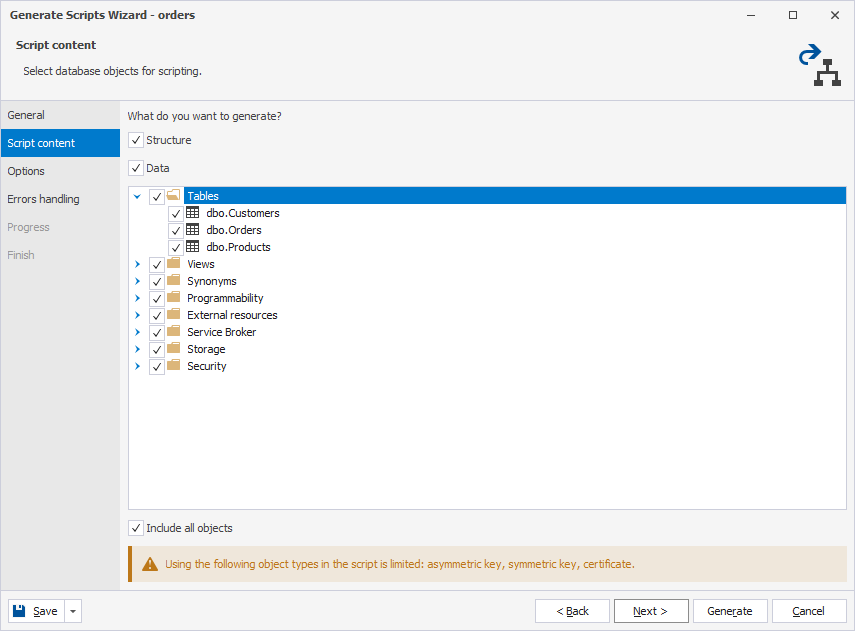
To proceed, select Generate to create the script, which will contain all commands needed to recreate the schema and insert data on another SQL Server instance.
After the ‘Script generation is completed‘ message appears, select Finish to close the wizard.
Now, you can execute the script on the SQL Server 2017 to which you want to copy the database objects with their data.
To do this, connect to the SQL Server 2017 instance and create an empty database with the same name. Then, on the ribbon, select File > Open File. In the window that opens, choose the .sql file with the required database and select Open to open the script.
On the standard toolbar, select Execute. If the script is successful, the corresponding execution status will be displayed at the bottom status bar, and the objects will appear in Database Explorer.
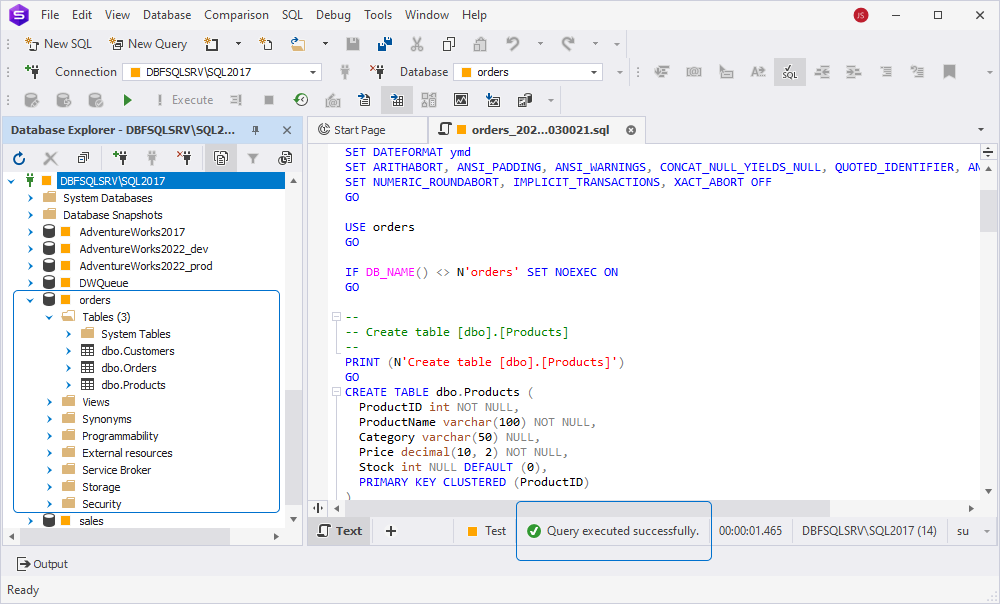
Let’s run the SELECT query to validate the data has been copied.
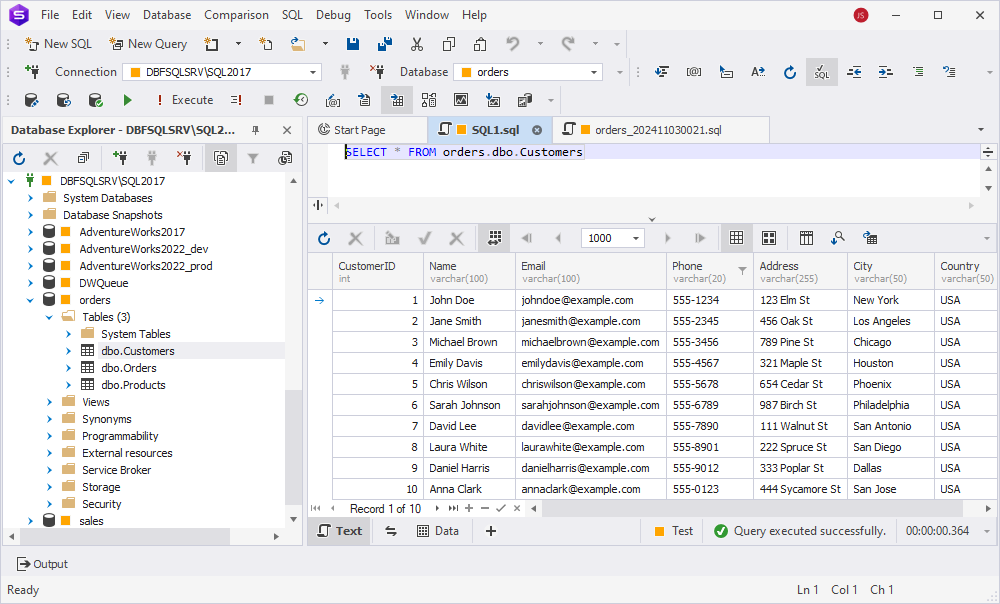
That’s it! The Generate Scripts Wizard turned out to be a practical and user-friendly tool for migrating database schema and data with high precision and flexibility, especially for tasks requiring compatibility with older SQL Server versions.
Exporting data using SQL Server Management Studio (SSMS)
The last but not least practical solution when a direct restore of a SQL Server 2019 backup on a SQL Server 2017 instance is impossible is using an SSMS add-in – dbForge Data Pump. It can help migrate only the data by exporting it from the SQL Server 2019 instance and then importing it into the SQL Server 2017.
Data Pump helps you easily migrate data in popular data formats, including HTML, TXT, XLS, XLSX, CSV, XML, RTF, PDF, JSON, MDB, DBF, ODBC, SQL, and Google Sheets. It offers a user-friendly interface for mapping columns during import, which ensures compatibility with the target database. Moreover, the tool allows for batch processing and automated data movement, which saves time and minimizes human error.
Still, it has some limitations that might make the data import/export process challenging:
- dbForge Data Pump focuses only on data migration, not schema migration. So, if you also need to transfer a database schema, you can use dbForge Schema Compare instead.
- With complex database structures, manual mapping of data fields may be required to ensure correct data alignment.
- Data Pump can import data into one table. So, if you have multiple tables to migrate, this method is not suitable, and it’d be better to use dbForge Schema Compare instead.
You can download dbForge Data Pump as part of the dbForge SQL Tools pack from the Devart website and then install it on your computer.
Finally, let us demonstrate how to migrate data from the SQL Server 2019 instance to SQL Server 2017. The workflow will include two steps:
- Exporting the data from the SQL Server 2019
- Importing it into the SQL Server 2017
For this method, we need to prepare the environment for data migration on the target SQL Server 2017 instance.
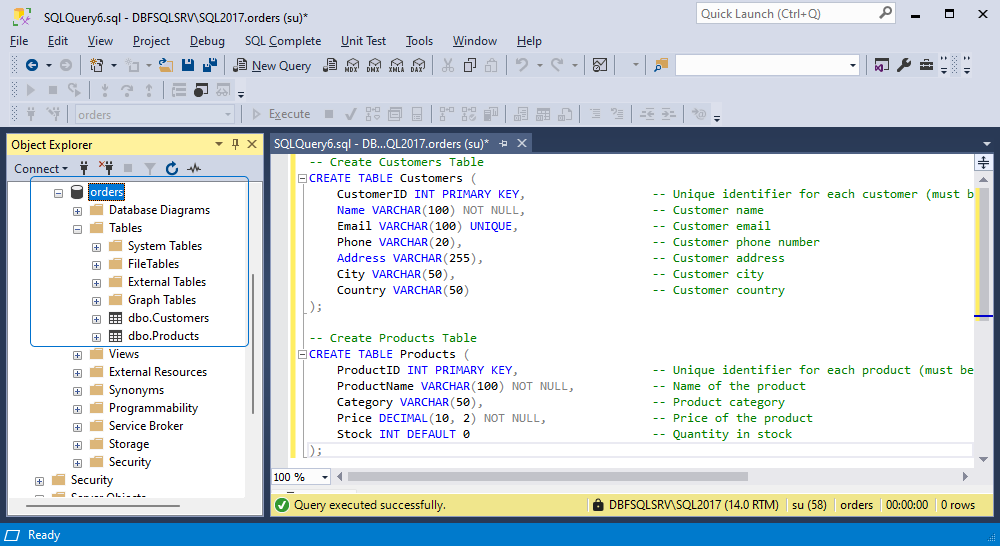
As a prerequisite, we create a sample database – orders – and tables – Customers and Products -on the SQL Server 2017 instance.
-- Create Customers Table
CREATE TABLE Customers (
    CustomerID INT PRIMARY KEY,
    Name VARCHAR(100) NOT NULL,
    Email VARCHAR(100) UNIQUE,
    Phone VARCHAR(20),
    Address VARCHAR(255),
    City VARCHAR(50),
    Country VARCHAR(50)
);

-- Create Products Table
CREATE TABLE Products (
    ProductID INT PRIMARY KEY,
    ProductName VARCHAR(100) NOT NULL,
    Category VARCHAR(50),
    Price DECIMAL(10, 2) NOT NULL,
    Stock INT DEFAULT 0
);
Exporting the data from the SQL Server 2019
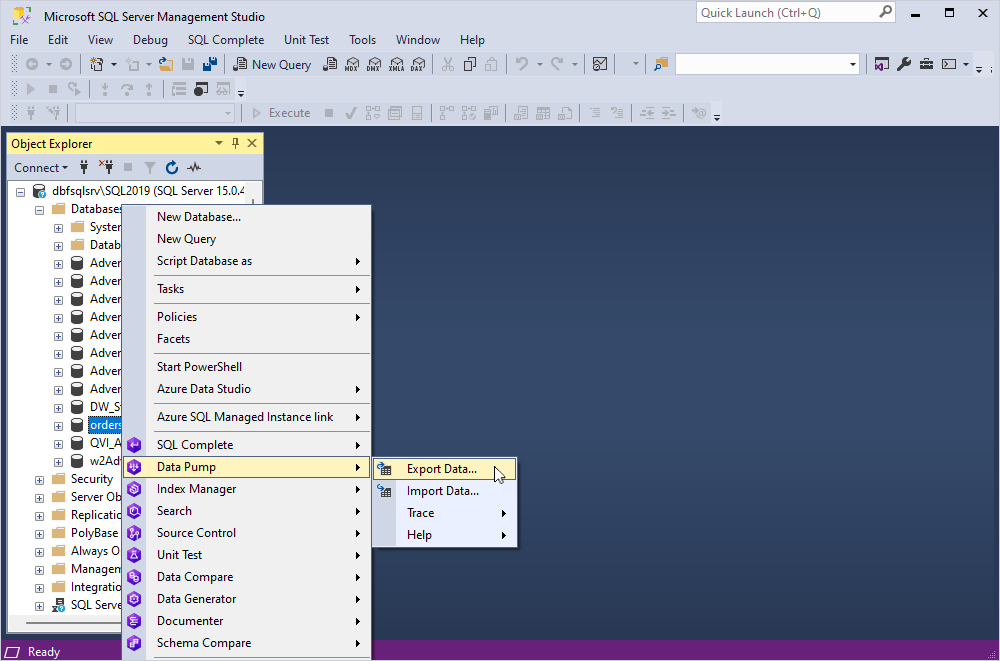
In Object Explorer, navigate to the SQL Server 2019 instance. Then, right-click the orders database and select Data Pump > Export Data to open the Data Export wizard.
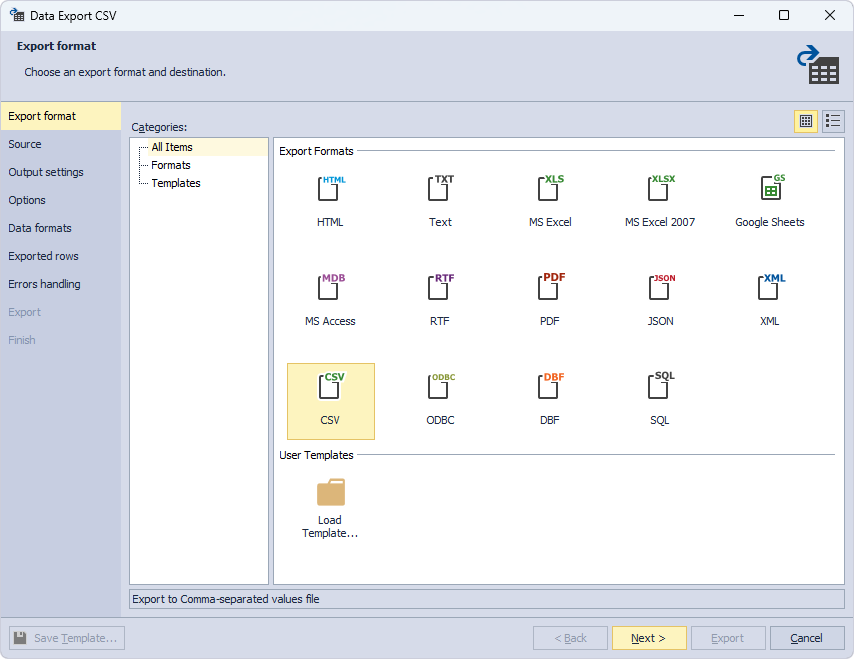
On the Export format page of the wizard, select the CSV format and then select Next.
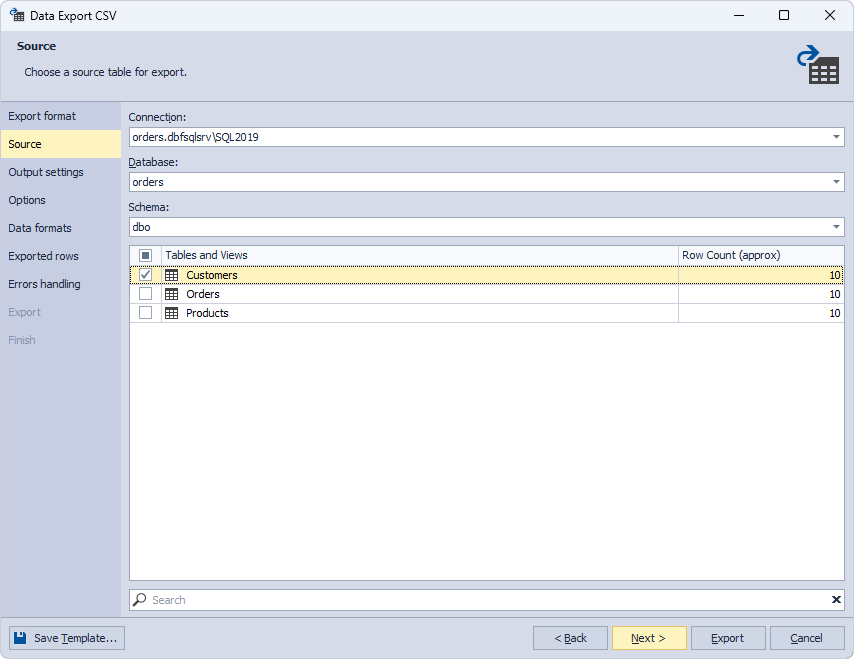
On the Source page, the connection and database are selected by default because the wizard has been invoked when right-clicking the database in Object Explorer. To proceed, select the schema and tables you want to populate and then select Next.
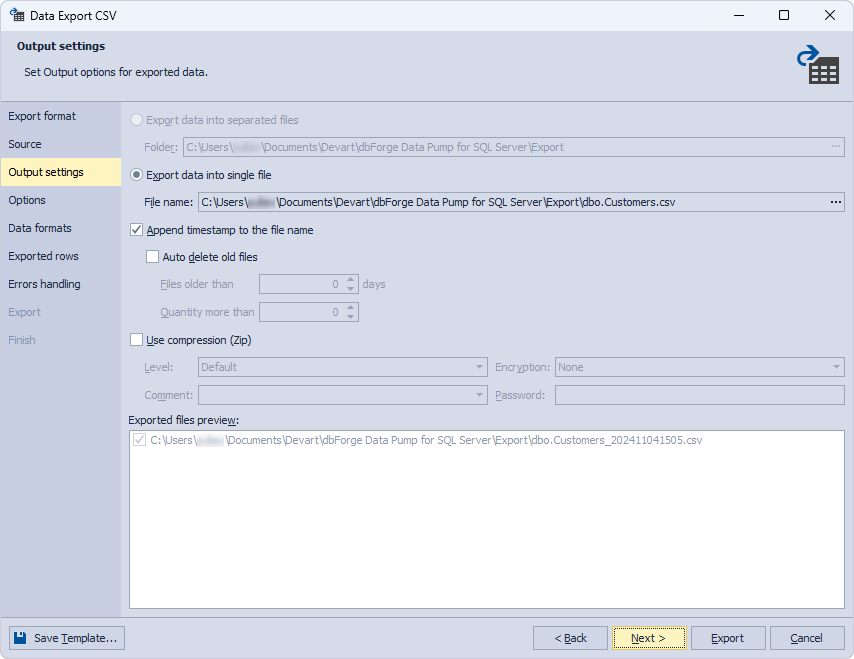
On the Output settings page, select the output option for exported data. It can be exported as separated files or as a single file. The default folder to store the files is C:\Users\Username\Documents\Devart\dbForge Data Pump for SQL Server\Export. If you want to save the files to a different folder, specify the required path.
You can export data from multiple tables. However, if you plan to import the data later using the Data Import functionality of dbForge Data Pump, it is recommended to create a separate export file for each table.
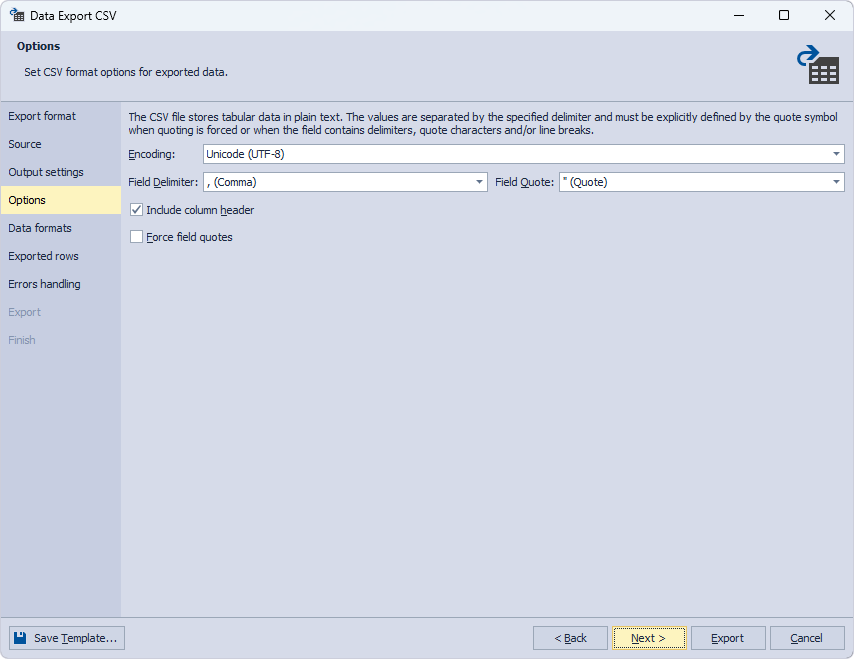
On the Options page, select CSV format options for exported data.
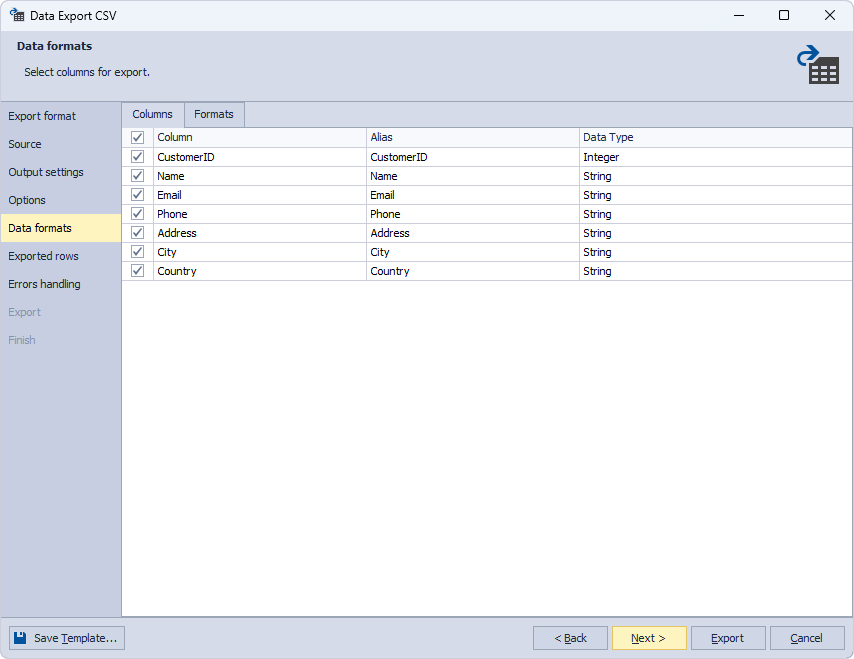
On the Data formats page, the tool automatically selects all columns for export. To proceed, select Next.
On the Exported rows page, choose whether you want to export all rows, only specific ones, or a range of the exported rows. Select Next.

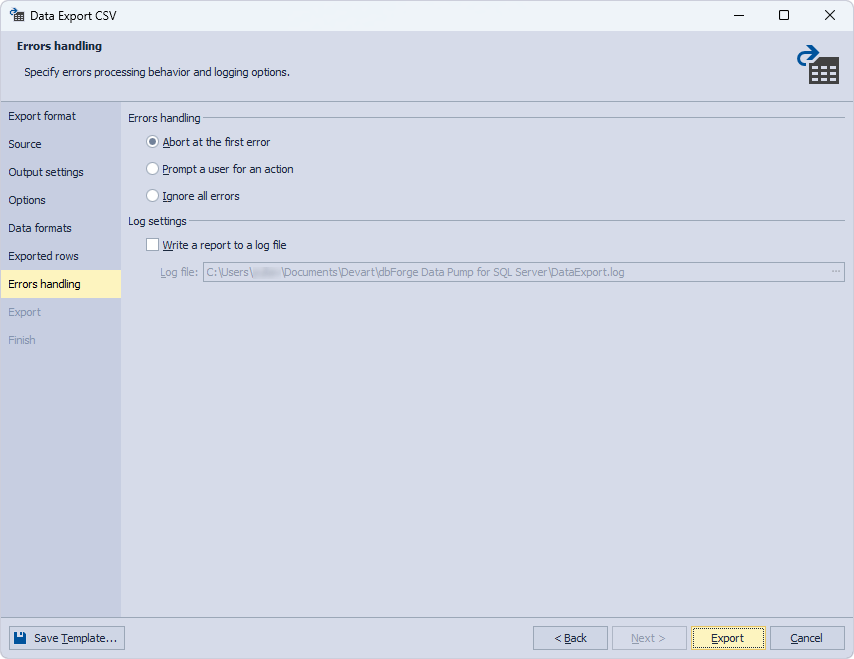
On the Errors handling page, specify errors processing behavior and logging options. Finally, select Export to run the export process.
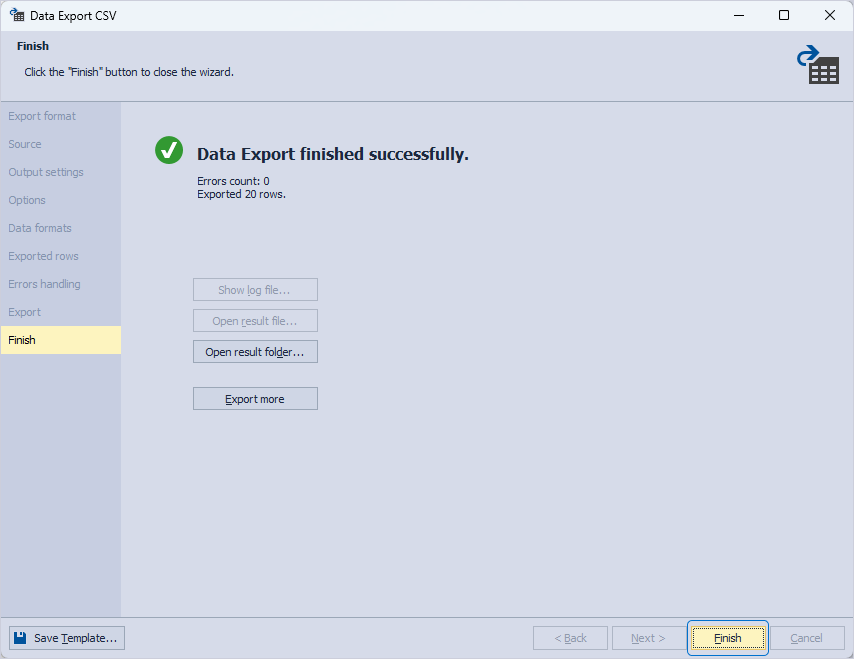
That’s it! Data export is complete, select Finish to close the wizard.
Importing it into SQL Server 2017
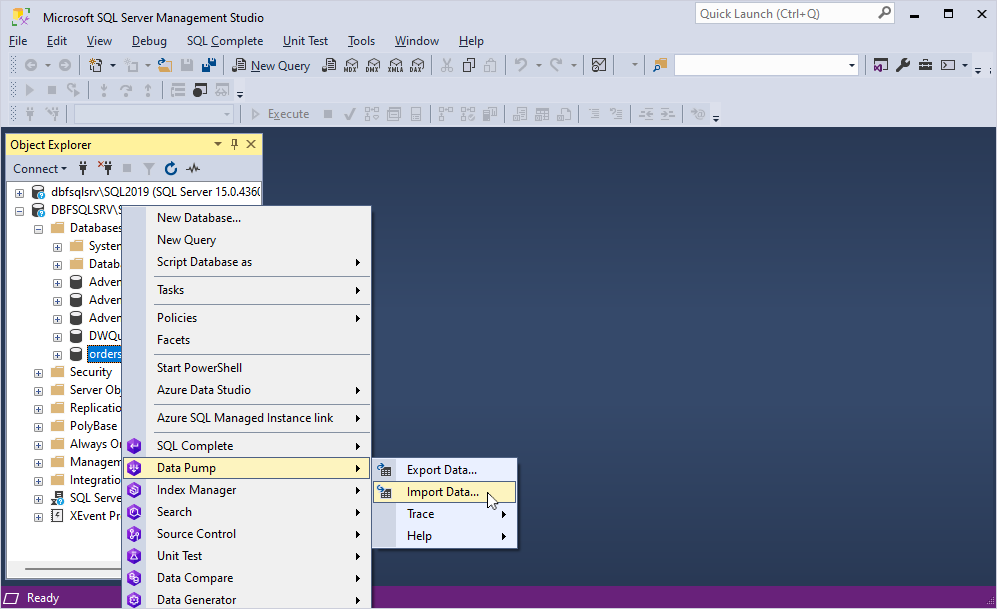
Now, select the SQL Server 2017 connection in Object Explorer. Then, in Object Explorer, right-click the orders database and select Data Pump > Import Data to open the Data Import wizard.
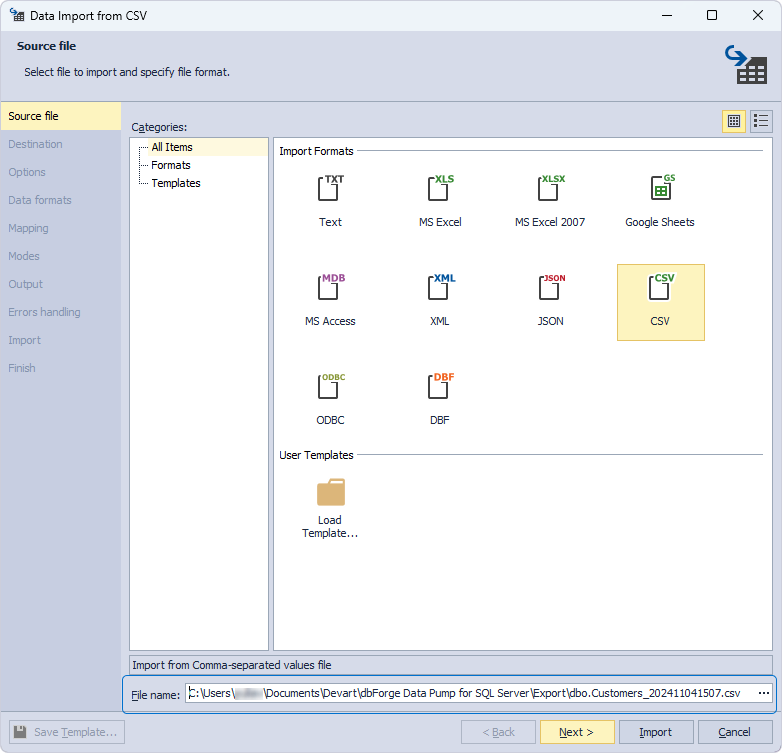
On the Source file page of the wizard, specify the path to the exported file in the File name field and select Next.
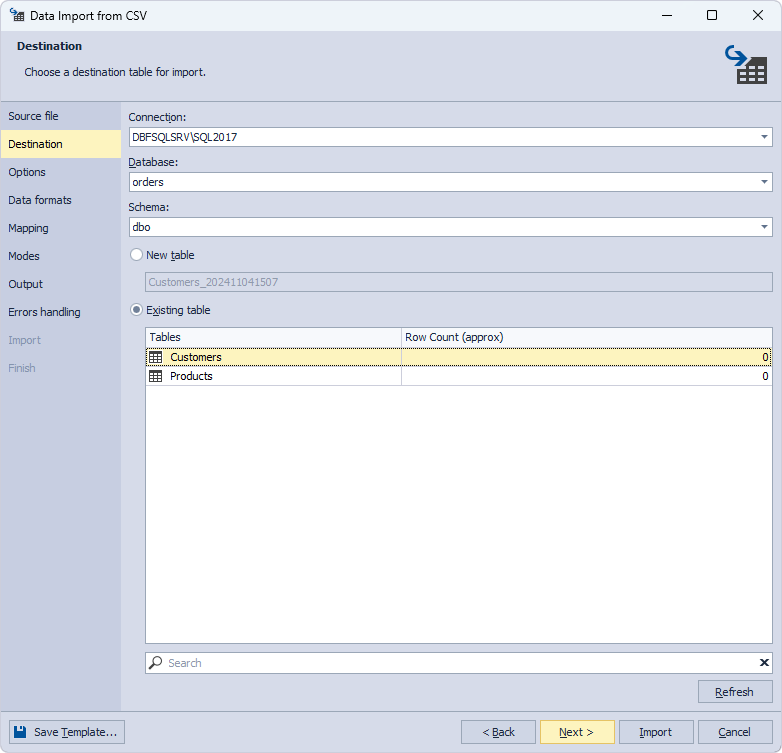
On the Destination page, the connection and database are selected by default. To proceed, select the schema and existing tables for data import.
You can select only one table for data import.
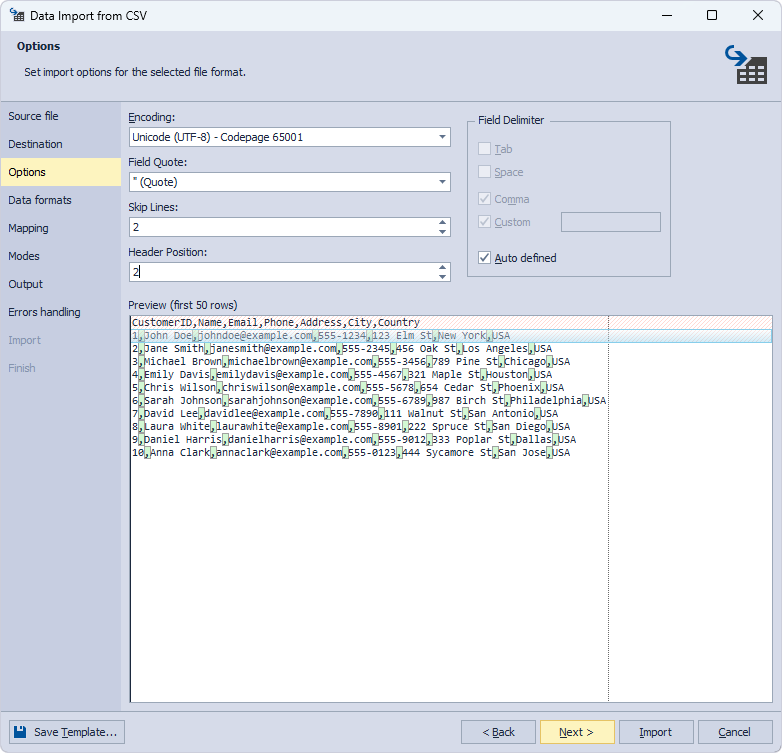
On the Options page, set import options for the selected file format and select Next.
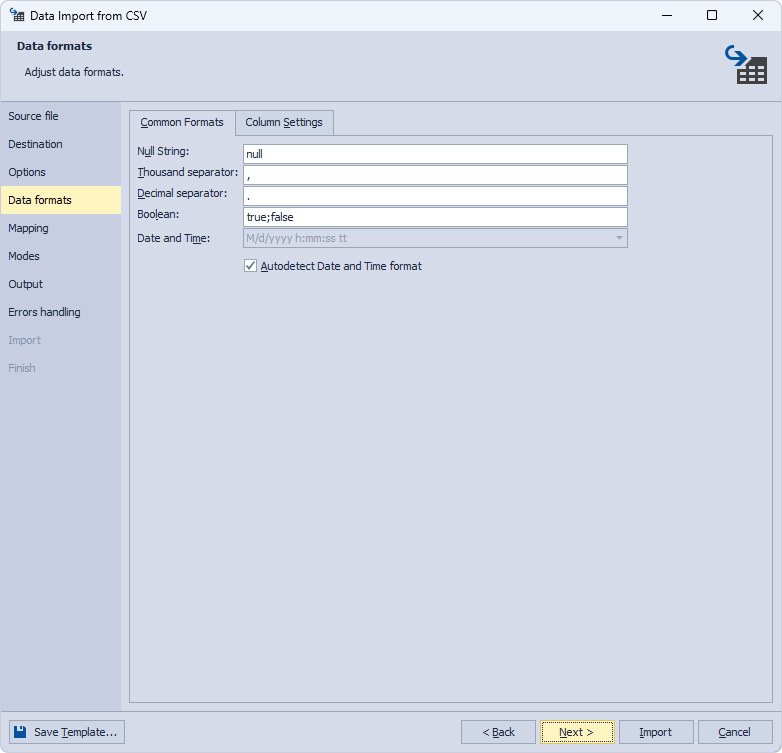
On the Data formats page, adjust data formats if required and select Next.
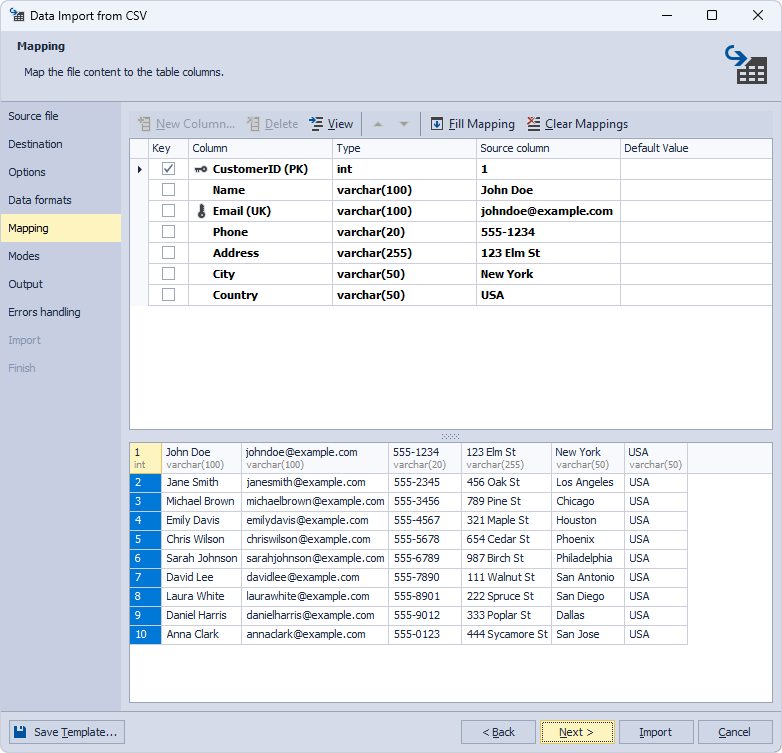
On the Mapping page, the tool automatically maps all the columns.
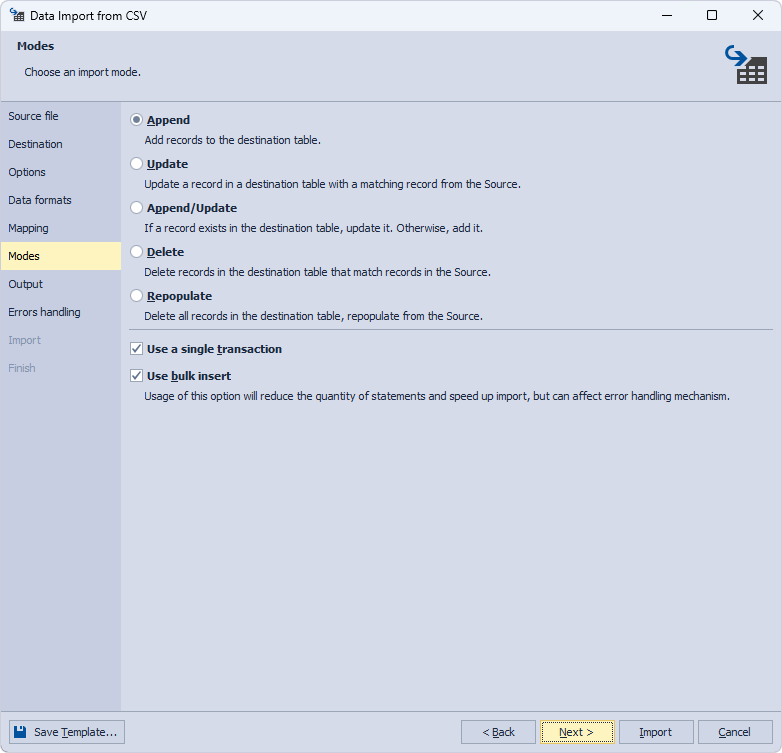
On the Modes page, choose an import mode and select Next. If you import data into an existing table, all the import modes will be available. If you transferred data to a new table, you could select only the Append mode.
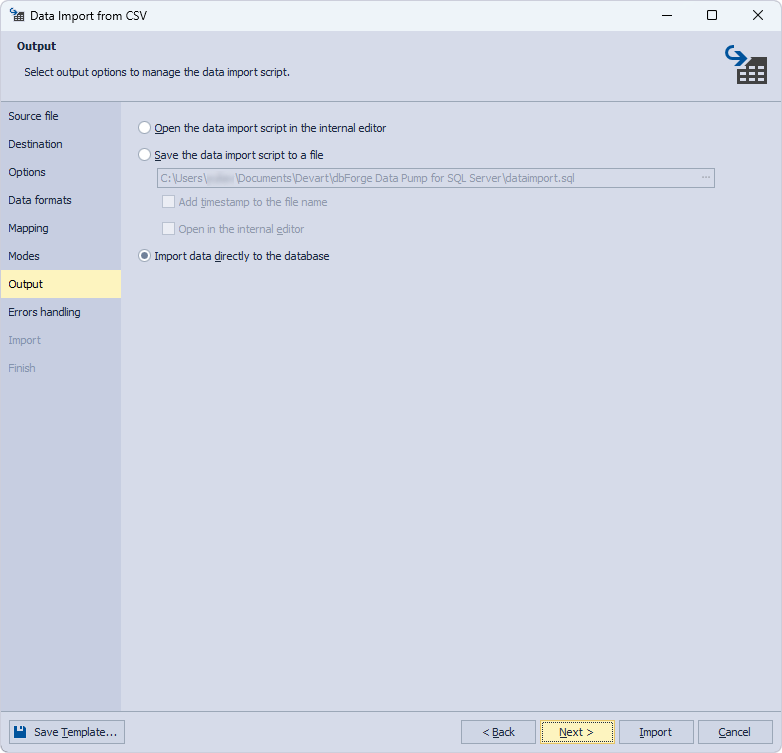
On the Output page, select the Import data directly to the database option and select Import.
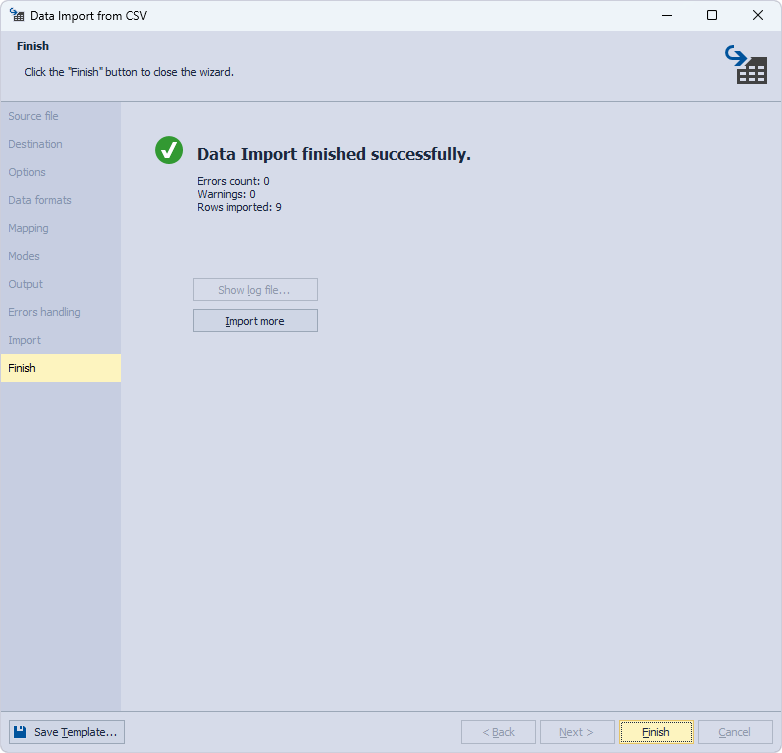
If data import is successfully complete, the corresponding message will be displayed. Select Finish to close the wizard.
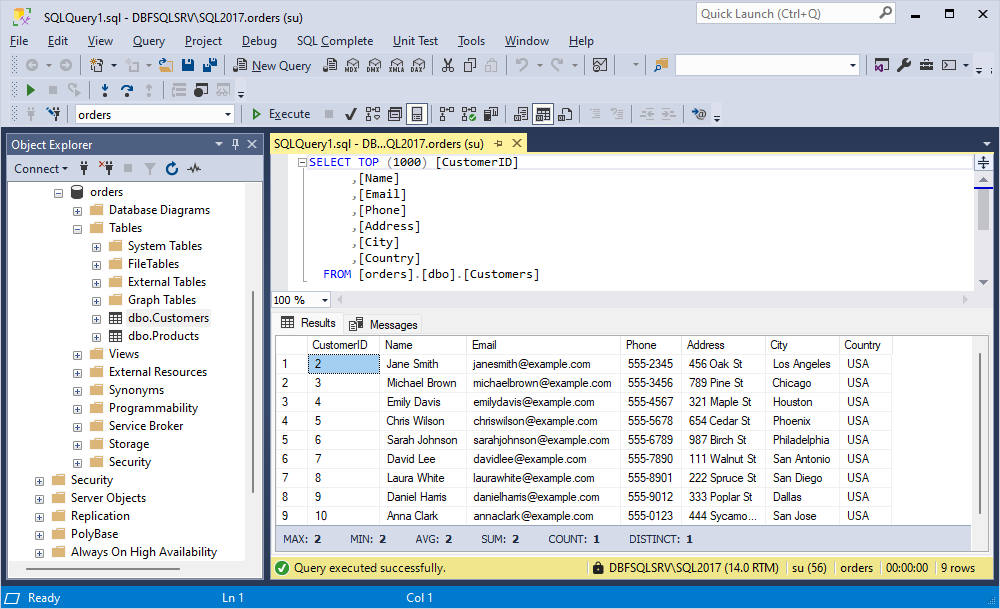
When we retrieve the data from the Customers table, we’ll see that the data has been copied to the table from the orders database to the SQL Server 2017 instance.
Why some downgrade methods may not be possible
Downgrading from a newer SQL Server version to an older one may complicate the process for the following reasons:
- Newer SQL Server versions often introduce features, metadata structures, and data types that can be incompatible with older versions.
- Objects or data that rely on the features unsupported in older versions will raise errors if the database is restored to the older instance. For example, SQL Server 2019 has new functionality, such as UTF-8 encoding support, which is not present in SQL Server 2017.
- Differences in metadata structures and data types can cause compatibility issues. For example, a data type added in SQL Server 2019 may not exist in SQL Server 2017, which will lead to incompatibility if scripts or data rely on these new types.
- System tables or procedures introduced in SQL Server 2019 may be unavailable in SQL Server 2017. Trying to reference these elements in a downgraded environment can result in errors.
- SQL Server 2019 also supports advanced security options, such as ‘Always Encrypted with Secure Enclaves’ and more advanced authentication methods. These options are incompatible with SQL Server 2017, creating obstacles if your database leverages them.
Common pitfalls and how to avoid them
We have considered some issues that might impact the downgrade process. Let us now review some common pitfalls to watch for and tips to troubleshoot and resolve issues.
- Unsupported features and data types: Identify unsupported features before the downgrade by using the schema comparison tools, such as dbForge Schema Compare. Modify or exclude incompatible elements, using alternative types or structures when necessary.
- Metadata and compatibility differences: Use a compatibility level check to identify incompatibilities and generate a schema script with only essential metadata. This approach allows you to replicate a compatible schema on the older version while avoiding problematic features.
- Data integrity and relationship constraints: Before data migration, thoroughly review and document relationships, constraints, and triggers. Use tools like dbForge Data Compare to verify data integrity before and after migration, ensuring that primary and foreign keys remain intact.
- Unexpected behavior of stored procedures, functions, and views after a downgrade: Manually review and adapt these elements to remove unsupported syntax. The Generate Scripts Wizard can also help isolate and recreate stored procedures compatible with the older version.
- Potential data loss during migration: Back up the database and validate the downgraded data using row counts, checksums, or hash values on critical tables. Performing a downgrade on a testing environment first can help ensure data accuracy.
Finally, try to follow these recommendations to guarantee a smoother downgrade process:
- Always test the downgrade process on a separate environment to identify issues before moving to production.
- Consider using dbForge Schema Compare and Data Compare to quickly identify and resolve schema and data inconsistencies.
- Document each step and modification made during the downgrade to maintain an audit trail and for potential future reference.
Conclusion
In the article, we have discussed several ways to migrate a database structure and its data from a higher version of SQL Server to a lower one. So, when a direct restore of the database is not possible, you can easily work around using the ultimate dbForge SQL tools, such as dbForge Schema and Data Compare, dbForge Studio for SQL Server, or Data Pump, an SSMS add-in. They will help you achieve your goal and boost your productivity and improve user experience while performing these tasks.
Each tool offers a full-featured 30-day free trial for you to explore. Go ahead and see all their advanced tools in action!

