Since version 4.0 LinqConnect can be used for writing Windows Metro applications. In this article we will show how to use LinqConnect for working with data, bind data to user interface elements, group data, etc. We will also discuss some other aspects, that are necessary to know for quick integration of LinqConnect into your applications. You can download the sources of the sample application using the link at the end of this article.
Creating the Project and Adding References
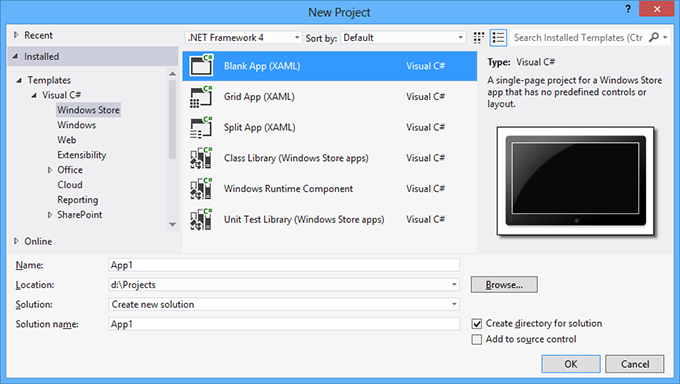
Let’s start with the creating project in Visual Studio. On the File menu, point to New, and then click Project…. In the New Project dialog box, select Visual C# > Windows Store, then select Blank App (XAML) in the list to the left, and click OK.
After this we need to add references to the LinqConnect assemblies. For this, right-click the project in Solution Explorer and select Add Reference… in the shortcut menu. In the displayed dialog box, select Windows > Extensions. In the list on the right select the Devart LinqConnect for Metro check box and click OK.
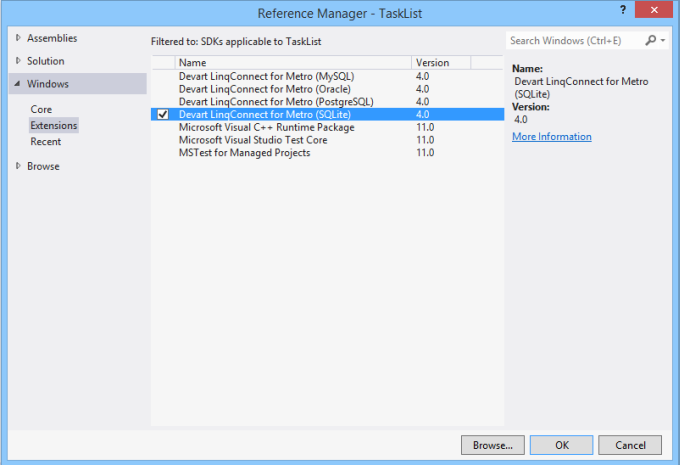
After this, the Devart LinqConnect for Metro node will appear in the References node. If you compile the application now, four LinqConnect assemblies will be placed to the binDebug folder: Devart.Data.dll, Devart.Data.SQLite.dll, Devart.Data.Linq.dll, Devart.Data.SQLite.Linq.dll. These four assemblies are the Extension SDK, named Devart LinqConnect for Metro.
Model Creation
Now let’s create a model using the Model First approach. Right-click the project in the Solution Explorer and select New Item from the Add submenu of the shortcut menu. In the displayed Add New Item dialog box, select Devart LinqConnect Model as shown on the following illustration.
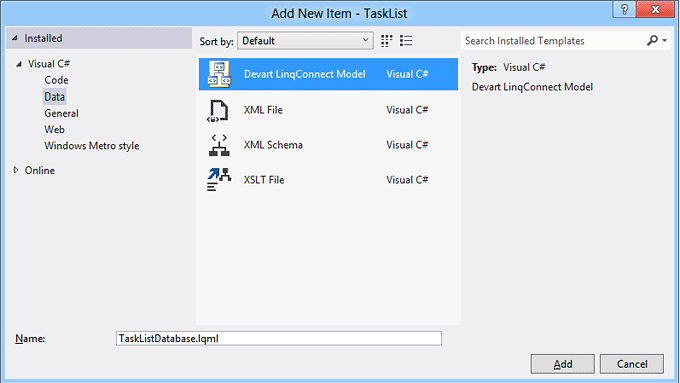
After clicking Add, the Entity Developer Create Model Wizard will be displayed. It helps to create and tweak a new empty model. Choose Model First on the first wizard page, and choose SQLite as the Target Server on the Model Synchronization Settings page. On the Model properties page you can specify the name of the namespace and the DataContext class of your model. We have used TaskListDatabase as the DataContext class name.
After creating the empty model, let’s use the designer to add the TaskListItem class with the following properties: ID, Category, Name, and Description. The result is shown below:
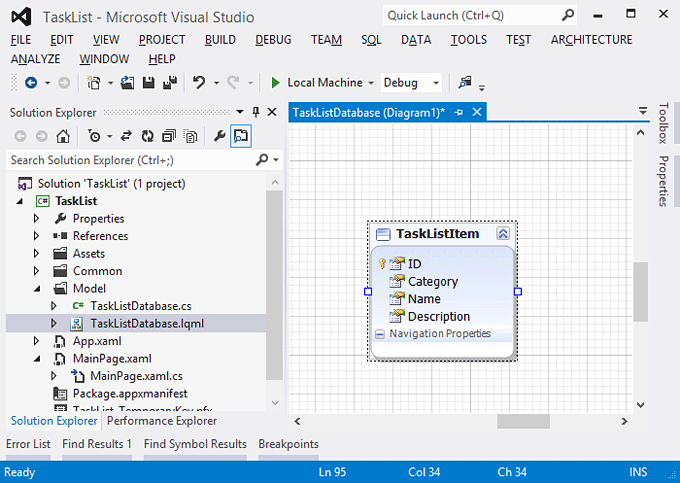
After saving the model, the C# code for the TaskListDatabase context and the TaskListItem entity will be generated automatically. Additionally we have manually created the TaskListDatabase.cs file (on the screenshot above). This file will contain the DataContext methods for creating database.
Database Deployment and Connection String Format
After we have prepared the model, it is necessary to implement the deployment of the database when running our application for the first time. Since we have used the Model First approach, the only option we have is to use the DatabaseExists and CreateDatabase methods of the DataContext class. The implementation may be the following:
    public static async void DeployDatabase() {

      try {
        using (TaskListDatabase db = new TaskListDatabase(
            "Data Source=ms-appdata:///local/TaskList.db"
        )) {

          if (!db.DatabaseExists())
            await db.CreateDatabaseAsync(false, true);
        }
      }
      catch (Exception ex) {
        // .. process exception, show error message, etc.
      }
    }
If we used the Database First approach and generated the model from an existing database, we could deploy the database file by simply copying it. For this we should have added the database file to the project and set the Build Action for it to Content. In such case the code would look like the following:
      private async void DeployDatabase() {

        try {
          StorageFile file = await StorageFile.GetFileFromPathAsync(
              Path.Combine(Package.Current.InstalledLocation.Path,
              "TaskList.db")
          );
          await file.CopyAsync(
              ApplicationData.Current.LocalFolder,
              "TaskList.db",
              NameCollisionOption.FailIfExists
          );
        }
        catch (Exception ex) {
          // process error...
        }
      }
You could notice that we used the methods with the Async suffix in the first DeployDatabase example. Since asynchronous execution is a key part in Metro application development, we have added this feature to LinqConnect for Metro. The DataContext class has the CreateDatabaseAsync, DeleteDatabaseAsync, and SubmitChangesAsync methods. All of them can be used with the await and async keywords, introduced in С# 5.0. We have also extended the Queryable class with the new extension methods, for example, ToListAsync, CountAsync, SumAsync, etc.
Both above samples deploy database to the LocalFolder (ApplicationData.Current.LocalFolder). Metro applications have very restricted access to the file system. We have extended the possible ways to specify the path to the database file in LinqConnect for Metro. They are the following:
- ms-appdata:///local/path_to_database – determines the path to the file in LocalFolder (for example, ms-appdata:///local/TaskList.db)
- ms-appdata:///roaming/path_to_database – determines the path to the file in RoamingFolder (for example, ms-appdata:///roaming/Data/TaskList.db)
- ms-appdata:///temp/path_to_database – determines the path to the file in TemporaryFolder (for example, ms-appdata:///temp/Temp.db)
- ms-appx:///path_to_database – determines the path to the file in the folder, where the application is installed.
- relative_path_to_database — determines the path to the file, relative to LocalFolder (for example, Database/TaskList.db)
- full_path_to_database – full path to the database file. It is used as-is.
In the following examples we will show how to create two different connection strings, actually specifying the same database file.
- With ms-appdata:///local:
public static string GetConnectionString(string dbName) { string msAppDataPath = "ms-appdata:///local/" + dbName; return string.Format("Data Source={0}", msAppDataPath); } - With the full path:
    public static string GetConnectionString(string dbName) {

      string fullPath = Path.Combine(
          ApplicationData.Current.LocalFolder.Path, dbName);
      return string.Format("Data Source={0}", fullPath);
    }
Binding and Displaying Data
We will use GridView for displaying data. Let’s write the code for reading all TaskListItems from the database and assigning the results to the GridView.ItemsSource property.
    private async void BeginLoadItems() {

      try {
        using (TaskListDatabase db = TaskListDatabase.Create()) {

          var query = from item in db.Items
                      select item;

          ItemGridView.ItemsSource = await query.ToListAsync();
        }
      }
      catch (Exception ex) {
        ShowMessage(ex.Message);
      }
    }
Then we declare GridView in XAML.
            <GridView Margin="20"
                      Visibility="Collapsed"
                      Grid.Row="1"
                      Name="ItemGridView"
                      ItemTemplate="{StaticResource ItemGridViewItemTemplate}"
                      ItemsPanel="{StaticResource ItemGridViewItemsPanelTemplate}"
                      ItemContainerStyle="{StaticResource ItemGridItemContainerStyle}">
            </GridView>
ItemTemplate looks like the following:
            <DataTemplate x:Key="ItemGridViewItemTemplate">
                <Grid HorizontalAlignment="Left" Background="White">
                    <StackPanel Orientation="Vertical">
                        <TextBlock Text="{Binding Name}" FontWeight="Bold" />
                        <TextBlock Text="{Binding Description}" />
                    </StackPanel>
                </Grid>
            </DataTemplate>
Data binding is performed in the two TextBlocks in the DataTemplate. These TextBlocks are bound to the Name and Description properties of the TaskListItem class. The result is shown below.

To display the grouped data you need to use the following code:
    private async void BeginLoadGrouppedItems() {

      try {
        using (TaskListDatabase db = TaskListDatabase.Create()) {

          var query = from item in db.Items
                      group item by item.Category into g
                      select g;

          GrouppedItems.Source = await query.ToListAsync();
        }
      }
      catch (Exception ex) {
        ShowMessage(ex.Message);
      }
    }
XAML for the GridView with grouped data is the following:
            <GridView Margin="20"
                      Grid.Row="1"
                      Name="GrouppedItemGridView"
                      ItemsSource="{Binding Source={StaticResource GrouppedItems}}"
                      ItemTemplate="{StaticResource ItemGridViewItemTemplate}"
                      ItemsPanel="{StaticResource ItemGridViewItemsPanelTemplate}"
                      ItemContainerStyle="{StaticResource ItemGridItemContainerStyle}">
                <GridView.GroupStyle>
                    <GroupStyle>
                        <GroupStyle.HeaderTemplate>
                            <DataTemplate>
                                <Grid Background="White" Margin="0">
                                    <TextBlock Text="{Binding Key}" Foreground="Blue"
                                         FontSize="25" Margin="5" />
                                </Grid>
                            </DataTemplate>
                        </GroupStyle.HeaderTemplate>
                        <GroupStyle.Panel>
                            <ItemsPanelTemplate>
                                <VariableSizedWrapGrid Orientation="Vertical" />
                            </ItemsPanelTemplate>
                        </GroupStyle.Panel>
                    </GroupStyle>
                </GridView.GroupStyle>
            </GridView>
ItemTemplate is not changed, however we use CollectionViewSource as an ItemsSource. It can be declared in the page resources in the following way.
    <Page.Resources>
        <CollectionViewSource x:Name="GrouppedItems" IsSourceGrouped="True" />
    </Page.Resources>
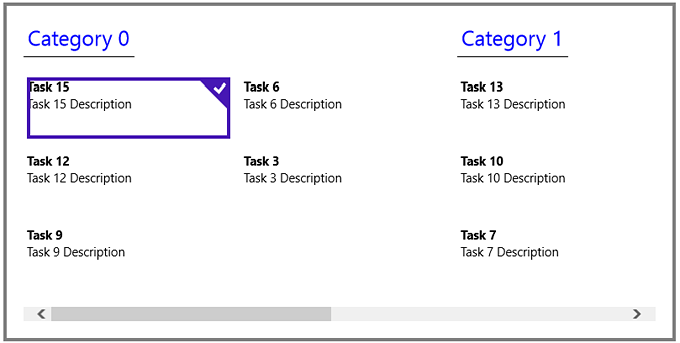
We should also note that we assign the collection not to the GridView.ItemsSource property, but to the CollectionViewSource.Source property. The result of displaying the grouped data is shown below.
You can download TaskList solution here.
