Business benefits from faster releases. End-users get updates immediately, their applications and systems work seamlessly, and both the software manufacturers and customers are happy. Thus the idea is to make software development and releases faster and safer. There are lots of tools to automate processes, accelerate performances, and eliminate the risks of errors.
There are application release automation solutions, but they are not enough. Those tools work with the application code. However, the databases (the base for those applications) behave differently. Moreover, issues that originate from databases are usually much more complicated. Should they get into the release, the problems will start to arise. Enterprises can not afford to miss the database challenges.
This way, we come down to the Database Continuous Integration concept. According to this concept, every time developers add changes to the database, a new build is created and tested. The specialists get the necessary feedback immediately and thus do not allow bugs to accumulate. The more they can build and test, the fewer issues appear on production.
To ensure all that, we need tools to test, package, and deploy database changes.
Automatic Database Releases with TeamCity and dbForge
Before the database version comes into Production, the process passes through several stages or steps:
- The Development step presupposes making changes to the database schema.
- The Version Control step involves committing changes to the version control system (Git, SVN, etc.). You need to configure your workflow to run for one or more events that will trigger build creation.
- The Build phase entails creating a database from scripts on the SQL server. When this phase is over, you get a new database.
- The Unit Test stage involves testing the created database with SQL unit tests. It is crucial to launch unit tests because thus you make sure that the changes won’t affect the required functionality.
- The Publish Database phase completes the CI process. The changes get into an artifact (NuGet package). The NuGet package then gets put into a dedicated folder or published in the NuGet repository.
In our case, these phases take place on the TeamCity server. TeamCity is a Continuous Integration server that is popular among developers mainly due to the fact that it allows the most flexibility for all sorts of workflows and development practices.
The continuous integration (CI) server deals with the development processes. It analyzes the source code and changes in it, manages builds, and performs other tasks to ensure that the CI phases are performed correctly. As a result, the process becomes faster, smoother, and all team members interact more effectively.
TeamCity Server is a powerful solution with robust functionality “out of the box.” It runs in a Java environment and is compatible with Apache Tomcat, Windows servers, and Linux servers.
When you use TeamCity to organize continuous integration processes, it covers the following stages:
- Tracking changes in the Version Control System (VCS) linked to the build.
- Detecting new changes, triggering the build, and adding it to the queue.
- Finding a free build agent to assign that build to.
- Running the build process according to the configuration steps.
- Producing the artifacts.
- Uploading the artifacts to the server.
- Generating a report for the operator.
As TeamCity is one of the most popular automation systems, Devart has developed an additional tool to make the processes of database release automation handier. The DevOps Automation for SQL Server solution includes the TeamCity support with a dedicated plugin for the users to create the database on the server, test it, deploy it, as well as document the database and all processes and changes.
Additionally, watch these videos to discover how dbForge products can boost database development.
- How dbForge SQL Complete is involved in the Database DevOps process
- How to import data to SQL Server database with dbForge Data Pump during the DevOps process
- Creating database documentation during the Continuous Integration workflow
- How to automate database schema changes for the CI process during database deployment
- dbForge Source Control in the DevOps pipeline
- Test data generation in the Continuous Integration and Deployment processes
- Unit Testing for SQL Server Database in DevOps process
Configure the process with the dbForge DevOps Automation for SQL Server Plug-in
Before you start to TeamCity CI, you need to install the dbForge tools on the machine where you will run a pipeline. If you are already using dbForge Studio for SQL Server, this multi-featured solution has all the necessary functionality. Or, you may choose the dbForge SQL Tools bundle.
It is also possible to install specific dbForge tools separately. For the DevOps tasks, you mostly need the following ones:
- dbForge Schema Compare for SQL Server.
- dbForge Data Generator for SQL Server.
- dbForge Unit Test for SQL Server.
Also, you will need the PowerShell module that comes with DevOps Automation for SQL Server.
Install the plugin
1. In TeamCity, click Administration.

2. On the left pane, under Server Administration, select Plugins List.
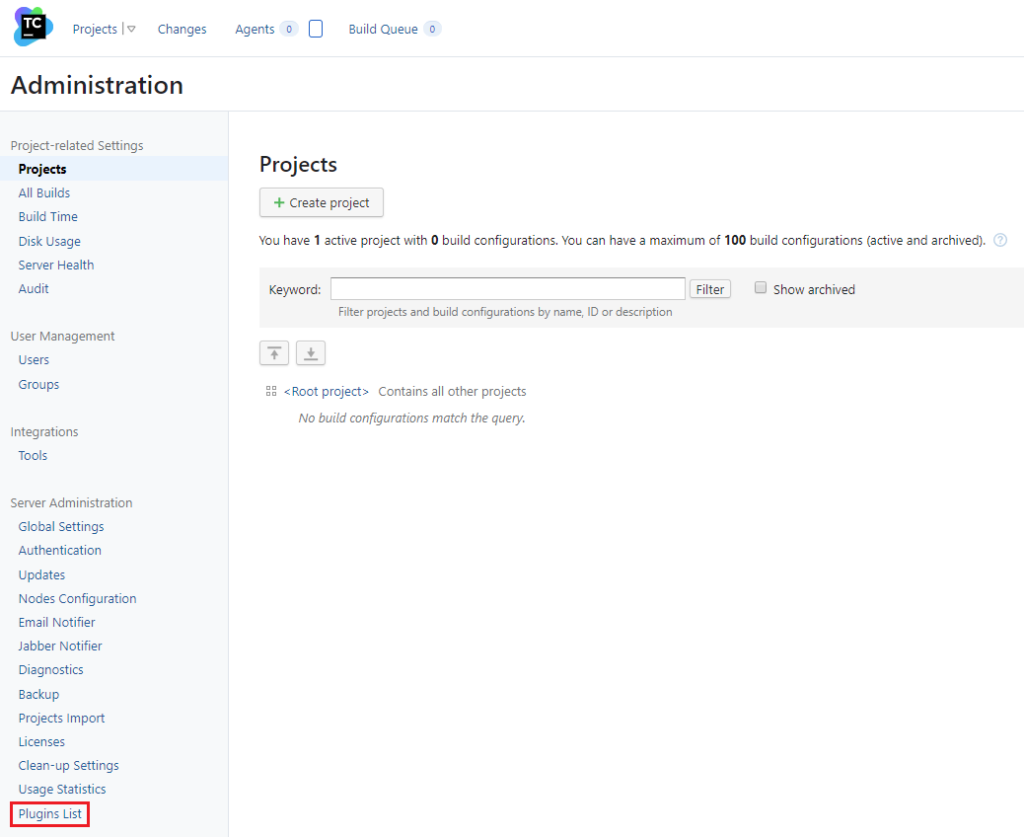
3. Click Browse plugins repository to install the plugin directly from the plugin repository.

4. In the JetBrains Plugins Repository, find the necessary plugin. To do this, type dbForge DevOps Automation for SQL Server in the search field, and the repository will transfer you to the necessary page.
Next, click Get to open the menu and select Install to.

This will install the demanded dbForge plugin on the TeamCity server.
Note: You can also install the plugin manually from a zip file. The plugin zip file can be downloaded at JetBrains Plugins Repository, or from the Devart website.
Create a New TeamCity Project
1. Navigate to the TeamCity server start page and click Create a project.

2. Configure the necessary VCS settings and click Proceed.
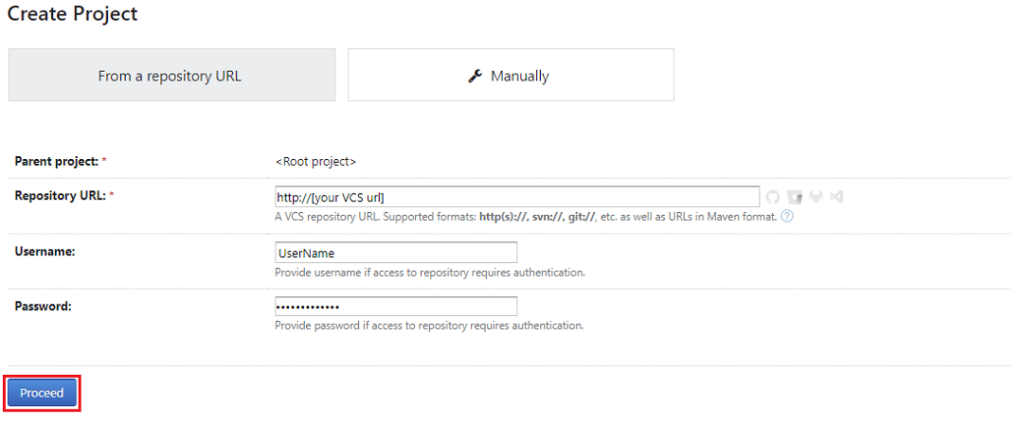
After checking the VCS settings, TeamCity will open a new window. There, you start to configure your project.
3. Specify the Project Name and the Build configuration name. Click Proceed.

4. A new page with the settings for the created project will appear.

Pay attention to the available options:
- On the General Settings tab, you can configure the basic project settings (name, ID, description), as well as the settings for artifacts.
- The Version Control Settings allow you to configure the settings for VCS that will be linked to the project.
- On the Build Steps tab, you can set the build phases.
- The Triggers tab contains settings for configuring triggers to initiate the start of the project build process.
- The Suggestions section provides additional recommendations on configuring TeamCity projects.
The basic logic of the CI process is configured in the Build Steps section by adding various build steps.
Configure the Build Process
Necessary tools: dbForge Studio for SQL Server or dbForge Schema Compare Pro for SQL Server.
Build is an essential phase in the Continuous Integration process. It syncs the script folders from the repository and the target database. If the sync process is correct and successful, the system will create the NuGet package. That package will have an ID serving as an identifier for all the further steps.
Hence, in this tutorial, we are going to explore how to arrange the Build stage of the Continuous Delivery with the help of dbForge DevOps Automation for SQL Server.
1. On the Build Steps tab, click the Add.

2. A new window for configuring a new step will appear. There, specify the Build runner type by choosing dbForge DevOps Automation for SQL Server – Build from the drop-down menu.
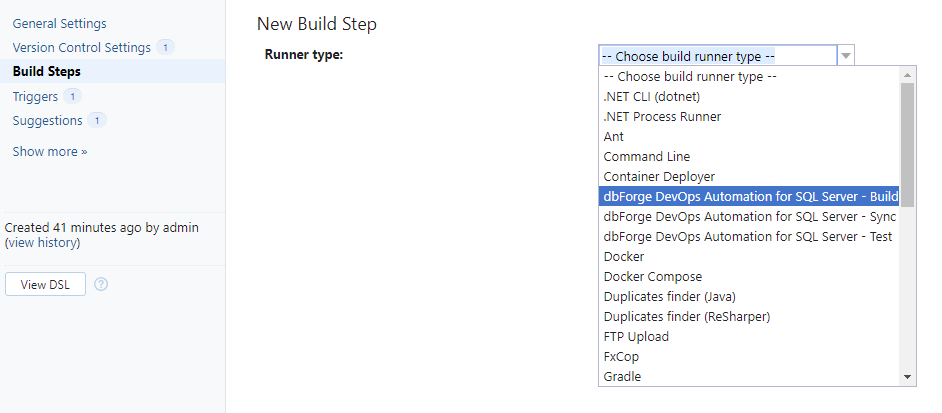
3. In the New Build Step window, that will appear note the following sections:
- Source-controlled database is the location of the folder where the database deployment scripts are stored.
- Package ID specifies the name of the NuGet package that will be generated as a result of this step.
- Temporary database server is the server to deploy the scripts from the source folder for validating.
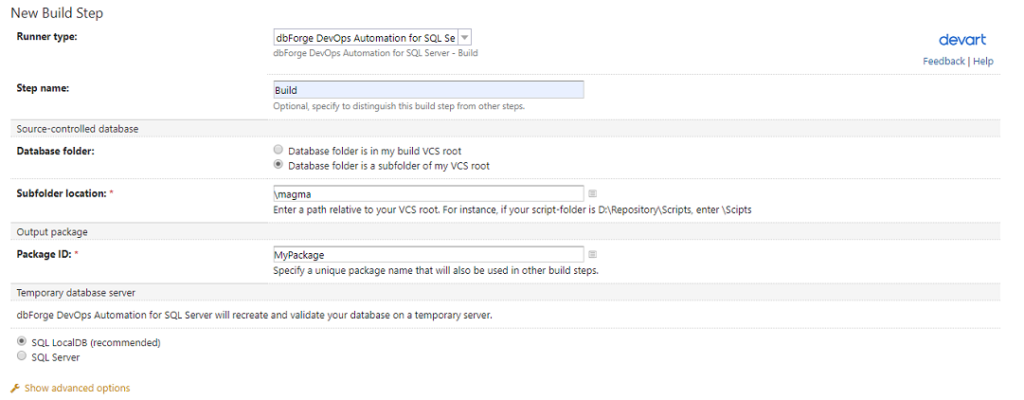
Note: It is better to choose the SQL LocalDB option. This variant suggests the creation of the LocalDB instance and a temporary database on it. After the validation task is successfully done, the LocalDB instance will delete that database and close. You can choose a specific server to deploy scripts – select that option and configure the connection settings.
Test the database
Necessary tools: dbForge Studio for SQL Server or dbForge Schema Compare Pro for SQL Server and dbForge Unit Test for SQL Server
At this stage, we synchronize the object created at the Build stage with the target connection and add the test data (optionally). Then, we run the tSQLt unit test on a given server and validate the SQL scripts this way.
Navigate Build Steps > Add build step > Choose build runner type > dbForge DevOps Automation for SQL Server – Test.
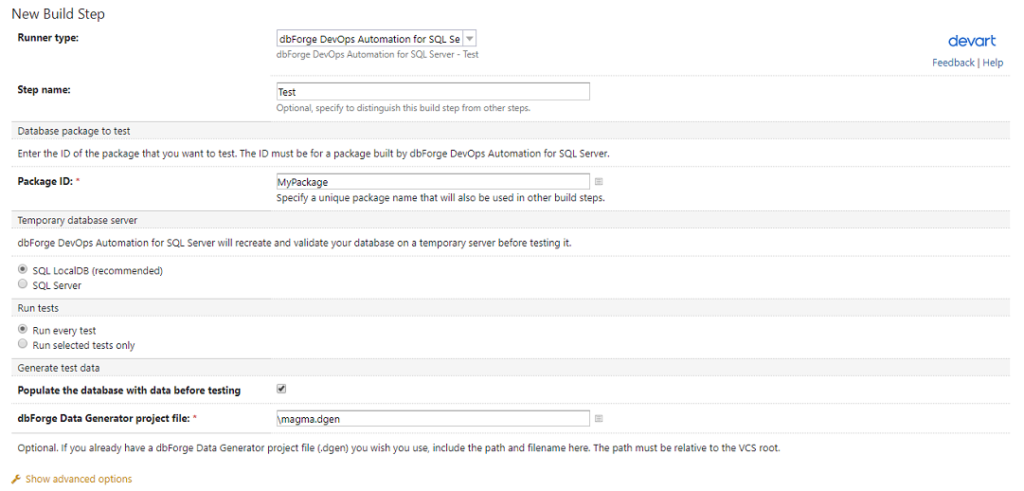
The Test step configuration window will appear. Pay attention to the functional sections of its interface:
- Database package to test is the name of the NuGet package the system generated in the Build step. SQL scripts from this NuGet package will be deployed on the temporary server for tSQLt unit tests.
- Temporary database server is the server where tSQLt unit tests will be performed.
- The Run tests field defines the run mode (every test or selected test).
- The Generate test data section enables test data generation mode before running tSQLt unit tests. Here, you must create the dbForge Data Generator for the SQL Server project file (*.dgen). This file contains settings and rules for test data generation. It should be in VCS, so the system will create the path according to the checkout directory.
Synchronize the Database Project Configuration
Necessary tools: dbForge Studio for SQL Server or dbForge Schema Compare Pro for SQL Server.
At this stage, we sync the NuGet package we generated and tested with the specified server.
Navigate Build Steps > Add build step > Choose build runner type > dbForge DevOps Automation for SQL Server – Sync.
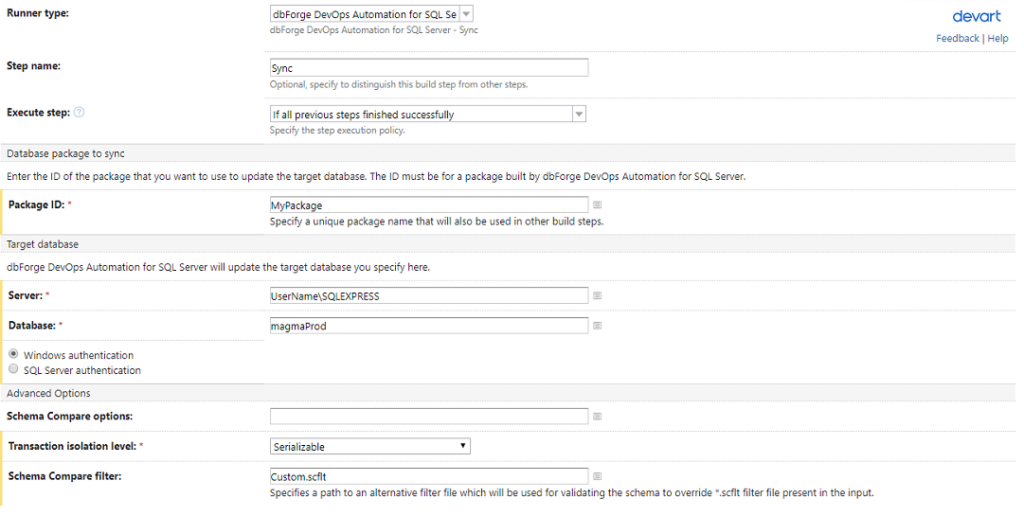
In addition to the functional sections we’re already familiar with, you’ll have two more in this interface:
- Database package to sync specifies the name of the generated and tested NuGet package. SQL scripts from it will be used for deployment on the specified server.
- Target database is the database we nee
There are other advanced options for synchronization. Among them, it’s worth special mentioning the possibility to filter objects during synchronization. For that, we apply the (*.scflt) filter file containing the filtering rules. To generate this file, use dbForge Schema Compare for SQL Server. When complete, locate the filter file in the version control system for CI processes.
Run the project
The project start can be either automated or manual. When you’ve configured the project, TeamCity will put it into the queue automatically as soon as it detects changes in the linked VCS repository.
Or, you can run the project yourself from Build Steps > Run (the top-right corner):
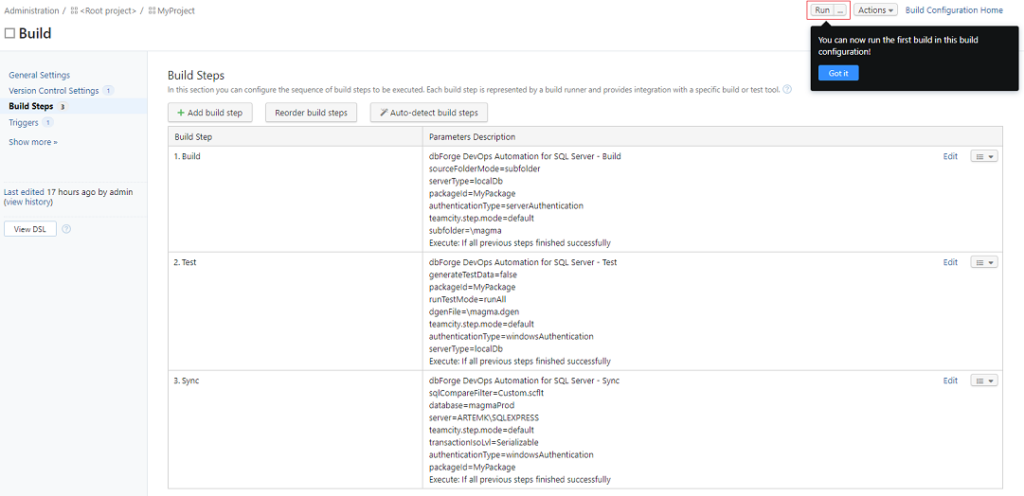
After that, the project will get into the build queue. When the system finds and assigns a free matching build agent, it will start the build process at once:

Note: The Build Log tab provides the build process monitoring results in real-time. You can find there the following information: updating source codes from VCS, forming a temporary directory, details about the implementation of each build step and publishing artifacts.

When the build process is over, you can check and download (if needed) the artifact on the Artifacts tab.

Conclusion
With the dbForge database tools, you can quickly and easily set up the Continuous Integration processes on TeamCity. Our tools allow tailoring Continuous Delivery by giving the possibility to flexibly arrange exactly those pipeline steps that are actually required.
Embrace the best DevOps practices with dbForge tools.


