
To properly manage the database development process, stay informed of the changes delivered by other developers, and avoid conflicts or missing data in the database, one needs database versioning. This allows you to reconstruct any version of the database, view the history of changes, and ensure smooth database delivery.
Contents
- What is database versioning
- Why is database versioning important
- Database versioning components
- Types of database version control
- Database data versioning
- Tools for database versioning
- Conclusion
What is database versioning
To begin with, let us define database versioning. It is the practice of managing changes to the structure and content of a database in a systematic and organized manner. It involves tracking and recording modifications, updates, and additions to the schema and data over time. This process helps developers and database administrators understand the evolution of the database and ensure consistency across different environments (such as development, testing, and production). Database versioning systems typically include features like version history, branching, merging, and rollback capabilities.
Why is database versioning important
Database versioning is a cornerstone of modern database management. It brings discipline to the process of making changes, reduces risks associated with updates, and supports an environment where multiple stakeholders can work together effectively and with confidence:
- Minimizing Downtime: Keeping a clear record of versioned changes allows for precise planning and execution of updates. This ensures that downtime is kept to a minimum, as teams can schedule updates during off-peak hours and have confidence that the deployment process will be swift and reliable.
- Improving Developer Productivity: Developers can work concurrently on different parts of a database, and the versioning system helps them integrate their changes seamlessly. It reduces conflicts, as the version control system handles merging changes intelligently. This allows developers to focus on their tasks without worrying about accidentally overwriting each other’s work.
- Ensuring Reproducibility: Versioning is crucial for debugging, testing, and auditing purposes. If an issue arises after a deployment, developers can roll back to a previous version to analyze and fix the problem. This reproducibility ensures that the database environment can be reliably reconstructed, which is particularly important in regulated industries or mission-critical applications.
- Collaboration and Teamwork: In collaborative environments, where multiple developers or teams work on the same database, versioning facilitates smooth teamwork. It provides a centralized repository where everyone can contribute their changes. Additionally, it offers features like branching, which allows for parallel development efforts. This means that teams can work on different features or fixes simultaneously and then merge their changes back together seamlessly.
Database versioning components
Unlike files and projects, a database has four main components:
- Database schema: Defines the structure of the database, including tables, columns, relationships, indexes, and constraints. It outlines how data is organized and stored within the database. Versioning the schema involves tracking changes to these structural elements, ensuring consistency, and allowing for controlled modifications over time.
- Database object definitions: Refer to elements within the schema, such as tables, views, stored procedures, functions, and triggers. Versioning database objects requires managing changes to the code or scripts that define these objects.
- Database data: Encompasses the information stored in the tables, such as records, rows, and entries. Versioning data allows you to manage changes to this content and track the inserts, updates, and deletions.
- User roles and privileges: Dictate who has access to the database and what actions they can perform. Versioning user roles and privileges involves managing changes to permissions, granting or revoking access, and defining the level of authority users have within the database.
Database DDL scripts include individual DDL scripts for database schemas and database objects. They contain:
- Table and view definitions
- Primary key definitions
- Foreign key definitions
- Stored procedures and functions definitions
- Triggers definitions
- Sequences definitions
- Index definitions
- Constraints definitions
Types of database version control
There are three primary types of data for versioning:
- Database DDL versioning (DDL scripts for database schemas and other database objects)
- Database data versioning
- The versioning of user roles and privileges
When it comes to implementation, point three is pretty much similar to point one. Thus, let’s examine point one in-depth.
DDL versioning
We can implement DDL versioning by applying the two main approaches:
- Redefine all objects within the database, except for tables (tables are processed separately).
- Update changed objects.
Redefining objects
The first approach is simple but inconvenient for modifying tables. You need to redefine tables in a separate iteration, and that affects the deployment duration. Still, this type applies to the SQL Server Database Project type in Visual Studio:
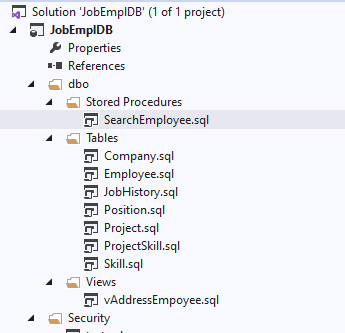
Img. 1. A database project
Updating changed objects
The second approach is complicated but more effective. It allows you to update the changed objects selectively and does not lead to fake redefinitions. Therefore, it significantly reduces the deployment duration.
There are a lot of ready solutions applicable to the first approach. As the second approach allows reducing the deployment time considerably, let’s review it in more detail.
There are three ways to record and check versions:
- With the help of database and object extended properties
- With the help of a dedicated table in a database
- With the help of checksums of the database and object definitions.
The third way is not that common. Hence, we won’t examine it here. Ways one and two are more common – for instance, the second is implemented in the .NET Entity Framework. The essence of the second way is that the migration versions are saved in a dedicated database table.
Now, let’s refer to the first way. We’ll review the process of updating the database definition by updating definitions of those objects that have been changed, as well as checking and recording their versions via their extended properties.
As a rule, we define the build version number first. Common practice suggests the following format:
YYYY_NN for the release where NN is the release number in the YYYY year.
YYYY_NN_HF_N for the hotfix where N is the hotfix number for the YYYY_NN release
This numbering format is appropriate for the releases that take place not more often than once a week, and there are no more than nine hotfixes per release. Then, we can tag the database with a version number in the following way:
declare @DB_Version nvarchar(128)=N'XXXX_NN'; --specify the release version here, for example, 2020_02 for the release version or 2020_01_HF_01 for the hotfix version
--the variable for the previous release value
declare @DB_BackVersion nvarchar(128);
SELECT TOP(1)
@DB_BackVersion=cast([value] as nvarchar(128))
FROM sys.extended_properties
WHERE [class]=0
  AND [name]='DB_Version';

IF(@DB_BackVersion is not null)
BEGIN
    EXEC sys.sp_updateextendedproperty @name=N'DB_Version', @value=@DB_Version;
END
ELSE
BEGIN
    EXEC sys.sp_addextendedproperty @name=N'DB_Version', @value=@DB_Version;
END

IF(
    EXISTS(
            SELECT TOP(1) 1
            FROM sys.extended_properties
            WHERE [class]=0
              AND [name]='DB_BackVersion'
          )
  )
BEGIN
    EXEC sys.sp_updateextendedproperty @name=N'DB_BackVersion', @value=@DB_BackVersion;
END
ELSE
BEGIN
    EXEC sys.sp_addextendedproperty @name=N'DB_BackVersion', @value=@DB_BackVersion;
END
Note: Before updating the DB_Version tag, the script saves the tag for the previous version in DB_BackVersion.
You can tag any database object in a similar way.
To roll back the database version, you can use the following script:
--a variable that will contain the previous release number
declare @DB_BackVersion nvarchar(128);

SELECT TOP(1)
@DB_BackVersion=cast([value] as nvarchar(128))
FROM sys.extended_properties
WHERE [class]=0
  AND [name]='DB_BackVersion';

--if the previous version is not set, we initialize it as 2020_00, i.e. no versioning
if(@DB_BackVersion is null) set @DB_BackVersion=N'2020_00';

IF(
    EXISTS(
            SELECT TOP(1) 1
            FROM sys.extended_properties
            WHERE [class]=0
              AND [name]='DB_Version'
          )
  )
BEGIN
    EXEC sys.sp_updateextendedproperty @name=N'DB_Version', @value=@DB_BackVersion;
END
ELSE
BEGIN
    EXEC sys.sp_addextendedproperty @name=N'DB_Version', @value=@DB_BackVersion;
END
Here, the DB_Version tag gets the DB_BackVersion tag value assigned.
Similarly, we can roll back the version tag for any database object.
Also, we can develop a more complicated versioning system for rolling tags forward and back. For instance, it can remember not only the previous version’s value but also store more tag values or even all tag values.
However, it is usually enough to store the current and previous versions of the database objects and the database itself.
When we have the version tags arranged on a database, we can check a database object definition for the current version value. Based on the received value, the system can either update the object definition or inform the user that the update is impossible.
For example, you’ve created the stored procedure for the 2020_03 build. Hence, you can roll this stored procedure definition forward only if its version in the destination database is less than 2020_03. If you roll the stored procedure definition of the 2020_03 version forward on the same version or a newer one, you will overwrite the newer procedure definition. It would not be a roll forward – it would be a rollback.
It is the same for rolling back a database and object definitions. You can roll back the 2020_03 version only if the object is located precisely in the same version as the database itself. Otherwise, you can roll back the wrong version as the object and the database are located in a different version, not the one that is intended for a rollback.
Summing up, we’ve reviewed the database versioning basics.
Database data versioning
But how can we version database data? Here, we need to consider the following checks:
- Check for the existence of the entry.
- Check for the required field(s) value.
In general, to add or alter the row, we need to write the following pseudocode:
;MERGE <schema_name>.<table_name> AS trg
USING #tbl_source AS src ON trg.[PK_1]=src.[PK_1] AND ... AND trg.[PK_N]=src.[PK_N]
WHEN NOT MATCHED THEN
	 INSERT ([PK_1], ..., [PK_N], [Field_1], ..., [Field_M])
	 VALUES (src.[PK_1], ..., src.[PK_N], src.[Field_1], ..., src.[Field_M])
WHEN MATCHED AND ((((trg.[Field_1]<>src.[Field_1]) AND ((trg.[Field_1] IS NOT NULL) AND (src.[Field_1] IS NOT NULL))) OR ((trg.[Field_1] IS NULL) AND (trg.[Field_N] IS NOT NULL)) OR ((trg.[Field_1] IS NOT NULL) AND (trg.[Field_1] IS NULL)))
					OR
					...
					OR (((trg.[Field_M]<>src.[Field_M]) AND ((trg.[Field_M] IS NOT NULL) AND (src.[Field_M] IS NOT NULL))) OR ((trg.[Field_M] IS NULL) AND (trg.[Field_M] IS NOT NULL)) OR ((trg.[Field_M] IS NOT NULL) AND (trg.[Field_M] IS NULL)))
					)
	 THEN UPDATE SET
	 trg.[Field_1]=src.[Field_1],
	 ...
	 trg.[Field_M]=src.[Field_M];
Here, instead of the #tbl_source temporary table, any source of data that satisfies the output parameters can be used. Those parameters must match the destination table. For instance, instead of the #tbl_source temporary table, we can use the specific values for one or several rows, as follows:
;MERGE <schema_name>.<table_name> AS trg
USING (
		SELECT <value_PK_1> AS [PK_1], ..., <value_PK_N> AS [PK_N], <value_Field_1> AS [Field_1], ..., <value_Field_M> AS [Field_M] UNION ALL
		...
		SELECT <value_PK_1> AS [PK_1], ..., <value_PK_N> AS [PK_N], <value_Field_1> AS [Field_1], ..., <value_Field_M> AS [Field_M]
	  ) AS src ON trg.[PK_1]=src.[PK_1] AND ... AND trg.[PK_N]=src.[PK_N]
WHEN NOT MATCHED THEN
	 INSERT ([PK_1], ..., [PK_N], [Field_1], ..., [Field_M])
	 VALUES (src.[PK_1], ..., src.[PK_N], src.[Field_1], ..., src.[Field_M])
WHEN MATCHED AND ((((trg.[Field_1]<>src.[Field_1]) AND ((trg.[Field_1] IS NOT NULL) AND (src.[Field_1] IS NOT NULL))) OR ((trg.[Field_1] IS NULL) AND (trg.[Field_N] IS NOT NULL)) OR ((trg.[Field_1] IS NOT NULL) AND (trg.[Field_1] IS NULL)))
					OR
					...
					OR (((trg.[Field_M]<>src.[Field_M]) AND ((trg.[Field_M] IS NOT NULL) AND (src.[Field_M] IS NOT NULL))) OR ((trg.[Field_M] IS NULL) AND (trg.[Field_M] IS NOT NULL)) OR ((trg.[Field_M] IS NOT NULL) AND (trg.[Field_M] IS NULL)))
					)
	 THEN UPDATE SET
	 trg.[Field_1]=src.[Field_1],
	 ...
	 trg.[Field_M]=src.[Field_M];
Let’s take the example of the [dbo].[Company] table definition:
SET ANSI_NULLS ON
GO

SET QUOTED_IDENTIFIER ON
GO

CREATE TABLE [dbo].[Company](
	[CompanyID] [int] IDENTITY(1,1) NOT NULL,
	[CompanyName] [nvarchar](255) NOT NULL,
	[Description] [nvarchar](255) NOT NULL,
	[IsDeleted] [bit] NOT NULL,
 CONSTRAINT [PK_Company_CompanyID] PRIMARY KEY CLUSTERED
(
	[CompanyID] ASC
)WITH (PAD_INDEX = OFF, STATISTICS_NORECOMPUTE = OFF, IGNORE_DUP_KEY = OFF, ALLOW_ROW_LOCKS = ON, ALLOW_PAGE_LOCKS = ON, OPTIMIZE_FOR_SEQUENTIAL_KEY = OFF) ON [PRIMARY]
) ON [PRIMARY]
GO

ALTER TABLE [dbo].[Company] ADD  DEFAULT ((0)) FOR [IsDeleted]
GO
To add and change the data for the two companies, we can write the following code fragment:
SET IDENTITY_INSERT [dbo].[Company] ON;

;MERGE [dbo].[Company] AS trg
USING (
		SELECT 1001 AS [CompanyID], 'Microsoft' AS [CompanyName], 'IT company' AS [Description], 0 AS [IsDeleted] UNION ALL
		SELECT 10 AS [CompanyID], 'DSS' AS [CompanyName], 'IT company' AS [Description], 1 AS [IsDeleted]
	  ) AS src ON trg.[CompanyID]=src.[CompanyID]
WHEN NOT MATCHED THEN
	 INSERT ([CompanyID], [CompanyName], [Description], [IsDeleted])
	 VALUES (src.[CompanyID], src.[CompanyName], src.[Description], src.[IsDeleted])
WHEN MATCHED AND ((((trg.[CompanyName]<>src.[CompanyName]) AND ((trg.[CompanyName] IS NOT NULL) AND (src.[CompanyName] IS NOT NULL))) OR ((trg.[CompanyName] IS NULL) AND (trg.[CompanyName] IS NOT NULL)) OR ((trg.[CompanyName] IS NOT NULL) AND (trg.[CompanyName] IS NULL)))
					OR
				  (((trg.[Description]<>src.[Description]) AND ((trg.[Description] IS NOT NULL) AND (src.[Description] IS NOT NULL))) OR ((trg.[Description] IS NULL) AND (trg.[Description] IS NOT NULL)) OR ((trg.[Description] IS NOT NULL) AND (trg.[Description] IS NULL)))
				  OR
				  (((trg.[IsDeleted]<>src.[IsDeleted]) AND ((trg.[IsDeleted] IS NOT NULL) AND (src.[IsDeleted] IS NOT NULL))) OR ((trg.[IsDeleted] IS NULL) AND (trg.[IsDeleted] IS NOT NULL)) OR ((trg.[IsDeleted] IS NOT NULL) AND (trg.[IsDeleted] IS NULL)))
					)
	 THEN UPDATE SET
	 trg.[CompanyName]=src.[CompanyName],
	 trg.[Description]=src.[Description],
	 trg.[IsDeleted]=src.[IsDeleted];

SET IDENTITY_INSERT [dbo].[Company] OFF;
Note: As the CompanyID is the IDENTITY column, you need to enable the insert permission for this column in the Company table before inserting or merging. After that, you will need to disable this option using the following statement: SET IDENTITY_INSERT <schema_name>.<table_name> <ON | OFF>.
A simple SELECT query proves that our table now contains the values we inserted with the help of the MERGE statement:
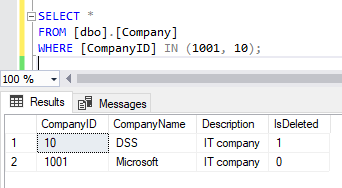
Img.2. The data added and altered in the Company table
You can perform deleting in the same way:
;MERGE <schema_name>.<table_name> AS trg
USING #tbl_source AS src ON trg.[PK_1]=src.[PK_1] AND ... AND trg.[PK_N]=src.[PK_N]
WHEN MATCHED DELETE;
Where instead of the #tbl_source temporary table, any source of data that satisfies the output parameters can be used. Those parameters must match the destination table. For instance, instead of the #tbl_source temporary table, we can use the specific values for one or several rows, as follows:
;MERGE <schema_name>.<table_name> AS trg
USING (
		SELECT <value_PK_1> AS [PK_1], ..., <value_PK_N> AS [PK_N], <value_Field_1> AS [Field_1], ..., <value_Field_M> AS [Field_M] UNION ALL
		...
		SELECT <value_PK_1> AS [PK_1], ..., <value_PK_N> AS [PK_N], <value_Field_1> AS [Field_1], ..., <value_Field_M> AS [Field_M]
	  ) AS src ON trg.[PK_1]=src.[PK_1] AND ... AND trg.[PK_N]=src.[PK_N]
WHEN MATCHED DELETE;
For example, to delete two companies from our table, we need to write the following code fragment:
;MERGE [dbo].[Company] AS trg
USING (
		SELECT 1001 AS [CompanyID], 'Microsoft' AS [CompanyName], 'IT company' AS [Description], 0 AS [IsDeleted] UNION ALL
		SELECT 1002 AS [CompanyID], 'NPP' AS [CompanyName], 'IT company' AS [Description], 1 AS [IsDeleted]
	  ) AS src ON trg.[CompanyID]=src.[CompanyID]
WHEN MATCHED THEN DELETE;
To make sure that our efforts were successful and the entries were deleted, we can execute the following query:
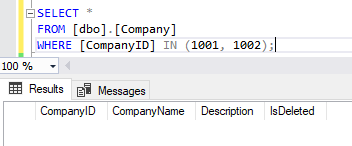
Img. 3. The result of data deletion
In all situations mentioned above, we add, alter, and delete items using the MERGE statement. In the same way, we can use the script on more complex examples.
Tools for database versioning
As a rule, data versioning applies to references and regulatory-referencing information. The code with the data itself is version-controlled, using three primary version-control systems:
However, there are many other options that offer a range of versioning capabilities tailored to different database environments:
Database migration tools
Liquibase: A versatile tool supporting various configuration languages for database schema and alterations. It facilitates cross-platform migrations.
Redgate Deploy: Designed for Microsoft SQL Server, with strong integration into the Microsoft Developer ecosystem, including Visual Studio.
Planetscale: Offers advanced database migration features, including schema branch/merge functionality, with a modern deployment environment. Specializes in MySQL.
Version-controlled data lakes
LakeFS: Introduces data lake versioning, enabling commits, branches, and rollbacks for unstructured or semi-structured data stored in cloud storage systems like S3 and GCS.
Version-controlled databases
Terminus DB: Provides full schema and data versioning, along with a graph database interface and a custom query language called Web Object Query Language (WOQL). Offers optional schema usage and JSON querying capabilities.
Version control SSMS add-in
dbForge Source Control for SQL Server: Helps version-control database schemas and data, view and resolve conflicts, roll back changes, and maintain the overall integrity of databases. Perfect for the SQL Server Management Studio users.
Conclusion
To sum up, we have reviewed the main approaches to database versioning and demonstrated how to version control database objects, including database schema and database data.
If you seek a reliable solution that will support all stages of the database lifecycle and ensure consistent database builds and releases, dbForge Source Control is the tool to help you accomplish that. This handy SSMS add-in for an SQL Server database was designed to assist you in version controlling your database.
Using the tool, you can commit and revert changes as well as view conflicts and resolve any inconsistencies that occur. Besides, you gain the possibility to automate your database development by means of the DevOps approach.
