
If you want to know everything about SQLite ODBC and how to use it with .NET, you are on the right way. In this article, we will consider the SQLite ODBC driver, SQL ODBC connection string, SQLite database manager with GUI, and code examples in .Net.

Before we start to review code examples, let’s check out the following prerequisites.
Prerequisites to Code Samples
In this section, you will know how to download and install the software we need for the code examples.
So, Windows 10 21H2 is the operating system used and the development IDE is Visual Studio 2022 (64-bit) version 17.1.3.
Next, here’s the stuff you need to download and install.
1. Download SQLite Database Manager
In our case, we will use SQLiteStudio version 3.3.3. It is free and open-source. But you can use any SQLite database manager you want.
You can download the Zip file from the official website. SQLiteStudio already includes sqlite3.dll for SQLite 3 databases so that you don’t need to download the binaries from the SQLite website.
Unzip the file to the desired folder when the download is complete and then find and run the SQLiteStudio.exe file. You can start creating a database from here – there is no need to install it.
2. Download the SQLite Sample Database
The database sample we will use will have one table only. Figure 1 shows the structure of the table.
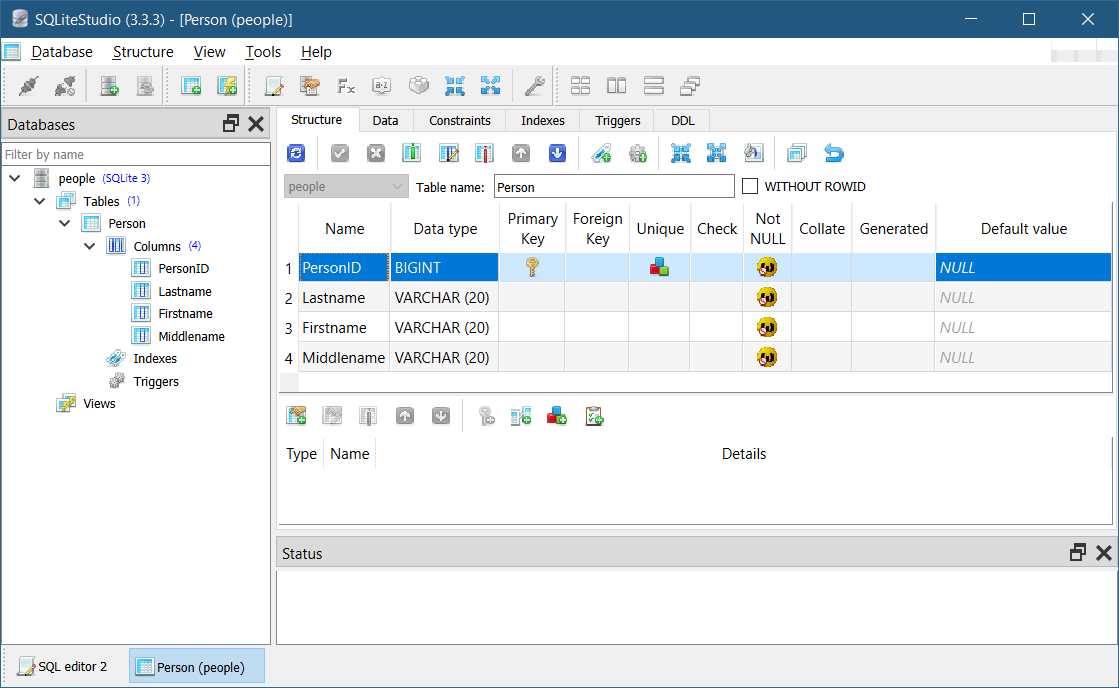
You can open the SQLite database loaded on SQLiteStudio and view the data.
3. Download and Install the ODBC Driver for SQLite for Windows 10
We will use the Devart ODBC driver for SQLite here. One of the advantages of this driver e SQLite ODBC driver is that it allows establishing a connection to an SQLite database in the Direct mode which improves performance. But if you choose not to, then you need to select the SQLite native client DLL from your local machine.
Now, you need to download the installer of ODBC driver for SQLite for the macOS, Windows 10, and Linux operating systems.:
In this case, choose the Windows installer. You can also choose between EXE and MSI installers. Then, follow the installation wizard instructions. For more information about this driver, please refer to the manual. You can also download the PDF or CHM manual from the driver download page.
After the driver is installed, you need to set the Data Source Name (DSN).
4. Create the SQL ODBC Connection DSN
There are 2 options you can use in your code for ODBC connection strings. The first uses a data source name (DSN), and the second one uses a DSN-less connection string.
Let’s start with creating the DSN using the ODBC Data Source Administrator (64-bit) as shown in Figure 2. Add a new System or User DSN and select the Devart ODBC Driver for SQLite. Then, click Finish.

Then, you just need to specify the data source name and tell where the database file is as shown in Figure 3.

Note that the Direct Mode checkbox is checked by default. To test the connectivity, click Test Connection. If the connection is successful, click OK.
After setting up the DSN, you can use SQLite ODBC connection string like this in your code:
DSN=PeopleDB-SQLiteYou will see this again in the code samples later.
Now, let’s talk about the DSN-less connection string. Going back to Figure 3, you can see the ellipsis button beside the Test Connection button. Click on it to have a DSN-less connection string as shown in Figure 4.
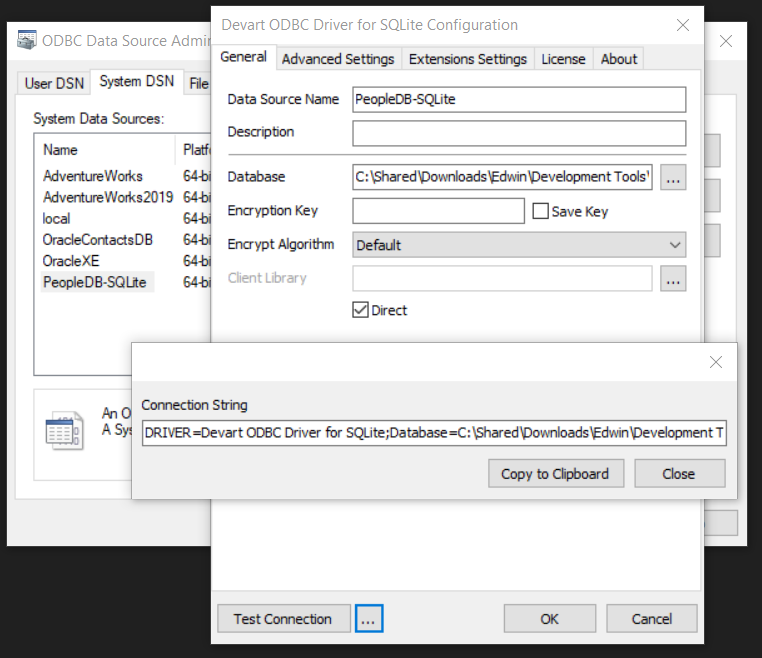
After clicking the ellipsis button, the connection string will appear. To use this connection string in your code, click the Copy to Clipboard button. Then, click Close.
5. Create the Visual Studio Project
In the sample, the Windows Forms App is used but any other app will do, like a Console App. You can also use the SQLite database for storing some information you need in your Windows app.
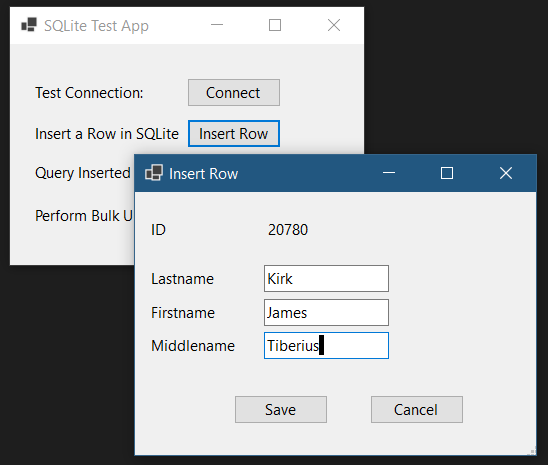
So, the project will have 2 Windows Forms. One will be the startup form where you can click the buttons that call various functions. And the other is a new data entry form called the startup form. You can see this form in Figure 5.
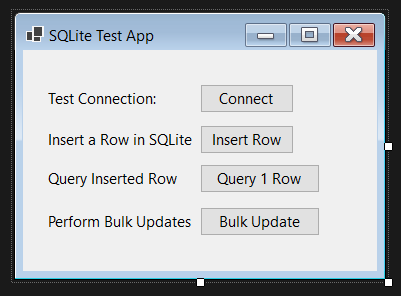
The app is very simple for demo purposes. Notice the buttons in Figure 5. These are buttons for functions we want to test. Later, you will see the code within those buttons.
Next, let’s see the data entry form in Figure 6.
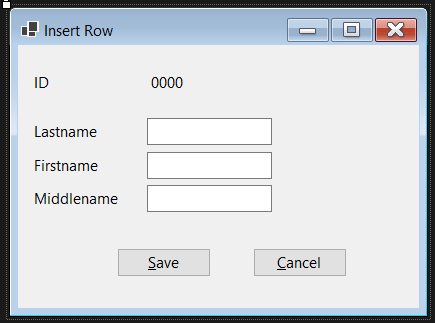
It’s also a simple form that closely matches the table structure in Figure 1.
These forms you’ll see more later.
But you need to add something more to your project.
Install the System.Data.Odbc Package
Another requirement is the System.Data.Odbc package. With this, you can use the methods to connect and query the database.
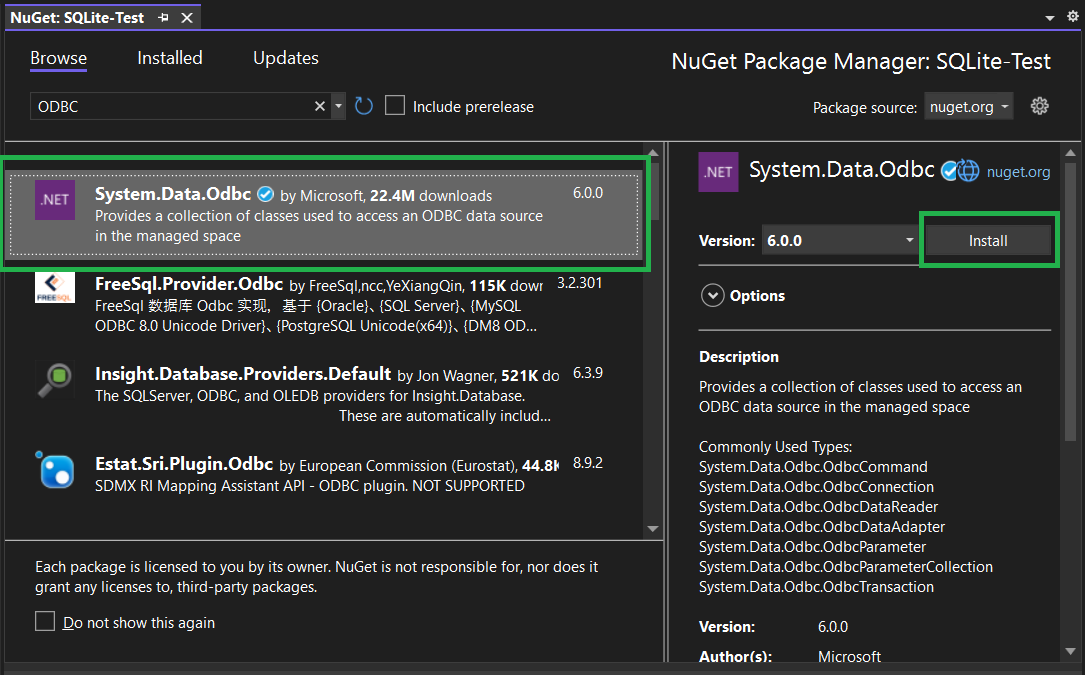
So, let’s install the System.Data.ODBC package in the Visual Studio project by following the steps:
- Right-click your Windows Forms App project.
- Select the Manage NuGet Packages.
- Browse and Search for ODBC.
- Select System.Data.Odbc by Microsoft.
- Click Install.
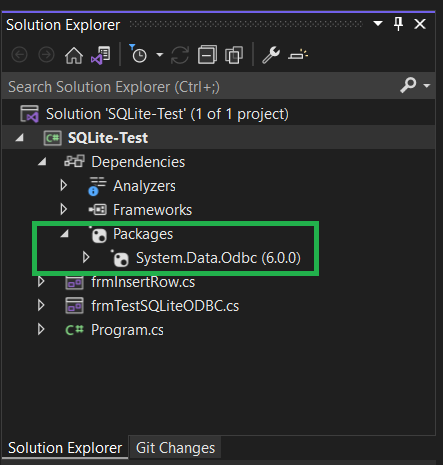
Then, you need to check the result. To do that, expand the Dependencies folder of your Visual Studio project as shown in Figure 8. Under the Packages folder, you should see System.Data.Odbc.
Once this is done, add the following on top of each form’s code:
using System.Data.Odbc;Now that it’s all set, let’s do the next simple operations:
- Connecting to the SQLite database
- Inserting a new record
- Querying a record
- Performing batch updates
Now let’s move on to the more interesting part and look at code examples
SQLite ODBC Examples Using .Net and C#
Here we will use the button-by-button approach based on Figure 5.
Let’s start.
1. Test the SQLite ODBC Connection
The purpose of this code section is to connect to the SQLite database and return a success message.
Here is the example of C# code for the Connect button click event:
private void btnConnect_Click(object sender, EventArgs e)
{
    using (var odbcConnection = new OdbcConnection("DSN=PeopleDB-SQLite"))
    {
        odbcConnection.Open();   // open the connection
        // prepare the message
        string message = "Connection Successful!"
                  + Environment.NewLine
                  + "DSN: " + odbcConnection.ConnectionString
                  + Environment.NewLine
                  + "Driver: " + odbcConnection.Driver;
        // show the result
        MessageBox.Show(message,
                        "Test Connection",
                        MessageBoxButtons.OK,
                        MessageBoxIcon.Information);


        odbcConnection.Close();  // close the connection
    }
}
Let’s dissect this code.
First, we used the previously set DSN (see Figure 3). We enclosed the connection object (odbcConnection) in a using statement to ensure it’s disposed of properly on exit in the button click event.
Then, the message string is defined. In Figure 9 you can see what the message box shows.
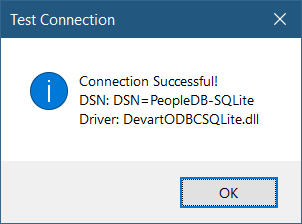
Finally, the connection is closed and the connection object is disposed of.
2. Insert a Row in the Database Table Using SQLite ODBC
Let’s insert a row in the SQLite database table called Person using the SQL INSERT statement. To do that, we’ll use the form to get the data like in Figure 6.
Once the connection to the SQLite database is established, the ODBC driver will take care of anything else. It’s like using another data access provider like OLE DB.
The following code examples will be similar to those that are used when using other data access providers.
Insert Row Button Click Event
First, the Insert Row button will call the data entry form to appear. Here is the code for this event:
private void btnInsert_Click(object sender, EventArgs e)
{
    var frmInsert = new frmInsertRow();
    frmInsert.ShowDialog(this);
}
There’s nothing extraordinary here. It’s just calling a form. But we get the last PersonID value in the table when the form loads.
Insert Row Form Load Event
Here’s the form load event code:
private void frmInsertRow_Load(object sender, EventArgs e)
{
    long latestID = 0;

    using (var odbcConnection = new OdbcConnection("DSN=PeopleDB-SQLite"))
    {
        odbcConnection.Open();   // open the connection
        using (var cmd = odbcConnection.CreateCommand())
        {

             // set the query statement
             cmd.CommandText = @"SELECT PersonID FROM PERSON
                                ORDER BY PersonID DESC
                                LIMIT 1; ";

             // execute the query
             var reader = cmd.ExecuteReader();
             if (reader.HasRows)  // check if there's an existing record
             {
                reader.Read();
                latestID = (long)reader[0];  // get the result and store
             }
             reader.Close();     // close the datareader
        }
        odbcConnection.Close();  // close the connection
    }

    // display the latest PersonID + 1 on the form.
    // Add 1 to avoid primary key violation upon saving
    lblID.Text = (latestID + 1).ToString();
}
Again, let’s dissect the code.
To hold the latest ID in the table, we need a variable of the long type (not int), because the PersonID column in the table has a BigInt data type.
Connecting to SQLite is done with our usual connection string.
A Command object is created, and the SQL SELECT statement is set to the CommandText property. We only need 1 row for the last PersonID so LIMIT 1 is used. Then, a DataReader object is created to read that 1 row. Once there is at least 1 row, we proceed with Read(). Then, we assign a LatestID variable to it and close the reader and connection objects.
Finally, we set the labelID to the latest ID we have. The form will display this value. Here, we add 1 to it to prevent an error when saving the primary key. PersonID is the primary key and should have a unique value.
The view of the form after loading is shown in Figure 10.
Save Button Click Event
Next, we need to save the entries from the form to the SQLite database.
Here’s the button click event for that:
private void btnSave_Click(object sender, EventArgs e)
{
    // validate entries first
    if (txtFirstName.Text != "" & txtLastName.Text != "")
    {
        using (var odbcConnection = new OdbcConnection("DSN=PeopleDB-SQLite"))
        {
            odbcConnection.Open();   // open the connection
            using (var cmd = odbcConnection.CreateCommand())
            {
                // form the INSERT statement with textbox values
                cmd.CommandText = @"INSERT INTO Person (
                                           PersonID,
                                           Lastname,
                                           Firstname,
                                           Middlename
                                      )
                                       VALUES (" +
                                           lblID.Text + ",'" +
                                           txtLastName.Text + "','" +
                                           txtFirstName.Text + "','" +
                                           txtMiddleName.Text + "');";

                cmd.ExecuteNonQuery();  // execute the INSERT statement

                MessageBox.Show("Record Successfully Saved",
                                "Record Status",
                                MessageBoxButtons.OK,
                                MessageBoxIcon.Information);
            }
            odbcConnection.Close();  // close the connection
        }
    } else
    {
        MessageBox.Show("Lastname and Firstname are Required",
                        "Validation",
                        MessageBoxButtons.OK,
                        MessageBoxIcon.Exclamation);
    }
}
Here we go again to dissect the code.
So, you need to not forget that the entries are validated, last name and first name are necessary. If these fields are empty, nudge the user to fill them out with a MessageBox. There’s no need to check if the entries will fit the columns of the table. The MaxLength property of each textbox is set to 20. That’s just the right size for each column.
Once validated, we open the usual ODBC connection.
Then, a Command object is created with a CommandText value equal to the INSERT statement. The VALUES clause includes the values of each text box in the form.
Then, the ExecuteNonQuery method executes the statement.
Finally, a successful connection message is displayed, and the connection is closed. We skipped further error handling at this point. You can cover that in your code.
Cancel Button Click Event
This click event simply closes the data entry form.
private void btnCancel_Click(object sender, EventArgs e)
{
    this.Close();
}
3. Query Inserted Row Using SQLite ODBC
One way to know if the insert operation in the previous section worked is to query it. So, we will run a SELECT statement on the last inserted row. Then, we will display the name in a message box.
Check out the code below:
private void btnQuery_Click(object sender, EventArgs e)
{
   using (var odbcConnection = new OdbcConnection("DSN=PeopleDB-SQLite"))
   {
	odbcConnection.Open();   // open the connection
	using (var cmd = odbcConnection.CreateCommand())
	{
	   cmd.CommandText = @"SELECT PersonID, Lastname, Firstname, Middlename
			       FROM Person
			       ORDER BY PersonID DESC LIMIT 1;";
	   var reader = cmd.ExecuteReader();
	   if (reader.HasRows)  // check if records exist
	   {
		reader.Read();

		// prepare the message
		string message = "ID: " + reader[0]
			   + Environment.NewLine
			   + "Lastname: " + reader[1]
			   + Environment.NewLine
			   + "Firstname: " + reader[2]
			   + Environment.NewLine
			   + "Middlename: " + reader[3];
		// show the result
		MessageBox.Show(message,
			   "Query Result",
			   MessageBoxButtons.OK,
			   MessageBoxIcon.Information);

		reader.Close(); // close the datareader
	   }
	   else  // if the table is empty
	   {
		MessageBox.Show("The SQLite database table is empty",
			   "Query Result",
			   MessageBoxButtons.OK,
			   MessageBoxIcon.Information);
	   }
	}
	odbcConnection.Close();  // close the connection
   }
}
So, the logic of the code above is similar to the Form Load event we talked earlier. The main difference is the query and the handling of the empty table. Figure 11 shows the result that is consistent with Figure 10.
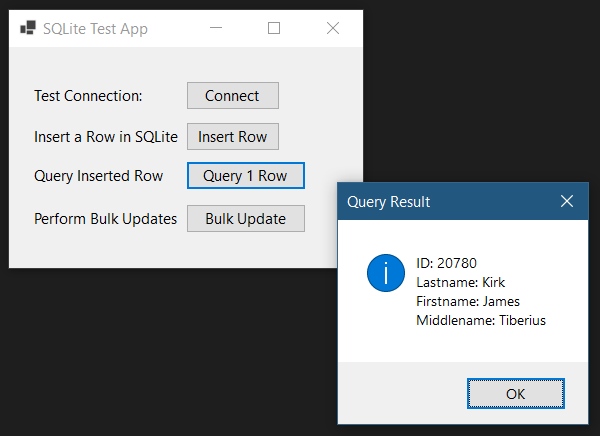
So, we can now prove that the INSERT operation worked.
4. Perform Batch/Bulk Updates Using SQLite ODBC
What we’ve been doing earlier are operations that involve only 1 row. Let’s try to update many records using 2 UPDATE statements. The code will be longer but not more difficult to understand.
Overview
Here’s the scope of the batch update in bulk:
- The batch update will replace empty middle name fields with the first letter of the last name.
- Updates will affect surnames that start with A or B.
- One UPDATE statement will cover the surnames that start with A but the middle name field is empty.
- The other UPDATE statement will cover the surnames that start with B but the middle name field is empty.
To know if the batch update is successful, we need to do the following steps:
- Get the number of records to update. Declare a variable (int recordsToUpdate). Then create a query where you get the number of records to update. Save the result in recordsToUpdate.
- Run the 2 UPDATE statements. This will replace the empty fields of middle names with either A or B.
- Get the number of records affected. Declare another variable (int recordsAffectedAfterUpdate) and then create another query that will return the affected records. Then save it in recordsAffectedAfterUpdate.
- Display the result of the 2 variables in a message box (both results must equal). If not, there’s a problem with some of the SQL statements.
The first 3 steps above need different commands.
C# Code
Let’s begin.
private void btnBulkUpdate_Click(object sender, EventArgs e)
{
  // declare variables that will store record counts
  int recordsToUpdate = 0;
  int recordsAffectedAfterUpdate = 0;

  using (var odbcConnection = new OdbcConnection("DSN=PeopleDB-SQLite"))
  {
    odbcConnection.Open(); // open the connection
    using (var cmd = odbcConnection.CreateCommand())
    {
      // get the number of records prior to update
      cmd.CommandText = @"SELECT COUNT(*) as RecordsToUpdate
                FROM PERSON
                WHERE Middlename = ''
                AND (SUBSTR(Lastname,1,1) = 'B' OR SUBSTR(Lastname,1,1) = 'A');

                ";

      var reader = cmd.ExecuteReader();
      if (reader.HasRows)
      {
        recordsToUpdate = (int)reader[0];
      }
      reader.Close();  // close the datareader so you can use it later w/o error
    }

    using (var cmd = odbcConnection.CreateCommand())
    {
      // set the 2 UPDATE statements to the CommandText
      cmd.CommandText = @"UPDATE PERSON
              SET Middlename = 'A'
              WHERE Middlename=''
              AND SUBSTR(Lastname,1,1) = 'A';
              UPDATE PERSON
              SET Middlename = 'B'
              WHERE Middlename=''
              AND SUBSTR(Lastname,1,1) = 'B';";

      // execute the batch
      cmd.ExecuteNonQuery();
    }

    using (var cmd = odbcConnection.CreateCommand())
    {
      // get the number of records after the update
      cmd.CommandText = @"SELECT COUNT(*) as RecordsAffected
              FROM PERSON
              WHERE (SUBSTR(Lastname,1,1) = 'B' AND Middlename = 'B')
                OR (SUBSTR(Lastname,1,1) = 'A' AND Middlename = 'A');
              ";

      var reader = cmd.ExecuteReader();
      if (reader.HasRows)
      {
        recordsAffectedAfterUpdate = (int)reader[0];
      }
      reader.Close(); // close the datareader again
    }

    // show the success message. Both variables should be equal in value.
    MessageBox.Show("Before Update: " + recordsToUpdate.ToString()
            + Environment.NewLine
            + "After Update: " + recordsAffectedAfterUpdate.ToString(),
            "Records Updated",
            MessageBoxButtons.OK,
            MessageBoxIcon.Information);

    odbcConnection.Close(); // close the connection
  }
}
We have already described the steps earlier and the code above includes comments. In that case, let’s dissect the SQL statements instead.
First, the SELECT statement used the COUNT(*) function. Empty lines for entering a middle name are taken into account (Middlename = ”). We need blanks to get the rows not yet updated. And the surnames should start with either ‘A’ or ‘B’ (SUBSTR(Lastname,1,1) = ‘B’ OR SUBSTR(Lastname,1,1) = ‘A’).
Then, the first UPDATE statement will set the middle name to ‘A’ (SET Middlename = ‘A’). The records to update should also have surnames that start with ‘A’. But the middle name is blank (Middlename=” AND SUBSTR(Lastname,1,1) = ‘A’).
The second UPDATE statement is similar to the first but will deal with surnames that start with B.
The final statement will also count affected rows. Surnames started with ‘A’ are counted and middle names equal to ‘A’ (SUBSTR(Lastname,1,1) = ‘A’ AND Middlename = ‘A’). Surnames started with ‘B’ are also counted and middle name equals ‘B’ (SUBSTR(Lastname,1,1) = ‘B’ AND Middlename = ‘B’). Middle names should have values. We no longer count blanks because of the update.
You can see the result in Figure 12.
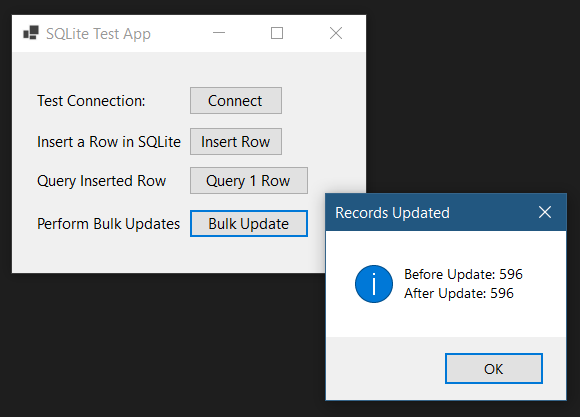
So, you can see that the used SQLite ODBC driver can handle batch updates. But note that you should use SUBSTR instead of SUBSTRING as the driver only recognizes the shorter form. Though SQLite accepts both keywords.
It might be worth mentioning another Devart product – the ADO.NET provider for SQLite, which can also interest the .NET developers. dotConnect for SQLite (its official name) is a solution that allows you to develop applications based on SQLite databases – design the architecture and improve the overall productivity.
With its complete support of .NET 5.0, full .NET Framework 2.0 – 4.8, and .NET Core 1.x, 2.x, and 3.1, dotConnect for SQLite can be the weapon of choice. Also, it supports SQLite-specific features, including CEROD, SQLiteCrypt, the SEE encryption extensions, etc. Moreover, it offers a set of GUI tools to help you construct your application faster, and advanced Visual Studio integration for you to work in a habitual environment.
Conclusion
In this article, we showed you how to use SQLite ODBC with .Net and C#, tested the connection, SELECT, INSERT, and UPDATE query operators. Statement batches also work with the Devart ODBC Driver for SQLite. All commands were executed instantly and gave the correct result. You can also try DELETE command on your own using the same pattern used here.
Was this post useful to you? Share it on your favorite social media platforms.
Happy coding, everyone!