Users often ask us how to use Oracle stored routines, returning REF CURSORs, in Entity Framework models with dotConnect for Oracle. So, we decided to post here a walkthrough, that describes how to create Entity Framework model with stored procedures in Entity Developer and EDM Designer. It tells how to create methods, based on Oracle stored procedures and functions, returning REF CURSOR parameters, and how to use the stored procedures for mapping insert, delete, and update operations.
In order to complete this walkthrough, you will need access to the Oracle database server 9.2.0.4 or higher. You also need dotConnect for Oracle Professional Edition 5.25 or higher. Microsoft Visual Studio 2008 SP1 or Visual Studio 2010 is also required.
Contents
- Stored Routines in Entity Framework Model
- Creating Database and Model
- Stored Procedure Returning Result Set using REF CURSOR Out Parameter
- Stored Function Returning REF CURSOR
- Mapping CUD Operations to Stored Routines
Stored Routines in Entity Framework Model
Stored Routines Support in Entity Framework
Entity Framework has limited support for stored routines. Stored routines can be used for mapping insert, delete, and update operations and for creating methods returning collections of entities or scalar objects by using Function Import. Stored functions that were added to the storage model can be invoked with Entity SQL, but cannot be invoked directly in the LINQ to Entities.
Stored routine parameter types have the same constraint as the table and view columns – they should be primitive non-object types. REF CURSOR out parameters and stored functions, returning cursors are also supported. Stored procedures, having more than one REF CURSOR out parameters cannot be supported completely and return only one result set.
Microsoft EDM Wizard and EDM Designer
Microsoft implementation of run-time and design-time tools for Entity Framework is targeted to the users of MS SQL Server. Current functionality doesn’t provide full support for specific features of Oracle stored routines.
- ADO.NET Entity Data Model Designer does not allow storage model editing which may cause its editing in the XML Editor. It also does not support drag-n-drop from the Server Explorer and you may need to update model with Update Wizard, which discards all manual changes made to the storage model.
- Visual Studio 2008 SP1 code generation supports Function Import only for methods that return a collection of entities. If the method should return nothing or a collection of scalars, code generation will not work.
- Stored functions are not supported by Function Import and cannot be used for mapping entity insert, delete, and update operations.
Devart Entity Developer
Entity Developer is designed for creating Entity Framework model visually, saving the user from editing XML manually. It provides you with completely editable storage model, including the dialog box for creating and editing command text. Drag-n-drop support from the Database Explorer eases model updating. Oracle specific features, such as returning result set using REF CURSORs and stored procedures from packages are considered. Flexible and customizable code generation supports all types of methods, created with Function Import.
Creating Database and Model
In order to complete this walkthrough, you need to create the DEPT table and a set of stored routines after this we will create the Entity Framework model using Entity Developer or Microsoft EDM Wizard with this table in the model. See the script for the table and the routines below. In this walkthrough we will use the SCOTT schema for our database objects.
CREATE TABLE DEPT (
  DEPTNO NUMBER(9),
  DNAME VARCHAR2(20),
  LOC VARCHAR2(20),
  CONSTRAINT PK_DEPT PRIMARY KEY (DEPTNO)
);
/

CREATE SEQUENCE DEPT_SEQ;
/

CREATE TRIGGER FOR_DEPT
  BEFORE INSERT ON DEPT FOR EACH ROW
BEGIN
  SELECT DEPT_SEQ.NEXTVAL INTO :NEW.DEPTNO FROM DUAL;
END;
/

CREATE PROCEDURE GET_DEPT_PROC(curParam OUT SYS_REFCURSOR)
IS
BEGIN
  OPEN curParam FOR
    SELECT *
      FROM DEPT
    ORDER BY DEPTNO;
END;
/

CREATE FUNCTION GET_DEPT_FUNC RETURN SYS_REFCURSOR
AS
 cur SYS_REFCURSOR;
BEGIN
  OPEN cur FOR
    SELECT *
      FROM DEPT
    ORDER BY DEPTNO;
  RETURN cur;
END;
/

CREATE PROCEDURE DEPT_UPDATE(pDEPTNO INT, pDNAME VARCHAR, pLOC VARCHAR) IS
BEGIN
  UPDATE DEPT
     SET DNAME = pDNAME,
         LOC = pLOC
   WHERE DEPTNO = pDEPTNO;
END;
/

CREATE PROCEDURE DEPT_DELETE(pDEPTNO INT) IS
BEGIN
  DELETE FROM DEPT
   WHERE DEPTNO = pDEPTNO;
END;
/

CREATE PROCEDURE DEPT_INSERT(pDNAME VARCHAR, pLOC VARCHAR, curParam OUT
SYS_REFCURSOR)
IS
  OUT_DEPTNO NUMBER;
BEGIN
  INSERT INTO DEPT (DNAME, LOC) VALUES(pDNAME, pLOC) RETURNING DEPTNO INTO
OUT_DEPTNO;
  OPEN curParam FOR SELECT OUT_DEPTNO AS "OUT_DEPTNO" FROM DUAL;
END dept_insert;
/

INSERT INTO DEPT (DNAME, LOC) VALUES ('ACCOUNTING', 'NEW YORK');
INSERT INTO DEPT (DNAME, LOC) VALUES ('RESEARCH', 'DALLAS');
INSERT INTO DEPT (DNAME, LOC) VALUES ('SALES', 'CHICAGO');
INSERT INTO DEPT (DNAME, LOC) VALUES ('OPERATIONS', 'BOSTON');
Devart Entity Developer
After you have created these database objects, perform the following steps:
- Choose Create From Database from the File menu.
- The Database Reverse Engineering Wizard will appear. Click Entity Framework and then click the Next button.
- Choose dotConnect for Oracle in the Provider box and set the connection parameters to connect to the database with the created objects. You can use Test Connection button to verify the entered parameters. Click the Next button.
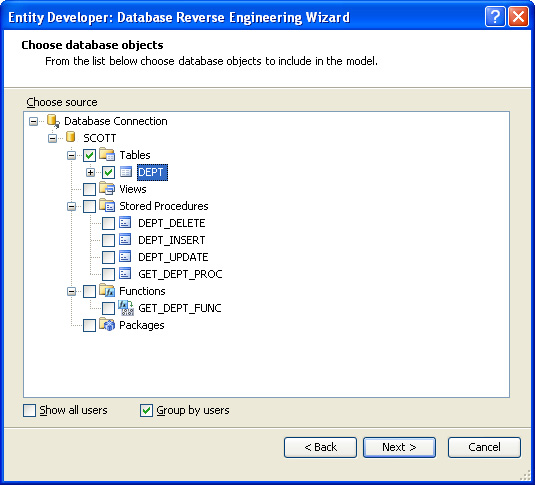
- Expand the database node in the Choose source tree and then the Tables node. Select the DEPT table node check box and click Next.
- Set naming options for classes and properties. Click Next.
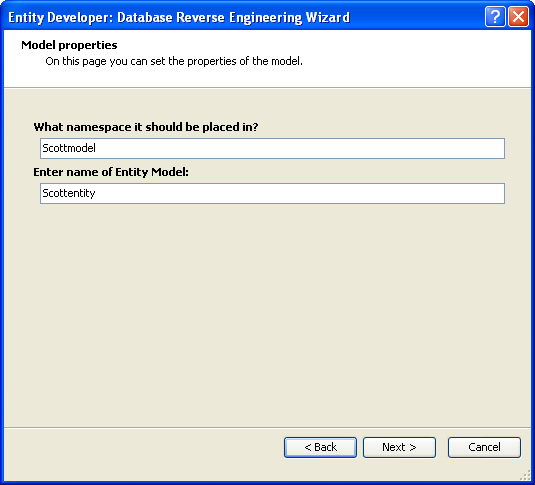
- Specify the namespace for the generated classes, enter name for Entity Container, and click the Next button.
- Clear the Run generator for model check box if it is selected and click the Finish button.
Microsoft EDM Wizard and EDM Designer
Perform the following steps to create such model in Visual Studio:
-
- Create your project in the Visual Studio.
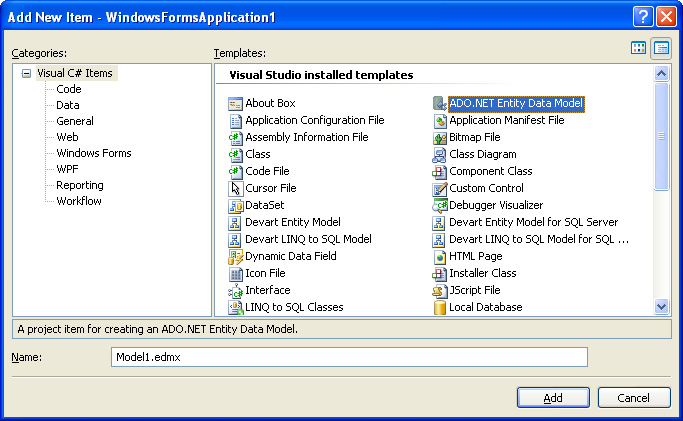
- Right-click it in the Solution Explorer and choose Add -> New Item from the popup menu.
- Click ADO.NET Entity Data Model in the Templates box, specify the name for the model, and click Add.
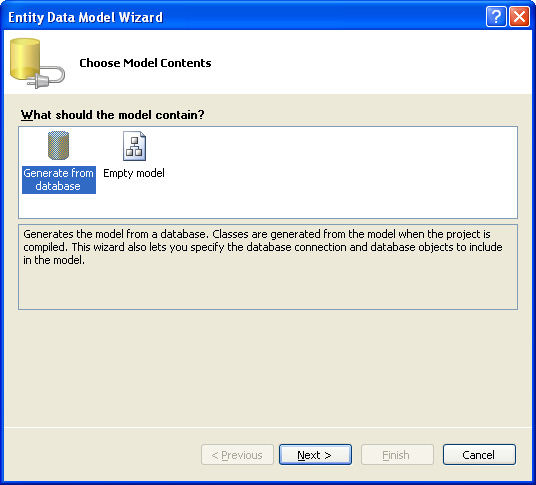
- Click Generate from database and then click Next.
- Click the New Connection button.
- In the appeared Choose Data Source Dialog Box click Oracle Database in the Data source list and select dotConnect for Oracle in the Data provider drop-down list, then click OK.
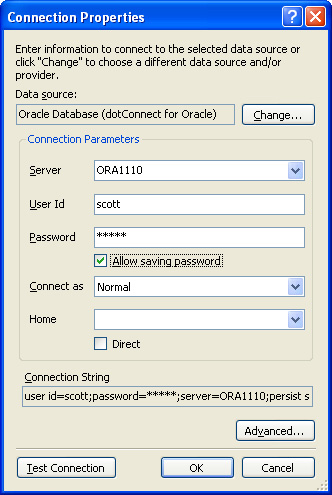
- Specify the connection parameters and click OK.
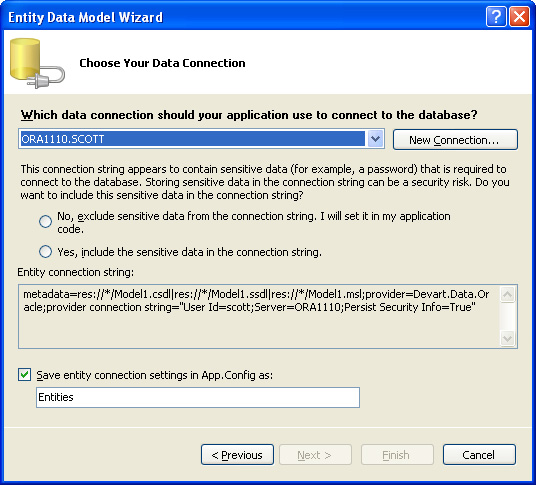
- Specify whether to include the sensitive data in the connection string and click Next.
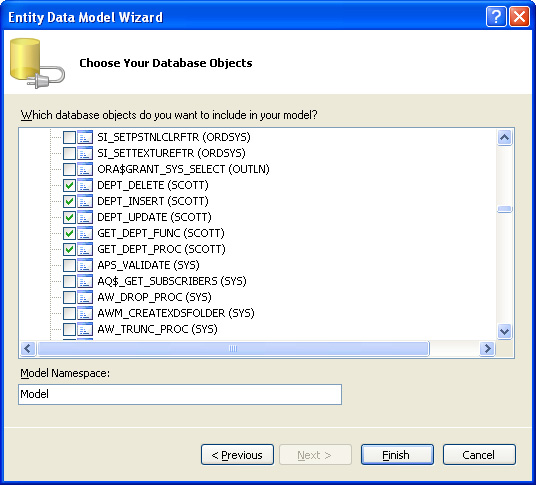
- Select the check boxes for the DEPT table and GET_DEPT_PROC, GET_DEPT_FUNC, DEPT_UPDATE, DEPT_DELETE, DEPT_INSERT stored procedures.
Note: For Entity Developer we did not select the stored routines because in Entity Developer it is very easy to add them later. In Microsoft EDM Designer you may use the Update Wizard to add a stored procedure into an existing model, but remember that Update Wizard overwrites the storage model and may discard your manual changes. So, it is better to add everything we need when creating model.
- Specify the Model Namespace and click Finish.
Stored Procedure Returning Result Set using REF CURSOR Out Parameter
Code of the procedure:
CREATE PROCEDURE GET_DEPT_PROC(curParam OUT SYS_REFCURSOR)
IS
BEGIN
 OPEN curParam FOR
 SELECT *
  FROM DEPT
  ORDER BY DEPTNO;
END;
Devart Entity Developer
Expand the connection node in the Database Explorer, then your schema node and then the Stored Procedures node. Drag the GET_DEPT_PROC to the diagram sheet. The function will be created in the storage model, its REF CURSOR parameter is hidden and its ResultSetParameterName attribute is automatically set to the needed parameter. Corresponding method will be automatically created in the conceptual model. However, you need to set the return type for it manually. To do this perform the following actions:
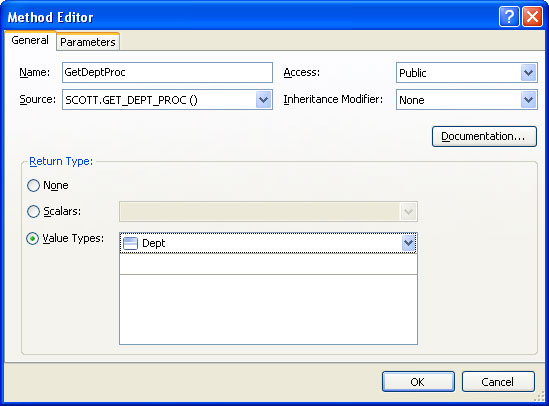
- Double-click the method in the Model Explorer.
- Click the Value Types drop-down list and then select DEPT class instead of the GETDEPTPROCResult complex type.
- Click OK.
You also may drag the procedure from Database Explorer to the storage model node in the Model Explorer. In such case only the storage model is updated, the corresponding method is not created. To create corresponding method, drag the procedure from the Model Explorer to the diagram sheet or right-click it in the Model Explorer and select Create Method from the popup menu.
Microsoft EDM Wizard and EDM Designer
After we have added GET_DEPT_PROC procedure to the model, the following XML was generated for it.
        <Function Name="GET_DEPT_PROC" Aggregate="false" BuiltIn="false"
NiladicFunction="false" IsComposable="false"
ParameterTypeSemantics="AllowImplicitConversion" Schema="SCOTT">
            <Parameter Name="CURPARAM" Type="REF CURSOR" Mode="Out" />
        </Function>
We need to perform some XML code changes manually to use this procedure in our model.
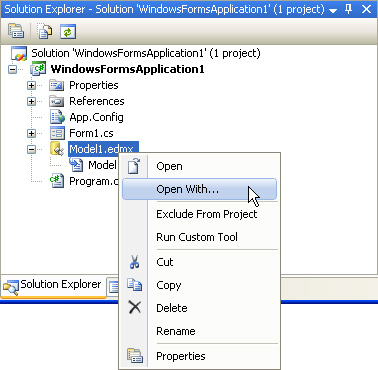
- Right-click the model and select Open With from the popup menu.
- Click XML Editor in the Choose the program you want to use to open this file box and then click OK.
- If the model was already opened in the model designer, Visual Studio will ask you whether to close the designer. Click Yes.
- Add the following attribute to the Schema tag, which is in the Storage Model:
xmlns:devart="http://devart.com/schemas/edml/StorageSchemaExtensions/1.0"
- Add the devart:ResultSetParameterName attribute with the “CURPARAM” value to the FUNCTION tag of the GET_DEPT_PROC function, and remove its CURRPARAM Parameter tag. The result XML for the function should look like this:
<Function Name="GET_DEPT_PROC" Aggregate="false" BuiltIn="false" NiladicFunction="false" IsComposable="false" ParameterTypeSemantics="AllowImplicitConversion" Schema="SCOTT" devart:ResultSetParameterName="CURPARAM"> </Function> - Save the file and close it.
- Reopen it in the ADO.NET EDM Designer.
- Locate the GET_DEPT_PROC in the Model Browser. Right-click it and select Create Function Import from the popup menu.
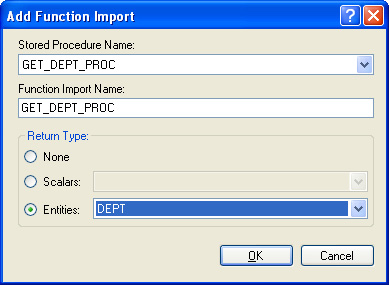
- In the Add Function Import dialog box click Entities and then select DEPT from the Entities drop-down list. You also may change the Function Import Name.
- Click OK.
Using the Method
This example illustrates call of the method, retrieving the collection of entities, and entity output to console. Object context name and case of the Depts class and its fields may differ in your case.
      using (SCOTTEntities context = new SCOTTEntities()) {
         var depts = context.GetDeptProc();
         foreach (Dept item in depts)
             Console.WriteLine("Dept {0}: '{1}', '{2}'", item.Deptno, item.Dname, item.Loc);
      }
Stored Function Returning REF CURSOR
Code of the function:
CREATE FUNCTION GET_DEPT_FUNC RETURN SYS_REFCURSOR
AS
cur SYS_REFCURSOR;
BEGIN
  OPEN cur FOR
  SELECT *
    FROM DEPT
    ORDER BY DEPTNO;
  RETURN cur;
END;
Devart Entity Developer
Expand the connection node in the Database Explorer, then your schema node and then the Functions node. Drag the GET_DEPT_FUNC to the diagram sheet. The function will be created in the storage model, and its following attributes will be set:
- IsComposable=”false” – This attribute indicates if the function returns some value.
- IsConcealedFunction=”true” – This attribute indicates that the function returns value, but the value is invisible for the Entity Framework.
Corresponding method will be automatically created in the conceptual model. However, you need to set the return type for it manually. To do this perform the following actions:
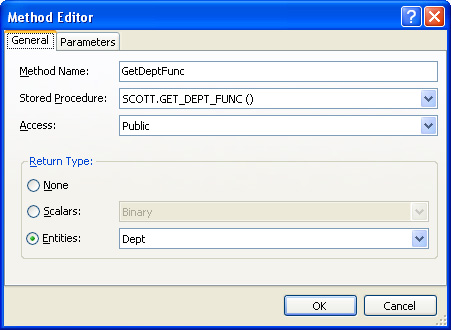
- Double-click the method in the Model Explorer.
- Click Entities and then select DEPT from the Entities drop-down list.
- Click OK.
You also may drag the function from Database Explorer to the storage model node in the Model Explorer. In such case only the storage model is updated, the corresponding method is not created. To create corresponding method, drag the function from the Model Explorer to the diagram sheet or right-click it in the Model Explorer and select Create Method from the popup menu.
Microsoft EDM Wizard and EDM Designer
After we have added GET_DEPT_FUNC function to the model, the following XML was generated for it.
<Function Name="GET_DEPT_FUNC" ReturnType="REF CURSOR" Aggregate="false"
BuiltIn="false" NiladicFunction="false" IsComposable="true"
ParameterTypeSemantics="AllowImplicitConversion" Schema="SCOTT" />
We need to perform some XML code changes manually to use this function in our model.
- Right-click the model and select Open With from the popup menu.
- Click XML Editor in the Choose the program you want to use to open this file box and then click OK.
- If the model was already opened in the model designer, Visual Studio will ask you whether to close the designer. Click Yes.
- Add the devart:IsConcealedFunction=”true” attribute to the FUNCTION tag of the GET_DEPT_FUNC function.
- Replace the ReturnType=”REF CURSOR” attribute with the devart:ReturnType=”REF CURSOR”
- Change value of the IsComposable attribute from “true” to “false”. The result XML for the function should look like this:
<Function Name="GET_DEPT_FUNC" devart:IsConcealedFunction="true"
devart:ReturnType="REF CURSOR" Aggregate="false" BuiltIn="false"
NiladicFunction="false" IsComposable="false"
ParameterTypeSemantics="AllowImplicitConversion" Schema="SCOTT" />
- Save the file and close it.
- Reopen it in the ADO.NET EDM Designer.
- Locate the GET_DEPT_FUNC in the Model Browser. Right-click it and select Create Function Import from the popup menu.
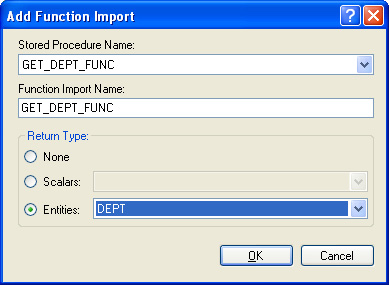
- In the Add Function Import dialog box click Entities and then select DEPT from the Entities drop-down list. You also may change the Function Import Name.
- Click OK.
Using the Method
This example illustrates call of the method, retrieving the first element of the collection of entities, and output to console. Object context name and case of the Depts class and its fields may differ in your case.
      using (SCOTTEntities context = new SCOTTEntities()) {
         Dept dept = context.GetDeptFunc().First();
         Console.WriteLine("Dept {0}: '{1}', '{2}'", dept.Deptno, dept.Dname, dept.Loc);
      }
Mapping CUD Operations to Stored Routines
Using stored routines for insert/update/delete operations is a widely met task in developing applications, working with databases. And it is often necessary that insert operation should return primary key column values. Let’s see, how it is done with Entity Framework.
Code of the stored routines:
CREATE PROCEDURE DEPT_UPDATE(pDEPTNO INT, pDNAME VARCHAR, pLOC VARCHAR) IS
BEGIN
  UPDATE DEPT
    SET DNAME = pDNAME,
    LOC = pLOC
    WHERE DEPTNO = pDEPTNO;
END;
/

CREATE PROCEDURE DEPT_DELETE(pDEPTNO INT) IS
BEGIN
  DELETE FROM DEPT
    WHERE DEPTNO = pDEPTNO;
END;
/

CREATE PROCEDURE DEPT_INSERT(pDNAME VARCHAR, pLOC VARCHAR, curParam OUT
SYS_REFCURSOR)
IS
  OUT_DEPTNO NUMBER;
BEGIN
  INSERT INTO DEPT(DNAME, LOC) VALUES(pDNAME, pLOC) RETURNING DEPTNO INTO
    OUT_DEPTNO;
  OPEN curParam FOR SELECT OUT_DEPTNO AS "OUT_DEPTNO" FROM DUAL;
END dept_insert;
/
Devart Entity Developer
- Expand the connection node in the Database Explorer, then your schema node and then the Stored Procedures node.
- Drag the DEPT_UPDATE, DEPT_DELETE, and DEPT_INSERT procedures to the storage model node in the Model Explorer to avoid automatic method creating.
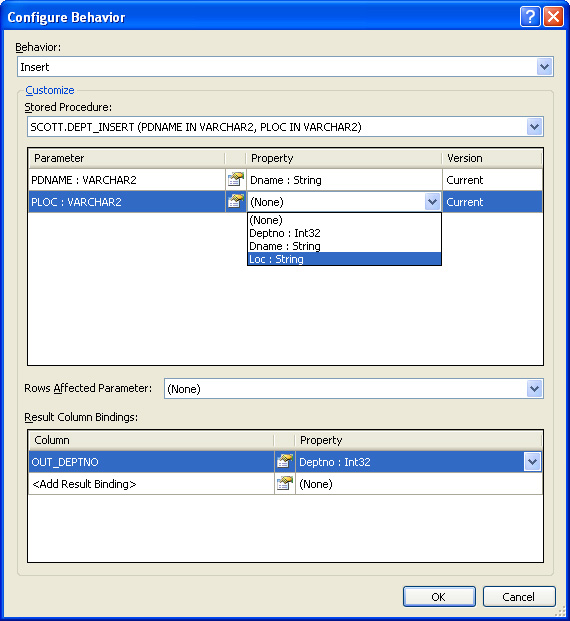
- Right-click the Dept class and choose Configure behavior from the popup menu.
- Choose Insert in the Behavior drop-down list.
- Choose the DEPT_INSERT stored procedure in the Stored Procedure drop-down list.
- Click <Add Result Binding> in the Result Column Bindings grid and type OUT_DEPTNO.
- Choose Deptno in the drop-down list in the Property column of the Result Column Bindings grid.
- Assign the corresponding Dept properties to the parameters in the grid below the Stored Procedure drop-down list by selecting the corresponding property from the drop-down list in the Property column.
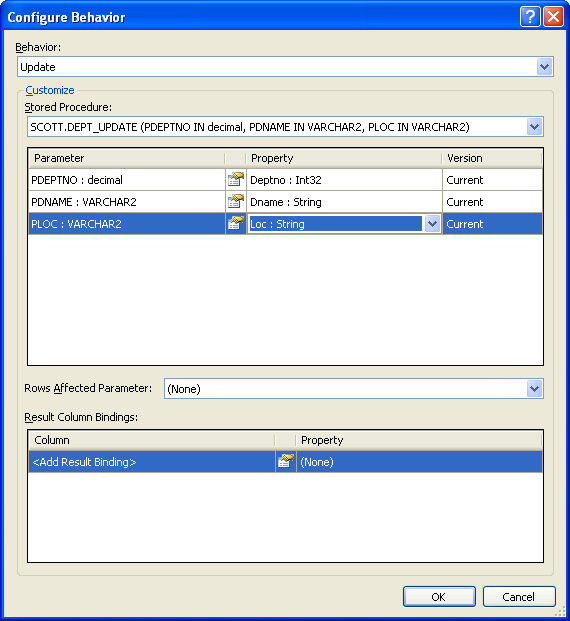
- Choose Update in the Behavior drop-down list.
- Repeat the steps 5 and 8 with the DEPT_UPDATE procedure.
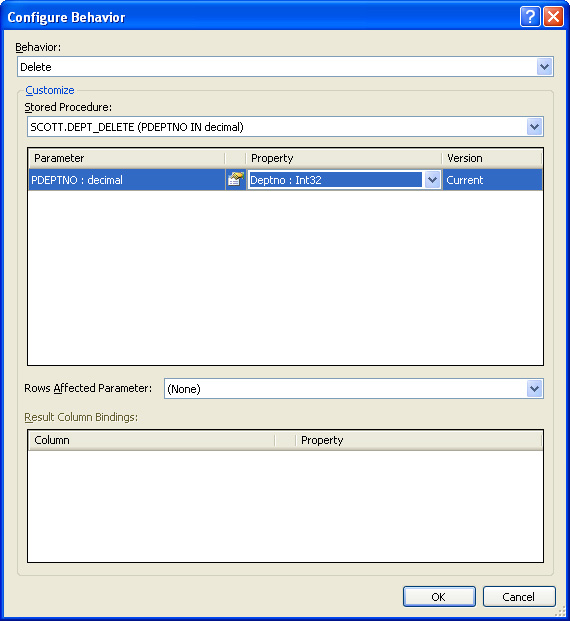
- Choose Delete in the Behavior drop-down list.
- Choose the DEPT_DELETE stored procedure in the Stored Procedure drop-down list.
- Assign Deptno property to the only parameter in the grid below by selecting the corresponding property from the drop-down list in the Property column.
- Click OK.
Microsoft EDM Wizard and EDM Designer
After we have added DEPT_UPDATE, DEPT_DELETE, and DEPT_INSERT procedures to the model, the following XML was generated for them.
        <Function Name="DEPT_DELETE" Aggregate="false" BuiltIn="false"
NiladicFunction="false" IsComposable="false"
ParameterTypeSemantics="AllowImplicitConversion" Schema="SCOTT">
            <Parameter Name="PDEPTNO" Type="decimal" Mode="In" />
        </Function>
        <Function Name="DEPT_INSERT" Aggregate="false" BuiltIn="false"
NiladicFunction="false" IsComposable="false"
ParameterTypeSemantics="AllowImplicitConversion" Schema="SCOTT">
            <Parameter Name="PDNAME" Type="VARCHAR2" Mode="In" />
            <Parameter Name="PLOC" Type="VARCHAR2" Mode="In" />
            <Parameter Name="CURPARAM" Type="REF CURSOR" Mode="Out" />
        </Function>
        <Function Name="DEPT_UPDATE" Aggregate="false" BuiltIn="false"
NiladicFunction="false" IsComposable="false"
ParameterTypeSemantics="AllowImplicitConversion" Schema="SCOTT">
            <Parameter Name="PDEPTNO" Type="decimal" Mode="In" />
            <Parameter Name="PDNAME" Type="VARCHAR2" Mode="In" />
            <Parameter Name="PLOC" Type="VARCHAR2" Mode="In" />
        </Function>
We need to perform some XML code changes manually to use this procedure in our model.
- Right-click the model and select Open With from the popup menu.
- Click XML Editor in the Choose the program you want to use to open this file box and then click OK.
- If the model was already opened in the model designer, Visual Studio will ask you whether to close the designer. Click Yes.
- Add the devart:ResultSetParameterName attribute with the “curParam” value to the FUNCTION tag of DEPT_INSERT function, and remove its curParam Parameter tag. The result XML for the function should look like this:
<Function Name="DEPT_INSERT" Aggregate="false" BuiltIn="false" NiladicFunction="false" IsComposable="false" ParameterTypeSemantics="AllowImplicitConversion" Schema="SCOTT" devart:ResultSetParameterName="CURPARAM"> <Parameter Name="PDNAME" Type="VARCHAR2" Mode="In" /> <Parameter Name="PLOC" Type="VARCHAR2" Mode="In" /> </Function> - Save the file and close it.
- Reopen it in the ADO.NET EDM Designer.
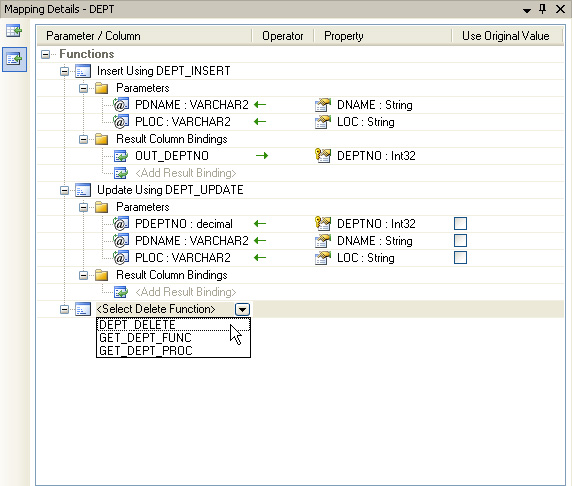
- Right-click the DEPT entity in the Model Browser window and choose Stored Procedure Mapping in the popup menu.
- Click <Select Insert Function> and select DEPT_INSERT from the drop-down list.
- Assign the corresponding Dept properties to the parameters in the grid below by selecting the corresponding property from the drop-down list in the Property column.
- Click <Add Result Binding> in the Result Column Bindings node and type OUT_DEPTNO.
- Choose Deptno in the drop-down list in the Property column of the Result Column Bindings node.
- Click <Select Update Function> and select DEPT_UPDATE from the drop-down list.
- Assign the corresponding Dept properties to the parameters in the grid below by selecting the corresponding property from the drop-down list in the Property column.
- Click <Select Delete Function> and select DEPT_DELETE from the drop-down list.
- Assign the Deptno property to the only parameter in the grid below by selecting the corresponding property from the drop-down list in the Property column.
Creating New Entity Instance
This example shows how to create a new entity instance and save it to database. When the entity is saved to the database, its Deptno field is updated. This new value is output to the console.
      using (SCOTTEntities context = new SCOTTEntities()) {
        Dept newDept = new Dept() { Dname = "New DNAME", Loc = "New LOC" };
        context.AddToDepts(newDept);
        context.SaveChanges();
        Console.WriteLine("DEPTNO: {0}", newDept.Deptno);
      }


i have a comment about the “Stored Procedure Returning Result Set using REF CURSOR Out Parameter”, as the way mentioned above is working fine when the stored procedure is returning just the REF CURSOR as out parameter, but if the stored procedure has another output parameters the following exception is fired:
{“ORA-06550: line 2, column 3:nPLS-00306: wrong number or types of arguments in call to ….: Statement ignored”} System.Exception {Devart.Data.Oracle.OracleException}
could you please help me?
We have performed a test using the latest 5.70.180 build of dotConnect for Oracle and haven’t reproduced this particular problem. However, we recommend you to use Entity Developer for such procedures, everything works smoothly in our tests.