
ODBC connection makes it easy for developers to access data stored in the Snowflake AI data cloud. Even if you aren’t familiar with Snowflake API or have never handled the specific formatting types of data this database supports, ODBC connectivity will still work for you. Using ODBC drivers to connect to Snowflake eliminates the need for manual interventions or finding workarounds. You can just fetch the necessary data from Snowflake and pass it on to your custom app, different reporting tools, and other applications handling data integration. The only requirement is the support of ODBC connectivity. An ODBC driver will streamline the process, letting you set up a secure connection with an ODBC connection string.
In this article, we’ll go through the basics of creating secure ODBC connection strings and explain how to use the versatile connection string parameters provided within the ODBC Driver for Snowflake from Devart to enhance query execution.
- Understanding ODBC Connection Strings
- Key Parameters in a Snowflake ODBC Connection String
- Key Features of the Devart ODBC Driver for Snowflake
- How to Write a Snowflake ODBC Connection String
- An Example of a Snowflake ODBC Connection String
- Conclusion
Understanding ODBC Connection Strings
Let’s imagine you’re the captain of a ship navigating it to the port to get the cargo, but you do not have the coordinates, and no one gave you the list of cargo you need to deliver. This journey probably won’t be safe, and chances are you won’t even be able to get to your destination in the first place.
Like in the situation with the lost ship, the ODBC connection string provides the “coordinates” for the ODBC driver, such as server IP address, port number, username, and password, to initiate the connection between your application and the Snowflake database while ensuring that the “route” is optimal.
These “coordinates” are called parameters, and they can be essential and optional. Let’s explore the difference between them in detail.
Key Parameters in a Snowflake ODBC Connection String
Depending on the task you want ODBC connection strings to handle, you can use different ODBC connection string parameters. However, some parameters are essential for your connection to work. Among them are Database, Domain, Schema, Password, Role, and User ID. If you don’t provide this information in a connection string, the ODBC driver won’t “know” where to connect and what you are allowed to access.
Speaking of the optional parameters, these provide extra customization options to your connection. E.g., you can specify the Timeout to define how long the application should wait before giving up and breaking the connection.
Let’s learn which essential and optional parameters you can use with the ODBC Driver for Snowflake from Devart.
Essential Parameters of ODBC Connection String
To set up an ODBC connection with the Snowflake database, you should specify the following essential parameters in the connection string.
| Parameter | Description |
|---|---|
| Database | A database within Snowflake that you want to access. E.g., Database=your_db |
| Domain | The URL of your ODBC Driver for the Snowflake admin panel. E.g., Domain=example.snowflake.com |
| Schema | The specific schema within the database where your tables or data are located. E.g., Schema=your_schema |
| Password | The secret password associated with your username to authenticate your access. E.g., Password=yourpassword |
| Role | The role or permission level when connecting (note that Roles determine what actions the user can perform). E.g., Role=your_role |
| User ID | The username required to log in to Snowflake (note that the user needs to have the required permissions to connect). E.g., UserID=youruserid |
| Warehouse | The warehouse you are going to work with. E.g., Warehouse=your_warehouse |
Note that before you use the connection string, you must ensure that the user under which you want to establish a connection has the required permissions. Otherwise, the connection will not be established.
Optional Parameters of ODBC Connection String
Even though the parameters provided below are not mandatory, they can significantly improve the efficiency of your connection. You can choose not to use them, or you can pick only the ones that specifically suit your project’s goals.
| Parameter | Description |
|---|---|
| Allow NULL strings | This parameter determines if the connection should allow NULL values in string fields. Not all parameters, according to MSDN, can accept a null value. |
| Empty strings as NULL | If this parameter is set to True, the driver will act as if, instead of a NULL parameter, it encountered an empty string. |
| Connection Timeout | This parameter specifies the maximum time (in seconds) to wait for a connection to the database to be established before quitting. E.g., Connection Timeout=30 |
| ODBC Behavior | This parameter configures specific behaviors of the ODBC driver for compatibility with different applications. E.g., some third-party tools expect the driver to exhibit ODBC 2.x behavior but forget to call SQLSetEnvAttr with the specified version or pass an incorrect value there. In this case, you can use this parameter to specify ODBC behavior. The possible values are:
|
| RegionalNumberSettings | Controls whether the connection should use the local regional settings for numbers (like decimal separators) when converting numbers to strings. |
| RegionalDateTimeSettings | Controls whether to use local regional settings for date and time formats when converting dates and times to strings. |
| ReturnForeignKeys | Specifies whether to return information about foreign key relationships in the database. Fetching metadata about foreign key constraints can be time-consuming; many third-party tools request foreign key metadata even when they do not require this information. Enabling this option may negatively affect performance of data access operations, so the value set by default is False. |
| String Types | Defines how the driver should handle string value types (Default, Ansi or Unicode)
|
| QueryTimeout | Specifies the maximum time (in seconds) to wait for a query execution before failing. |
| UTC Dates | Controls whether date and time values are stored and retrieved in UTC (Coordinated Universal Time) format. |
Additionally, in the ODBC Driver for Snowflake, you can set up proxy parameters for enhanced security.
| Parameter | Description |
| Proxy Server | The proxy hostname or IP address. |
| Proxy User ID | The proxy server account ID. |
| Proxy Password | The proxy password. |
The use of optional parameters in the ODBC connection strings is up to you, so feel free to use them for an improved connectivity workflow.
Now, let’s move on the process of setting up a connection. But first, we’ll have to learn more about the ODBC driver we’ll be using to set up connectivity with Snowflake.
Key Features of the Devart ODBC Driver for Snowflake
There are different ODBC driver options you can use to connect your apps with Snowflake to fetch data, however, not all of them are tailored specifically to be used with the Snowflake database. Getting an ODBC driver for Snowflake from Devart can significantly improve your experience, making it extra easy to use standard SQL expressions, or ensure full support of Snowflake data types.
Among the advantages of the Devart ODBC Driver for Snowflake there are:
- Ability to connect directly to Snowflake via HTTPS. And, if direct access to Snowflake via HTTPS is unavailable, you can connect through a proxy server.
- Support for all Snowflake standard SQL expressions, including functions and operations such as INSERT, UPDATE, and DELETE.
- Complete support for Snowflake field data types and compatibility with the Snowflake API. Learn more about the supported data types from the documentation.
Keep reading to see how you can configure the Devart ODBC Driver for Snowflake to use the connection string with the parameters you have provided to fetch the data.
How to Write a Snowflake ODBC Connection String
Now, let’s move on to writing your first ODBC connection string. Since you are aware of the syntax, this shouldn’t be overly complicated.
Here’s an example of how the connection string featuring the Devrt ODBC driver can look like:
Note, that here {Devart ODBC Driver for ODBC Driver for Snowflake} part stands for an actual name of Data Source Name configuration which you can check after installing ODBC Driver of Snkowflake.
An Example of a Snowflake ODBC Connection String
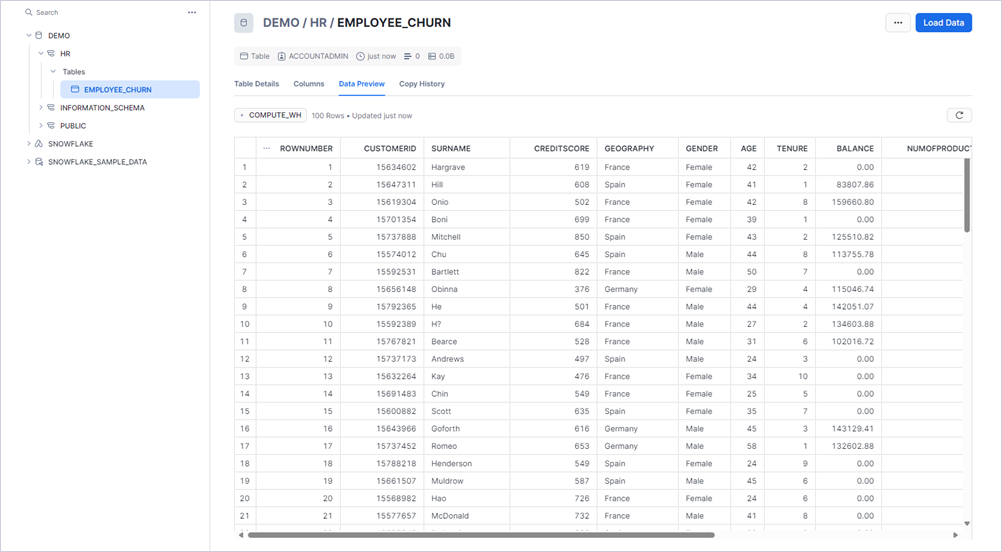
Since you’re reading this article, we assume that you already have the Snowflake account. Probably, you also have a database, so for demonstrational purpose we’re going to use a database named DEMO which you can replace with an actual database name in your project.
We’re also going to use HR schema and EMPLOYEE_CHURN table from our DEMO database. Check the screenshot below to see where you can find this information in your Snowflake interface.
Now, let’s proceed with creating and using your first ODBC connection string for Snowflake.
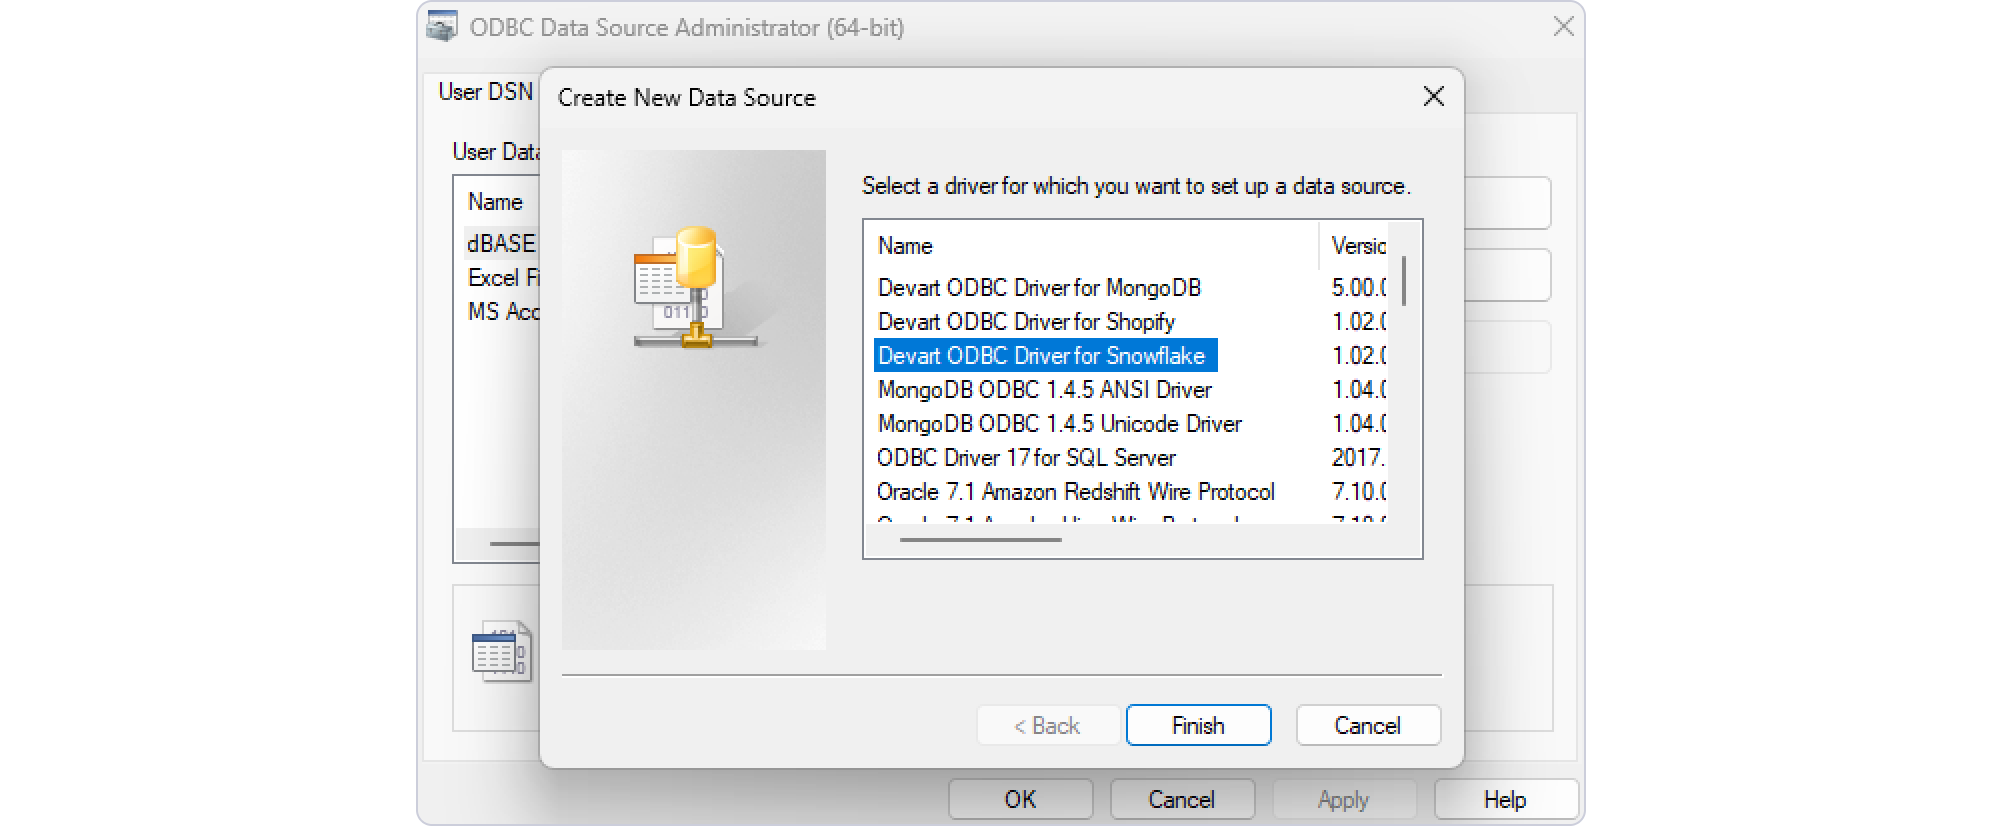
- First off, install the ODBC driver for Snowflake. After the installation, go to ODBC configuration and set up the Devart ODBC for Snowflake. Open the ODBC Data Source Administration panel and create a new data source.
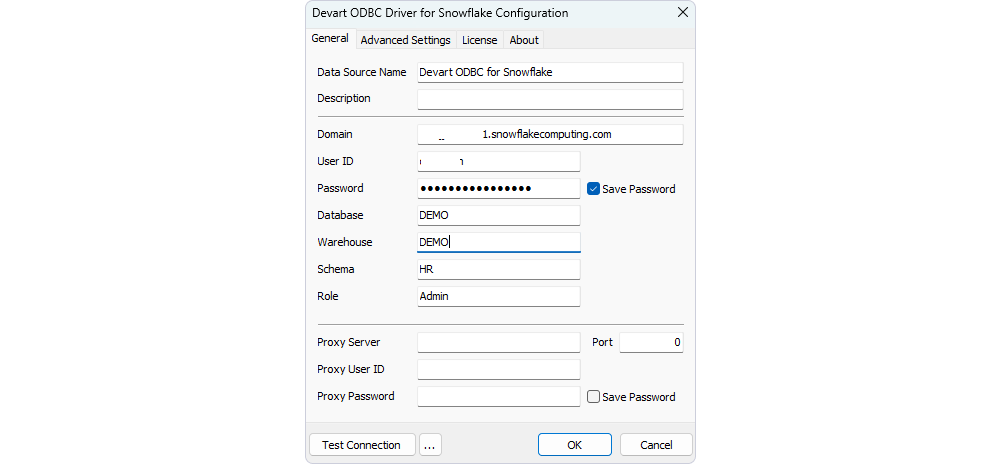
- Input the following connection parameters:
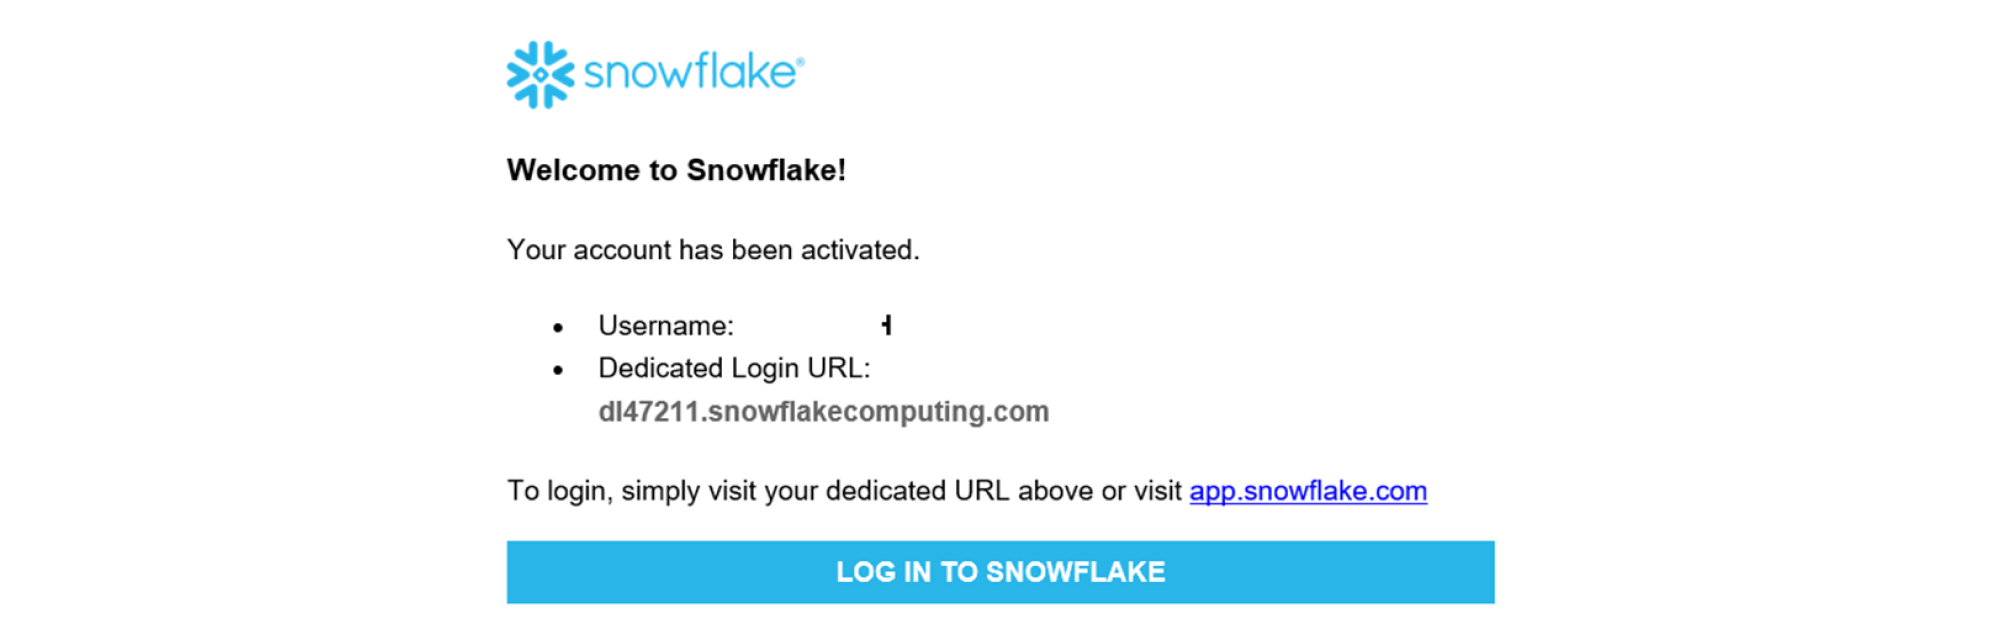
- Domain. Here you should add the URL of your Snowflake domain. You can get this URL in the activation email of Snowflake account.
- User ID. This should be an ID of your Snowflake account
- Database. In our case, we use DEMO as this is the name of the database we want to connect to.
- Schema. We are going to use HR schema.
- Warehouse. DEMO name of a cluster of compute resources in Snowflake. This parameter can be optional.
- Role. We suggest using the Admin role of User ID to login to Snowflake.
- If you have Proxy, for access you must provide the proxy server details, and specify user and password information.
- After everything is set up, the ODBC connection string is going to look like this:
Feel free to adjust it using optional parameters for better efficiency.
Conclusion
It’s astonishing how easy it is to set up an ODBC connection string and access the Snowflake database to pull the data from it to your applications or third-party platforms. With a tailored ODBC driver, here’s no need to use complex configurations or study API to ensure all the data types will be supported. Moreover, ODBC Driver for Snowflake from Devart will let you perform DML operations, as it supports fully SQL-92 Standard.
Try the Devart ODBC Driver for Snowflake to set up seamless and secure connectivity between your Snowflake database and any application of your choice!
