A recent update of dbForge Studio for PostgreSQL has added one more entry to its list of supported databases. We’re talking about TimescaleDB, a PostgreSQL fork marketed as “the easiest, fastest, and most cost-effective time-series database.” Now it can be seamlessly accessed and managed from the Studio—and that’s what our story is about.
If you aren’t acquainted with TimescaleDB, below you’ll get the fastest way to learn all about it. And if you’re already an active user, chances are that after reading this post you’ll discover an excellent database management tool that will make your daily work a breeze. Either way, fasten your seatbelts and let’s go!

Contents
- What is TimescaleDB used for?
- How to install the TimescaleDB extension and connect with dbForge Studio for PostgreSQL
- How to create hypertables in TimescaleDB
- Code completion, formatting, and syntax check in TimescaleDB
- Schema and data comparison in TimescaleDB
- Test data generation in TimescaleDB
- TimescaleDB in action: use cases and business applications
What is TimescaleDB used for?
TimescaleDB was designed as a superior as-a-service alternative to the regular PostgreSQL, which retains all of its advantages—including compatibility with the entire ecosystem of PostgreSQL tools, drivers, and connectors—yet comes with drastically improved performance, better scalability, and time-series hyperfunctions. The latter is the main focus of TimescaleDB.
In case you don’t know what a time-series database is, let us explain. It’s a database that allows storing, retrieving, and managing timestamped data. This includes data records that are part of a so-called ‘time series’, where data points are associated with timestamps—and the said timestamps define the actual relations between data points.
Let’s make it clearer with a simple example. Imagine an application that continuously retrieves measurements from sensors and allows you to monitor them in real time. That’s a large data flow for sure, yet it’s conveninently timestamped, and you can always retrieve the required data points from any period of time for subsequent analysis.
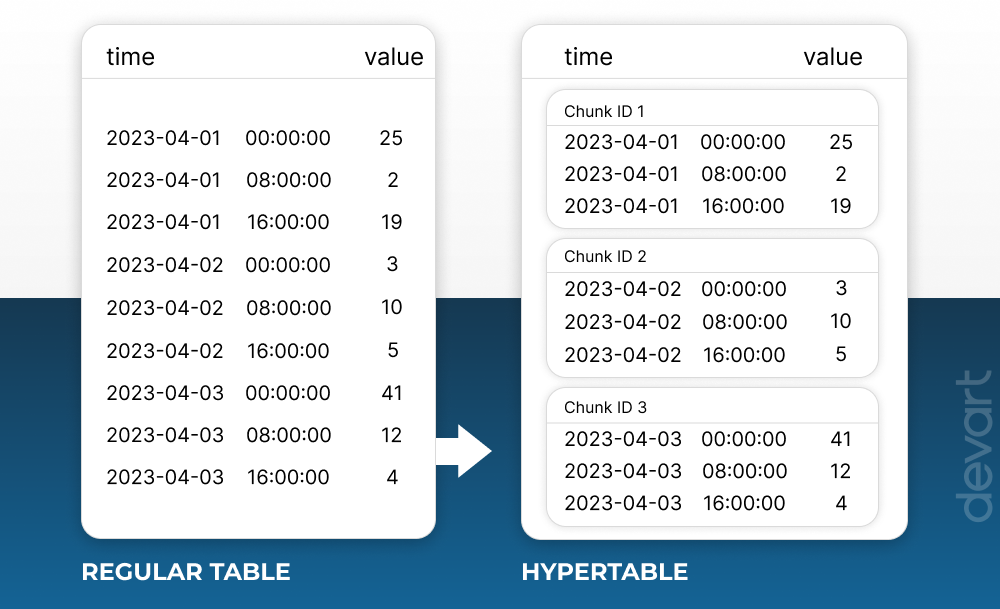
Time-series databases work with hypertables, a specific type of tables designed to improve performance by partitioning time-series data on its time parameter. To be more precise, hypertables consist of multiple regular PostgreSQL child tables that are called chunks. A chunk is a partition based on a certain time constraint and thus contains data from a certain time range. Yet it’s not as complicated as it sounds—since chunks are set up and managed by your database automatically, you can manage your data as if it’s stored in a standard table.
Here’s a regular table versus a hypertable where the chunk timespan equals 1 day.
By the way, hypertables and standard PostgreSQL tables can easily coexist in the same database. You only have to use hypertables for time-series data and standard tables for relational data, and that’s pretty much it.
Now, with the basics out of the way, let us show you how to install a self-hosted TimescaleDB database and connect to it with dbForge Studio for PostgreSQL.
How to install the TimescaleDB extension and connect with dbForge Studio for PostgreSQL
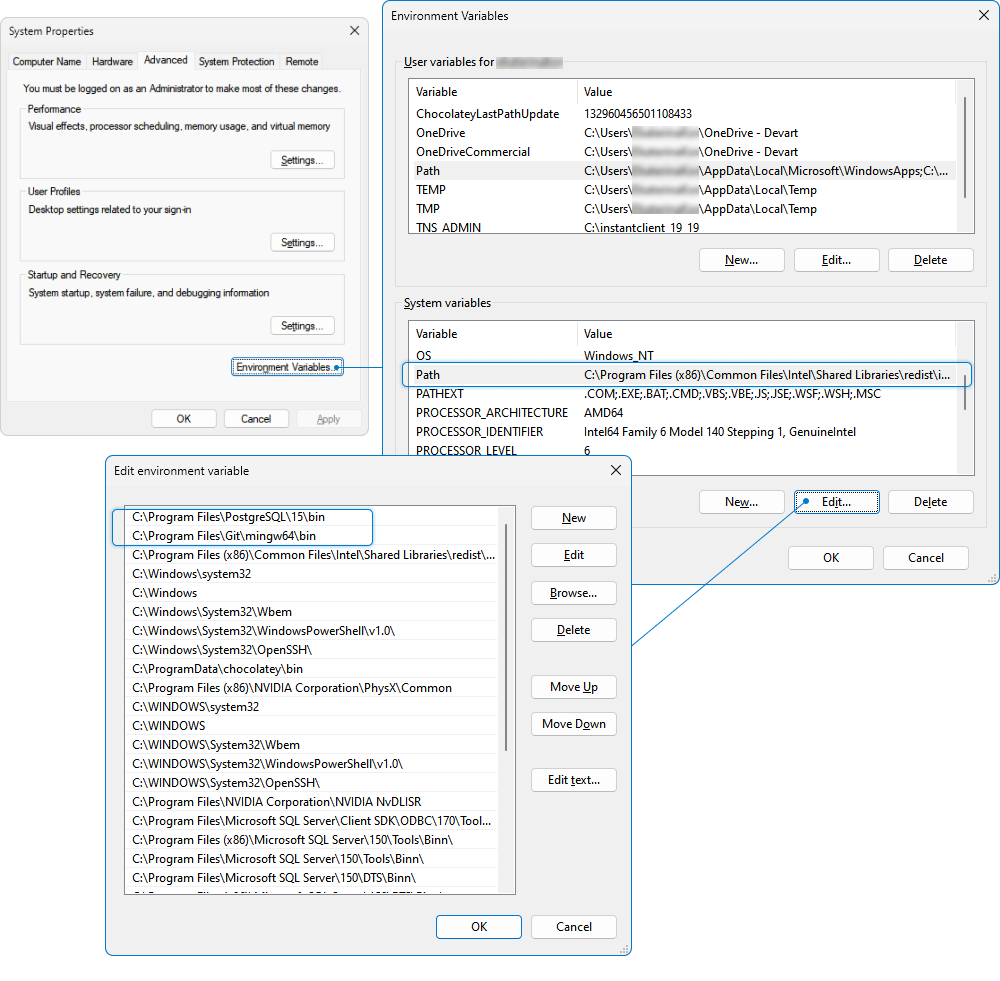
The first thing you need to do is add two system environment variables: C:\Program Files\PostgreSQL\15\bin and C:\Program Files\Git\mingw64\bin. To do that:
- Go to the Start menu, start typing “environment variables”, and you will be prompted to open Edit the system environment variables.
- Click it to open the System Properties window. There, click Environment Variables.
- In the Environment Variables window that opens, find Path under System variables, select it and click Edit.
- In the Edit environment variable window that opens, click New and add the two abovementioned variables.
- Finally, click OK to apply your changes.
Now let us show you how to install a self-hosted TimescaleDB on a Windows machine. The following guide is a concise version of the official TimescaleDB installation manual. If any problems arise during the installation, feel free to consult it to get more details.
Prerequisites
- Operating system: Microsoft Windows 10 / Microsoft Windows 11 / Microsoft Windows Server 2019
- The minimum supported PostgreSQL versions are: 12.8 / 13.5 / 14.0 / 15.0; in order to install PostgreSQL 15.1.1 or later, make sure you have installed OpenSSL 1.1.1 on your machine
Install self-hosted TimescaleDB on Windows
- Download and install the Visual C++ Redistributable for Visual Studio from the Microsoft website.
- Download and install PostgreSQL from the PostgreSQL website. You might need to add the pg_config file location to your path.
- Download the TimescaleDB installation .zip file from Windows releases.
- Locate the downloaded archive and extract the files.
- In the extracted TimescaleDB directory, right-click the setup.exe file and select Run as Administrator to start the installer.
- After you complete the installation, you need to configure your database. You can do it by running the timescaledb-tune script, which is included with the timescaledb-tools package.
Set up the TimescaleDB extension
1. Go to the command prompt and connect to the PostgreSQL instance as the postgres superuser.
psql -U postgres -h localhostIf your connection is successful, you’ll see a message similar to this, followed by the psql prompt:
psql (13.3, server 12.8 (Ubuntu 12.8-1.pgdg21.04+1))
SSL connection (protocol: TLSv1.3, cipher: TLS_AES_256_GCM_SHA384, bits: 256, compression: off)
Type "help" for help.
tsdb=>
2. At the psql prompt, create an empty database. This is what it looks like for a database called example:
CREATE database example;3. Next, connect to the database you have created using the following command:
\c example4. Then add the TimescaleDB extension:
CREATE EXTENSION IF NOT EXISTS timescaledb;5. Finally, you can connect to your database with the following command:
psql -U postgres -h localhost -d exampleConnect to TimescaleDB via dbForge Studio
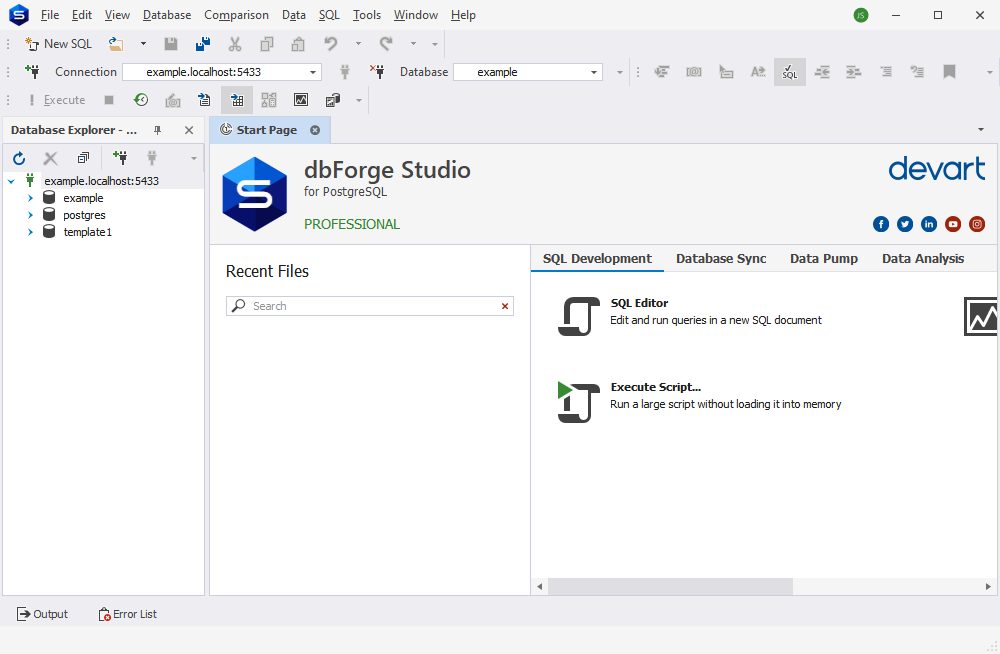
Now we’re going to connect to our newly created database using dbForge Studio for PostgreSQL, an advanced IDE for database development and management. As we open it, we are greeted by the Database Connection Properties window, where we enter the credentials for our newly created database.

Then we click Connect, and there we go!
Note: dbForge Studio for PostgreSQL comes both separately and as part of a bundle called dbForge Edge, which contains three more Studios for SQL Server, MySQL, and Oracle databases.
How to create hypertables in TimescaleDB
Now let’s proceed to creating our first hypertable. To do that, we’ll run the following query in dbForge Studio.
CREATE TABLE conditions(
tstamp timestamptz NOT NULL,
device VARCHAR(32) NOT NULL,
temperature FLOAT NOT NULL);

SELECT create_hypertable(
'conditions', 'tstamp',
chunk_time_interval => INTERVAL '1 day'
);
This is what it looks like in the Studio’s interface.

Note: An alternative query with column partitioning would look like this:
SELECT create_hypertable(
'conditions', 'tstamp',
partitioning_column => 'device',
number_partitions => 8,
chunk_time_interval => INTERVAL '1 day');
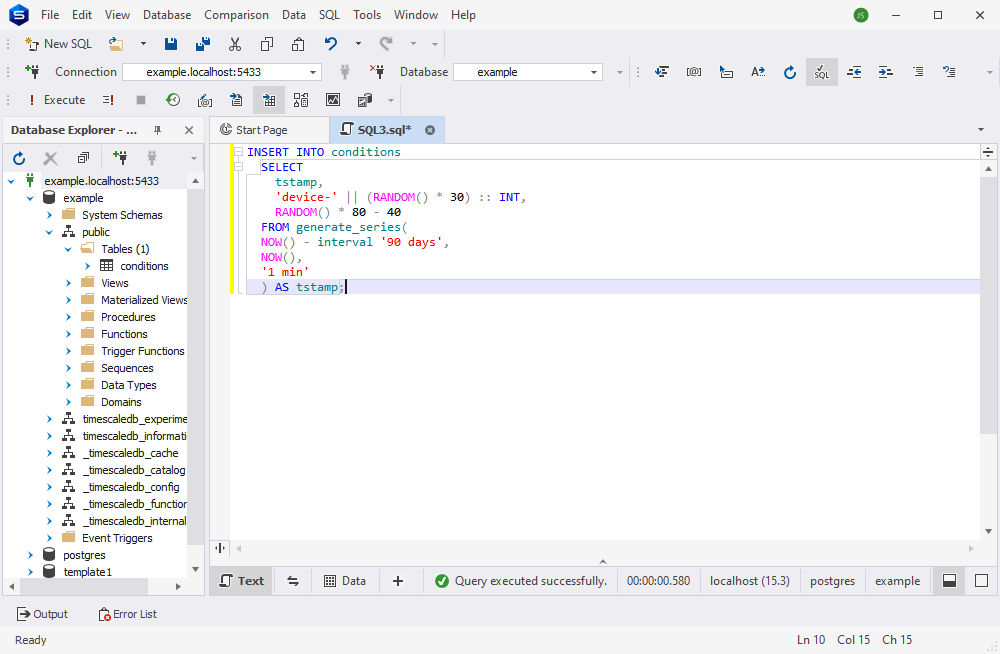
After we run our query, our table is successfully created, and we can immediately fill it with data. To do that, we use the following query.
INSERT INTO conditions
SELECT
tstamp, 'device-' || (random()*30)::INT, random()*80 - 40
FROM
generate_series(
NOW() - INTERVAL '90 days',
NOW(),
'1 min'
) AS tstamp;
This is what it looks like in the Studio.
Now let’s check it with a SELECT query. Voilà! We’ve got the data.

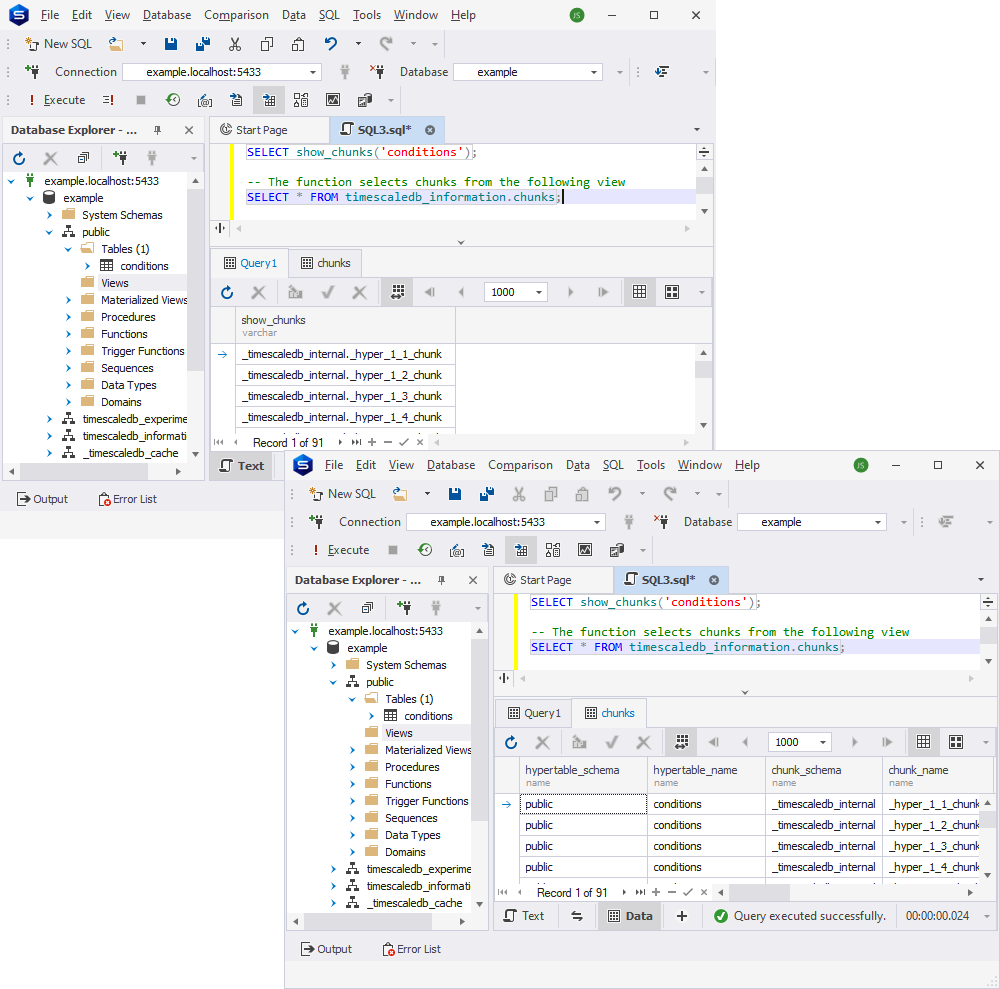
We can view chunks as well using the following code:
SELECT show_chunks('conditions');

-- The function selects chunks from the following view
SELECT * FROM timescaledb_information.chunks;
Once we run it, this is what we get.
Now let us show you some of the most important features of dbForge Studio applied to a TimescaleDB database.
Code completion, formatting, and syntax check in TimescaleDB
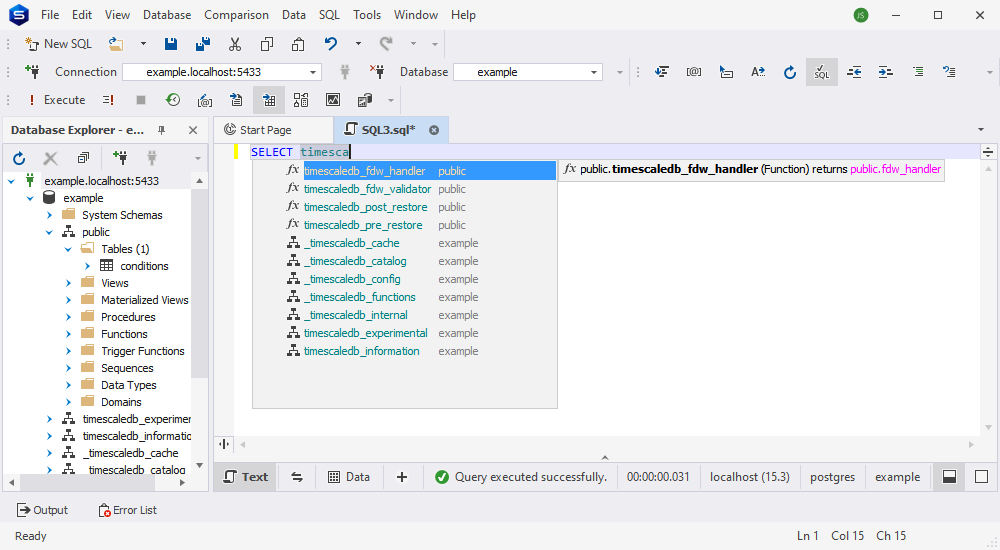
First and foremost, let’s talk about one of the top essentials of dbForge database solutions: SQL coding assistance. It’s at your service in its entirety, from context-aware code completion and syntax validation, which help you write clean, error-free SQL code at a much faster pace, to advanced SQL formatting with a rich set of options and templates, designed to help create unified, consistent code styles.
Schema and data comparison in TimescaleDB
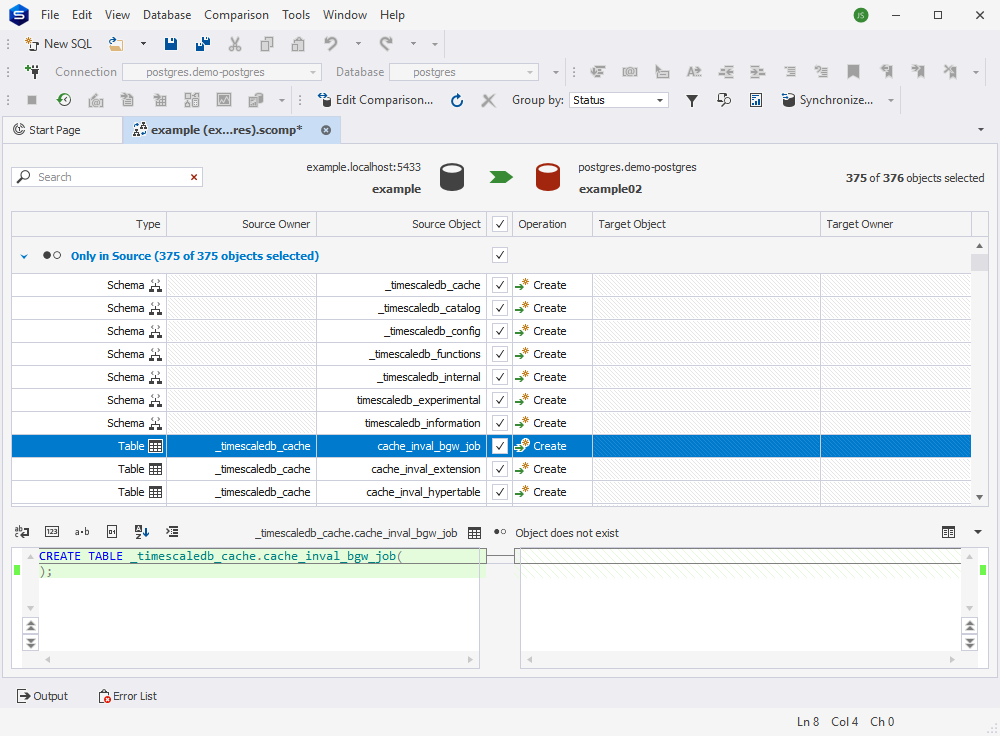
The Studio’s integrated tool called Schema Compare delivers the easiest way of spotting differences in the objects of your TimescaleDB databases. Just like with a regular PostgreSQL database, you set the source, set the target, and run the comparison. Afterwards, the differences can be reviewed and synchronized to the target database.
How about comparing actual table data? Well, since chunks are basically your regular tables, the Studio has no problems comparing entire hypertables and identifying discrepancies. This is especially useful for time-series databases, which tend to deal with huge amounts of data. Similarly, differences can be synchronized in a matter of moments.
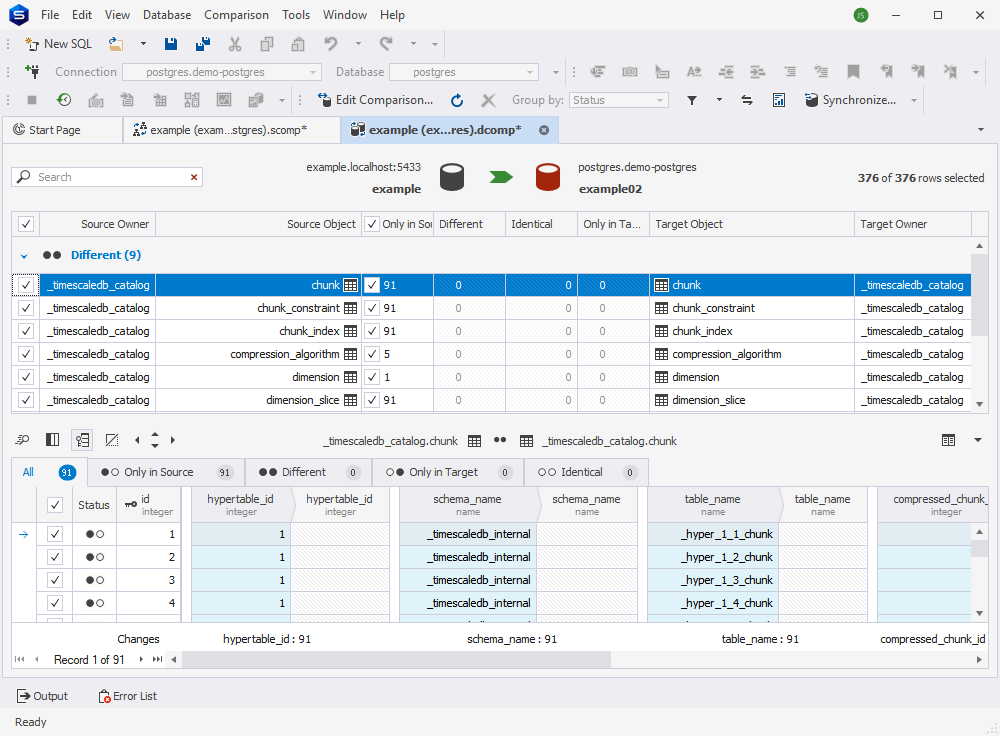
Note: Both Data Compare and Schema Compare are also available for PostgreSQL as standalone applications.
Test data generation in TimescaleDB
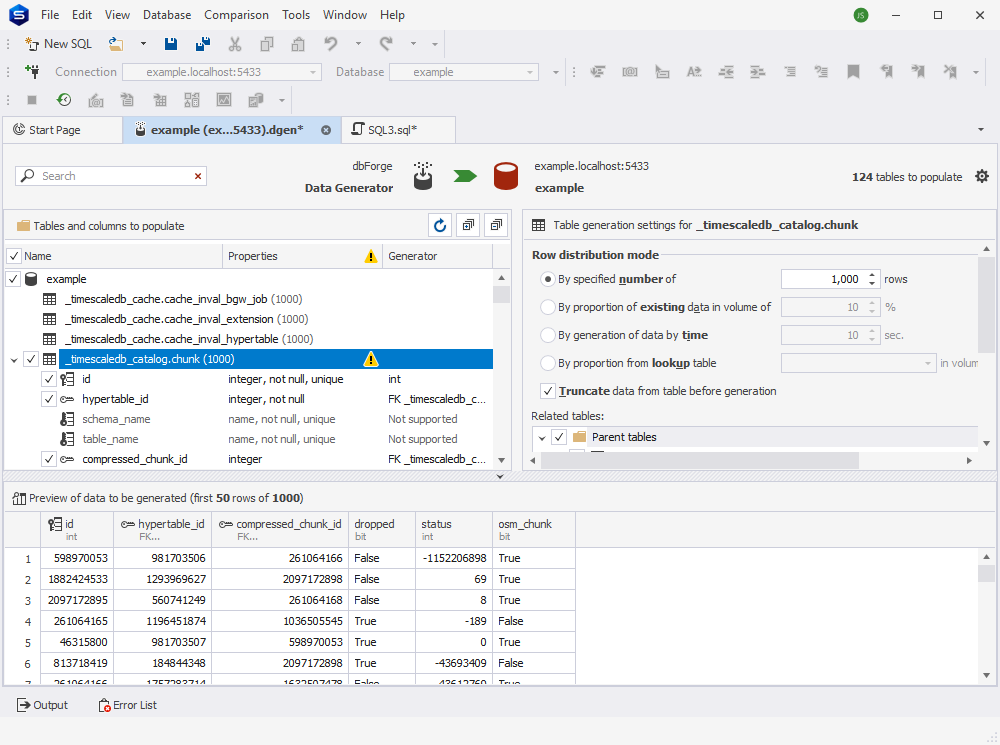
Finally, you can fill your TimescaleDB databases with realistic test data using the Studio’s built-in Data Generator. A large collection of predefined generators will quickly supply any amount of column-intelligent data, tailored to the specifics of your database. And if it’s not enough, you can easily create your own custom generators.
TimescaleDB in action: use cases and business applications
Now that you’ve seen how TimescaleDB works, let us give you a few cases where time-series databases can be applied:
- Data-driven predictive analytics
- Software that uses telemetry data from IoT devices
- Solutions that involve the rapidly changing financial market data
- Telecommunications
- Machine learning algorithms
- System or application performance monitoring software
- Security applications
Download dbForge Studio for PostgreSQL for a free 30-day trial today!
Traditionally, we’d love to invite you to get some firsthand experience with dbForge Studio by downloading it for a free month-long trial, which is an excellent chance explore all of its features and see how it works in tandem with TimescaleDB.


