Database developers and administrators often need to compare and synchronize schemas and table data across multiple databases. Recognizing and deploying changes to target environments are vital steps in database development, especially when working with development, test, staging, and production databases. Such routine tasks can be automated, allowing for efficient multi-database comparisons.
Devart’s dbForge product line offers some of the best tools for database comparison and synchronization: Schema Compare and Data Compare. Both tools are available as standalone solutions or features within their multifunctional Studios – IDEs tailored for major database systems like SQL Server, MySQL, Oracle, and PostgreSQL. This article delves into automating database comparisons using dbForge Studio for SQL Server and Windows PowerShell.

Contents
- Automation of database comparisons with PowerShell
- Setting up the databases
- Creating the PowerShell script
- Executing the PowerShell script
- Analyzing the generated reports
- Reviewing the logs
- Conclusion
Automation of database comparisons with PowerShell
Windows PowerShell is a dedicated solution for task automation that allows, among others, database administrators to handle most of their routine tasks with minimum effort. With PowerShell, you can adjust various settings, stop and launch services, and also schedule and run diverse tasks, such as database comparison using the SQL Server PowerShell module or – as we recommend – in dbForge Studio for SQL Server.
The process is simple:
- In a dedicated text file, specify which databases should be compared.
- Create a PowerShell script with the task configuration.
- Execute the script and analyze the results.
In this case, the PowerShell script will initiate the comparison of databases and generate a comparison report and a log file with detailed information about the comparison process.
Setting up the databases
First of all, it is necessary to define the databases to be compared. In our scenario, we have a database that we need to compare to several other databases. This single database must be defined in the PowerShell script – we are going to examine this point further in our article. The databases we need to compare to that “original” database should be specified in a separate text file. Also, we need to provide the connection details for each database in that text file.
Open any text editor that you prefer and enter the server connection, database name, authentication type, username, and password for the database in a single line, separated by commas. The string should look like this:
<server>,<database>,<is_windows_auth>,<user>[,<password>]
In the provided example:
- server is the name of the server where the target database is located.
- database is the name of the database.
- is_windows_auth defines the authentication type. If it is set to True, it uses Windows Authentication, while False means utilizing SQL Server Authentication.
- user is the username.
- password is the password. If we apply the SQL Server Authentication (is_windows_auth is False), the password is not needed.
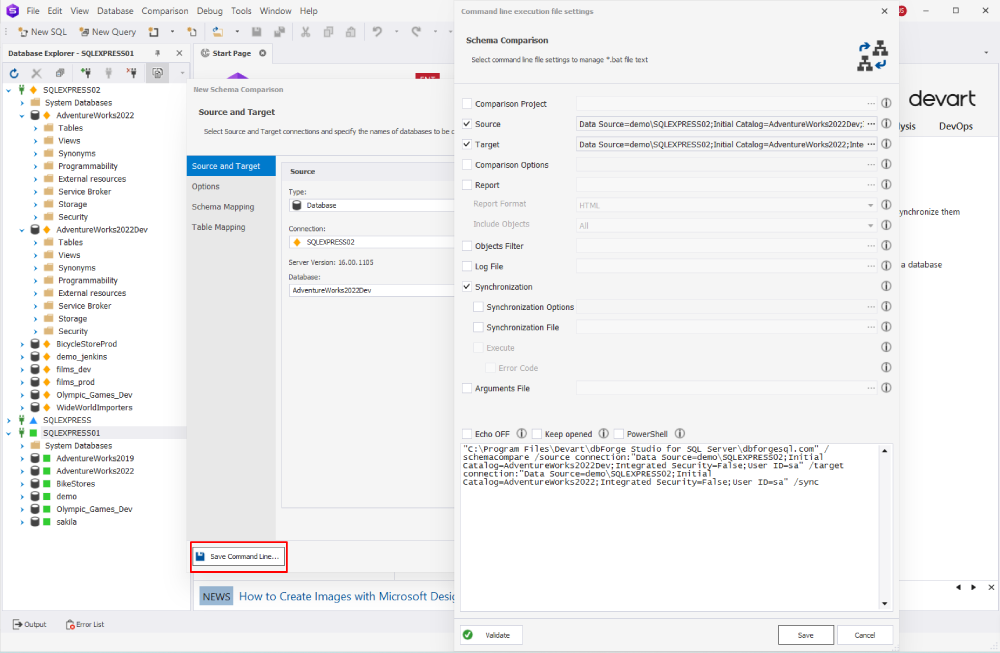
A simple option to retrieve these details is turning to “Save Command Line” in the Schema Compare feature of dbForge Studio for SQL Server. By clicking that button, you can get an automatically generated string with all the details for the target database.

This way, you can compile the list of all databases for comparison – you can specify as many databases as needed. Note that each database must be on a separate line like below:
Data Source=demo\SQLEXPRESS02;Initial Catalog=AdventureWorks2022Dev;Integrated Security=False;User ID=sa
Data Source=demo\SQLEXPRESS;Initial Catalog=AdventureWorks2022Test;Integrated Security=False;User ID=sa
Data Source=demo\SQLEXPRESS;Initial Catalog=AdventureWorks2019;Integrated Security=False;User ID=sa
You can compare your database to other databases, no matter if they are stored on the same server or on different servers. You only need to specify the necessary connection details correctly.
Once done, save this file. We give it the name Databases.txt, you may name it as it suits you, but the path to that file is essential for the task configuration, as we must define it in the PowerShell script. In our example, we save the Databases.txt file in the root directory of the D drive.
The next step is preparing a PowerShell script that will command dbForge Studio for SQL Server to perform the task.
Creating the PowerShell script
The script for PowerShell that you are going to create at this stage will launch the task, generate comparison reports and log files, and save them in the designated folder.
To create the script, open any text editor or the PowerShell Integrated Scripting Environment (ISE) and enter the PowerShell commands in the editor.
Below you can see an example. Pay attention to the paths to the Databases.txt file and to dbForge Studio for SQL Server. Make sure you customize these parameters according to your specific environment and project’s requirements.
#region Variables

$rootFolder = "D:\Monitor"
$databasesTxtPath = "D:\Monitor\Databases.txt"
$diffToolLocation = "C:\Program Files\Devart\dbForge Studio for SQL Server\dbforgesql.com"
$SourceConnectionString = "Data Source=demo\SQLEXPRESS02;Initial Catalog=AdventureWorks2022;Integrated Security=False;User ID=sa"
#endregion


foreach ($line in [System.IO.File]::ReadAllLines($databasesTxtPath)) {
   # Read the connection parameters for the current database from the configuration file
   $TargetConnectionString = "$line"
   $today = (Get-Date -Format "dd-MM-yyyy_HH_MM_ss")
   $ReportsLocation = New-Item -ItemType Directory -Force -Path ($rootFolder + "\" + "DiffReports")
   $logsLocation = New-Item -ItemType Directory -Force -Path ($rootFolder + "\" + "Logs")
   $srvCleanName = ($server -replace "\\", "")
   $currentReportFile = Join-Path $ReportsLocation "$srvCleanName.$database.$today"
   $logName = Join-Path $logsLocation "$srvCleanName.$database.$today.txt"


# Initiate the comparison of the Source Database with the multiple Targer Databases and generate a report
$process = Start-Process -FilePath $diffToolLocation -ArgumentList "/schemacompare /source connection:`"$SourceConnectionString`" /target connection:`"$TargetConnectionString`" /report:`"$currentReportFile`" /reportformat:html /includeobjects:All /log:`"$logName`"" -PassThru -Wait -windowstyle hidden


   # Return exit code 100 in case the databases are identical
   if ($process.ExitCode -eq 100) {
      Add-Content -Path $logName -Value "The databases are identical"
      #remove the newly created report, since no differences are detected
      Remove-Item -Path $currentReportFile".html" -Force:$true -Confirm:$false
      continue
   }
   else {
      Write-Host "We have difference!More information in log file `"$logName`" and in report"
   }
}
Save your file as a PowerShell script with the .ps1 extension (e.g., Task.ps1).
Now you can execute it to launch the database comparison.
Executing the PowerShell script
The Task.ps1 file can be executed whenever you wish to compare your database with several other databases. Or, you can schedule this task and run it regularly, using the Windows Task Scheduler. Let us check how the PowerShell script works at the moment.
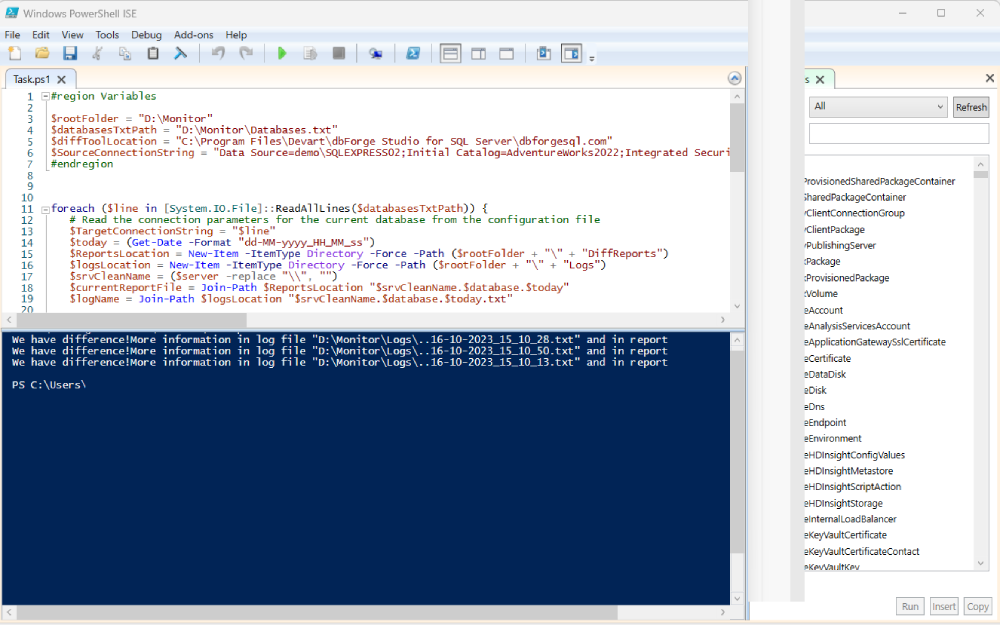
Right-click the Task.ps1 file and select Run with PowerShell. Or, you might prefer using the PowerShell ISE as it allows more visualization options.

The task is done, and the Studio has also generated reports and log files with detailed information about the task performance. Now we can review them.
Analyzing the generated reports
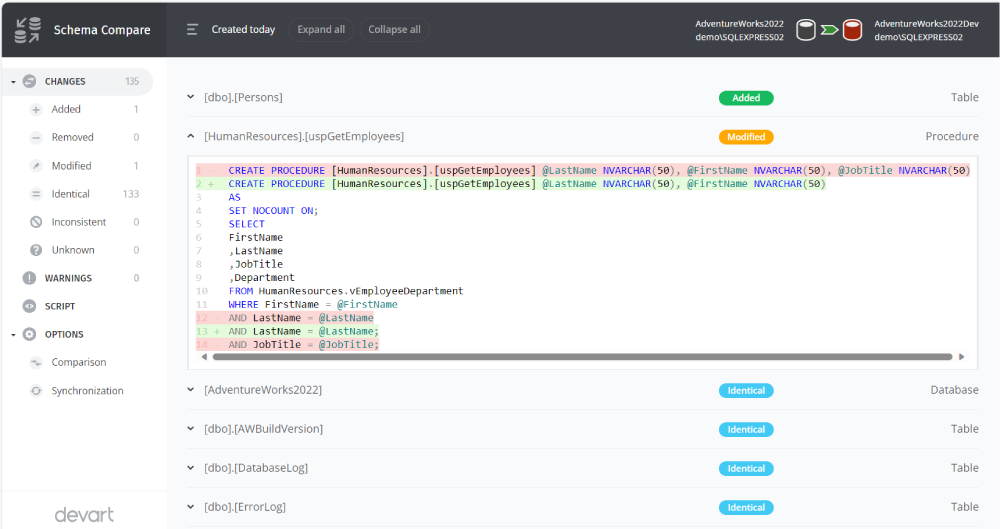
dbForge Studio for SQL Server generates reports for each comparison of two databases and saves them in the dedicated folder. In our case, we specified the HTML format for the reports and designated the DiffReports folder to store these files. After the task is performed successfully, we navigate to the necessary folder and view the reports there.
Every report contains the following details:
- Date of generation
- Source and Target database information
- Comparison results in the form of a list – you can explore each result for more information
- Dedicated synchronization script for deploying changes
- Warnings

Reviewing the logs
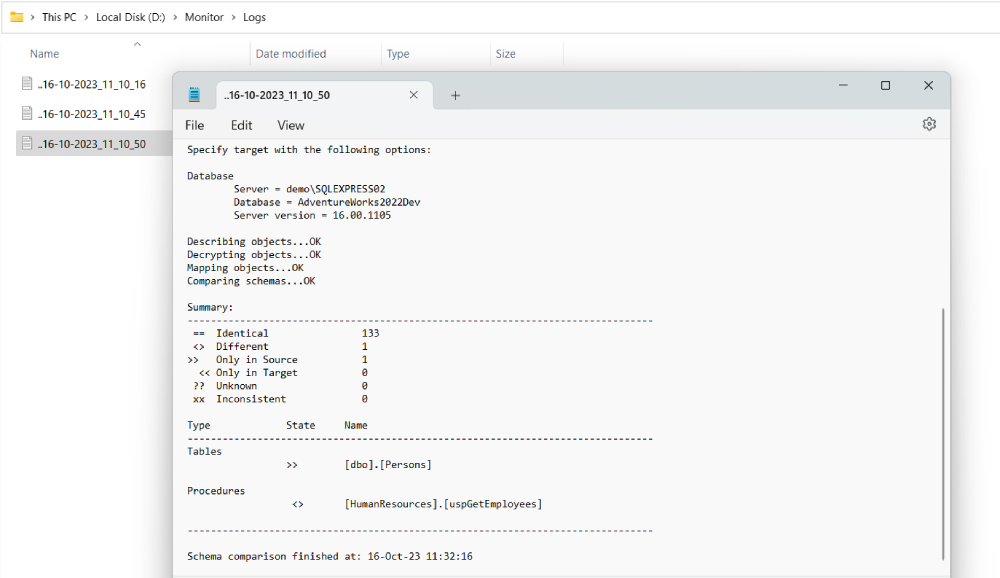
The logs for each “pair” are saved in the Logs folder – the location should also be specified in the PowerShell script. Navigate to that folder to check the log files:

Note that we have explored the automation of tasks of the database schemas comparison. dbForge Studio for SQL Server also includes the Data Compare feature that allows table data comparison and synchronization. The configuration of the task is similar – you only need to select Data Comparison.
Conclusion
The automation of database schema comparison provides more than just streamlining the often cumbersome and error-prone task. It ensures accuracy and consistency, eliminating human error and allowing businesses to reallocate resources to more important tasks. The benefits also extend to collaboration, as teams can rapidly identify and address changes and work cohesively to implement or revert them.
With dbForge Studio for SQL Server, comparing databases, including their schemas and table data, becomes effortless. Its robust automation capabilities even allow simultaneous comparison of one database with multiple databases. This can be executed seamlessly through a PowerShell script and scheduled for regular execution within the Studio.
Explore this feature, along with numerous others, by taking advantage of the fully functional free trial of dbForge Studio for SQL Server. Experience the trial under a full workload, test all of its capabilities, and witness the immediate growth of your productivity!


