
The SQL Server PowerShell module is a set of tools that enable the use of PowerShell for SQL Server instances, databases, and objects. With the powerful command-line interface of the SQL Server PowerShell module, database administrators and developers can manage and automate SQL Server environments, efficiently perform routine maintenance tasks, deploy consistent configurations across multiple instances, and implement repeatable scripting solutions—all without the overhead of the graphical interface.
If you want to improve operational efficiency and reduce manual intervention, we’ll show you how to install SQL Server PowerShell, also known as the SqlServer module, and get a significant productivity advantage in database administration.
Contents
- Prerequisites for installing the SQL Server PowerShell module
- Steps to install the SQL Server PowerShell module
- Common issues
- Benefits of using the SQL Server PowerShell module
- Conclusion
- FAQ
Prerequisites for installing the SQL Server PowerShell module
Before installing the SQL Server module, verify that you have the required PowerShell version for SQL Server and that your system matches other SQL Server PowerShell prerequisites.
Understanding PowerShell versions
Make sure the PowerShell version requirements are met. PowerShell 5.1 or higher is required for compatibility with most SQL Server-related cmdlets and automation scripts.
To check the PowerShell version, run the following command in Windows PowerShell.
$PSVersionTable.PSVersionIf the version is below 5.1, you need to upgrade to a compatible PowerShell version for SQL Server. More recent PowerShell versions (7.0 and above) offer additional benefits when working with SQL Server, including improved parallel processing, enhanced cross-platform support, and better performance for resource-intensive database operations.
System requirements
Windows 8.1 and higher are compatible operating systems for SQL Server PowerShell.
Other SQL Server PowerShell system requirements include:
- Windows Server 2012 R2 and higher.
- Windows Management Framework (WMF) 5.1 or higher (ensure your WMF version corresponds to the PowerShell version).
- .NET Framework 4.7.2 or higher (required for SMO and other dependencies).
Also, for remote SQL Server connections, you need to configure WinRM (Windows Remote Management) and have a user account with appropriate access rights.
Steps to install the SQL Server PowerShell module
You can install the SQL Server PowerShell module on a computer with or without an internet connection. Follow the PowerShell module installation steps in the following sections.
Installing on systems with internet access
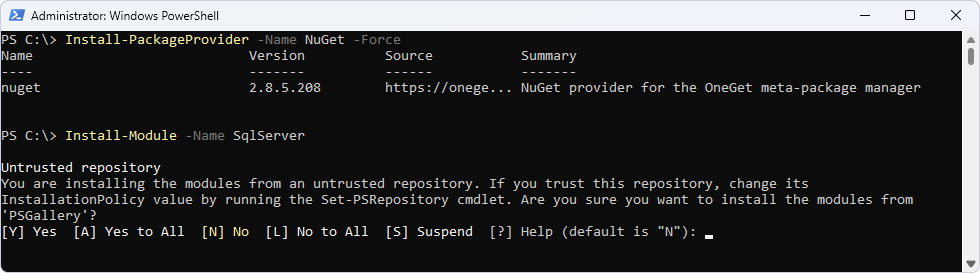
1. Open Windows PowerShell in the administrator mode.
2. Install the NuGet provider, which is required for working with the module repositories.
Install-PackageProvider -Name NuGet -Force
3. Run the install SqlServer module command.
Install-Module -Name SqlServer
4. If you get the untrusted repository prompt, confirm the installation by entering Y and pressing Enter.
You can now verify if the SQL Server PowerShell install online was successful.
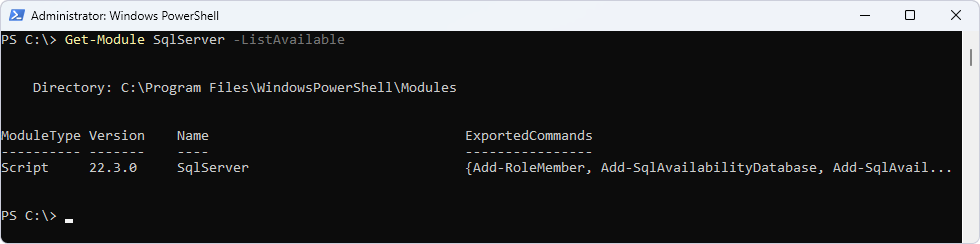
Verifying the installation
To verify the SQL Server PowerShell module installation, run the following command.
Get-Module SqlServer -ListAvailable
This command checks installed PowerShell modules and filters the results to display only the SqlServer module. If the module appears in the output, the installation was successful, and you can start using SQL Server cmdlets.
If the command returns no results, the module installation was unsuccessful or PowerShell can’t locate the module. In this case, you may need to reinstall the module. You can extend the installation command with -Force to ensure it overwrites any conflicting files and -AllowClobber to overwrite existing commands.
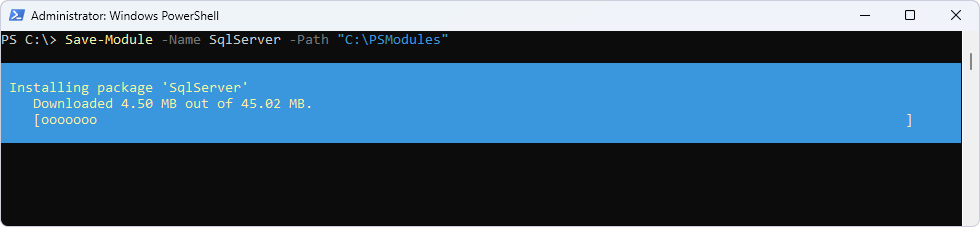
Installing on offline systems
To install the SqlServer module offline, you need another computer connected to the internet.
1. On an internet-connected computer, run the command to download the SqlServer module. In the -Path parameter, specify the folder to which all the files for the module need to be saved.
Save-Module -Name SqlServer -Path "destination_folder"
2. Copy the downloaded SqlServer folder to C:\Program Files\WindowsPowerShell\Modules on the destination offline computer.
Check the result of the offline SQL Server PowerShell installation as described in Verifying the installation earlier on this page.
Common issues
Now, let’s talk about SQL Server PowerShell troubleshooting. The following sections can help you resolve SqlServer installation issues that often occur.
Resolving untrusted repository prompts
To avoid a prompt about an untrusted repository for the SqlServer module during its installation, you can modify the command with the -Force parameter. It overrides restrictions that might prevent the module from being installed.
Install-Module-NameSqlServer -Force
Another way to fix an untrusted repository in PowerShell is to set the installation policy for all PowerShell Gallery repositories to Trusted. This way, when you install any module from the PowerShell Gallery, you won’t be prompted for confirmation each time.
Set-PSRepository-NamePSGallery -InstallationPolicyTrusted
Handling compatibility errors
The most common issue with the SqlServer module is the PowerShell compatibility error. As mentioned in the earlier section about prerequisites, the SQL Server PowerShell module requires PowerShell version 5.1 or higher.
To resolve this error, first check your current PowerShell version.
$PSVersionTable.PSVersion

If it’s below 5.1, update PowerShell to the latest version.
winget install --id Microsoft.Powershell --source winget
After the PowerShell update, we recommend that you also update the PowerShellGet and PackageManagement modules.
Install-Module PowerShellGet -Force
Install-Module PackageManagement -Force
Ensuring a correct module path
When you use cmdlets like Install-Module or Get-Module, PowerShell searches specific directories to find the SqlServer module. The default directories are:
C:\Users\<user>\Documents\WindowsPowerShell\Modules– For the current userC:\Program Files\WindowsPowerShell\Modules– For all usersC:\Windows\System32\WindowsPowerShell\v1.0\Modules– System modules
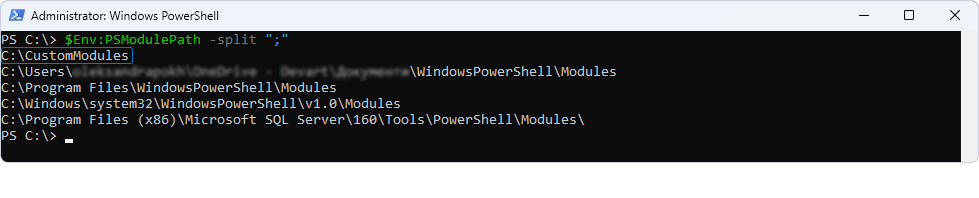
You can get a list of directories where PowerShell modules are stored.
$Env:PSModulePath -split ";"
If the SqlServer module is installed in a different folder, PowerShell can’t find the module. For example, if we have installed the module in C:\CustomModules, we need to specify this folder to resolve PowerShell module path issues.
Specify the path for a current session
Set the $Env:PSModulePath environment variable to the folder storing the SqlServer module.
$Env:PSModulePath = "<folder_path>;"
Now we can search for the module.
Get-Module -ListAvailable -Name SqlServer
PowerShell locates the SqlServer module in C:\CustomModules.

Specify the path for all sessions
To specify a folder storing the module for all PowerShell sessions, we need to configure the Microsoft.PowerShell_profile.ps1 file.
1. Run notepad.exe $PROFILE. You’ll be offered to create a text file.
2. Enter this line in the text file and save it.
$Env:PSModulePath = "<folder_path>;" + $Env:PSModulePath
3. Run the command to change the security policy and allow the execution of unsigned scripts.
Set-ExecutionPolicy RemoteSigned -Scope CurrentUser
4. When the Execution Policy Change notification appears, enter A and press Enter.

5. Restart PowerShell as administrator.
6. Check the list of directories where PowerShell can locate installed modules.
$Env:PSModulePath -split ";"
Our C:\CustomModules folder is on the list, and PowerShell will be able to use it in every session.
Benefits of using the SQL Server PowerShell module
When considering why to use PowerShell for SQL Server, note that the SQL Server PowerShell module offers a wide range of advantages, particularly in automating tasks and managing databases more efficiently. With the module’s powerful cmdlets, administrators can simplify complex database operations such as schema and data comparisons, backups, configuration management, and security auditing. The advantages of the SqlServer module are clear—automating these tasks not only saves time but also reduces manual errors and enhances productivity. This section explores how the SQL Server PowerShell module helps achieve advanced automation, making it a key tool for SQL Server management.
Using PowerShell for multiple database comparisons
PowerShell scripts are ideal for comparing multiple databases. You can configure a script to read database details from a configuration file and use SqlServer module cmdlets like Invoke-Sqlcmd to run queries that compare multiple databases with PowerShell, focusing on schema and data. This process generates reports and logs for easy review.
The automation of comparisons saves time, reduces manual effort, and minimizes human error, leading to more consistent and reliable results. It also boosts productivity by enabling database administrators to focus on more strategic tasks. Furthermore, automation helps maintain data integrity across environments, ensuring consistency and reducing the risk of data loss.
Let’s consider a few examples of database comparison scripts. The following script compares the schemas of two databases—DB1 and DB2.
# Connection parameters
$server = "<server_name>"
$database1 = "DB1"
$database2 = "DB2"
$user = "<user>"
$password = "<password>"

# Forming connection strings with the TrustServerCertificate parameter
$connectionString1 = "Server=$server;Database=$database1;User Id=$user;Password=$password;TrustServerCertificate=True;"
$connectionString2 = "Server=$server;Database=$database2;User Id=$user;Password=$password;TrustServerCertificate=True;"

# Query to get the list of objects (tables, views, procedures, functions, etc.)
$queryObjects = @"
SELECT
OBJECT_NAME(object_id) AS OBJECT_NAME,
type_desc AS OBJECT_TYPE
FROM sys.objects
WHERE type IN ('U', 'V', 'P', 'FN', 'IF', 'TF') -- U: User tables, V: Views, P: Stored Procedures, FN: Scalar functions, IF: Inline functions, TF: Table-valued functions
"@

# Get schema information (tables, views, procedures, functions, etc.) from both databases
$db1Objects = Invoke-Sqlcmd -Query $queryObjects -ConnectionString $connectionString1
$db2Objects = Invoke-Sqlcmd -Query $queryObjects -ConnectionString $connectionString2

# Create lists to hold objects for each category
$onlyInSource = @()
$onlyInTarget = @()
$differ = @()

# Compare objects from both databases
foreach ($object1 in $db1Objects) {
$matchingObject = $db2Objects | Where-Object { $_.OBJECT_NAME -eq $object1.OBJECT_NAME -and $_.OBJECT_TYPE -eq $object1.OBJECT_TYPE }

if (-not $matchingObject) {
# Object is only in the source (DB1)
$onlyInSource += $object1
} else {
# Object exists in both databases, now check if it has any differences (e.g., in definition)
# In this example, we're comparing the specific objects "EmployeeDetails" and "GetEmployeeFullName"
if ($object1.OBJECT_NAME -in @("EmployeeDetails", "GetEmployeeFullName")) {
$differ += $object1
}
}
}

foreach ($object2 in $db2Objects) {
$matchingObject = $db1Objects | Where-Object { $_.OBJECT_NAME -eq $object2.OBJECT_NAME -and $_.OBJECT_TYPE -eq $object2.OBJECT_TYPE }

if (-not $matchingObject) {
# Object is only in the target (DB2)
$onlyInTarget += $object2
}
}

# Output the results
Write-Host "Objects only in source ($database1):"
$onlyInSource | Format-Table -Property OBJECT_NAME, OBJECT_TYPE

Write-Host "Objects only in target ($database2):"
$onlyInTarget | Format-Table -Property OBJECT_NAME, OBJECT_TYPE

Write-Host "Objects that are the same in both databases but may have differences:"
$differ | Format-Table -Property OBJECT_NAME, OBJECT_TYPE

Write-Host "Script completed."
We run the script in PowerShell and get the comparison result.

Another example is comparing database data.
# Connection parameters
$server = "<server_name>"
$database1 = "DB1"
$database2 = "DB2"
$user = "<user>"
$password = "<password>"
# Forming connection strings with the TrustServerCertificate parameter
$connectionString1 = "Server=$server;Database=$database1;User Id=$user;Password=$password;TrustServerCertificate=True;"
$connectionString2 = "Server=$server;Database=$database2;User Id=$user;Password=$password;TrustServerCertificate=True;"
# Query to get the list of tables
$query = "SELECT TABLE_NAME FROM INFORMATION_SCHEMA.TABLES WHERE TABLE_TYPE = 'BASE TABLE'"
# Get the list of tables from both databases
$db1Tables = Invoke-Sqlcmd -Query $query -ConnectionString $connectionString1
$db2Tables = Invoke-Sqlcmd -Query $query -ConnectionString $connectionString2
# Compare tables
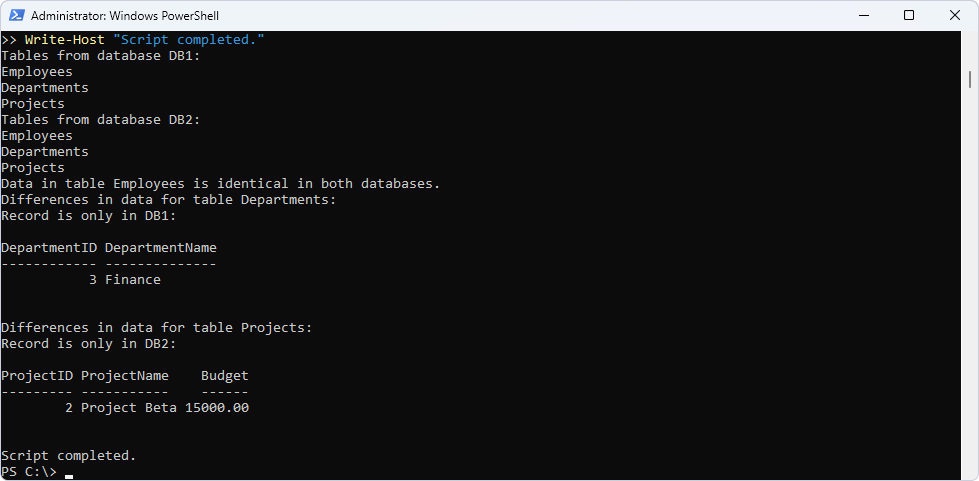
Write-Host "Tables from database ${database1}:"
$db1Tables.TABLE_NAME
Write-Host "Tables from database ${database2}:"
$db2Tables.TABLE_NAME
# Function to get data from a table
function Get-TableData {
param (
[string]$tableName,
[string]$connectionString
)
$query = "SELECT * FROM $tableName"
return Invoke-Sqlcmd -Query $query -ConnectionString $connectionString
}
# Compare data in the tables
foreach ($table in $db1Tables.TABLE_NAME) {
if ($table -in $db2Tables.TABLE_NAME) {
# Get data for the table from both databases
$db1Data = Get-TableData -tableName $table -connectionString $connectionString1
$db2Data = Get-TableData -tableName $table -connectionString $connectionString2
# Check if there is data to compare
if ($db1Data -and $db2Data) {
$dataDiff = Compare-Object -ReferenceObject $db1Data -DifferenceObject $db2Data
# Output differences
if ($dataDiff) {
Write-Host "Differences in data for table ${table}:"
foreach ($diff in $dataDiff) {
if ($diff.SideIndicator -eq "=>") {
Write-Host "Record is only in ${database2}:"
$diff.InputObject | Format-Table -AutoSize
} elseif ($diff.SideIndicator -eq "<=") {
Write-Host "Record is only in ${database1}:"
$diff.InputObject | Format-Table -AutoSize
}
}
} else {
Write-Host "Data in table ${table} is identical in both databases."
}
} else {
Write-Host "No data for comparison in table ${table}."
}
}
}
Write-Host "Script completed."
When the script is executed, we see the data comparison result in PowerShell.
While PowerShell scripts are effective for automating database tasks, tools like dbForge Studio for SQL Server offer advanced features for comparison and automation. With its command-line interface, dbForge Studio offers features like schema and data comparison, advanced filtering, and synchronization, making it more efficient for complex tasks. Additionally, it doesn’t require any add-ons like the SQL Server PowerShell module.
With dbForge Studio for SQL Server installed, let’s see how we can perform the same PowerShell database comparison tasks using the dbForge Studio command line. The schema comparison script goes first.
# Path to the dbForge Studio executable
$exePath = "C:\Program Files\Devart\dbForge Studio for SQL Server\dbforgesql.com"

# Connection details for source and target databases
$srcConn = "`"Data Source=<server_name>;Encrypt=False;Initial Catalog=DB1;Integrated Security=False;User ID=<user>`""
$tgtConn = "`"Data Source=<server_name>;Encrypt=False;Initial Catalog=DB2;Integrated Security=False;User ID=<user>`""

# Path to the log file where output will be stored
$logFile = "C:\Logfiles\logfileSC.txt"

# Run dbForge Studio schema comparison within PowerShell
& $exePath /schemacompare /source connection:$srcConn /target connection:$tgtConn /CompareDatabaseProperties:No /IgnoreDatabaseExtendedProperties:No | Tee-Object -FilePath $logFile

# Display the log file content in PowerShell after execution
Get-Content $logFile
Just look at how much shorter the script is. And it still produces the result perfectly.

Now, let’s move on to the data comparison script.
# Path to the dbForge Studio executable
$exePath = "C:\Program Files\Devart\dbForge Studio for SQL Server\dbforgesql.com"

# Connection details for source and target databases
$srcConn = "`"Data Source=<server_name>;Encrypt=False;Initial Catalog=DB1;Integrated Security=False;User ID=<user>`""
$tgtConn = "`"Data Source=<server_name>;Encrypt=False;Initial Catalog=DB2;Integrated Security=False;User ID=<user>`""

# Path to the log file where output will be stored
$logFile = "C:\Logfiles\logfileDC.txt"

# Run dbForge Studio data comparison within PowerShell
& $exePath /datacompare /source connection:$srcConn /target connection:$tgtConn | Tee-Object -FilePath $logFile

# Display the log file content in PowerShell after execution
Get-Content $logFile
Again, it didn’t let us down; the task is completed within PowerShell using the functionality of dbForge Studio.
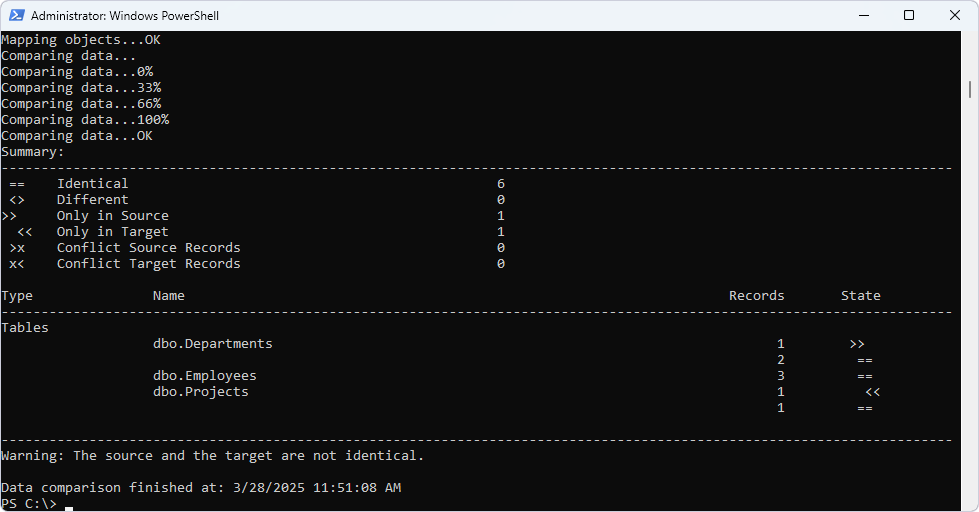
The use of dbForge Studio’s command line simplifies the database comparison process, offering a user-friendly, time-saving solution compared to creating custom PowerShell scripts. It allows you to automate common tasks with minimal configuration.
In any case, scripts for automating database comparisons are highly beneficial in environments with frequent changes or the need for consistency, such as development, testing, and auditing. In development, they can automate schema and data synchronization between different environments, ensuring consistency across versions. In testing, they help validate data integrity before and after regression tests. In auditing, they automate checks for unauthorized changes and maintain a compliance audit trail.
In production environments, scripts can be used for post-deployment checks, comparing current databases with backups or staging versions to ensure accurate updates. They also assist in monitoring database health and generating reports for administrators, providing efficient tracking and validation of database changes across various stages.
Simplified SQL Server management
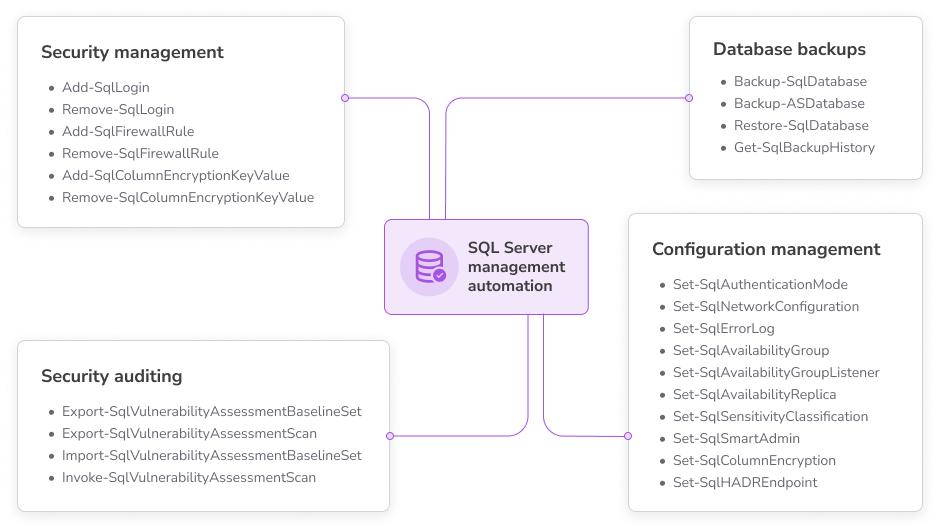
The SQL Server PowerShell module provides powerful automation for key database tasks, including backups, configuration, security, and compliance checks. Administrators can automate operations like creating and restoring backups, configuring server settings, managing user access, and conducting security audits. This leads to more efficient, consistent, and secure SQL Server management, reducing manual efforts and errors. The following sections describe tasks that showcase the benefits of the SQL Server PowerShell module.
Automate database backups
The SQL Server PowerShell module can automate key database management tasks, such as backup management, restoration, and auditing. It helps database administrators efficiently create backups, restore databases, and track backup history, ensuring consistent management of SQL Server environments. Relevant cmdlets:
Backup-SqlDatabase– Automates the process of backing up SQL Server databases.Backup-ASDatabase– Takes a backup of an Analysis Services database to a file.Restore-SqlDatabase– Restores a database from a backup file or transaction log.Get-SqlBackupHistory– Retrieves backup history for auditing and monitoring.
Automate configuration management
The module simplifies and automates SQL Server configuration tasks. It enables administrators to manage server authentication, network settings, error logs, availability groups, and encryption. Relevant cmdlets:
Set-SqlAuthenticationMode– Configures the authentication mode of the target SQL Server instance.Set-SqlNetworkConfiguration– Adjusts the network settings for the target SQL Server instance.Set-SqlErrorLog– Defines the maximum number of error log files before they are recycled.Set-SqlAvailabilityGroup– Modifies settings for an availability group.Set-SqlAvailabilityGroupListener– Configures the port setting for an availability group listener.Set-SqlAvailabilityReplica– Modifies settings for an availability replica.Set-SqlSensitivityClassification– Assigns sensitivity labels and information types to database columns.Set-SqlSmartAdmin– Configures backup retention and storage settings.Set-SqlColumnEncryption– Encrypts, decrypts, or re-encrypts columns in the database.Set-SqlHADREndpoint– Configures the properties of a database mirroring endpoint.
Automate security management
The SQL Server PowerShell module simplifies the management of security-related tasks, such as creating and removing logins, managing firewall rules, and handling column encryption. Relevant cmdlets:
Add-SqlLogin– Creates a new login object in SQL Server for user authentication.Remove-SqlLogin– Removes an existing login object from SQL Server.Add-SqlFirewallRule– Adds a Windows Firewall rule to allow connections to a specified SQL Server instance.Remove-SqlFirewallRule– Disables the firewall rule that allows connections to a specified SQL Server instance.Add-SqlColumnEncryptionKeyValue– Adds an encrypted value to an existing column encryption key in the database.Remove-SqlColumnEncryptionKeyValue– Removes an encrypted value from an existing column encryption key in the database.
Conduct security auditing and compliance checks
The module automates security and compliance tasks related to database vulnerabilities. It enables administrators to conduct vulnerability assessments, export and import baseline sets, and initiate new scans, ensuring databases follow security best practices. Relevant cmdlets:
Export-SqlVulnerabilityAssessmentBaselineSet– Exports a vulnerability assessment baseline set to a file for auditing and review.Export-SqlVulnerabilityAssessmentScan– Exports the results of a vulnerability assessment scan to a file for further analysis or reporting.Import-SqlVulnerabilityAssessmentBaselineSet– Imports a vulnerability assessment baseline set from a file to apply to the current SQL Server instance.Invoke-SqlVulnerabilityAssessmentScan– Initiates a new vulnerability assessment scan to identify potential security issues.
The cmdlets for each of the described tasks can be used from the SQL Server PowerShell module, enabling a wide range of automation possibilities, from backups to security auditing, and ensuring that SQL Server management is more efficient and error-free.
Integration with automation scripts
Let’s consider a couple of examples where we use the SQL Server PowerShell module in combination with PowerShell scripts for advanced automation.
For instance, we can monitor SQL Server performance and record information to a log file if the server load exceeds a specified threshold.
# Import the SQL Server module
Import-Module SqlServer
# Connection parameters
$server = "<server_name>"
$database = "DB1"
$user = "<user>"
$password = "<password>"
$cpuThreshold = 10 # CPU usage threshold (active workers)
$logFilePath = "C:\LogFiles\cpu_alert_log.txt"
# Check and create the log directory if it does not exist
if (-not (Test-Path "C:\LogFiles")) {
New-Item -Path "C:\" -Name "LogFiles" -ItemType Directory
}
# Forming the connection string with the TrustServerCertificate parameter
$connectionString = "Server=$server;Database=$database;User Id=$user;Password=$password;TrustServerCertificate=True;"
# Query to retrieve processor, memory, and active worker statistics
$query = @"
SELECT
os.cpu_count,
os.physical_memory_kb / 1024 AS physical_memory_mb,
os.virtual_memory_kb / 1024 AS virtual_memory_mb,
os.committed_kb / 1024 AS committed_memory_mb,
pm.total_virtual_address_space_kb / 1024 AS total_virtual_memory_mb,
pm.available_commit_limit_kb / 1024 AS available_commit_mb,
(SELECT AVG(runnable_tasks_count) FROM sys.dm_os_schedulers WHERE scheduler_id < 255) AS avg_runnable_tasks,
(SELECT AVG(work_queue_count) FROM sys.dm_os_schedulers WHERE scheduler_id < 255) AS avg_work_queue,
(SELECT AVG(current_workers_count) FROM sys.dm_os_schedulers WHERE scheduler_id < 255) AS avg_active_workers
FROM sys.dm_os_sys_info os
CROSS JOIN sys.dm_os_process_memory pm;
"@
# Execute the query
$result = Invoke-Sqlcmd -ConnectionString $connectionString -Query $query
# Check if the result is not empty
if ($result -ne $null) {
# Extract the active workers count
$activeWorkers = [math]::Round($result.avg_active_workers, 2)
# Check if active workers exceed the threshold
if ($activeWorkers -ge $cpuThreshold) {
# Format the log message
$logMessage = "$(Get-Date -Format 'yyyy-MM-dd HH:mm:ss') -
Server: $server | Database: $database
CPU Cores: $($result.cpu_count)
Physical Memory (MB): $($result.physical_memory_mb)
Virtual Memory (MB): $($result.virtual_memory_mb)
Committed Memory (MB): $($result.committed_memory_mb)
Available Virtual Memory (MB): $($result.available_commit_mb)
Average Runnable Tasks: $($result.avg_runnable_tasks)
Average Work Queue Size: $($result.avg_work_queue)
Average Active Workers: $activeWorkers (Threshold: $cpuThreshold)
---------------------------"
# Write to the log file
$logMessage | Out-File -FilePath $logFilePath -Append -Force
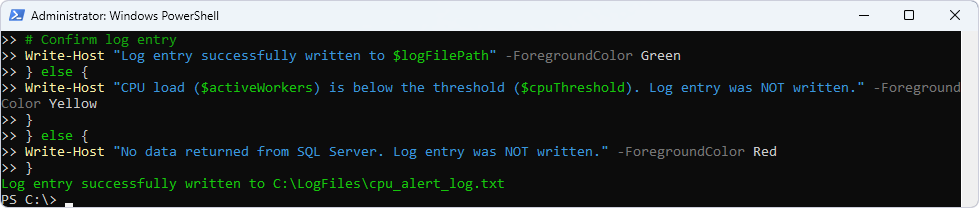
# Confirm log entry
Write-Host "Log entry successfully written to $logFilePath" -ForegroundColor Green
} else {
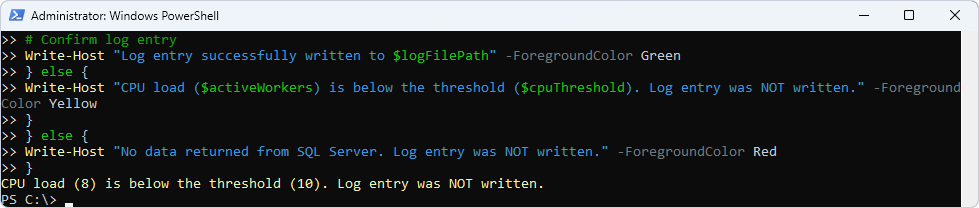
Write-Host "CPU load ($activeWorkers) is below the threshold ($cpuThreshold). Log entry was NOT written." -ForegroundColor Yellow
}
} else {
Write-Host "No data returned from SQL Server. Log entry was NOT written." -ForegroundColor Red
}
Currently, the server CPU usage is below the threshold, so no entry is made to the specified log file.
However, if we decrease the CPU usage threshold to 5, we can see a different result.
The following record appeared in our log file.
Server: <server_name> | Database: DB1
CPU Cores: 8
Physical Memory (MB): 32693
Virtual Memory (MB): 134217727
Committed Memory (MB): 920
Available Virtual Memory (MB): 11660
Average Runnable Tasks: 0
Average Work Queue Size: 0
Average Active Workers: 8 (Threshold: 5)
Using a script like this offers several advantages, which include automated monitoring of CPU usage and other metrics without manual intervention, and threshold alerts that help identify performance issues early. It logs detailed performance metrics for auditing and troubleshooting, and is customizable to different environments with adaptable parameters. This proactive management helps maintain optimal performance and avoid downtimes. Additionally, the script is easy to use, utilizing PowerShell for straightforward execution and management of SQL Server tasks.
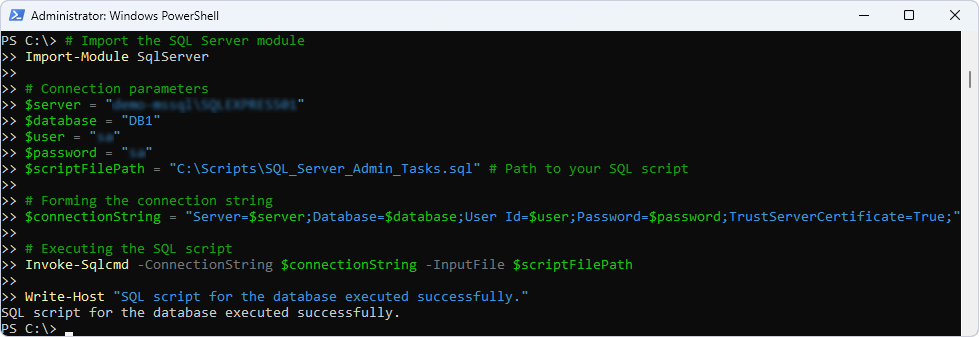
Another example is related to running SQL scripts. We can automate the execution of SQL scripts for various administrative tasks.
Say, we have the SQL_Server_Admin_Tasks SQL file with a list of administrative tasks (in our example, the tasks include clearing the error log using sp_cycle_errorlog, using a cursor to find queries with a “suspended” state, and terminating stuck queries in SQL Server using the KILL command).

The following PowerShell script connects to the SQL Server using the specified connection parameters and then runs a SQL script from the file.
# Import the SQL Server module
Import-Module SqlServer

# Connection parameters
$server = "<server_name>"
$database = "<database>"
$user = "<user>"
$password = "<password>"
$scriptFilePath = "C:\Scripts\SQL_Server_Admin_Tasks.sql"

# Forming the connection string
$connectionString = "Server=$server;Database=$database;User Id=$user;Password=$password;TrustServerCertificate=True;"

# Executing the SQL script
Invoke-Sqlcmd -ConnectionString $connectionString -InputFile $scriptFilePath

Write-Host "SQL script for the database executed successfully."
After the operations from the SQL file are completed, the script displays a message indicating the successful completion of the task.
The sample scripts we’ve provided illustrate the module’s capabilities in automating critical tasks, enhancing productivity, and ensuring a proactive approach to SQL Server management. This leads to improved system performance and reliability. As you continue to explore and implement these automation techniques, you’ll find the SQL Server PowerShell module to be an invaluable tool in your administrative toolkit.
Conclusion
In this guide, we covered installing the SQL Server PowerShell module, including prerequisites, installation steps, and troubleshooting tips. This module allows administrators to automate essential tasks like schema and data comparisons, backups, security audits, and configuration management. Using PowerShell scripts with the SqlServer module saves lots of time, reduces manual work, and minimizes errors.
Automation through the SQL Server PowerShell module streamlines daily operations, improves productivity, and ensures reliable database management. Whether comparing databases, managing backups, or performing security audits, this module efficiently handles complex tasks, making it invaluable for SQL Server management.
We also recommend that you try dbForge Studio for SQL Server as an alternative to the SQL Server PowerShell module. dbForge Studio offers similar functionality right out of the box, making it an excellent choice for your comparison and automation tasks.
FAQ
How to use PowerShell with SQL Server?
PowerShell can interact with SQL Server using the SQL Server PowerShell module, which includes cmdlets for managing SQL Server instances and running SQL queries.
Can I run SQL from PowerShell?
Yes, you can run SQL queries from PowerShell using the Invoke-Sqlcmd cmdlet, enabling you to run SQL scripts directly within a PowerShell session.
What is the SQL Server PowerShell module?
The SQL Server PowerShell module is Microsoft’s official tool for managing SQL Server via PowerShell. It provides specialized cmdlets for various database operations and exposes SQL Server Management Objects (SMO) for programmatic administration of SQL Server instances.
What is the SQL provider for Windows PowerShell?
The SQL provider (SQLSERVER:) is a set of cmdlets that creates a file system-like interface for navigating SQL Server objects. It enables you to browse and manage SQL instances, databases, tables, and other components using standard PowerShell commands like Get-ChildItem and Set-Location, treating them as if they were file system objects.
How do I install the SQL Server PowerShell module?
You can install the SQL Server PowerShell module using the Install-Module -Name SqlServer command in PowerShell, ensuring you have the prerequisites like PowerShell 5.1 or higher. For offline environments, the module can be downloaded from the PowerShell Gallery and installed manually.
What are the most useful cmdlets for SQL Server management?
Key cmdlets include Invoke-Sqlcmd for running queries, Backup-SqlDatabase and Restore-SqlDatabase for managing backups, Get-SqlDatabase for retrieving database information, and Test-SqlAvailabilityGroup for checking availability group health.
Can I use PowerShell to automate backups for SQL Server?
Yes, you can automate backups using the Backup-SqlDatabase cmdlet in PowerShell like this: Backup-SqlDatabase -ServerInstance "<server_name>" -Database "<db_name>" -BackupFile "<path>\backup.bak". You can also combine it with PowerShell scheduling to set up a complete backup strategy, including rotation, verification, and notifications.
How do I troubleshoot common SQL Server errors with PowerShell?
You can use PowerShell to query error logs with Get-SqlErrorLog, check system health with Get-SqlAgentJobHistory, and monitor performance counters. Additionally, you can create scripts to parse SQL logs, check for blocking queries, and generate alerts. Implementing try/catch blocks for error handling and detailed logging is a best practice to ensure robust script execution and troubleshooting.