RAD Studio XE2 allows creating applications for Mac OS X. But the problem is that RAD Studio XE2 (both Delphi XE2 and C++Builder XE2) can be installed and run only under MS Windows, therefore applications for Mac OS X can be developed under MS Windows. That is why many people may face the problem of deploying applications on Mac OS X. Taking this into account, we decided to write this article that will help our users deal with deploying problem and deploy their applications to Mac OS X successfully. In this article, we will tell about two ways of applications deploying on Mac OS X and the peculiarities that must be taken into account during deploying applications that use Devart Data Access Components and Devart dbExpress drivers.
Using PAServer
The easiest way to deploy applications to Mac OS X is to deploy them using PAServer.
When PAServer is used to debug applications on a remote computer with Mac OS X, it copies executable Mac OS X application packages to the “PAServer_Installation_Directory” directory (where “PAServer_Installation_Directory” is the “/Users/$USER/Applications/Embarcadero/PAServer” directory by default). In the scratch-dir directory PAServer creates directories with names, that consist of the computer name and the remote profile name. For example, if the computer name (where RAD Studio XE2 is run) is “MyPC”, and the remote profile name for the Mac OS X platform is “Mac OS X”, PAServer will create the “PAServer_Installation_Directory/scratch-dir/MyPC-Mac OS X” directory. In this directory, PAServer will create an application package with the name of the project plus the “.app” extension. For example, if your application name is “MyProject”, PAServer will create the “MyProject.app” application package.
You can use PAServer for both debugging your application and for deploying it as well. For this, you should choose Release Build Configuration and run it without debugging (the Run Without Debugging command from the Run menu). Also, before the final deployment, you should clean the application package folder (for example, “MyProject.app”) from all old files that could remain after previous runnings and deployments.
Note: You can choose files to deploy in an application package by selecting “Deployment” from the Project menu in RAD Studio XE2.
Manual
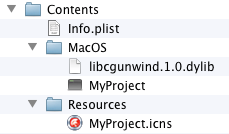
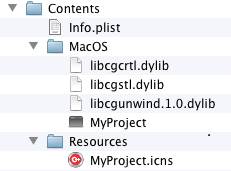
An application package is internally represented by a folder with the following structure:
For Delphi: |
For C++Builder: |
Note: To view the content of the application package in Mac OS X, you can right click on package and select “Show Package Contents” from the shortcut menu.
All needed files to create the Mac OS X application package are supplied by RAD Studio XE2. To create the Mac OS X application package manually, the following steps must be performed:
- create a FireMonkey Delphi or C++Builder application;
- add the OS X platform to Target Platforms and make it active;
- build the application using Release Build Configuration;
- create a folder with the name that consists of the project name and the “.app” extension, for example, “MyProject.app”;
- create the Contents folder in the MyProject.app folder;
- copy the “MyProject_DirectoryOSX32ReleaseMyProject.info.plist” file to the Contents folder and rename it to info.plist;
- create the MacOS folder in the Contents folder;
- for Delphi applications: copy
“RAD_Studio_XE2_Install_DirectoryRedistosx32libcgunwind.1.0.dylib”
to the MacOS folder;
for C++Builder applications: copy
“RAD_Studio_XE2_Install_DirectoryRedistosx32libcgunwind.1.0.dylib”,
“RAD_Studio_XE2_Install_DirectoryRedistosx32libcgcrtl.dylib” and
“RAD_Studio_XE2_Install_DirectoryRedistosx32libcgstl.dylib”
to the MacOS folder; - copy the “MyProject_DirectoryOSX32ReleaseMyProject” file to the MacOS folder;
- create the Resources folder in the Contents folder;
- copy the “MyProject_DirectoryOSX32ReleaseMyProject.icns” file to the Resources folder.
After performing these steps you can run the MyProject.app application package on Mac OS X.
Specificity of deploying applications that use Devart Data Access Components
Applications using some of the Devart Data Access Components products require database client libraries to function on Mac OS X. Client libraries can be located in public libraries directory (for example, /usr/lib ) or in the MacOS folder of the application package. The table below shows the required client libraries for each particular Devart Data Access Components:
| DAC | Mode | |
|---|---|---|
| Direct | Client | |
| ODAC | Not required | Oracle client |
| MyDAC | Not required | libmysql.dylib |
| IBDAC | for InterBase: libibtogo.dylib for Firebird: libfbclient.dylib |
|
| PgDAC | Not required | |
| SQLite (by UniDAC) | libsqlite3.dylib | |
| UniDAC | Correspondent libraries for used data provider | |
Specificity of deploying applications that use Devart dbExpress drivers
Applications using some of the Devart dbExpress drivers products require database client libraries plus the libmidas.dylib library and the correspondent dbExpress driver library to function on Mac OS X. All required libraries can be located in the public libraries directory (for example, /usr/lib ) or in the MacOS folder of the application package. The table below shows all required libraries for each particular dbExpress driver:
| dbExpress driver | Mode | |
|---|---|---|
| Direct | Client | |
| dbExpress driver for Oracle | libmidas.dylib libdbexpoda40.dylib |
libmidas.dylib libdbexpoda40.dylib Oracle client |
| dbExpress driver for MySQL | libmidas.dylib libdbexpmda40.dylib |
libmidas.dylib libdbexpmda40.dylib libmysql.dylib |
| dbExpress driver for InterBase & Firebird | libmidas.dylib libdbexpida40.dylib for InterBase: libibtogo.dylib for Firebird: libfbclient.dylib |
|
| dbExpress driver for PostgreSQL | libmidas.dylib libdbexppgsql40.dylib |
|
| dbExpress driver for SQLite | libmidas.dylib libdbexpsqlite40.dylib libsqlite3.dylib |
|
