When it comes to building interactive, scalable, and data-driven websites and applications, you may consider a combination of PHP with MySQL. Integrating PHP as a server-side language with MySQL as a relational database allows for dynamic content generation, user authentication, form handling, and easier data management.
In the article, we’ll explore several methods to connect PHP with a MySQL database, including the mysqli and PDO (PHP Data Objects) extensions. After establishing the connection, we’ll validate this using dbForge Studio for MySQL, an all-in-one IDE that helps database developers and administrators manage and optimize their MySQL and MariaDB environments, increasing productivity and simplifying database workflows.
Contents
- Connecting PHP to MySQL using mysqli
- Connecting PHP to MySQL using PDO (PHP Data Objects)
- Validating a PHP connection to MySQL using dbForge Studio for MySQL
- Using a legacy mysql_connect method
Connecting PHP to MySQL using mysqli
mysqli is a MySQL improved extension of PHP used to access MySQL databases and manipulate data in them.
mysql_connect is a PHP function that was previously used to establish a connection to a MySQL database. It belongs to the original MySQL extension that allowed PHP applications to access MySQL databases.
mysqli offers improved functionality, security, and performance over the older mysql_connect extension, which is deprecated as of PHP 5.5.0 and has been completely removed, meaning it is no longer available for use.
Why is mysqli recommended to use?
- Support for prepared statements that enhance security by reducing the risk of malicious code execution.
- Support for object-oriented and procedural programming styles that make it easier for developers to choose an approach that best suits their coding style.
- Ability to execute multiple statements in a single query that improves performance in complex scenarios.
- Support for transactional operations that help maintain data integrity and ensure the successful execution of all the related queries before being committed.
- Compatibility with the MySQL Native Driver (mysqlnd), which reduces memory usage and improves query execution times.
Prerequisites
Before we connect to a MySQL database, we need to download XAMPP. It is a free and open-source software package to set up a local web server environment on your computer for development and testing. The software will help us connect PHP to MySQL using mysqli because it provides a complete and pre-configured environment that includes:
- Apache (Web Server): To run PHP scripts, which process server-side code.
- MySQL (Database Server): To store and manage data for your PHP applications.
- PHP (Scripting Language): To write and execute server-side code that interacts with MySQL.
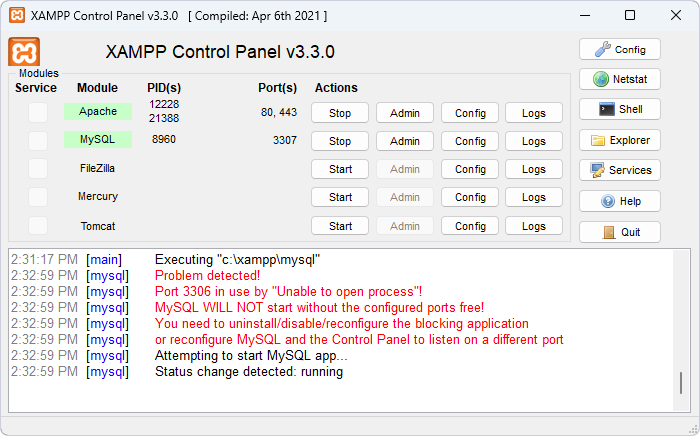
After XAMPP has been installed, launch it and start the Apache and MySQL servers from the Control Panel. In addition, it includes a web-based tool – phpMyAdmin that allows for easier management of MySQL databases.
Note that the required ports must be available; otherwise, errors may occur. If an error arises because the port is in use, you must change it to a free one by adjusting the configuration. To do this, select Config next to the required server:
- For Apache: Select Apache (httpd.conf) from the Config shortcut menu. In the configuration file that opens, locate the port number, update it to an available port, and save the changes.
- For MySQL: Select my.ini from the Config shortcut menu. In the file that opens, update the port number to a free one and save your changes.
When the servers are running, they are highlighted in green.

Note that when using XAMPP to host websites or web applications locally, you must save your PHP files to the htdocs folder. To access these .php files, you need to navigate to this folder, copy the file name, and open it in a web browser at http://localhost/filename. For example, if you have an index.php file in the htdocs folder, you can open it in a web browser at http://localhost/index.php.
After we have prepared the environment, we can create a connection between PHP and MySQL using the mysqli extension.
Creating a connection
Use the following script to connect with a MySQL server database and execute a SQL query.
To proceed, open the text editor and save the following PHP script to the htdocs folder with a .php extension. The script establishes a connection with a MySQL database:
<?php
$conn = @mysqli_connect("localhost", "root", "", "test", 3307);

if (mysqli_connect_errno()) {
    echo "Failed to connect to MySQL: (" . mysqli_connect_errno() . ") " . mysqli_connect_error();
    exit();
}
echo "Connected successfully!";
?>
The script parameters include:
@mysqli_connect(...)is a function that creates a connection to a MySQL database using themysqliextension.localhostis the address of the database server.rootis the username for the specified database connection.""is the password for the specified database connection. In the example, it is left empty. It is not recommended for security but can be used for local testing.testis the database name to which the script connects.3307is the port number for the MySQL server.mysqli_connect_errno()is the function that checks for connection errors. If an issue occurs, the function returns an error message with the code, and the script exits to prevent further processing. If no error arises, the script confirms a successful connection by displaying ‘Connected successfully!’.
Let us now check if the connection has been created. To do this, open the file in the browser at http://localhost:80/ConnectToMySQL.php where ConnectToMySQL.php is the name of the PHP file to create to a MySQL connection.
Note that since the port 80 is the default, so specifying it in the URL is unnecessary unless it has been reconfigured to use a different port.

As you can see, the connection is now successfully in place.
Handling connection errors
For testing purposes, it might be required to debug a PHP script for possible errors in PHP when connecting to a MySQL database using mysqli. In such cases, you can use the mysqli_error() function. It displays the specific error message MySQL returns.
To debug and output the connection error message, run the following script:
if (mysqli_connect_errno()) {

    echo "Failed to connect to MySQL: (" . mysqli_connect_errno() . ") " . mysqli_connect_error();

    exit();
}
In this script, mysqli_connect_errno() checks if there was an error when connecting to the MySQL database. Upon a successful connection, it returns 0. However, if an error has been detected, the function outputs an error message providing a clear explanation for the connection failure. In case the connection fails, the function stops the execution of the script.
For example, if we save the following script, in which we intentionally changed the database name for test1, and open it in a browser:
<?php
$conn = @mysqli_connect("localhost", "root", "", "test1", 3307);

if (mysqli_connect_errno()) {
    echo "Failed to connect to MySQL: (" . mysqli_connect_errno() . ") " . mysqli_connect_error();
    exit();
}
echo "Connected successfully!";
?>
We’ll get the following result:

In the error message, we see that the script stops executing since it is trying to connect to a non-existent database – test1 – that does not exist on the specified MySQL server.
Connecting PHP to MySQL using PDO (PHP Data Objects)
What is PDO (PHP Data Objects)? It is a database access layer in PHP that provides a unified interface to interact with different databases, including MySQL. Unlike the mysqli extension, which only works with MySQL, PDO supports multiple DBMSs, including PostgreSQL, SQLite, and Microsoft SQL Server. This makes it popular for developers working on projects where migration between different databases is their common task. PDO also offers advanced features, such as prepared queries and transaction management.
Here are some key advantages of using PDO for database interactions:
- Compatibility with different databases: PDO supports multiple database systems, such as MySQL, PostgreSQL, SQLite, Oracle, etc. For example, if you want to migrate your project from MySQL to PostgreSQL or any supported database, you’ll only need to change the DSN (Data Source Name) line instead of rewriting the entire code.
- Support for prepared statements:
- Security: They help reduce the risk of SQL injection attacks.
- Efficiency: They allow compiling a SQL query once and executing it multiple times with different parameters. This, in turn, improves performance when running similar queries multiple times.
- Support for an object-oriented interface: This approach allows for better code organization and enhanced code reuse. This makes database code cleaner and more maintainable.
- Errors handling: PDO offers robust error handling through exception-based error reporting. You can manage database-related errors more efficiently by setting the error handling mode to throw exceptions (PDO::ERRMODE_EXCEPTION). This makes debugging and error tracking easier, as PDO displays a clear error message on exceptions whenever a failure occurs.
- Support for named parameters in prepared statements: They can improve code readability. In addition, named parameters allow variables to be associated with query parameters by name rather than in order, which makes code more understandable, especially when working with large queries.
- Support for transactions: They can ensure data integrity when running multiple dependent queries. PDO can validate or roll back all changes based on whether all queries are successful or fail.
- Flexibility in data retrieval: PDO offers different selection modes to retrieve data in multiple formats, such as an associative array, an indexed array, an object or even a custom class. This gives flexibility in handling query results and improves code structure.
- Support for parameter binding by data type: PDO allows you to explicitly bind parameters to specific data types (int, string, etc.) in prepared statements to ensure that the data is processed correctly and cast to the correct type. This helps to improve security and avoid potential SQL errors due to type incompatibility.
- Backward compatibility: PDO is compatible with multiple versions of PHP, ranging from PHP 5.x to PHP 8.x. This ensures that your code remains functional and portable across different environments without significantly modifying the database interaction logic.
Creating a connection using PDO with new PDO()
To create a connection to a MySQL database using PDO, you use the new PDO() function, which initializes a PDO object with the necessary database credentials and connection options.
Here is a step-by-step example: Open the text editor and save the following script with a .php extension to the htdocs folder:
<?php
$host     = 'localhost';          // Host
$db       = 'test';               // Name of the database you want to connect to
$user     = 'root';               // MySQL username
$pass     = '';                   // MySQL password
$charset  = 'utf8mb4';            // Character set to use
$port     = 3307;                 // MySQL port

$dsn = "mysql:host=$host;port=$port;dbname=$db;charset=$charset";  // Data Source Name (DSN) with port

$options = [
    PDO::ATTR_ERRMODE            => PDO::ERRMODE_EXCEPTION,       // Throw exceptions on errors
    PDO::ATTR_DEFAULT_FETCH_MODE => PDO::FETCH_ASSOC,             // Set default fetch mode to associative array
    PDO::ATTR_EMULATE_PREPARES   => false,                        // Use real prepared statements
];

echo "Connection successful!";
?>
The variables in the code define the information to connect to a MySQL database. To run this code, you must initialize a PDO object with $dsn, $user, $pass, and $options for an actual database connection.
The DSN string provides connection details, including:
hostis the MySQL server location.portis the port number for the specified MySQL server.dbnameis the name of the MySQL database you want to connect.charsetis the character encoding.
PDO options include:
PDO::ATTR_ERRMODE => PDO::ERRMODE_EXCEPTIONensures any database errors trigger exceptions for easier error handling.PDO::ATTR_DEFAULT_FETCH_MODE => PDO::FETCH_ASSOCsets the default fetch mode to return results as associative arrays.PDO::ATTR_EMULATE_PREPARES => falseensures prepared statements are processed directly by the database server.
When we open this file in a browser, we’ll see that the connection has been established successfully:

Handling exceptions
After successfully connecting to the MySQL database using PDO, it is recommended to handle potential errors to ensure your application remains stable. In this case, try-catch blocks may be useful. They can help you detect and respond to errors like connection issues or failed queries.
Let us explore how to manage these exceptions in PDO. In the editor, create a .php file with the following code and save it to the htdocs folder. As you may have noticed, we have intentionally changed the database from test to test1, a non-existent database.
<?php
$host     = 'localhost';          // Host
$db       = 'test1';              // Name of the database you want to connect to
$user     = 'root';               // MySQL username
$pass     = '';                   // MySQL password
$charset  = 'utf8mb4';            // Character set to use
$port     = 3307;                 // MySQL port

$dsn = "mysql:host=$host;port=$port;dbname=$db;charset=$charset";  // Data Source Name (DSN) with port

$options = [
    PDO::ATTR_ERRMODE            => PDO::ERRMODE_EXCEPTION,       // Throw exceptions on errors
    PDO::ATTR_DEFAULT_FETCH_MODE => PDO::FETCH_ASSOC,             // Set default fetch mode to associative array
    PDO::ATTR_EMULATE_PREPARES   => false,                        // Use real prepared statements
];

try {
    $pdo = new PDO($dsn, $user, $pass, $options);                 // Create a new PDO instance
    echo "Connection successful!";                                // Connection is successful
} catch (PDOException $e) {
    echo "Connection failed: " . $e->getMessage();                // Handle connection error
}
?>
In this code, the try block attempts to create a PDO instance and connect to the MySQL database. If an exception is thrown, the catch block catches the PDOException and outputs the error message using $e->getMessage(), which explains why the connection failed.
After opening this .php file in the browser, we’ll get the following error message – ‘Connection failed: Unknown database ‘test1”.

Validating a PHP connection to MySQL using dbForge Studio for MySQL
We have already established the PHP connection to a MySQL database. It is time to verify if we can work on it.
To validate this, we’ll use an advanced MySQL IDE – dbForge Studio for MySQL, which is available on Windows, Linux, and macOS platforms. The Studio is designed to simplify MySQL and MariaDB database development, administration, and management. It offers multiple built-in tools for database-related operations, such as query building, database design, data editing, debugging of MySQL database objects, query profiling, automation of routine tasks, and performance analysis. With its user-friendly interface, the rich functionality of the Studio boosts productivity by providing visual data import/export tools, schema comparison, and backup management.
To enhance productivity and ensure consistency across SQL scripts, dbForge Studio for MySQL simplifies SQL development by providing IntelliSense-style code completion, context-aware prompts, and automated formatting for clean, efficient, and error-free code.
Setting up dbForge Studio for MySQL
You can download dbForge Studio from the Devart website and read about compatibility requirements before the tool’s installation. After downloading the Studio, navigate to the installation folder and run the dbforgemysql.exe file. The default installation folder is C:\Program Files\Devart\dbForge Studio for MySQL. Alternatively, you can install the Studio from the command line.
In the installation wizard that opens, follow the steps and then launch the Studio. That’s it!
Creating a connection with dbForge Studio for MySQL
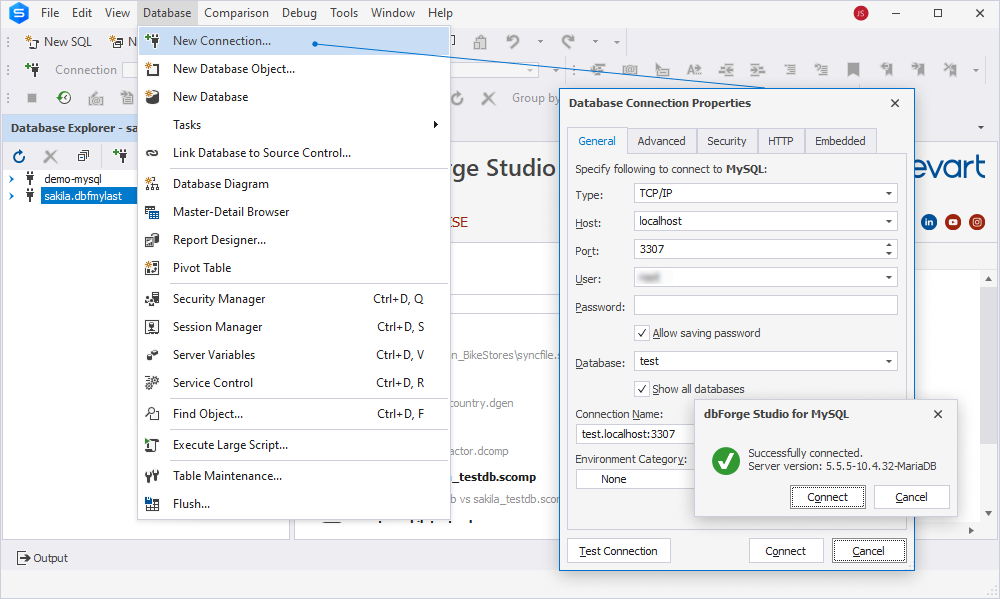
Now, you can establish a PHP connection to a MySQL server using dbForge Studio for MySQL. To do this, you need to open the Database Connection Properties dialog.
To connect to a server, follow the steps:
1. Open the Studio.
2. Navigate to the Database menu and select New Connection to open the Database Connection Properties dialog.
Alternatively, on the Database Explorer toolbar, select New Connection.
3. On the General tab of the dialog that opens, specify the connection details:
- Host: Specify the MySQL server you want to connect. In our example, it is localhost.
- Port: Specify the port number of the server. For our case, it is 3307.
- User: Enter the username for the specified database connection.
- Database: Specify the database name to which you want to connect. If the tool allows you to choose the test database from the list, this validates that the connection to PHP has been established. The sample database is test.
4. Select Test Connection to verify that the connection has been created. If it is successful, the popup window displays the server version, and the Successfully connected message appears.
5. In the popup window, select Connect.

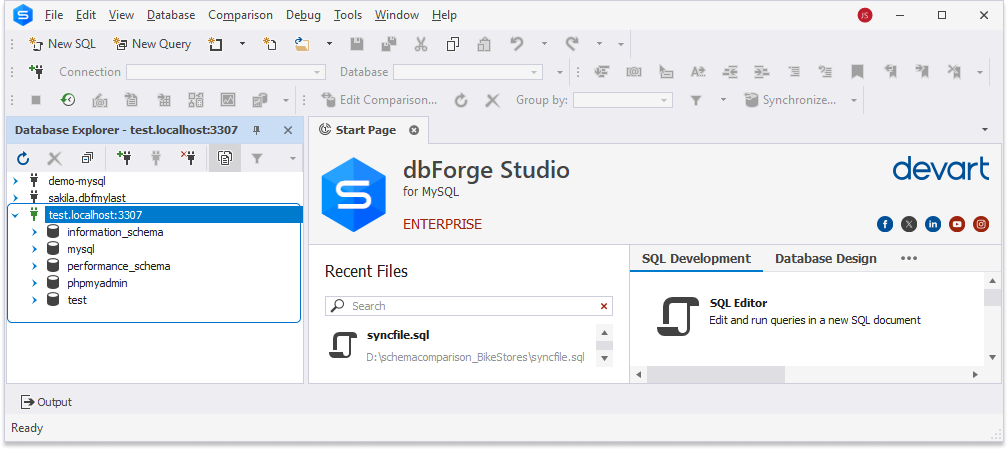
The Database Explorer tree will show the connection and a list of databases available for this connection.

Using a legacy mysql_connect method
In PHP, the mysql_connect function was earlier used to connect PHP to MySQL databases. However, since PHP 5.5.0 it has become outdated and was fully removed in PHP 7.0.0. This function is no longer used or recommended due to a number of limitations and vulnerabilities it has compared to more advanced alternatives, such as mysqli and PDO.
Why has mysql_connect been deprecated?
- Deprecation in favor of improved extensions:
mysql_connect()was removed in PHP 7.0. Any code that uses this function will cause fatal errors in PHP 7 and higher versions. Therefore, it is recommended that developers who maintain code using this function switch to more modern extensions, such asmysqliorPDO. - Lack of support for advanced MySQL features:
mysql_connect()does not support prepared statements, which are necessary to prevent SQL injection. Instead,mysqliandPDOcan be used with prepared statements, making them much more secure when dealing with dynamic data from users. - Single database connection:
mysql_connect()opens a new database connection each time it is called unless the connection is persistent (viamysql_pconnect()). This can lead to inefficiencies and increased load, especially in high-traffic applications. Modern extensions, such asmysqliandPDO, allow for more efficient management of the connection pool. - No object-oriented support:
mysql_connect()uses a procedural API, which means it lacks the flexibility and code organization capabilities that object-oriented programming (OOP) provides. In contrast,mysqliandPDOsupport an object-oriented interface to improve code organization, modularity, and reusability. - No support for multiple queries:
mysql_connect()does not support executing multiple queries in a single statement, which limits its use for batch processing or handling complex logic in one query. This feature, however, is available inmysqli, allowing more flexibility in executing multiple queries at once. - Limited error handling: Error handling in
mysql_connect()is minimal. It relies on functions, such asmysql_error()andmysql_errno(), which provide only basic error messages. The newer extensions, such asmysqliandPDO, offer error handling via exceptions, which is much more reliable and easier to manage. - Lack of encoding support: Setting the character encoding for a MySQL connection in
mysql_connect()requires additional steps, such as running a separate SQL query (SET NAMES), which can lead to inconsistencies or errors. In contrast,mysqliandPDOallow developers to specify encoding directly when connecting, which makes it easier to work with different languages and encodings.
Limitations of mysql_connect()
- Security risks: One of the most critical limitations of
mysql_connect()is the lack of support for prepared statements. This means that developers must manually escape user input, which increases the risk of SQL injection, one of the most common vulnerabilities in web applications. - Procedural approach: It is not suitable for scaling and maintenance in large projects. Object-oriented programming (OOP) is used in modern development practices. OOP is supported by
mysqliandPDO. - Issues with persistent connections:
mysql_pconnect(), which is the persistent version ofmysql_connect(), has own challenges, including difficulties with connection pool management, which can lead to resource management issues. Persistent connections often don’t behave as expected in modern environments and can potentially cause unpredictable results. - No transaction support:
mysql_connect()does not support database-level transactions, which can be used to ensure data integrity for complex operations. Without transactions, it is difficult to ensure that some operations will either fully execute or completely roll back. Modern alternatives, such asmysqliandPDO, provide full support for transactions. - Lack of support for executing multiple queries: Unlike
mysqli_multi_query(), which allows executing multiple SQL queries in a single call,mysql_connect()does not support this feature. This limits performance and efficiency when working with batch queries. - Compatibility issues: Since
mysql_connect()is no longer available in recent versions of PHP, any code using this function is not compatible with future versions of PHP. Developers have to rewrite older codebases to ensure compatibility with PHP 7+ and higher versions.
We have already discussed the reasons and limitations of why the mysql_connect() is not recommended for use. Still, we would like to illustrate this in an example.
Connecting with mysql_connect
Open the text editor and save the script to the .php file in the htdocs folder. This PHP script establishes a basic connection to a MySQL database using the mysql_connect() function.
<?php
$host     = 'localhost:3307';  // Hostname with port 3307
$user     = 'root';            // MySQL username
$password = '';                // MySQL password (empty for default in XAMPP/WAMP)
$dbname   = 'test';            // Name of the database

$conn = mysql_connect($host, $user, $password);                   // Establish MySQL connection

if (!$conn) {
    die('Connection failed: ' . mysql_error());                   // Handle connection error
}

mysql_close($conn);                                               // Close the MySQL connection
?>
Then, open the created file in the browser. The result would be as follows:

The error informs that the mysql_connect() function is called, but PHP cannot find it because it is no longer available. This happened because the mysql_connect() function was removed in PHP 7.0.
Migration to mysqli or PDO
To fix the problem, we can use either mysqli or PDO instead of mysql_connect(). Let us rewrite the script and validate it using dbForge Studio for MySQL.
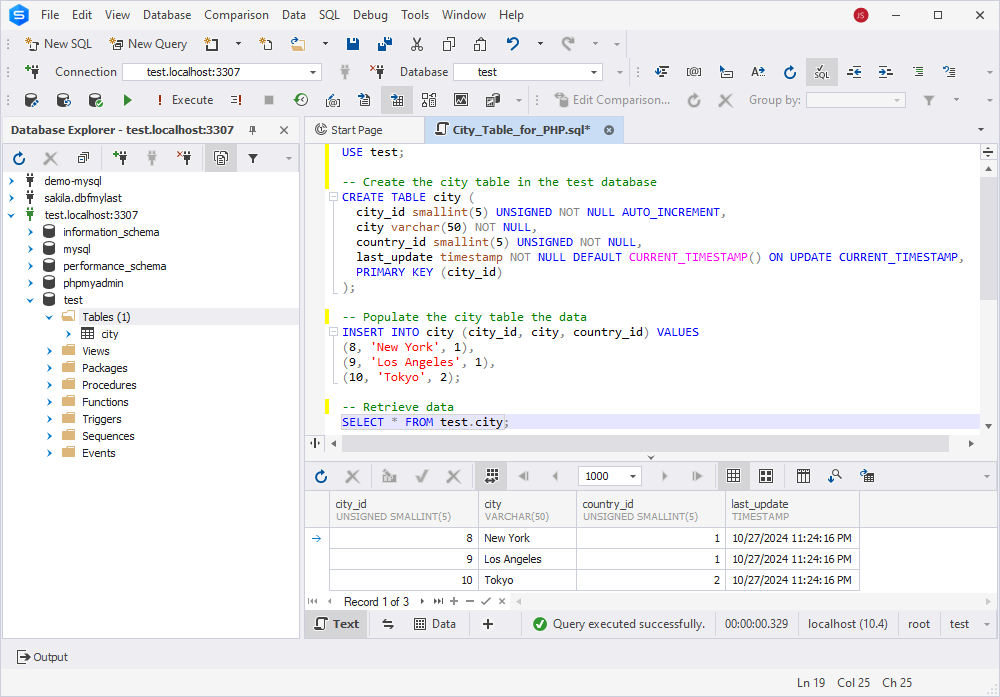
In the Studio, open a SQL document and execute the following queries to create the sample city table in the test database and populate it with data:
USE test;

-- Create the city table in the test database
CREATE TABLE city (
  city_id smallint(5) UNSIGNED NOT NULL AUTO_INCREMENT,
  city varchar(50) NOT NULL,
  country_id smallint(5) UNSIGNED NOT NULL,
  last_update timestamp NOT NULL DEFAULT CURRENT_TIMESTAMP() ON UPDATE CURRENT_TIMESTAMP,
  PRIMARY KEY (city_id)
);

-- Populate the city table with data
INSERT INTO city (city_id, city, country_id) VALUES
(8, 'New York', 1),
(9, 'Los Angeles', 1),
(10, 'Tokyo', 2);
Running the SELECT query will show us that the table has been created and it contains three records:

Next, we rewrote the script using mysqli, saved it to the .php file, and opened it in the browser:
<?php
$host     = 'localhost';      // Host where MySQL is running
$port     = 3307;             // Custom port number
$user     = 'root';           // MySQL username
$password = '';               // MySQL password (empty for XAMPP/WAMP)
$dbname   = 'test';           // Name of the database

// Create connection using mysqli
$conn = mysqli_connect($host, $user, $password, $dbname, $port);

if (!$conn) {
    die("Connection failed: " . mysqli_connect_error());          // Handle connection error
}

$sql    = "SELECT * FROM city";                                   // SQL query to fetch data
$result = mysqli_query($conn, $sql);                              // Execute the query

if (!$result) {
    die("Query failed: " . mysqli_error($conn));                  // Handle query error
}

// Fetch and display results
while ($row = mysqli_fetch_assoc($result)) {
    echo "City : " . $row['city'] . " - City_id: " . $row['city_id'] . "<br>";
}

mysqli_close($conn);                                              // Close the MySQL connection
?>
As you can see, the result is the same.

Conclusion
In the article, we have covered the main methods for connecting PHP to a MySQL database – mysqli and PDO extensions, along with dbForge Studio for MySQL. We explained why these options are preferable over the outdated mysql_connect() function and demonstrated how to use each through specific examples. They all can help you easily create advanced and efficient web applications.
You can try a free fully functional trial version of dbForge Studio for MySQL for 30 days and have a better user experience in PHP development.

