This article explains implementation of the TFS custom check-in policy for pre-commit code review. We developed this policy for Review Assistant – our code review tool.
Idea Behind the Implementation
A while ago a user posted an idea on the Review Assistant forum on UserVoice:
“I setup a build management in TFS server and add a build check-in policy to TFS, and now every check-in has to have a successful build, otherwise you cannot check-in.
It’d be great if we can setup a custom policy to TFS that every check-in needs to pass a code review. So, instead of developers having to shelve their changes manually and assign the shelveset to a code review, if this tool can do that automatically for you in a check-in process, that’d be super.”
Other users supported this idea so we decided to implement it.
The rest of the article explains what is a check-in policy and how to implement it.
What is TFS Check-in Policy?
Check-in policy enforces constraints every time when files are checked into source control. Team Foundation Server provides a number of out-of-box check-in policies, including policies that check that static code analysis has been performed, and policies that check that work items are associated with check ins.
How to Add Check-in Policy
To add check-in policy in TFS, you must have the Edit project-level information permission set to Allow. For more information, see Team Foundation Server Permissions.
- Open Team Explorer, left-click the window header, click Settings, and then click Source Control under Team Project section.
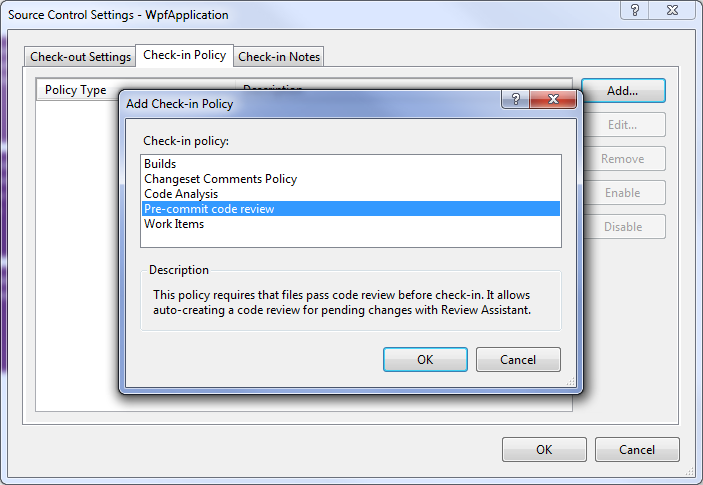
The Source Control Settings dialog box appears. - Click the Check-in Policy tab and then click Add.
The Add Check-in Policy dialog box appears. - In the Check-in Policy list, select the policy type you want, and then click OK.
- When you are satisfied with the settings for the check-in policies, click OK; the new check-in policy now displays with future check-ins.
For more information see Add Check-in Policies on MSDN.
How Does Check-in Policy Work?
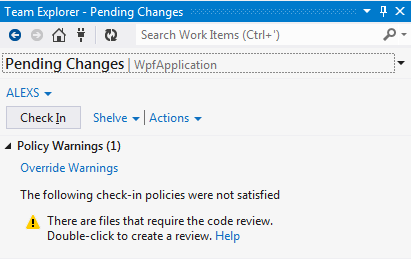
Before you check-in, TFS evaluates pending changes in your working directory. Here TFS evaluates the check-in policy for the first time. If the policy evaluation fails you get a warning.

You can override the policy warning if necessary to force check-in, but you need to specify the reason for such override.
Check-in Policy Implementation Procedure
Implementation procedure for a custom check-in policy is pretty straightforward:
- Create and build a custom policy class.
- Register the custom policy in the Windows registry.
Then you can add your policy to a TFS project as described earlier in this article.
Custom Policy Class Skeleton
All you need is to create a class that derives from PolicyBase and place it into a class library. It may look like the following.
using System;
using Microsoft.TeamFoundation.VersionControl.Client;

namespace Devart.ReviewAssistant.TeamFoundation
{
  /// <summary>
  /// Custom check-in policy that requires pre-commit code review.
  /// </summary>
  [Serializable]
  public class CodeMustBeReviewedPolicy : PolicyBase
  {
    /// <summary>
    /// Gets the description of this policy.
    /// </summary>
    public override string Description
    {
      get
      {
        return "The policy forces users to review code using Review Assistant...";
      }
    }
    /// <summary>
    /// This is a string that is stored with the policy definition on the source
    /// control server. If a user does not have the policy plug-in installed,
    /// this string is displayed. You can use this to explain to the user
    /// how they should install the policy plug-in.
    /// </summary>
    public override string InstallationInstructions
    {
      get
      {
        return "none";
      }
    }

    /// <summary>
    /// This string identifies the type of policy. It is displayed in the
    /// policy list when you add a new policy to a Team Project.
    /// </summary>
    public override string Type
    {
      get
      {
        return "Pre-commit code review";
      }
    }

    /// <summary>
    /// This string is a description of the type of policy. It is displayed
    /// when you select the policy in the Add Check-in Policy dialog box.
    /// </summary>
    public override string TypeDescription
    {
      get
      {
        return "This policy requires that files pass code ...";
      }
    }

    /// <summary>
    /// This method is called if the user double-clicks on
    /// a policy failure in the UI.
    /// </summary>
    /// <param name="failure">The policy failure that causes this event.</param>
    public override void Activate(PolicyFailure failure)
    {
      // create a review
    }

    /// <summary>
    /// This method is called if the user presses F1 when a policy failure
    /// is active in the UI.
    /// </summary>
    /// <param name="failure">The policy failure that causes this event.</param>
    public override void DisplayHelp(PolicyFailure failure)
    {
      // open help page
    }

    /// <summary>
    /// This method is called by the policy framework when you create
    /// a new check-in policy or edit an existing check-in policy.
    /// You can use this to display a UI specific to this policy type
    /// allowing the user to change the parameters of the policy.
    /// </summary>
    /// <param name="policyEditArgs">
    /// Arguments for the configuration dialog box.</param>
    /// <returns>True if the dialog box opened; otherwise, false.</returns>
    public override bool Edit(IPolicyEditArgs policyEditArgs)
    {
      // Do not need any custom configuration
      return true;
    }

    /// <summary>
    /// This method performs the actual policy evaluation.
    /// It is called by the policy framework at various points in time
    /// when policy should be evaluated.
    /// </summary>
    /// <returns>
    /// An array of PolicyFailures that results from the evaluation.
    /// </returns>
    public override PolicyFailure[] Evaluate()
    {
      return new PolicyFailure[0]; // never fail
    }
  }
}
Registering Custom Policy
Next, you need to add an entry to the Windows registry so that your policy appears in the Add Check-in Policy dialog box.
Here is an example of the .reg file that registers the policy.
Windows Registry Editor Version 5.00
[HKEY_LOCAL_MACHINE\SOFTWARE\Microsoft\VisualStudio\11.0\TeamFoundation\SourceControl\Checkin Policies]
"Devart.ReviewAssistant.TeamFoundation"="c:\\Program Files\\Devart\\ReviewAssistant\\Devart.ReviewAssistant.TeamFoundation.dll"
Note that you must install the policy assembly on every computer that needs to have a reference the assembly.
Make sure that you provide valid installation instructions for your policy as it will help fellow developers to install it.
Let’s dive into the details of our implementation of the check-in policy for code review. We shall discuss:
- The algorithm of our Pre-Commit Code Review policy;
- Main problems of implementing the algorithm;
- Restrictions of the policy implementation.
How Does the Pre-Commit Code Review Policy Work?
Here is the policy algorithm description in a nutshell:
- Once a user invokes the Check In Pending Changes command or just opens the Pending Changes view in Team Explorer, the policy is evaluated.
- The policy loads the Review Assistant package and attempts to connect to a review server using previously stored credentials.
- Policy searches for the open reviews for the pending changes. There are three possible outcomes:
- No review is found – the policy is not satisfied.

- An open review is found – the policy is still not satisfied.

- A closed review is found – the policy is satisfied (no warning).
- No review is found – the policy is not satisfied.
- A user activates the policy (when it’s not satisfied). Here we have two scenarios:
- There are files that require the code review.
- A shelveset with pending changes is created
- Code Review Board is opened and the new review for the above shelveset is created.
- The user specifies a reviewer and publishes the review.
- Files in the pending check-in are under review.
- Code Review Board is opened and the review, which causes the policy to fail, is displayed.
- The user can check the status of the review and push the things forward, if necessary.
- There are files that require the code review.

Note: When the policy fails to evaluate correctly it returns no failure. In other words, if it fails to connect to a review server the policy is still satisfied.
Tough Point of the Implementation
The main problem of the pre-commit code review process lies in creeping changes. Developers are constantly changing the code, even while the review is in process.
Thus, we faced the dilemma: how to identify what code was reviewed and what wasn’t. It’s not enough to identify the files that were changed. We want to make sure that the file content remains stable throughout the review.
The solution we chose was to calculate MD5 hash of each changed file during the policy evaluation. Fortunately, the policy evaluation runs in a background thread and doesn’t block the Visual Studio UI.
These hash-values are stored locally on user’s computer. We maintain a sort of cache for the reviews created by the user. This saves time on searching the reviews for the pending changes.
Policy Restrictions
Finally, we’ll cover the restrictions of our Pre-Commit Code Review policy.
- Policy does not filter the files during the evaluation. It will fail even if you change supplementary files that don’t need a review. In this case you should override the policy warning.
- If you add files to your check-in after the review is created the policy will fail. In this case you should remove additional files from the check-in to satisfy the policy.
- Reviews created by the policy are cached for a limited time. But it won’t be an issue unless you delay the check-in for a month.
Conclusion
We’ve covered some detail of the implementation of Pre-Commit Code Review policy in Review Assistant. We hope it helps you in using our product. Download Review Assistant and start reviewing code today.
[…] […]
[…] More information on some of the new features, particularly the TFS custom check-in policy, is available here. […]
I have followed all the steps as mentioned, still I am unable to see the custom policy in “Add Check-in Policy” dialog box.
I am using visual studio version ultimate 2012 (version 11.0.61030.00)
If your OS is 64bit and your VS is 86x you should add it to the Wow6432Node or add it not to local machine but to HKEY_CURRENT_USER
https://stackoverflow.com/questions/14571063/tfs-custom-check-in-policy-is-not-in-the-add-box