
What’s the big deal with SSIS Execute Process Task?
Among the many SSIS components, Data Flow and SQL tasks are enough for simple tasks. Using SSIS to compare two tables is one example. But sometimes, those task components alone are not enough for our requirements. Executing a batch file, a PowerShell script, or an executable file as the next step makes sense. So, why not make use of it in SSIS?
And guess what? The SSIS Execute Process Task can use these useful software nuggets.
This article will discuss how to use Execute Process Task in SSIS with examples. You’ll learn the following:
- What is Execute Process Task?
- The different Execute Process Task arguments.
- Running Batch Files using SSIS Execute Process Task.
- Using SSIS Execute Process Task with PowerShell.
- Running executable (.EXE) files with SSIS Execute Process Task.
- Unzipping Zip files with SSIS Execute Process Task.
- Finally, how to make your SSIS Execute Process Task flexible by using variables.
Before we begin, the following tools are used in the examples:
- SQL Server Integration Services 2019
- Visual Studio 2019
- Windows 10 21H2
Now, let’s dive in.

What is the Execute Process Task in SSIS?
The SSIS Execute Process Task runs apps or batch files as part of the SSIS package workflow. Though you can run any executable app, batch file, or PowerShell commands, you typically use it for data integration purposes. An example of this is unzipping a Zip file that contains CSV files within. Then, the CSV files will be opened and processed by another SSIS data flow component.
You can use this component by dragging the Execute Process Task from the toolbox into your SSIS package’s Control Flow.
There are a few settings you need to know to configure this component properly. You do this after right-clicking the Execute Process Task component. Then, the Execute Process Task Editor window will appear. See a screenshot of this in Figure 1.
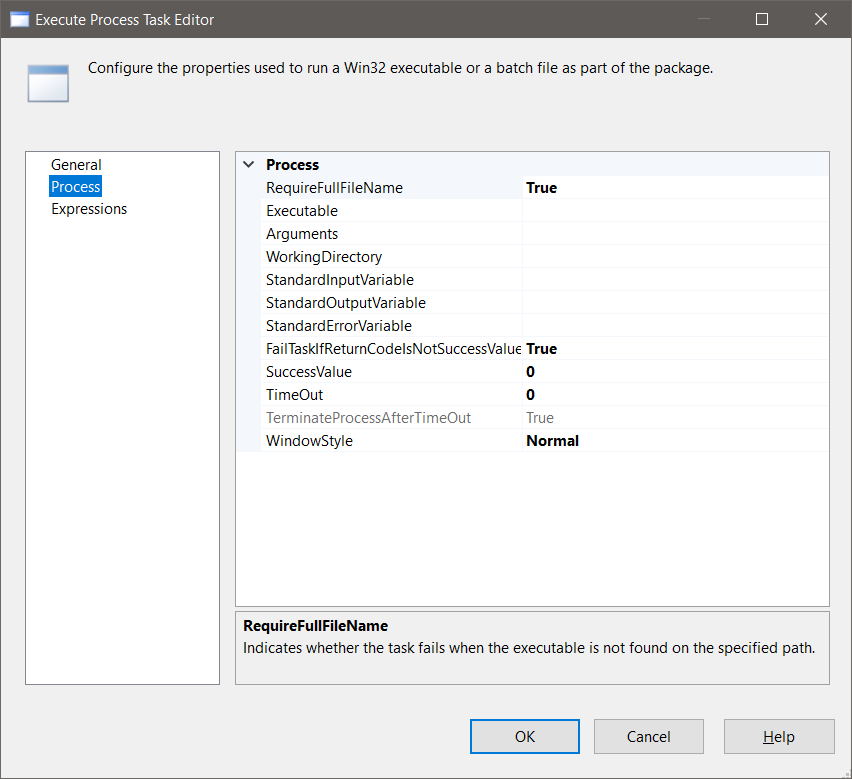
Let’s describe each property.
Execute Process Task Properties
RequireFullFileName
When True, the task will fail if the app is not found on the specified path.
Executable
This is the app or batch file you want to run. You can also specify the full path along with the app or batch name.
Arguments
Apps and batch files can have parameters or arguments. You pass the values from the SSIS package from here. The next section will discuss this further with an example.
WorkingDirectory
This is where you put the exact working folder location for your app’s input/output.
StandardInputVariable
Sometimes, a console app requires input from the user. But SSIS packages typically run unattended. So, you can use this property to pass a value a user will enter. And when you use a variable for that purpose, the execution will continue to run without user input. This will be explained further with an example in the next section.
StandardOutputVariable
You may want to get the output from the app and handle the values in your SSIS package. Enter your preferred variable here so you can work on the value in a later task.
StandardErrorVariable
An app can go wrong. So, you need to capture the error to handle the problem. The app can pass the error in the variable you specify here.
FailTaskIfReturnCodeIsNotSuccessValue
Defaults to True. When true, the Execute Process Task will fail if the output value is not the same as the value of SuccessValue.
SuccessValue
Defaults to zero. But the app may return a different value, like 1. Specify the success value here. This is also used as a basis in FailTaskIfReturnCodeIsNotSuccessValue.
TimeOut
Specify the number of seconds until time-out here. Zero means indefinite. When you provide a non-zero value, you can choose to let the app end using the TerminateProcessAfterTimeOut = True.
WindowStyle
Possible values here are Normal, Maximized, Minimized, or Hidden. This indicates how the app will display when invoked.
Execute Process Task Arguments
Arguments passed into the app or batch file are specified in a single string value. This string value can be entered as a literal value or through an argument variable. It also accepts single or multiple arguments within the string. Further, you may include double quotes when needed.
Let’s say you want to copy a Zip file to another folder.
CMD.EXE /C COPY PAY202201.ZIP C:\WorkingFolder
The executable is CMD.EXE. The arguments are the rest of the text command. So, in the Execute Process Task Editor, enter /C COPY PAY202201.ZIP C:\WorkingFolder for Arguments.
Arguments vs StandardInputVariable – What’s the Difference?
We’re going to use an example to answer this. But first, see the settings in Figure 2.
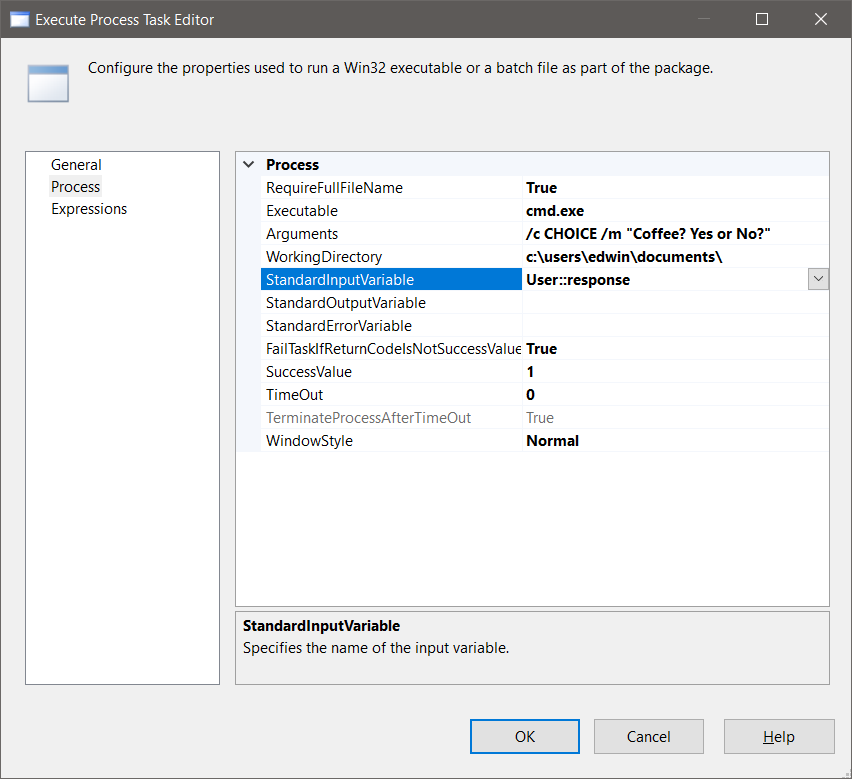
As you can see in Figure 2, Arguments and StandardInputVariable are not the same. So, what’s the functional difference?
Arguments are for app parameters. Meanwhile, StandardInputVariable is for user input within the app. Command prompt commands like DATE and TIME wait for user input. Without the /T parameter, the DATE command will wait for user input for a new system date.
Now, consider the example above.
It will invoke the CHOICE console command. It asks if you want coffee or not. Then, you can enter either Y or N. The value of Arguments is the CHOICE command and its parameter values. Meanwhile, the StandardInputVariable is User::response. And if User::response equals Y, the SSIS task will continue to run without waiting for user input. It will act as if a user presses Y. But without the StandardInputVariable, the SSIS task will pause until Y or N is pressed. And we don’t want that on an unattended execution.
Here’s the point: Don’t use parameter values for StandardInputVariable. And don’t use supposed-to-be user input under Arguments. It won’t work. But note that the example is for console apps with 1 user input. By the looks of the property setting, it only accepts 1 input.
How to Run .EXE Files from Command Line on SSIS Execute Process Task
Earlier, we run the command prompt through the SSIS Execute Process Task. But let’s have another example that will clarify it further. Let’s try encrypting a folder and the files within it through this component. Check out Figure 3.
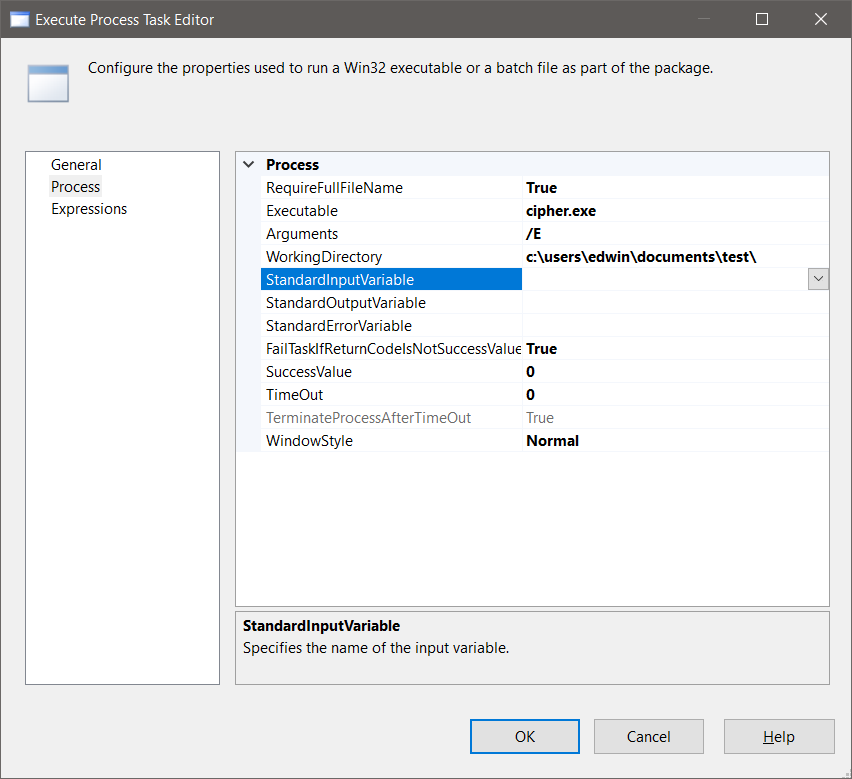
The executable used is CIPHER.EXE. It is pre-installed on Windows 10 systems but will only work in Windows 10 Pro and Enterprise. The /E argument tells Cipher to encrypt the files and folder specified in WorkingDirectory.
That’s easy. Next, let’s try it with batch files.
How to Run Batch File with SSIS Execute Process Task
At this point, the idea should be easy. But let’s try the Execute Process Task in SSIS with batch files. Consider Figure 4 below for the batch file example.
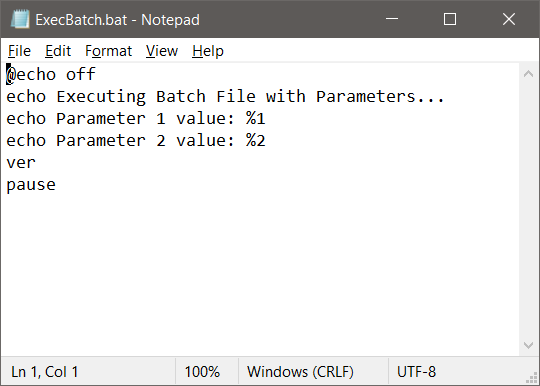
Our example in Figure 4 will do the following for our demo purposes:
Accept 2
batch file parameters and display them.
Display
the Windows version
In the
end, pause and wait for any keyboard press, so we can have a
screenshot of the result. You don’t do this in production batch
files, though.
Then, see Figure 5 for the settings.
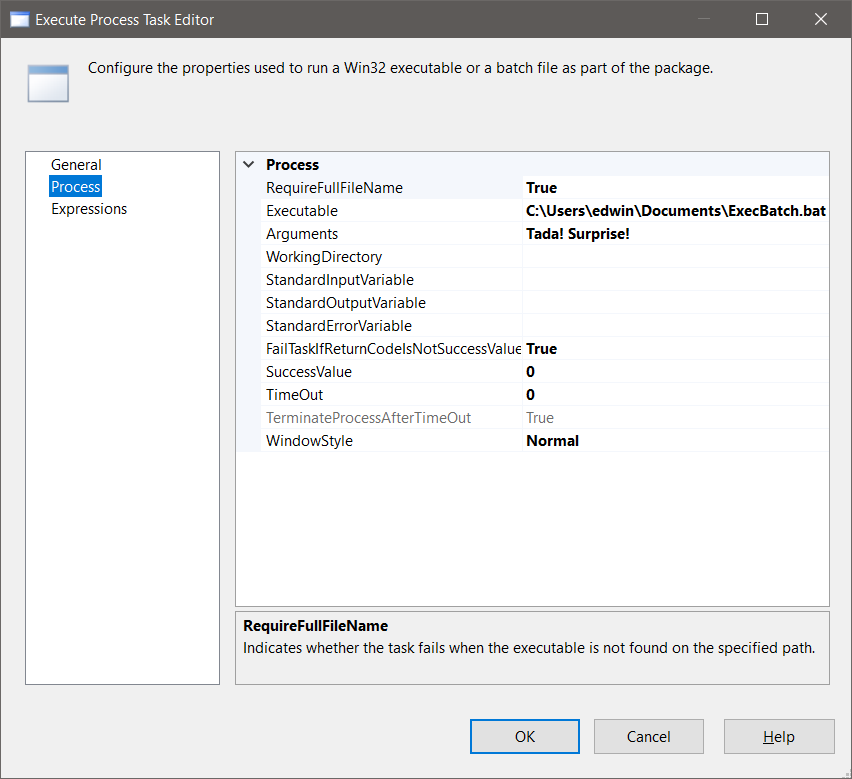
Figure 5 shows the setting for running a batch file with 2 parameters. The Executable is ExecBatch.bat with the full path indicated. Then, the Arguments are “Tada!” and “Surprise!”.
See a screenshot of the result in Figure 6.
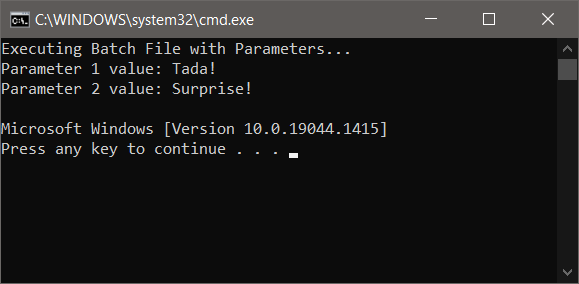
The batch file functioned as expected after executing the task.
Run PowerShell Script from SSIS Execute Process Task
If SSIS can run apps, SSIS and PowerShell can work together. So, we’re going to try executing a PowerShell script block from within SSIS Execute Process Task. The concept is basically the same.
In our example below, SSIS will run a PowerShell script block with arguments to search for a string within a text file.
Executable:
powershell.exe
Arguments:
-NoProfile -ExecutionPolicy ByPass -Command “if (select-string
-pattern BOMB -path AUDIT202201.txt) {exit 0} else {exit 1}”
WorkingDirectory:
c:\users\edwin\documents\
FailTaskIfReturnCodeIsNotSuccessValue:
False
The text file is AUDIT202201.txt. And we will look for the word “BOMB” inside that file. It will return 0 if it exists. Otherwise, 1. The NoProfile and ExecutionPolicy arguments are supplied so the script won’t break if there are server configuration changes that will affect it.
Here’s how the whole Control Flow and the Execute Process Task Editor window look like in Figure 7.

The working directory setting ensures that PowerShell can find the file in that folder. Also, setting the FailTaskIfReturnCodeIsNotSuccessValue to False ensures that the whole package won’t fail if the string is not found.
The result will lead to Show Failure as the search string does not exist in my copy of the text file.
How to Unzip .ZIP Files Using Execute Process Task
Another data integration task is to unzip a file that includes data files like CSV and Excel files. Let’s try this by using the bsdtar archiving tool or TAR.EXE. This is pre-installed in Windows 10 Build 17063 or newer. So, there’s no need to download any Zip/Unzip tool like 7Zip if you want to try this example yourself.
First, drag the Execute Process Task to the Control Flow of your SSIS package in Visual Studio. Then, check out Figure 8 for the property settings.
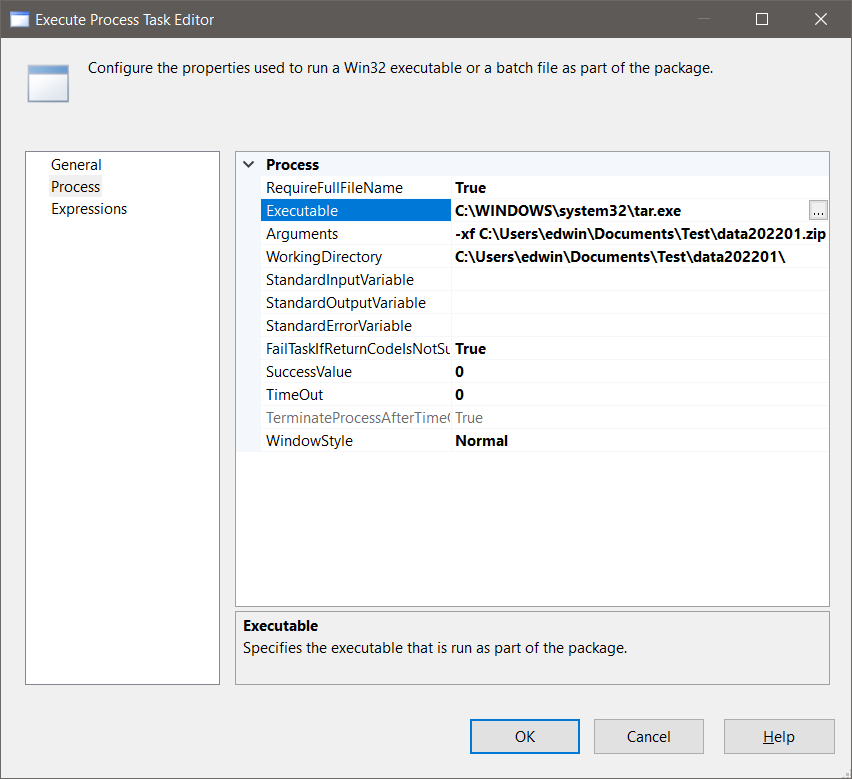
Extracting a Zip file needs the /xf argument and the zip file itself. You also need to specify the WorkingDirectory so it will extract the files there.
SSIS Execute Process Task with Variables
So far, the configurations you saw use hardcoded values. This way, you can see the samples straight and clear. But this time, let’s add a little flexibility by using SSIS variables.
Some of the properties in the Execute Process Task in SSIS require variables. This includes StandardInputVariable which you saw in an earlier section. Also, there are StandardOutputVariable and StandardErrorVariable. All these are useful for creating a defensive control flow design.
You can set a variable using the SSIS Script Task based on some factors, like year and month. Or, you can also use expressions if your desired output is simpler. Let’s change the configuration for unzipping ZIP files from the previous section.
Create the Variables
First, let’s have the variables. We need 4 variables as seen in Figure 9.

Instead of using a script, we used expressions as seen in Figure 9. With expressions, you can use functions and operators to get your desired value. You can observe the following from the above variables:
A fixed
working folder in workingFolder variable.
A string
that holds the year and month (yearMonthString). We need this
to form the values of the next variables. The expression is defined
as (DT_WSTR, 4) YEAR(GETDATE()) + RIGHT(“00” + (DT_WSTR,
2) MONTH(GETDATE()),2). The DT_WSTR is used to convert
numeric values, like month and year, to strings. Meanwhile, the
YEAR, MONTH, and GETDATE are date functions used to get the year,
month, and current date respectively.
targetDataFolderName that
holds the flexible target folder name to extract the files. This is
based on the yearMonthString. The expression is defined
as “data” + @[User::yearMonthString].
Lastly, a
flexible name for the Zip file with the full path. The expression is
defined as @[User::workingFolder] + “data” +
@[User::yearMonthString] + “.zip”.
Now create the user variables as you see them in Figure 9 above. Then, we will use these variables in the next section.
Set the Properties to Variables
To use these variables in the SSIS Execute Process Task, check out Figure 10 and follow the steps after it.
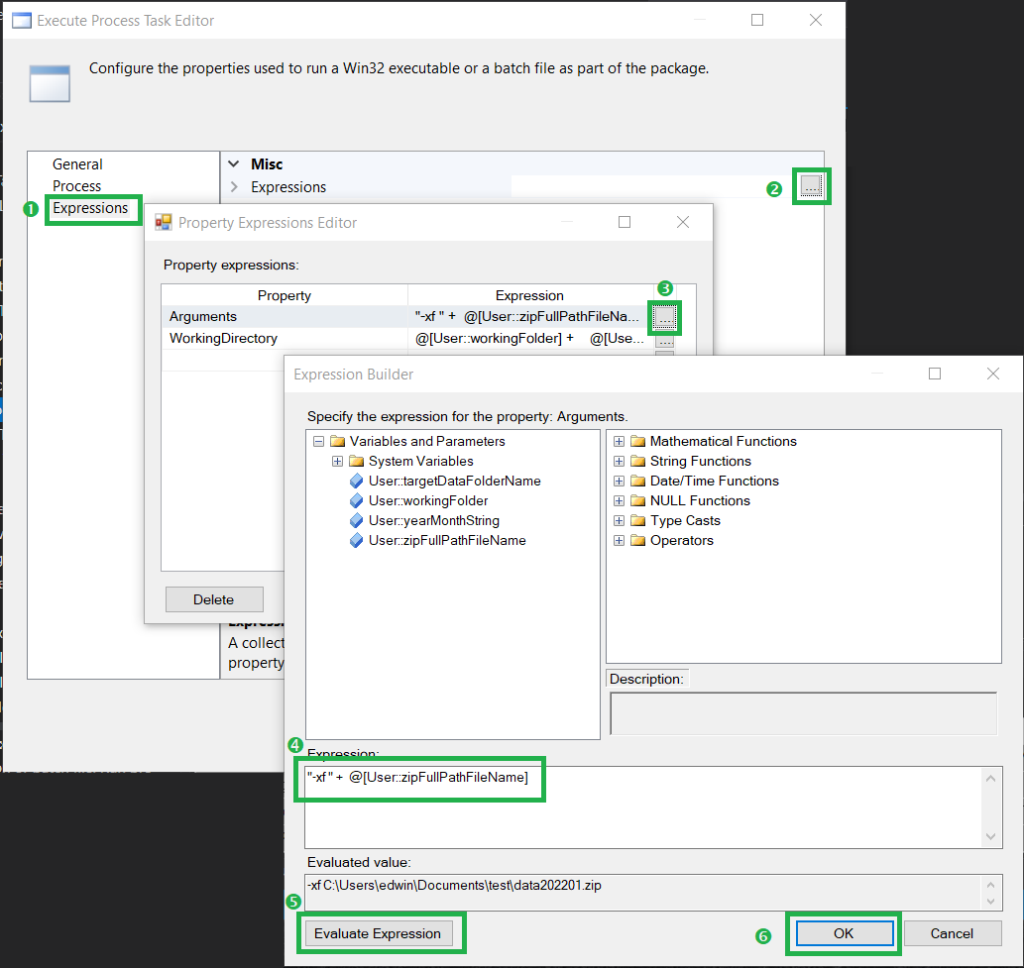
Here are the steps to configure the task as on the Figure 10:
- Click Expressions in the left pane of the Execute Process Task Editor.
- Under Misc, click the ellipsis button of the Expressions property.
- Add and select Arguments property. Then, click the ellipsis button.
- The Expression Builder window will open. Type the expression “-xf ” + @[User::zipFullPathFileName].
- Click the Evaluate Expression button to check the syntax. If there’s an error, correct it.
- Click the OK button to close the Expression Builder window.
Then, continue working for the WorkingDirectory property. Here’s the next thing to do:
Add
another property and select WorkingDirectory. Then,
click the ellipsis button.
The Expression
Builder window will appear again. This time, set the
expression to @[User::workingFolder] +
@[User::targetDataFolderName].
Click
the OK button to close the Expression Builder
window.
Then,
click back to the Process pane of the Execute
Process Task Editor, change the Executable property
setting to C:\Windows\system32\tar.exe.
Finally,
click the OK button to close the Execute Process
Task Editor window.
You can now perform a test run. It should behave like the example in the previous section.
Our design includes a simple setup with 1 task component. It also doesn’t involve catching the output value of the app and the error if there’s any. But the point of using variables inside the SSIS Execute Process is the same. And you can apply this in other properties as well.
Conclusion
That’s it.
Using the SSIS Execute Process Task is easy to understand and configure. You will find this a valuable component in your data integration projects. But if you have questions, please fire away in the Comments section below.
Do you find this post helpful? Please share it with your friends on your favorite social media platforms.