
dbForge Source Control for SQL Server is an SSMS add-in that enables database version control and is compatible with the biggest version control systems, including Git, Mercurial, SVN, TFVC, Azure DevOps Server, Perforce, and SourceGear Vault.
With its help, you can retrieve, commit, and revert changes in your SQL Server databases, resolve conflicts, view data and schema differences in your local and remote repositories, work with multiple branches, and do much more directly from SSMS.
In this article, we’ll show you how to get started with the basic operations in Source Control quickly and effortlessly.
CONTENTS
- Download and install dbForge Source Control
- Link a database to a repository
- Link static data
- Retrieve the latest version
- Commit changes
- Undo changes
- Resolve conflicts
- View the history of changes
- Download Source Control for a free trial

Download and install dbForge Source Control
Source Control can be downloaded as part of dbForge SQL Tools, a bundle of 15 SSMS add-ins and standalone apps that cover different aspects of SQL Server development, management, and administration. So, first off, download the bundle from our official website, run the installation file, and let the wizard do the rest.
In case you get stuck during the installation, feel free to consult this brief step-by-step video guide.
Once the installation is completed, Source Control will be accessible from SSMS.
Link a database to a repository
Let’s start our exploration with linking your database to a repository. In our case, it will be Git—the most popular version control system. As for the prerequisites, you need to have the Git client installed on your Windows machine, and a Git repository created locally or cloned from a remote repository. Once it’s done, you can proceed to link your databases.
To link a database to a Git repo, take the following steps:
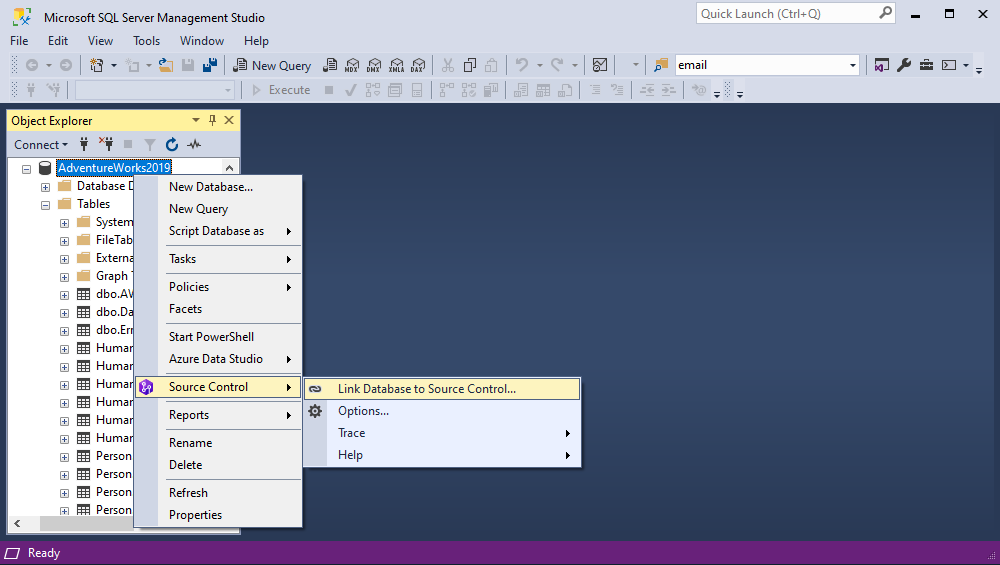
1. In the SSMS Object Explorer, right-click the required database and select Source Control > Link database to Source Control from the shortcut menu.
2. The Link Database to Source Control wizard opens. On the Link page, click + in the Source control repository field.
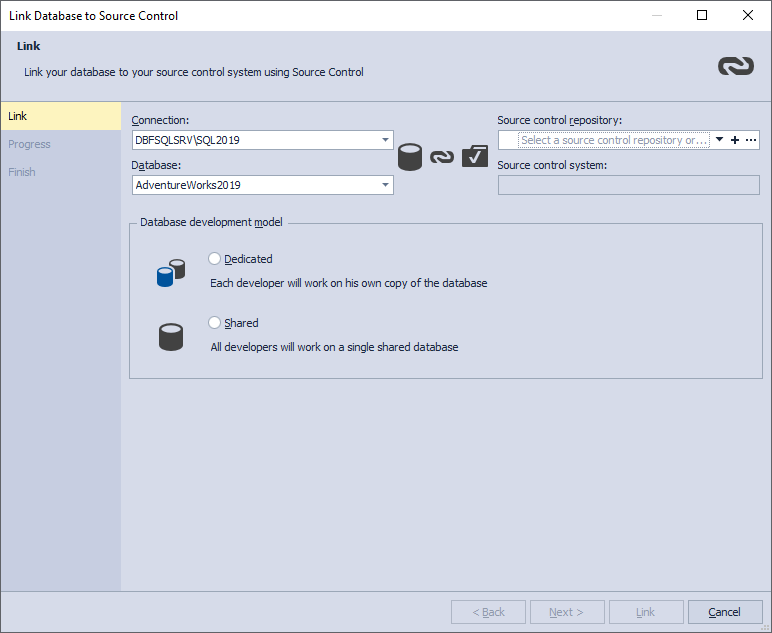
Note: Refer to our documentation to learn more about the dedicated development model and the shared development model.
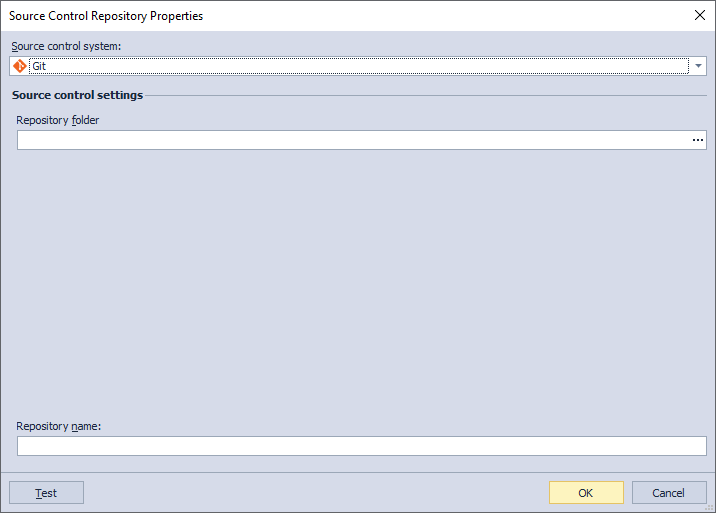
3. In the Source Control Repository Properties dialog that opens, select Git from the Source сontrol system drop-down list and provide a path to your local Git repository.
Note: Check our comprehensive guides to setting up and managing version control using the following solutions:
- How to version-control SQL Server databases in GitHub
- How to version-control SQL Server databases in GitLab
- How to version-control SQL Server databases in Azure DevOps
- How to version-control SQL Server databases in Bitbucket
4. Click Test to check the connection. Then click OK to close the dialog.
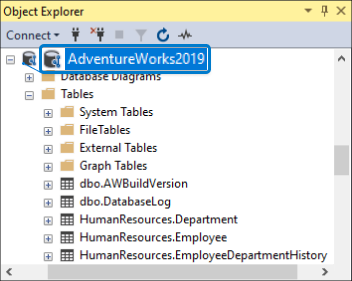
5. Back at Link Database to Source Control, select the preferred database development model and click Link. If the linking is successful, you will see the following icon in Object Explorer; it indicates that your database is linked to Source Control. That’s it!
Note: Let us reiterate that Git is not the only version control system supported by dbForge Source Control. Refer to our documentation for the following topics:
- Linking to SVN
- Linking to TFVC
- Linking to Mercurial
- Linking to Perforce
- Linking to SourceGear Vault
- Linking to Plastic SCM
- Linking to a working folder
Link static data
Source Control also lets you link and version-control static table data. And, since static data can have an impact on database performance and proper functioning, keeping track of changes in it is a good idea.
To link static data to Source Control, take the following steps:
1. In the SSMS Object Explorer, right-click the database containing the required tables with static data. Point to Source Control and select Link / Unlink Static Data.
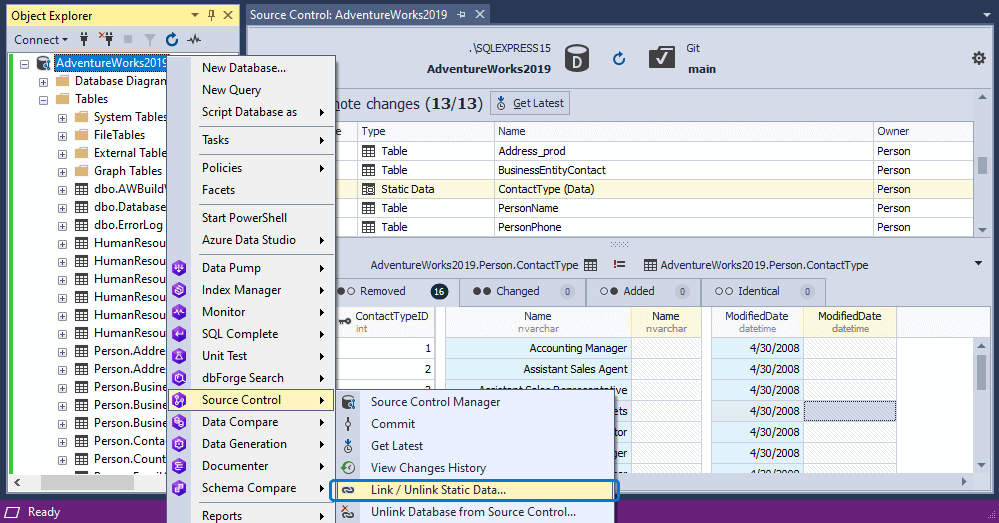
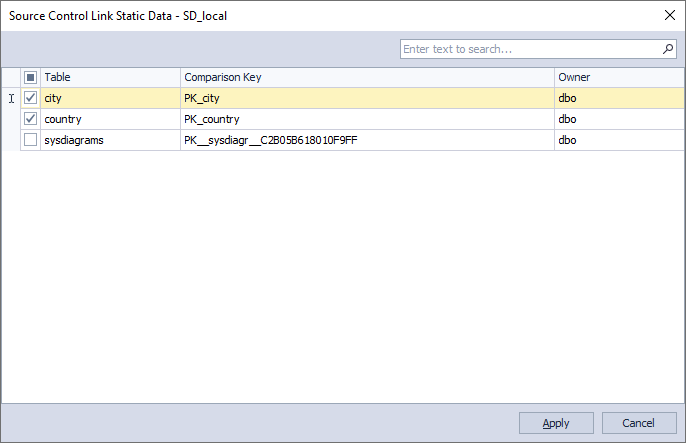
2. The Source Control Link Static Data dialog opens. Select the required tables with static data and click Apply. Please note that you can link and source-control only tables with properly defined primary keys.
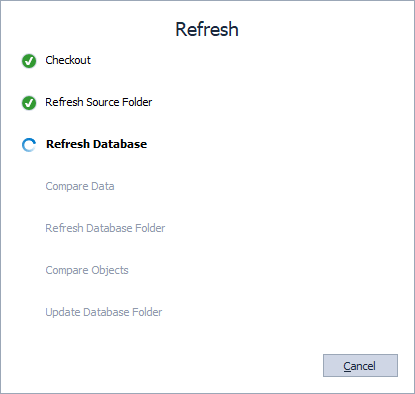
Afterwards, the Refresh dialog opens automatically, showing the progress of each stage.
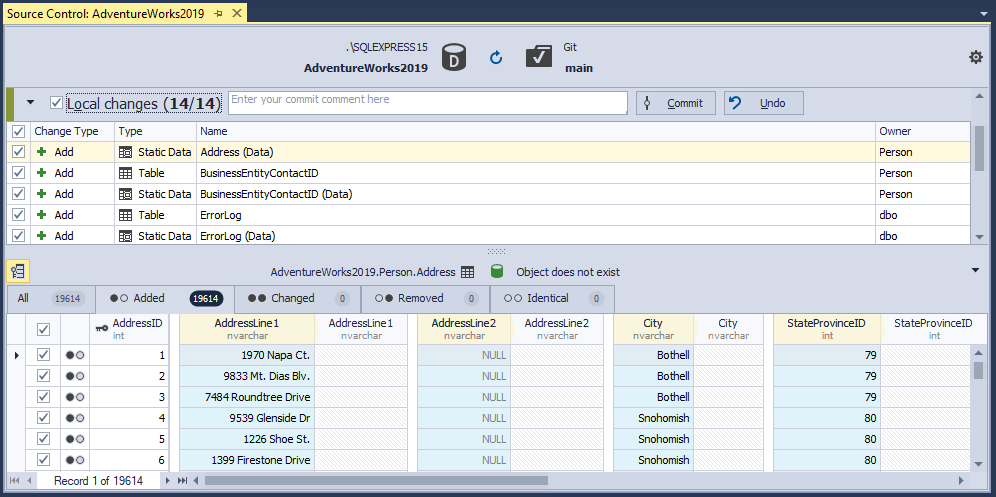
3. Once the refresh is done, Source Control Manager opens, where you can check all the introduced changes in the corresponding tabs. If everything is correct, go to the Local Changes section, select the linked tables with static data, and click Commit.
Learn more in our documentation: Linking static data
Retrieve the latest version
To get the latest changes from Source Contol, do the following:
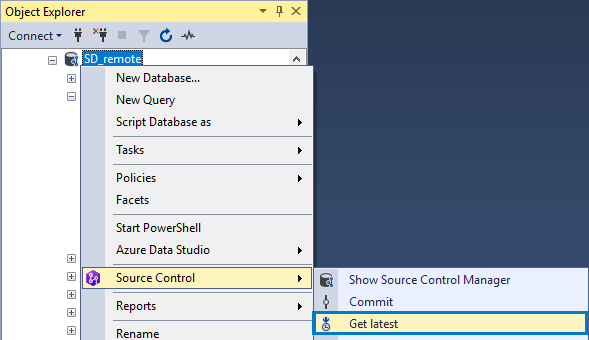
1. In the SSMS Object Explorer, right-click the linked database that you need to update, point to Source Control, and click Get Latest.
Like in the previous case, the Refresh dialog opens automatically, showing the progress of each stage.
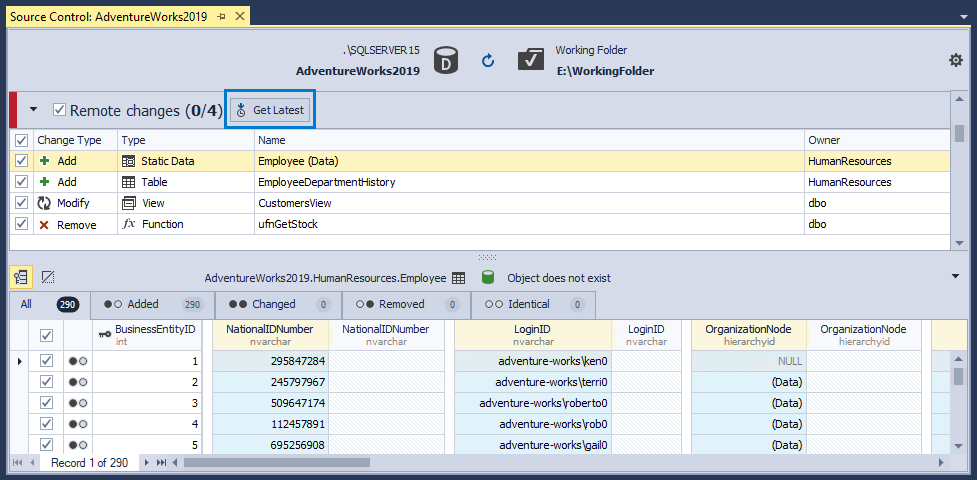
2. Once the refresh is done, Source Control Manager opens. In the Remote Changes section, select the objects and/or data that you need to update and click Get Latest.
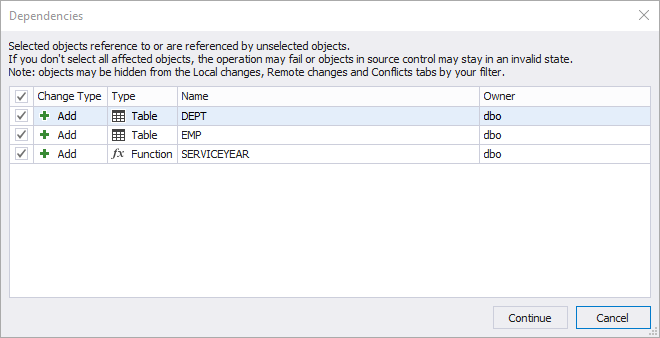
Note that if you select not all the related objects, but only one, then, upon clicking Get Latest, the following Dependencies window opens with a suggestion to include all affected objects:
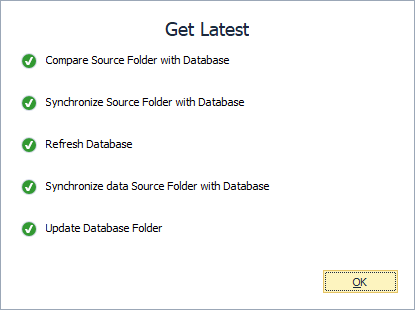
3. If everything is correct, upon clicking Get Latest, you will see the Get Latest dialog that shows the progress. Once it’s all completed, click OK.
Done! Now your local version is updated with the latest changes.
Learn more in our documentation: Getting the latest version
Commit changes
To commit changes to your repository, do the following:
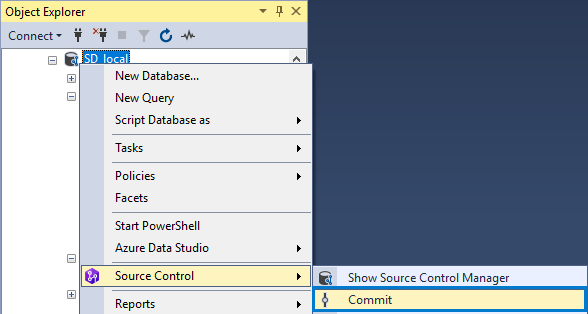
1. In the SSMS Object Explorer, right-click the required linked database, point to Source Control, and click Commit.
Afterwards, the Refresh dialog opens automatically, showing the progress of each stage.
2. Once the refresh is done, Source Control Manager opens. In the Remote Changes section, select the objects and/or data that you want to commit.
Note that if you select not all the related objects, but only one, then, upon clicking Commit, the following Dependencies window opens with a suggestion to include all affected objects:
3. In the text box, write a comment describing your commit. This will help your fellow developers understand what it’s about. Then check the changes to make sure everything is right.
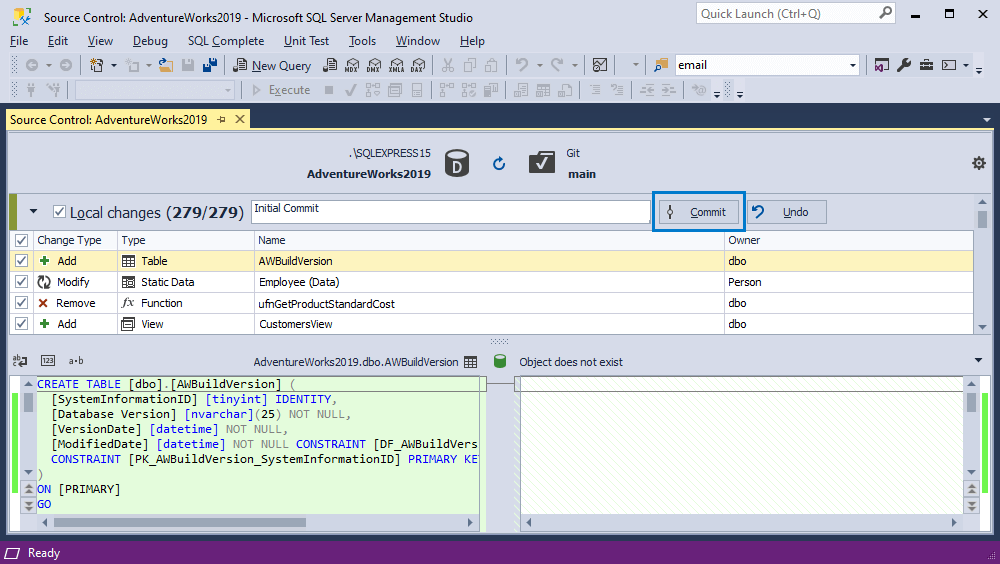
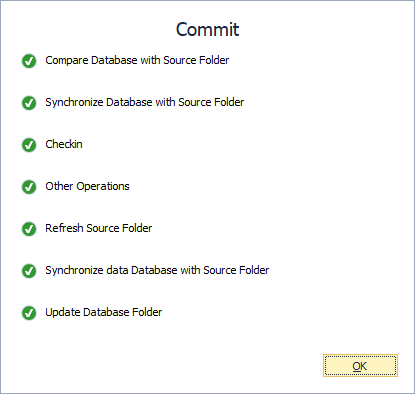
4. Click Commit. The corresponding dialog opens, showing the progress of the commit operation. Once it’s all completed, click OK.
That’s it! Now your repository is updated with your local changes.
Learn more in our documentation: Committing changes
Undo changes
You can undo changes that have been made in database objects but have not been committed yet. However, note that the undo operation leads to permanent changes in your databases; these changes can be reverted only through the restoration of a previously saved database backup.
To undo changes, take the following steps:
1. In the SSMS Object Explorer, right-click a linked database or a specific database object, point to Source Control, and click Show Source Control Manager.
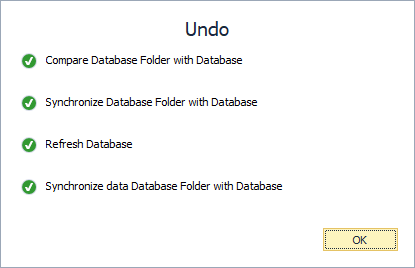
2. In the Local changes section of Source Control Manager, select the changes that you want to undo, and click Undo.
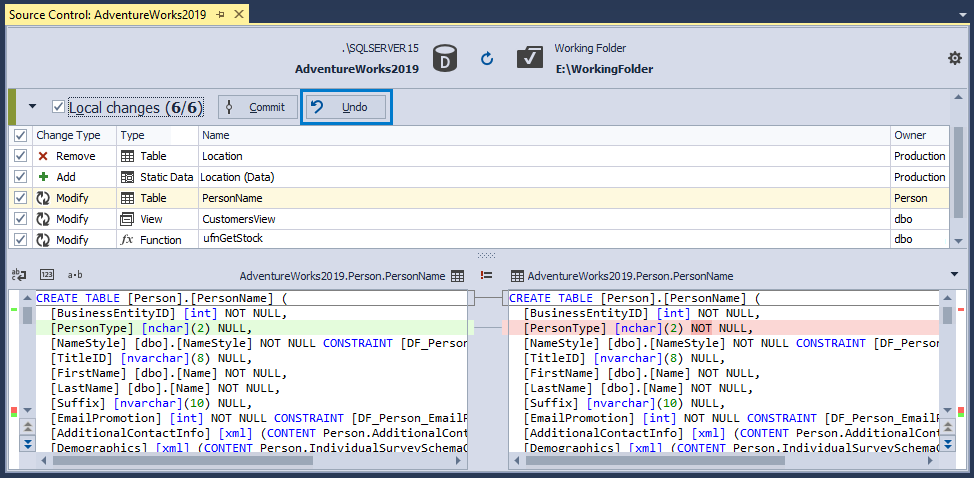
3. After the process is completed, click OK.
Now your local version is reverted to the latest changes from your repository.
Take note that you cannot undo changes that have been committed, changes in static data, as well as dropped data.
Learn more in our documentation: Undoing changes
Resolve conflicts
A conflict occurs when two or more people simultaneously introduce changes to the same database object. In Source Control, conflicts are displayed in the corresponding section of Source Control Manager.
To resolve a conflict in Source Control, do the following:
1. In the SSMS Object Explorer, right-click a linked database or a specific database object, point to Source Control, and click Show Source Control Manager.
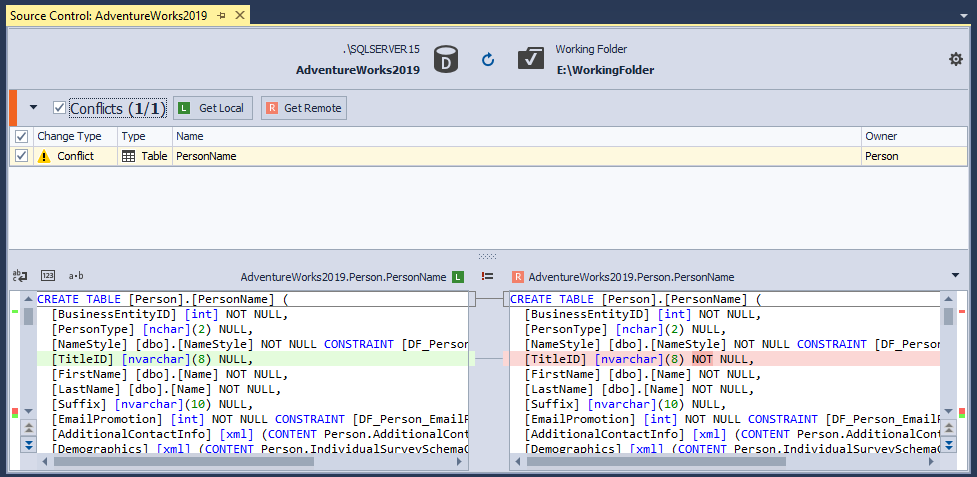
2. Select the conflicting object or data and pick either of the following ways to resolve your conflict:
- Get Local – your version of the said object or data will be committed to Source Control
- Get Remote – your changes will be discarded; your local database will be updated with the latest version of the said object or data from Source Control
That’s it! But keep in mind that data changes may not apply without the related schema changes. If you have applied both schema and data changes to a database object, you need to commit them simultaneously. Similarly, if you are pulling someone else’s schema and data changes, pull them simultaneously.
That said, if you have a schema conflict and a data change on an object, this change cannot be committed or retrieved without resolving the schema conflict beforehand.
Learn more in our documentation: Resolving conflicts
View the history of changes
Changes in Source Control can be tracked using the Changes History, which lets you do the following:
- View the history of changes for entire databases or separate objects
- View the details of each commit, including revision ID, date, author, and comments
- View a list of objects modified in each commit
- View DDL differences for each object
- Compare two revisions
To open the Changes History, do the following:
1. In the SSMS Object Explorer, right-click a linked database or a specific database object, point to Source Control, and click View Changes History.
2. And if you want to compare two separate revisions, press and hold CTRL and select your revisions from the list. The differences will be highlighted with red, as shown in the screenshot below.

Learn more in our documentation: Viewing Source Control history
Download Source Control for a free trial
Now that you know all about the basic operations in dbForge Source Control, you are all set to try it yourself.
And there’s no better way to start than to download Source Control for a free 30-day trial right now. Since it is available as part of the SQL Tools bundle, we suggest you check other tools as well—we bet you will have a lot of useful discoveries.