
When a monolithic app starts to hit its limits, microservices are often the next step forward. They let you scale only what’s under pressure, keep changes local, and give teams the freedom to deploy on their own schedule. It’s no wonder the market for microservices is growing fast, from $1.93 billion in 2024 to a projected $11.36 billion by 2033.
So how do you build microservices? In .NET, the process is surprisingly straightforward. ASP.NET Core sets the boundaries of each service: handling routing, middleware, authentication, and the APIs your clients call. Behind that, EF Core manages data for each service through its own DbContext and schema, with no shared database to worry about.
For the data layer, PostgreSQL fits naturally. Its schema-based design aligns perfectly with per-service isolation, while ACID reliability and JSON flexibility make it ideal for distributed systems. Additionally, it’s open source, cloud-ready, and proven under high-concurrency workloads, making it a strong alternative to vendor-locked platforms like SQL Server.
In this guide, we’ll bring these elements together: exploring how microservices differ from monoliths, what makes the architecture work, and how to build a complete Customer service using ASP.NET Core, EF Core, dotConnect for PostgreSQL, and Entity Developer.
Table of contents- What are microservices?
- Inside the microservices architecture
- Monolith vs. microservices: choosing the right architecture
- Building scalable microservices with ASP.NET Core and EF Core
- Run & test the microservices
- Conclusion
What are microservices?
Microservices are a modern architectural approach that breaks an application into small, independent deployable services, each built around a specific business function. Instead of one tightly coupled system handling everything, every service manages its own logic, database, and deployment.
In an e-commerce app, for example, User Management, Inventory, Billing, and Orders can each run as separate microservices with their own PostgreSQL schema and EF Core context. This lets teams develop, deploy, and scale each service independently.
The benefits are clear:
- Agility: Faster releases without redeploying the entire system.
- Fault isolation: A failure in one service doesn’t affect others.
- Scalability: Each service scales according to its workload.
However, microservices introduce their own operational challenges. Coordinating communication between distributed services requires mature integration patterns, such as REST APIs, gRPC, or event-driven messaging via RabbitMQ or Kafka. Each additional service increases the need for robust observability, deployment automation, and version control across environments.
Inside the microservices architecture
A microservices architecture operates like an ecosystem. Each service is self-contained, with its own API controllers, business logic, EF Core context, and PostgreSQL schema. This design allows teams to develop, deploy, and scale services independently while maintaining clear boundaries of responsibility.
System building blocks
At the system level, several core components hold this distributed structure together. These include:
- API gateway: Acts as the single entry point for external requests. It routes traffic to the right microservice, applies authentication and rate limiting, and can aggregate multiple responses into one. This keeps external clients simple while protecting internal endpoints.
- Service discovery: Manages how services locate each other as instances scale, restart, or move. Tools like Kubernetes or Consul dynamically update service addresses, removing the need for hardcoded endpoints and reducing downtime from configuration drift.
- Messaging layer: Handles communication between services. Use REST or gRPC for direct, low-latency calls, and RabbitMQ or Kafka for asynchronous, event-driven workflows. This combination keeps services decoupled, improves resilience, and absorbs traffic spikes gracefully.
- Containerization: Packages each service with its dependencies into a Docker container for consistency across environments. With Kubernetes, containers can be deployed, scaled, and updated automatically, keeping the system stable as it grows.
Data ownership and access
Each microservice manages its own data and connects to a separate PostgreSQL database or schema. This prevents direct data sharing between services and keeps each one fully independent. Database access is handled through EF Core, which manages connections efficiently and securely using SSL and connection pooling for reliable performance.
Continuous delivery and orchestration
To sustain agility at scale, CI/CD pipelines per service automate builds, tests, and deployments, while Kubernetes orchestrates containers, handles scaling, and maintains service health. Use rolling or canary strategies for safe releases. Together, these tools transform a set of distributed applications into a reliable, evolving system that can adapt without losing cohesion.
In essence, microservices break big, rigid apps into small, modular pieces that work on their own but operate as one.
Monolith vs. microservices: choosing the right architecture
Every software architecture starts with a fundamental decision: build as a monolith or as a collection of microservices. Both models can succeed. However, the key is understanding their trade-offs and how they align with your system’s growth, complexity, and team structure.
A monolithic architecture packages all components (UI, business logic, and data access) into a single, unified application. It’s simple to develop, test, and deploy, making it an attractive starting point for smaller teams or early-stage products. But, as the codebase grows, monoliths become harder to scale and maintain. A single change can require redeploying the entire system, and tightly coupled dependencies can slow down releases.
A microservices architecture, by contrast, distributes functionality across independently deployable services. Each service owns its domain and database, enabling parallel development and selective scaling. While this model improves agility and fault tolerance, it demands stronger DevOps discipline, service monitoring, and data governance.
Here’s how the two architectures compare.
| Dimension | Monolithic architecture | Microservices architecture |
|---|---|---|
| Deployment | Single unit; redeploy entire app for updates | Independent deployments per service |
| Scalability | Scales vertically (entire system) | Scales horizontally (per service) |
| Data model | Shared database schema | Isolated schema per service (via EF Core + dotConnect) |
| Team structure | Centralized team managing one codebase | Distributed teams owning individual services |
| Tech stack | Typically uniform | Can vary by service |
| Fault tolerance | Failures affect the entire system | Failures are isolated to specific services |
| Development speed | Faster to start | Faster to evolve at scale |
| Operational complexity | Low at a small scale | Higher—requires orchestration, monitoring, CI/CD |
Role of EF Core and dotConnect
In both architectures, EF Core simplifies how applications interact with the database—the difference lies in scope. In a monolith, a single EF Core context handles all entities across the system. In microservices, each service has its own EF Core context and schema, ensuring full data independence. Using a reliable PostgreSQL connection with SSL and connection pooling helps maintain secure and efficient communication between each service and its database.
Takeaway:
- A monolith delivers speed and simplicity, ideal for proof-of-concept or early growth.
- Microservices deliver resilience and scalability, best for systems that must evolve continuously.
Many organizations start monolithic and transition gradually to microservices as their teams, workloads, and release cycles demand greater independence.
Building scalable microservices with ASP.NET Core and EF Core
This walkthrough builds a lightweight Customer microservice with ASP.NET Core and EF Core. It keeps the domain tightly bound, owns its EF Core context and PostgreSQL schema, and exposes a clean REST surface for CRUD. Follow the steps to scaffold the project, model the entity, wire the service layer, and register endpoints for GET, POST, PUT, and DELETE.
Let’s take it from the top.
Create a .NET project
- Open Visual Studio and create a new Console App project.
- Name your project, then click Create.
- In Solution Explorer, right-click the project and select Manage NuGet Packages.
- On the Browse tab, search for and install the following package: Devart.Data.PostgreSql.EFCore.
Note: Microsoft.EntityFrameworkCore is automatically included with this package. Entity Developer is not installed via NuGet.
After installing the package, we’ll create our DbContext and entity classes using Entity Developer to simplify and speed up the modeling process. The easiest way to begin is directly inside Visual Studio. Here are the steps.
Open Entity Developer:
- Go to Extensions > Devart > Entity Developer > New Model.
- Choose Create Model Wizard.
- Select EF Core Model.
- Choose Database First.
Connect to PostgreSQL:
- Select PostgreSQL as the provider.
- Click New Connection.
- Enter host, port, database, username, and password.
- Click Test Connection.
- Proceed to the next step.
Generate the model and DbContext:
- Select the schema (e.g., public).
- Choose the tables to scaffold (e.g., customer).
- Accept default naming and template settings.
- Click Finish.
- Save the model.
- Go to Model > Generate Code to create Customer entity class, AppDbContext, plus all mappings and configuration
With the model generated, your microservice now owns its data layer cleanly, and you can begin wiring the EF Core context into the service. For a more detailed, step-by-step walkthrough of creating and configuring an EF Core model in Entity Developer, see Devart’s full guide.
Creating a Customer microservice
Next, assemble the stack piece by piece: connection string, Customer entity, EF Core context, CRUD service, REST controller, and program setup.
Step 1: Connect to the database
Define application logging and a service-local PostgreSQL connection string to ensure isolated, owned data access.
Example: AppSettings.js
{
  "Logging": {
"LogLevel": {
   "Default": "Information",
   "Microsoft.AspNetCore": "Warning"
}
  },
  "ConnectionStrings": {
"Dvdrental": "Host=localhost;Port=5432;Database=dvdrental;User Id=postgres;Password=postgres;License Key=**********;Pooling=true;"
  }
}
Step 2: Define the customer model
Map the domain to public.customer with validation and column attributes, including precise types (e.g., DateOnly) for PostgreSQL.
Note: The DbContext and entity model were generated via Entity Developer. This tool provides a visual way to define tables, relationships, and properties, then automatically generates the EF Core classes to match the database structure.
Example: Customer.cs
using System.ComponentModel.DataAnnotations;
using System.ComponentModel.DataAnnotations.Schema;

namespace ProductMicroservice.Models
{
[Table("customer", Schema = "public")]
public class Customer
{
     [Key]
     [Column("customer_id")]
     public int CustomerId { get; set; }

     [Column("store_id")]
     public short StoreId { get; set; }

     [Required]
     [MaxLength(45)]
     [Column("first_name")]
     public string FirstName { get; set; } = string.Empty;

     [Required]
     [MaxLength(45)]
     [Column("last_name")]
     public string LastName { get; set; } = string.Empty;

     [MaxLength(50)]
     [Column("email")]
     public string? Email { get; set; }

     [Column("address_id")]
     public int AddressId { get; set; }

     [Column("activebool")]
     public bool ActiveBool { get; set; }

     [Column("create_date")]
     public DateOnly CreateDate { get; set; }

     [Column("last_update")]
     public DateTime? LastUpdate { get; set; }
}
}
Step 3: Add EF Core DbContext
Establish the service’s EF Core context, apply table mapping, and configure value conversion (DateOnly > date) to keep persistence concerns localized.
Example: AppDbContext.cs
using Microsoft.EntityFrameworkCore;
using ProductMicroservice.Models;

namespace ProductMicroservice.Data
{
public class AppDbContext : DbContext
{
     public AppDbContext(DbContextOptions<AppDbContext> options) : base(options)
     {
     }

     public DbSet<Customer> Customers => Set<Customer>();

     protected override void OnModelCreating(ModelBuilder modelBuilder)
     {
         base.OnModelCreating(modelBuilder);
         modelBuilder.Entity<Customer>().ToTable("customer", "public");
         modelBuilder.Entity<Customer>()
             .Property(c => c.CreateDate)
             .HasConversion(
                 v => v.ToDateTime(TimeOnly.MinValue),
                 v => DateOnly.FromDateTime(v)
             )
             .HasColumnType("date");
     }
}
}
Step 4: Create the customer service
Implement asynchronous CRUD with AsNoTracking reads, explicit updates, and a transactional delete that safely removes dependents before the root record.
Example: CustomerService.cs
using Microsoft.EntityFrameworkCore;
using ProductMicroservice.Data;
using ProductMicroservice.Models;

namespace ProductMicroservice.Services
{
public class CustomerService : ICustomerService
{
     private readonly AppDbContext _dbContext;

     public CustomerService(AppDbContext dbContext)
     {
         _dbContext = dbContext;
     }

     public async Task<List<Customer>> GetAllAsync(CancellationToken cancellationToken = default)
     {
         return await _dbContext.Customers.AsNoTracking().ToListAsync(cancellationToken);
     }

     public async Task<Customer?> GetByIdAsync(int id, CancellationToken cancellationToken = default)
     {
         return await _dbContext.Customers.AsNoTracking().FirstOrDefaultAsync(c => c.CustomerId == id, cancellationToken);
     }

     public async Task<Customer> CreateAsync(Customer customer, CancellationToken cancellationToken = default)
     {
         _dbContext.Customers.Add(customer);
         await _dbContext.SaveChangesAsync(cancellationToken);
         return customer;
     }

     public async Task<bool> UpdateAsync(int id, Customer customer, CancellationToken cancellationToken = default)
     {
         var existing = await _dbContext.Customers.FirstOrDefaultAsync(c => c.CustomerId == id, cancellationToken);
         if (existing == null)
         {
             return false;
         }

         existing.StoreId = customer.StoreId;
         existing.FirstName = customer.FirstName;
         existing.LastName = customer.LastName;
         existing.Email = customer.Email;
         existing.AddressId = customer.AddressId;
         existing.ActiveBool = customer.ActiveBool;
         existing.CreateDate = customer.CreateDate;
         existing.LastUpdate = customer.LastUpdate;

         await _dbContext.SaveChangesAsync(cancellationToken);
         return true;
     }

     public async Task<bool> DeleteAsync(int id, CancellationToken cancellationToken = default)
     {
         var exists = await _dbContext.Customers.AsNoTracking().AnyAsync(c => c.CustomerId == id, cancellationToken);
        if (!exists)
         {
             return false;
         }

         await using var tx = await _dbContext.Database.BeginTransactionAsync(cancellationToken);

         // Delete dependents first, then the customer
         await _dbContext.Database.ExecuteSqlRawAsync(
             "DELETE FROM public.payment WHERE customer_id = {0}", id);
         await _dbContext.Database.ExecuteSqlRawAsync(
             "DELETE FROM public.rental WHERE customer_id = {0}", id);
         await _dbContext.Database.ExecuteSqlRawAsync(
             "DELETE FROM public.customer WHERE customer_id = {0}", id);

         await tx.CommitAsync(cancellationToken);
         return true;
     }
}
}
Step 5: Add ICustomerService.cs
Declare a clear, testable contract that decouples the controller from data-access implementation and stabilizes the service boundary.
Example: ICustomerService.cs
using ProductMicroservice.Models;

namespace ProductMicroservice.Services
{
public interface ICustomerService
{
     Task<List<Customer>> GetAllAsync(CancellationToken cancellationToken = default);
     Task<Customer?> GetByIdAsync(int id, CancellationToken cancellationToken = default);
     Task<Customer> CreateAsync(Customer customer, CancellationToken cancellationToken = default);
     Task<bool> UpdateAsync(int id, Customer customer, CancellationToken cancellationToken = default);
    Task<bool> DeleteAsync(int id, CancellationToken cancellationToken = default);
}
}
Step 6: Create the Customer controller
Expose RESTful endpoints with proper status codes (200/201/204/404/400), route constraints, and an alternate PUT path to support body-only updates.
Example: CustomerController.cs
using Microsoft.AspNetCore.Mvc;
using ProductMicroservice.Models;
using ProductMicroservice.Services;

namespace ProductMicroservice.Controllers
{
[ApiController]
[Route("api/[controller]")]
public class CustomersController : ControllerBase
{
     private readonly ICustomerService _service;

     public CustomersController(ICustomerService service)
     {
         _service = service;
     }

     [HttpGet]
     public async Task<ActionResult<IEnumerable<Customer>>> GetAll(CancellationToken cancellationToken)
     {
         var customers = await _service.GetAllAsync(cancellationToken);
         return Ok(customers);
     }

     [HttpGet("{id:int}")]
     public async Task<ActionResult<Customer>> GetById(int id, CancellationToken cancellationToken)
     {
         var customer = await _service.GetByIdAsync(id, cancellationToken);
         if (customer == null)
         {
             return NotFound();
         }
         return Ok(customer);
     }

     [HttpPost]
     public async Task<ActionResult<Customer>> Create([FromBody] Customer customer, CancellationToken cancellationToken)
     {
         if (!ModelState.IsValid)
         {
             return ValidationProblem(ModelState);
         }

         var created = await _service.CreateAsync(customer, cancellationToken);
         return CreatedAtAction(nameof(GetById), new { id = created.CustomerId }, created);
     }

     [HttpPut("{id:int}")]
     public async Task<IActionResult> Update(int id, [FromBody] Customer customer, CancellationToken cancellationToken)
     {
         if (customer.CustomerId != 0 && id != customer.CustomerId)
         {
             return BadRequest("ID in route and body must match");
      }

         var success = await _service.UpdateAsync(id, customer, cancellationToken);
         if (!success)
         {
             return NotFound();
         }
         return NoContent();
     }

     // Alternate PUT for clients sending only body with customerId
     [HttpPut]
     public async Task<IActionResult> Update([FromBody] Customer customer, CancellationToken cancellationToken)
     {
         if (customer.CustomerId == 0)
         {
            return BadRequest("customerId is required in body");
         }
         var success = await _service.UpdateAsync(customer.CustomerId, customer, cancellationToken);
         if (!success)
         {
             return NotFound();
         }
         return NoContent();
     }

     [HttpDelete("{id:int}")]
     public async Task<IActionResult> Delete(int id, CancellationToken cancellationToken)
     {
         var success = await _service.DeleteAsync(id, cancellationToken);
         if (!success)
         {
             return NotFound();
         }
         return NoContent();
     }
}
}
Step 7: Register the service
Wire DI for the DbContext and service, configure Swagger in development, and map controllers, ensuring an isolated connection via UsePostgreSql.
Example: Program.cs
using Microsoft.EntityFrameworkCore;
using ProductMicroservice.Data;
using ProductMicroservice.Services;

var builder = WebApplication.CreateBuilder(args);

// Add services to the container.

builder.Services.AddControllers();
// Learn more about configuring Swagger/OpenAPI at https://aka.ms/aspnetcore/swashbuckle
builder.Services.AddEndpointsApiExplorer();
builder.Services.AddSwaggerGen();

// Product Microservice DbContext
builder.Services.AddDbContext<AppDbContext>(options =>
{
options.UsePostgreSql(builder.Configuration.GetConnectionString("Dvdrental"));
});

// DI Services
builder.Services.AddScoped<ICustomerService, CustomerService>();

var app = builder.Build();

// Configure the HTTP request pipeline.
if (app.Environment.IsDevelopment())
{
app.UseSwagger();
app.UseSwaggerUI();
}

app.UseHttpsRedirection();

app.UseAuthorization();

app.MapControllers();

app.Run();
Why this aligns with microservices best practices:
- Isolated domain: The service focuses solely on Customer concerns.
- Independent data layer: A dedicated EF Core context mapped to the service’s own PostgreSQL schema.
- RESTful boundary: Clear CRUD endpoints (GET, POST, PUT, DELETE) encapsulate behavior and expose only what clients need.
- Operational clarity: Transactional delete logic handles dependent rows cleanly, enabling safe, isolated lifecycle management.
We can append a short Run & Test subsection (curl/Postman examples) or add a Dockerfile + compose snippet next, without changing any of the provided code.
Run & test the microservices
This stage validates the service’s public contract and its independent data lifecycle. Each call confirms a specific behavior (creation, retrieval, mutation, and removal) backed by clear status codes and predictable responses.
How to run:
- Start the API (F5 in Visual Studio). Note the HTTPS PORT from the console (e.g., 5001).
- Use Swagger at https://localhost:PORT/swagger, Postman, or **curl**. For requests with a body, set Content-Type: application/json`.
Confirming basic functionality
Use the following calls to verify that each endpoint (create, read, update, and delete) behaves as designed with clear status codes and predictable responses. Replace PORT with your local HTTPS port.
GET all:
- Method: GET
- URL: https://localhost:PORT/api/customers
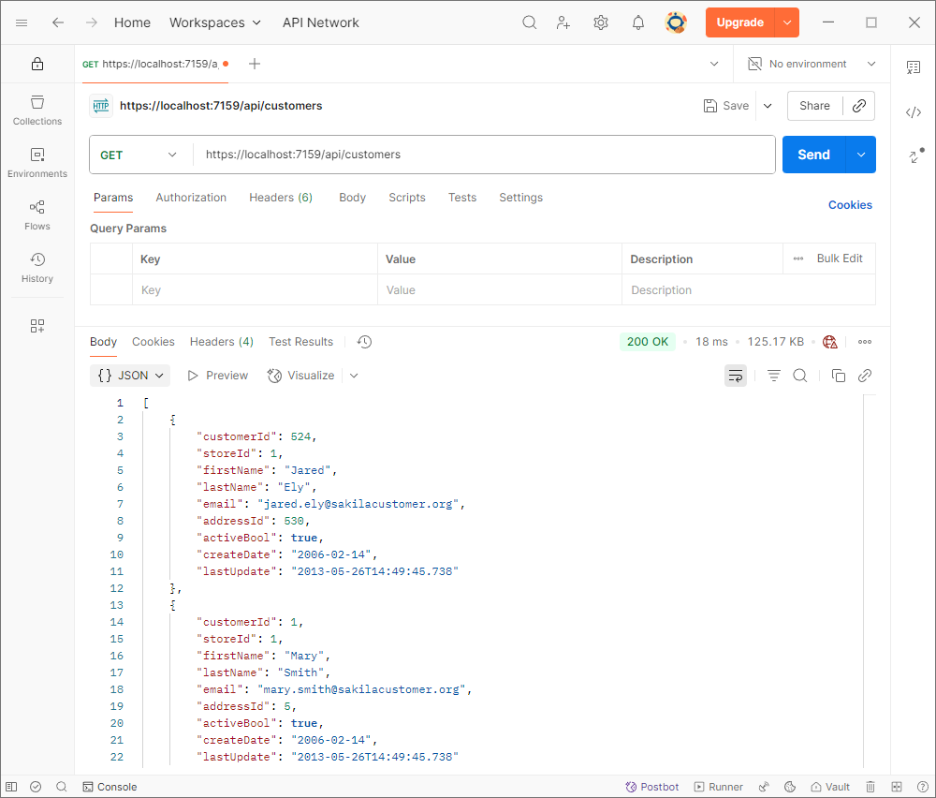
- Expect:
200 OKwith a JSON array (empty or populated). - Confirms: Read path and wiring.
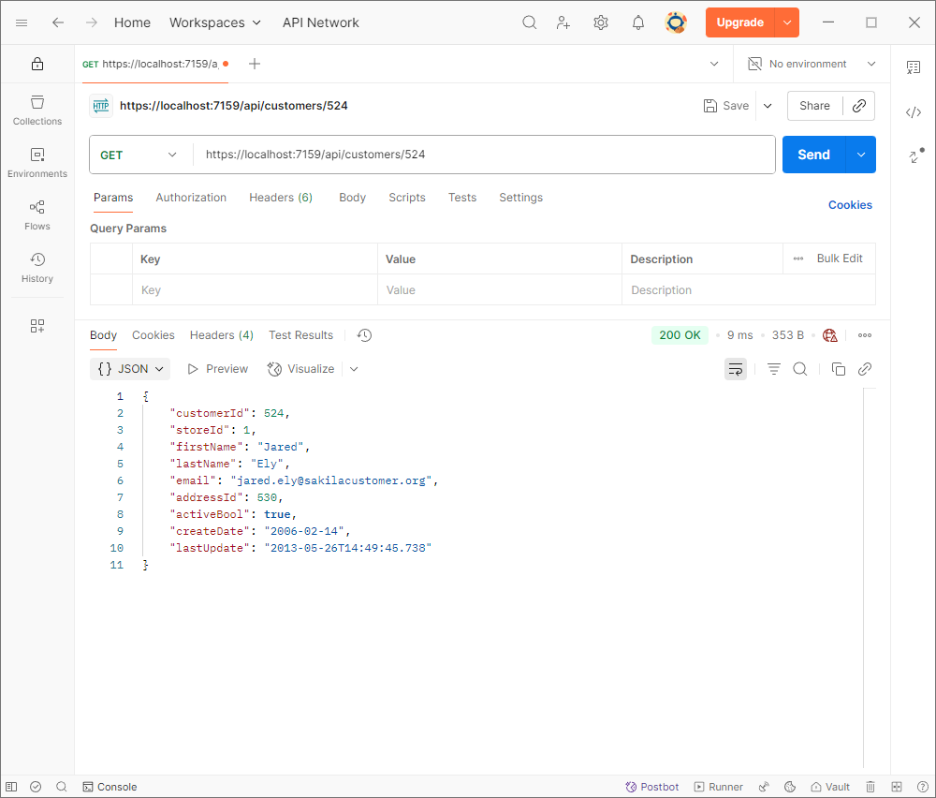
GET by id:
- Method: GET
- URL: https://localhost:PORT/api/customers/524

- Expect:
200 OKwith a single customer if it exists; otherwise404 Not Found. - Confirms: Routing, model binding, targeted retrieval.
POST create:
- Method: POST
- URL: https://localhost:PORT/api/customers
- Body (raw JSON):
{
"customerId": 1000,
"storeId": 1,
"firstName": "John1000",
"lastName": "Doe1000",
"email": "[email protected]",
"addressId": 1,
"activeBool": true,
"createDate": "2006-02-14",
"lastUpdate": "2006-02-15T09:30:00Z"
}
Result
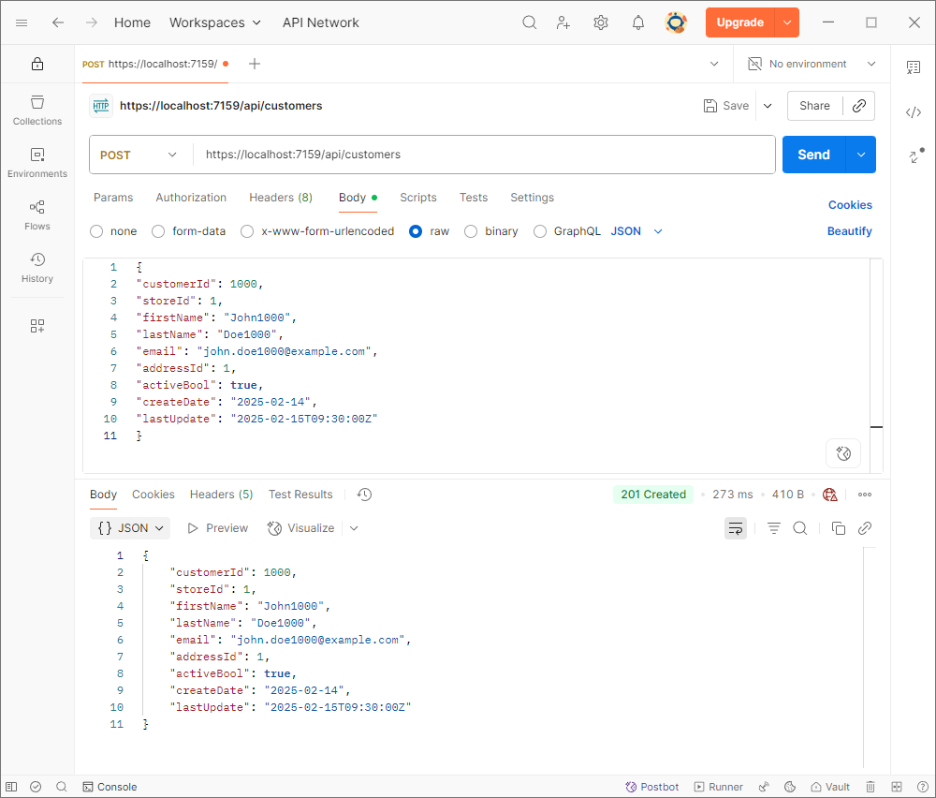
- Expect:
201 Createdwith the created entity and aLocationheader pointing to/api/customers/1000. - Confirms: Validation and insert flow.
PUT update (route id):
- Method: PUT
- URL: https://localhost:PORT/api/customers/[id]
- Body (raw JSON):
{
"customerId": 1000,
"storeId": 1,
"firstName": "NewJohnny",
"lastName": "NewDoe",
"email": "[email protected]",
"addressId": 1,
"activeBool": true,
"createDate": "2025-02-14",
"lastUpdate": "2025-02-16T10:00:00Z"
} - PUT response expectations:
204 No Contenton success;404 Not Foundif the record doesn’t exist;400 Bad Requestif the route id and bodycustomerId differ(when provided).
To verify, call GET https://localhost:PORT/api/customers/1000.
- Expect:
200 OKwith the updated customer. - Confirms: Update semantics and id consistency.
DELETE:
- Method: DELETE
- URL: https://localhost:PORT/api/customers/[id]
Result
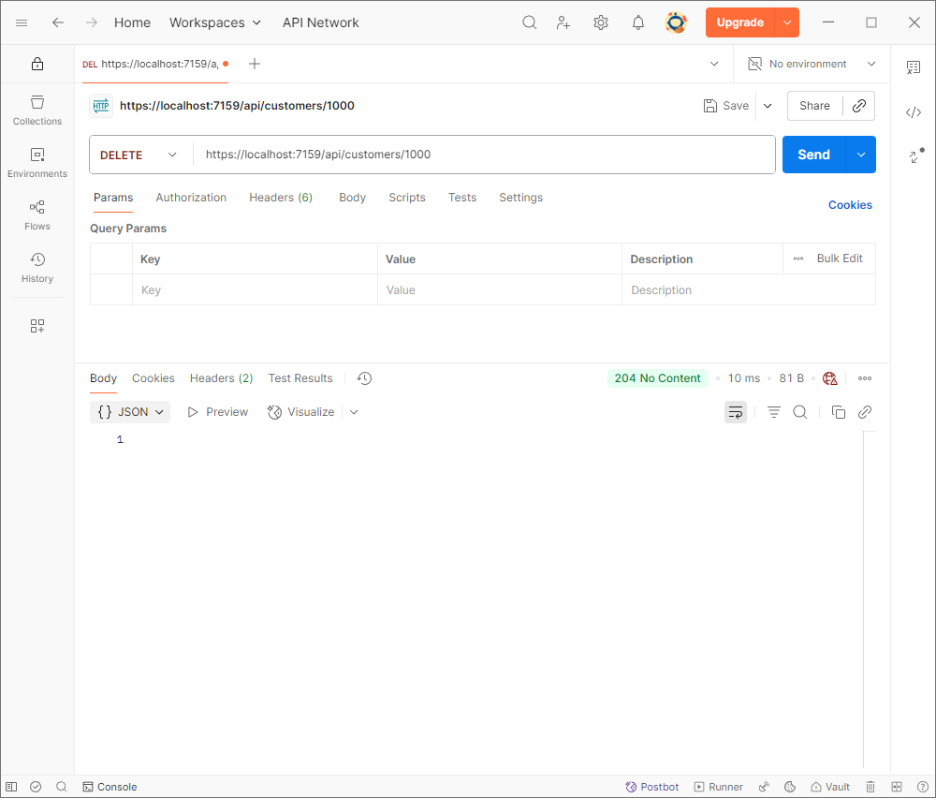
- Expect:
204 No Contenton success;404 Not Foundif the record doesn’t exist. Internally, dependent rows (payment, rental) are removed first in a transaction, then thecustomer.
- Confirms: Safe teardown and referential cleanup.
Conclusion
Microservices pay off when you keep the rules simple: small services, clear APIs, and strict data ownership. In this guide, we contrasted that approach with a monolith and built a focused Customer service using ASP.NET Core and EF Core.
To keep that service reliable, the data layer needed to be just as modular and independent as the code behind it, and that’s where dotConnect for PostgreSQL, paired with Entity Developer, came in. This ADO.NET provider manages connectivity between EF Core and PostgreSQL, handling pooling, transactions, and command execution efficiently. It keeps each microservice’s database communication secure, fast, and isolated from others.
Apply these same principles across other domains like Orders, Billing, and Inventory. Start with a monolith, then evolve toward microservices as your system grows, and ensure your connections remain secure, efficient, and scalable. With this approach, you can build a system that scales naturally and lets teams ship with confidence.
You can download the complete Visual Studio project used in this tutorial here: full sample project.