
Oracle Autonomous Database is a powerful technology that provides data processing and management in the cloud for self-driving, self-securing and self-repairing databases which can operate with no human intervention. So, it’s quite unsurprising that many want to know how to establish a connection between Oracle Client and Oracle Autonomous. Let’s take a look at how this can be achieved.
Various applications can connect to Autonomous Transaction Processing through any of the connection types supported by Oracle Net Services. In this particular case, we’ll need to use an Oracle Call Interface connection also known as OCI.
The following steps outline the basic process of making any OCI-type connection:
- Installing the client software
- Downloading the client credentials
- Configuring certain files and environment variables
- Setting up the connection in the application

For the last step, we’ll use dbForge Studio for Oracle by Devart – an IDE that allows synchronizing data between different Oracle servers and automating schema change management during the development process.
Now, we’ll go through each of the steps in detail.
Installing the client software
First, you will need to install the Oracle Client software on your computer.
If you want to use the full Oracle Database Client edition, download version 11.2.0.4 or higher. Alternatively, you can use Oracle Instant Client. It contains the minimum required set of components for making an Oracle Call Interface connection. For most applications, Instant Client version 12.1.0.2 or higher will be sufficient.
Downloading the client credentials
Once the sufficient version of Oracle Client is installed, the next step would be to download the client credentials and store them on your machine.
Oracle client credentials, or wallet files, provide access to data in your Autonomous Transaction Processing database – so they should only be stored in a secure location. In addition, only authorized users should have access to credentials.
Feel free to follow this guide for detailed information on how to download client credentials via the Oracle Cloud Infrastructure console.
When the archive with necessary files is successfully downloaded, extract it to a secure folder on your computer – for example, D:/Wallet_DB201904201312
Configuring files and environment variables
Navigate to D:/Wallet_DB201904201312 and copy the content of tnsnames.ora and sqlnet.ora files.
Then, go to the folder where you have downloaded the Oracle Instant Client and paste the copied content into the files with the same names.
Finally, open sqlnet.ora and replace ?/network/admin with the path to the unzipped wallet in this part, for example:
WALLET_LOCATION = (SOURCE = (METHOD = file) (METHOD_DATA = (DIRECTORY="D:/Wallet_DB201904201312")))
SSL_SERVER_DN_MATCH=yes
Where D:/Wallet_DB201904201312 is the actual directory of the wallet.
As a result, the files will look as follows, for example:
tnsnames.ora
TNSNAMES.ORA Network Configuration File
Generated by Oracle configuration tools.

OLYMPICGAMESTEST =
    (description =
    (retry_count=20)
    (retry_delay=3)
    (address=(protocol=tcps)(port=1522)(host=adb.us-phoenix-1.oraclecloud.com))
    (connect_data=(service_name=olympicgame_high.adb.oraclecloud.com))
    (security=(ssl_server_dn_match=yes))
    )
sqlnet.ora
sqlnet.ora Network Configuration File: D:\Oracle\product\21.0.0\client_1\NETWORK\ADMIN\sqlnet.ora
Generated by Oracle configuration tools.

This file as actually generated by netca. But if customers choose to install "Software Only", this filw wont exist and without the native authentication, they will not be able to connect ot the database on NT.

SQLNET.AUTHENTICATION.SERVICES= (NONE)

NAMES. DIRECTORY_PATH= (TNSNAMES, EZCONNECT)

SQLNET.ENCRYPTION_CLIENT = REQUIRED
SQLNET.ENCRYPTION_TYPES_CLIENT = (AES256)

WALLET_LOCATION = (SOURCE = (METHOD = file) (METHOD_DATA = (DIRECTORY="D:/Wallet_DB201904201312"))) SSL_SERVER_DN_MATCH=yes
Setting up the connection
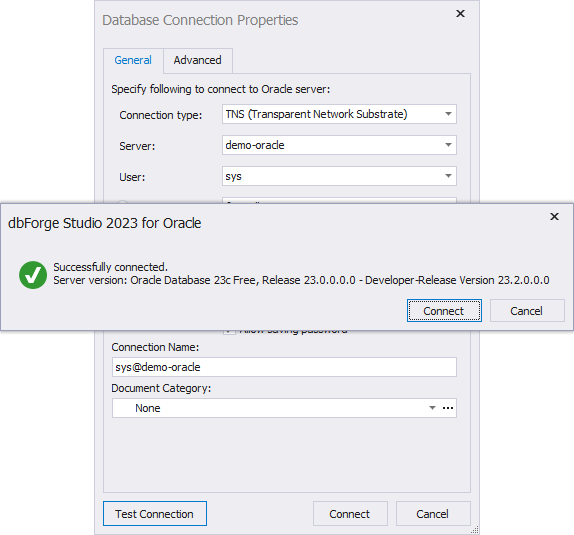
With everything properly configured, we can finally set up the connection in dbForge and connect to the server.
To create a new connection, go to Database and click New Connection. Specify the necessary information such as connection type, server name, username and password. Once the connection is created, you will be able to connect to the server by double-clicking the connection in the Database Explorer section situated in dbForge’s top left corner:
Summary
As we have seen, connecting Oracle Client to Oracle Autonomous Transaction Processing is not a complicated process as it only requires a few rather simple steps. However, you should still be diligent when performing them – especially when it comes to client credentials. You will need to make sure that all wallet files are stored in a secure place and are only accessible to authorized users.
If all steps are followed properly, the process should not cause any difficulties.
As for dbForge Studio for Oracle – you can download it and try out its robust database development and maintenance features for free.