
In the article, we are going to provide a step-by-step guide on how to connect to SQL Server and execute SQL queries using the sqlcmd utility, SQL Server Management Studio, and dbForge Studio for SQL Server.

Contents
- Connecting to MS SQL Server using SSMS
- Connecting to SQL Server using the sqlcmd utility
- Connect to a SQL Server instance using Windows Authentication
- Connect to a SQL Server instance using SQL Server Authentication
- View a list of databases available on the server using the sqlcmd utility
- View a list of tables available in the selected database using the sqlcmd utility
- Retrieve data from the table using the sqlcmd utility
- Connecting to SQL Server using dbForge Studio for SQL Server
Connecting to MS SQL Server using SSMS
SQL Server Management Studio (SSMS) is a powerful IDE with a set of tools for the management, configuration, administration, monitoring, and development of SQL Server and Azure SQL databases.
In the section, we’ll describe how to connect to SQL Server using Windows Authentication and SQL Server Authentication.
Prerequisites
To start working with SSMS, it should be installed on your computer. If not, download and install it.
Connect to SQL Server using Windows Authentication
The Windows Authentication mode allows you to connect with the credentials from your Windows user account.
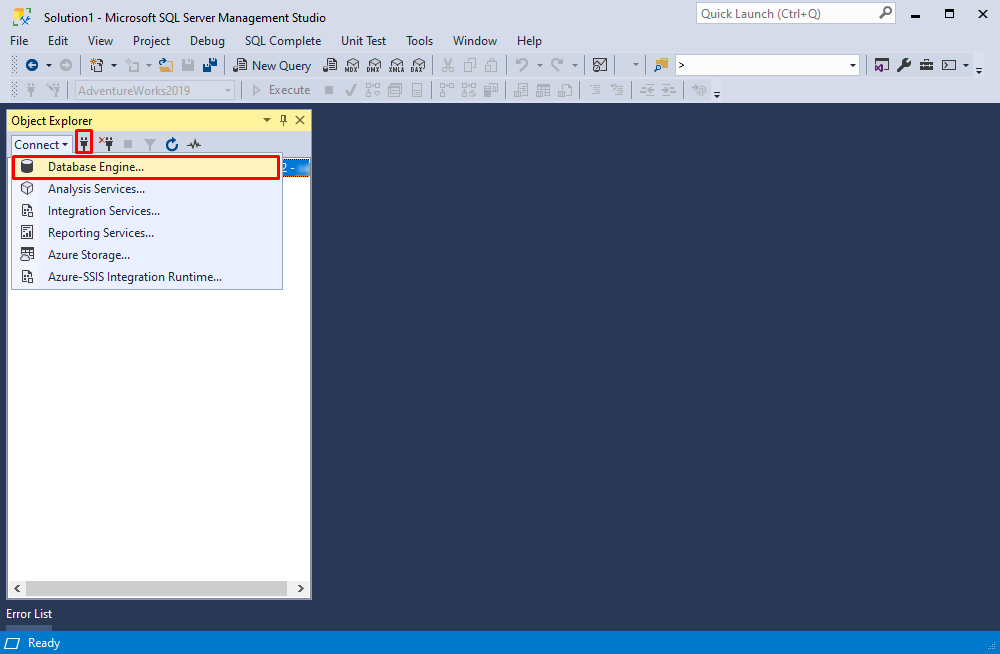
To connect to the server, open the SSMS. In Object Explorer, click Connect and select Database Engine from the drop-down list. Alternatively, click Connect Object Explorer.
In the Connect to Server dialog that opens, enter the following:
- Server name: Specify the name of the server to which you want to connect. If you don’t use the default instance MSSQLSERVER, you should specify the server name and instance name separated with a backward slash.
- Authentication: Select Windows Authentication from the drop-down list. Your Windows domain login and password will be pulled up automatically.
If you want to change some additional connection properties, such as a network protocol, column encryption, connection string parameters, connection or execution timeout, click Options.
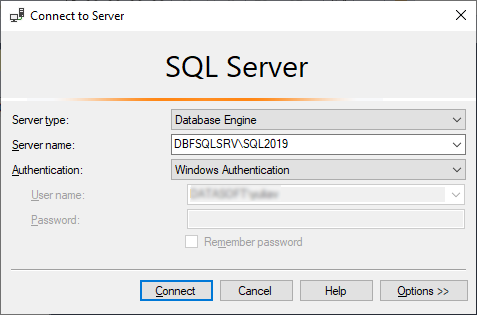
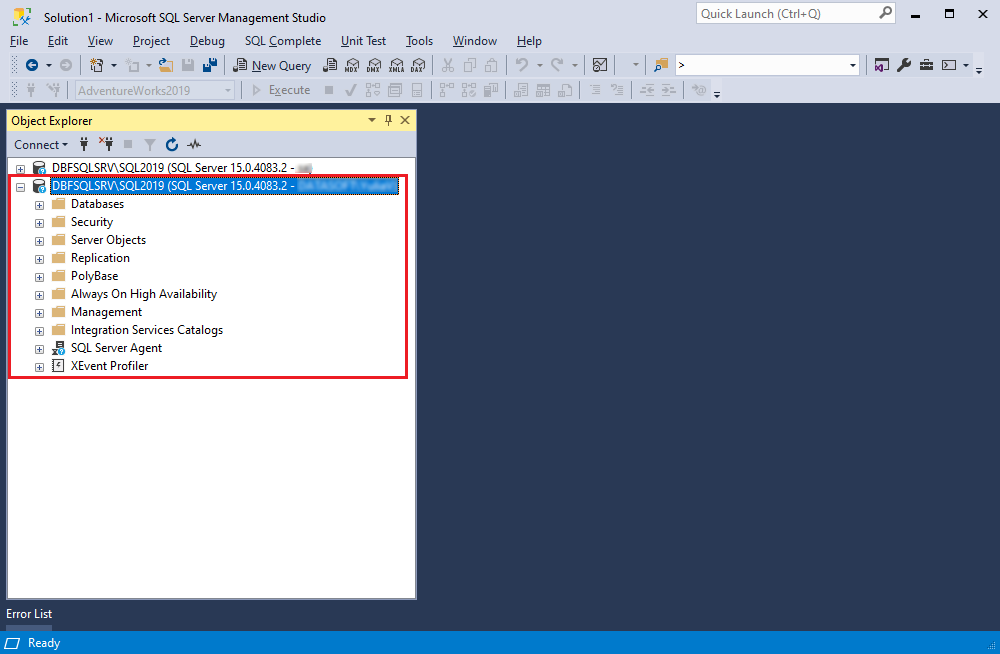
After the connection properties are entered, click Connect. A new connection will be displayed in Object Explorer.
Connect to SQL Server using SQL Server Authentication
The SQL Server Authentication mode allows you to connect to the server by providing the SQL Server login and password.
To connect to the server, open the connection manager by selecting Object Explorer > Connect > Database Engine from the drop-down list or by clicking Connect Object Explorer.
In the Connect to Server dialog that opens, enter the following information:
- Server name: Specify the server name and instance name separated with a backward slash.
- Authentication: Select SQL Server Authentication from the drop-down list.
- Login: Enter the login from the server account required to log in to the SQL Server.
- Password: Enter the password from the server account required to log in to the SQL Server. To save the password for later use, select the Remember password checkbox.
To modify connection properties, such as a network protocol, column encryption, connection string parameters, connection or execution timeout, click Options.

Once done, click Connect. The new connection will be displayed and set as active in Object Explorer.
After the connection is created, let’s do the following:
- View a list of databases available on the server
- View a list of tables available on the selected database
- Retrieve data from the table
View a list of databases available on the server
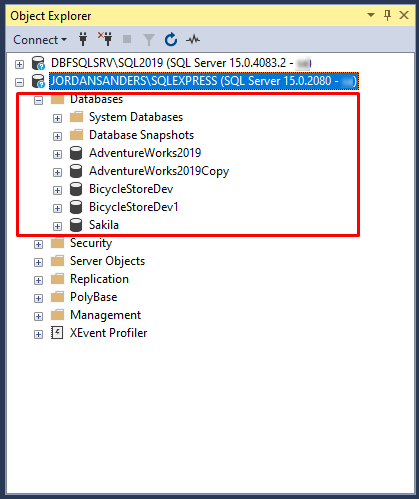
In SSMS, you can easily view a list of databases located on the server in Object Explorer. Select the server and expand the Databases node.
View a list of tables available in the selected database
To see the tables of the specific database, in Object Explorer, expand the selected database and then expand the Tables node.

Retrieve data from the table
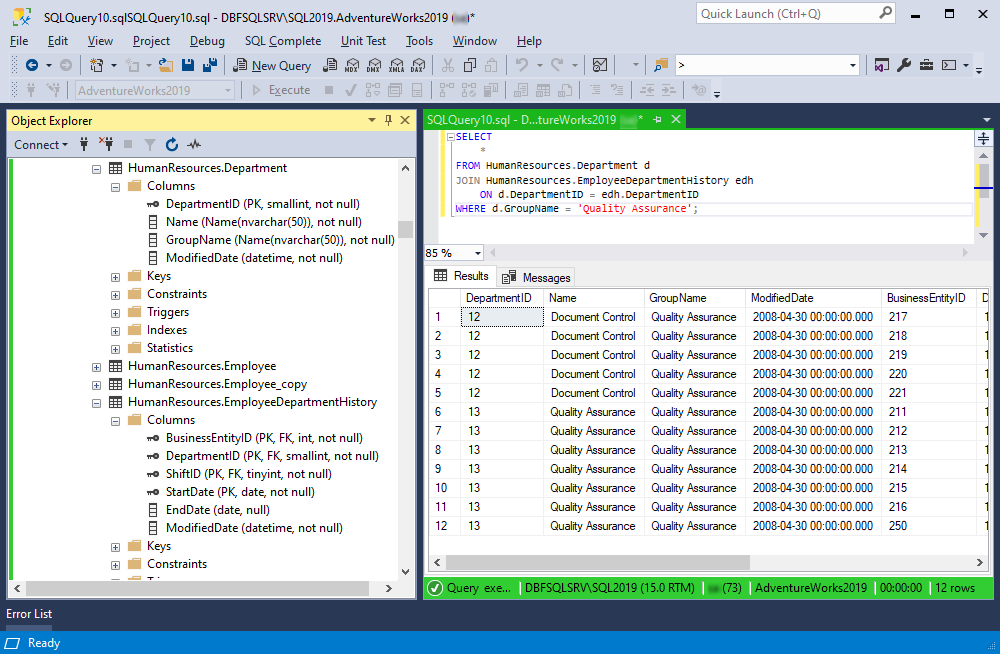
To move on, let’s run a SQL query to check that everything works properly. For example, we want to retrieve only the ‘Quality Assurance’ department from the HumanResources.Department and HumanResources.EmployeeDepartmentHistory tables. To do so, on the toolbar, click New Query. In the SQL document that opens, enter the following SQL statement and then click Execute.
SELECT
	*
FROM HumanResources.Department d
JOIN HumanResources.EmployeeDepartmentHistory edh
	ON d.DepartmentID = edh.DepartmentID
WHERE d.GroupName = 'Quality Assurance';
The output is as follows:
Connecting to SQL Server using the sqlcmd utility
The sqlcmd utility allows you to execute SQL queries, T-SQL statements, system procedures, and script files using the command line. The utility uses the OLEDB provider to connect to the server.
In this section, we’ll describe how to connect to SQL Server using Windows Authentication and SQL Server Authentication, and to execute the query.
Note: Prior to working with the sqlcmd utility, make sure that it has been downloaded and installed on your Windows machine.
The default location of the sqlcmd utility is ‘C:\Program Files\Microsoft SQL Server\150\Tools\Binn’.
Connect to a SQL Server instance using Windows Authentication
Open the Command Prompt and switch to the location of the sqlcmd utility. Then, execute the following command by replacing the connection parameters with the server (server_name) and instance (instance_name) names to which you want to connect.
sqlcmd -S server_name\instance_name -E-E indicates a trusted connection.
If you have successfully connected, you will see 1>. It verifies that you are connected to the SQL Server and can execute SQL statements.

To close the current sqlcmd session, type exit and press Enter.
Connect to a SQL Server instance using SQL Server Authentication
Now, let’s see how to connect to SQL Server using SQL Server Authentication. Except for the server and instance names to which you want to connect, you also need to specify a user name:
sqlcmd -S server_name\instance_name -U user_nameAfter that, you will need to enter the password. If you have connected to the server, a new line starts with 1>. This means that the connection is successfully created and you can start working with queries.

After we have connected to the SQL Server, we are going to verify that it works properly by executing some SQL queries that allow us to:
- View a list of databases available on the server
- View a list of tables available on the selected database
- Retrieve data from the table
View a list of databases available on the server using the sqlcmd utility
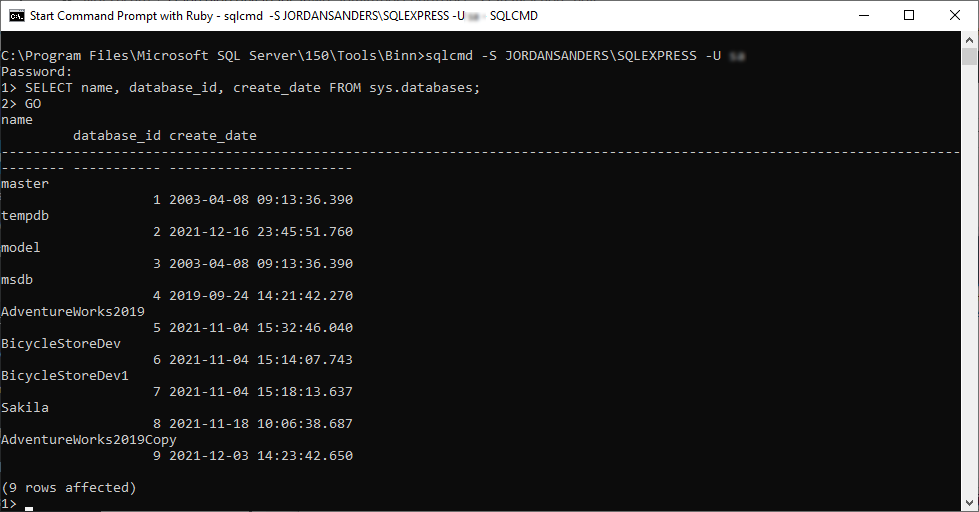
To get the list of databases located on the server, execute the following query and press Enter:
SELECT name, database_id, create_date FROM sys.databases;Then, type GO and press Enter. In the output result, you will see all databases connected to SQL Server, including the database name, its ID, the creation date, and the total number of databases.
View a list of tables available in the selected database using the sqlcmd utility
To view a list of tables located in the database, execute the following query and press Enter:
SELECT name, crdate FROM sysobjects WHERE xtype = 'U';where name is the name of the table, crdate – a creation date, xtype – an object type for the row, and U – user table. Then, type GO and press Enter.

As you can see, the query returns the table, its creation date, and the total number of tables available in the BicycleStoreDev database.
Retrieve data from the table using the sqlcmd utility
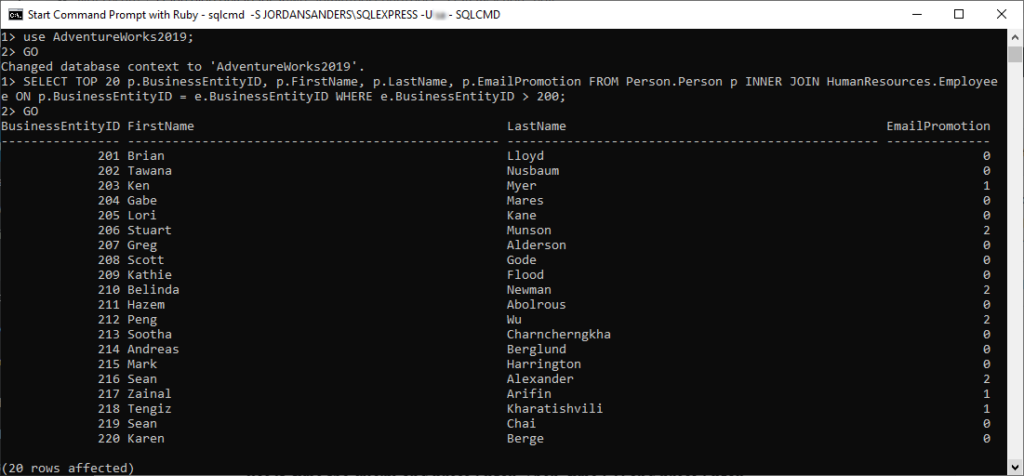
As mentioned, we will retrieve data from the table. For this, we are going to use the AdventureWorks2019 database and execute a SELECT statement to get data from the Person.Person and HumanResources.Employee tables with the condition that BusinessEntityID is higher than 200. To cut the list for demo purposes, we output the first 20 rows in the result.
SELECT TOP 20
  p.BusinessEntityID
 ,p.FirstName
 ,p.LastName
 ,p.EmailPromotion
FROM Person.Person p
INNER JOIN HumanResources.Employee e
  ON p.BusinessEntityID = e.BusinessEntityID
WHERE e.BusinessEntityID > 200;
In the Command Prompt, switch to the AdventureWorks2019 database to use it, type the query, and press Enter. Then, type GO and press Enter again. The output will display the required data.
Now, you can close the utility by typing exit and pressing Enter.
Connecting to SQL Server using dbForge Studio for SQL Server
dbForge Studio for SQL Server is a forefront IDE that comes with a bunch of built-in tools, features, and capabilities that allow you to enjoy the process of SQL Server database development, management, administration, and deployment and boost your productivity at the same time.
To get started, download and install dbForge Studio for SQL Server. Keep in mind that you can use a free fully-functional 30-day trial version of the tool to evaluate all its remarkable features and functionalities. After the trial version expires, you will be offered to purchase the tool.
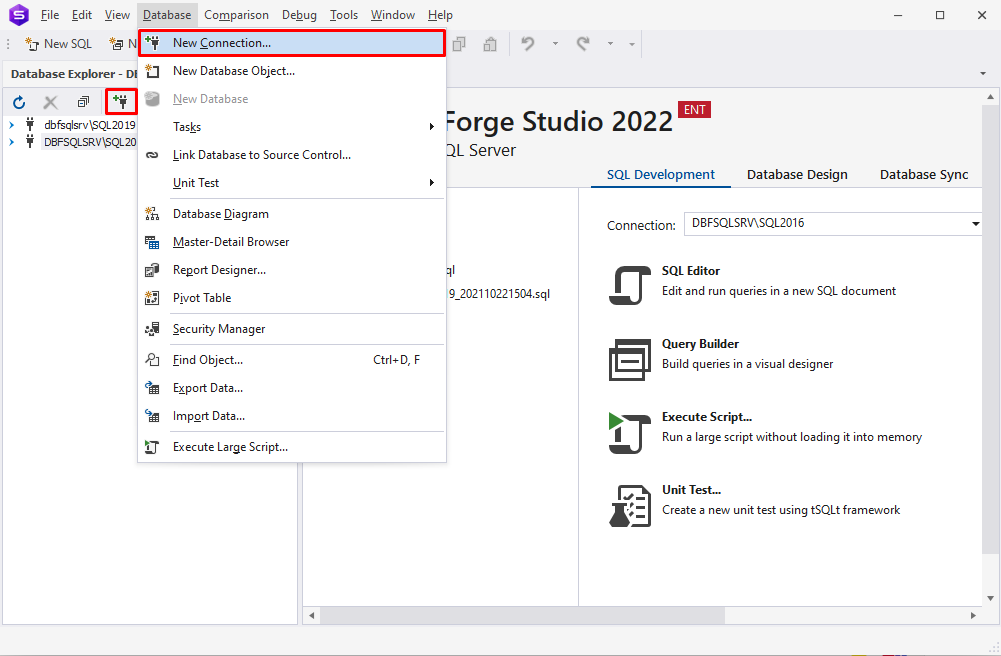
To connect to SQL Server, launch the Studio and open the Connection Manager by using one of the following ways:
- On the Database Explorer toolbar, click New Connection.
- On the Database main menu, select New Connection.
In the Database Connection Properties dialog that opens, do the following:
- Select the server to which you want to connect.
- Choose the authentication mode from the drop-down list.
- Depending on the authentication mode you chose, enter the login and password.
- Select the database you want to connect to.
- Optional step: Assign the environment category (development, production, sandbox, or test).
If you want to configure some additional connection details such as connection and execution timeout, connection encryption, switch to the Advanced tab.
After the connection details are added, click Connect.

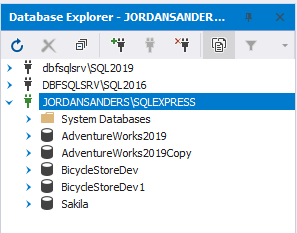
The Database Explorer will display the new connection with the green connection icon that indicates the active connection.
For more information about how to connect to SQL Server with dbForge Studio for SQL Server, see the documentation. You can also watch this step-by-step tutorial to see how to connect to a SQL Server instance in dbForge Studio for SQL Server.
Additionally, feel free to watch this introductory video.
After the connection is created, let’s do the following:
- View a list of databases available on the server
- View a list of tables available on the selected database
- Retrieve data from the table
View a list of databases available on the server using dbForge Studio for SQL Server
In dbForge Studio for SQL Server, you can easily view a list of databases located on the server without executing a query. To do so, go to the Database Explorer and expand the server connection.
View a list of tables available in the selected database using dbForge Studio for SQL Server
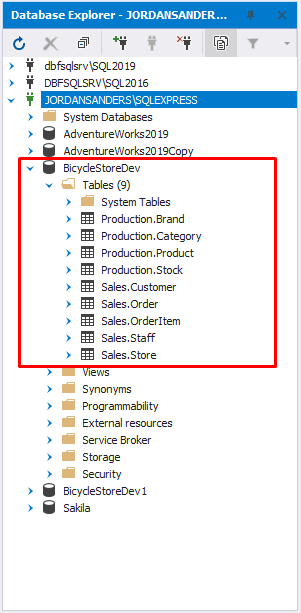
If you want to see tables located on a specific database, you simply need to navigate to the Database Explorer and expand the selected database > the Tables node. The list of tables available on the server will be displayed. The Tables folder will also contain the total number of tables in brackets.
Retrieve data from the table using dbForge Studio for SQL Server
Now, let’s execute a SQL statement to retrieve data from the Production.Product table based on the condition that the ProductID value is higher than 300. To do so, click New SQL on the toolbar. In the SQL document that opens, type the query and click Execute on the toolbar.
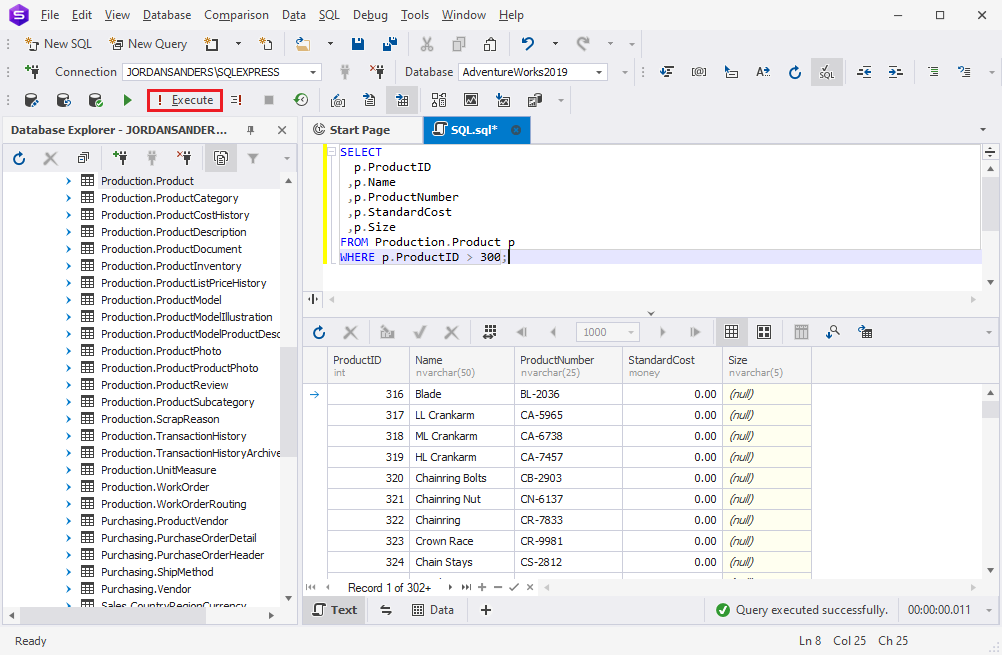
As you can see, dbForge Studio for SQL Server is an easy and visual way to connect to SQL Server and quickly customize connection configuration up to your needs.
Conclusion
In the article, we described several ways to connect to SQL Server using the sqlcmd utility, SQL Server Management Studio, and dbForge Studio for SQL Server. With SSMS and dbForge Studio for SQL Server, you can easily set up connection details visually in the wizards. However, dbForge Studio for SQL Server is the best alternative to SSMS that leaves it behind due to a rich set of features and capabilities you can use in an intuitive and user-friendly GUI.