Mastering SSIS conditional split is essential for efficient data sorting. Whether you intend to direct data to different tables based on specific conditions or want to split it for optimization, this type of transformation will save your day. This technique can help you create customized datasets for different reports, handle files separately whenever your project requires such an approach, and optimize data flow for better performance.
From this article, you’ll get an idea of the SSIS conditional split transformation specifics and will learn to use this technique to direct the data to multiple destinations.
- Understanding the conditional split in SSIS
- Setting up your SSIS environment
- Configuration of the flat file source
- Conditional split transformation
- Directing data to different destinations
- Conclusion
Understanding the conditional split in SSIS
The conditional split transformation is used in a data flow task of SQL Server integration services to split the input of any data source when you need to differentiate the data based on the user-defined condition and route the output to an appropriate destination. It acts like the if..else, or case statement in a programming language.
The conditional split has three key components. Let’s check them out.
- Input. It can be a data source, like ODBC, OLEDB, Flat file, or any other upstream transformation that provides the data for the conditional split.
- User-defined conditions. The conditions are logical expressions that are based on the values of input columns.
- Output. The output can be set to conditional or default. The default output is the data that does not satisfy any user-defined criteria.
Now that you are aware of the basics, let’s move on to the practical use case covered in this article to demonstrate how you can use SSIS conditional split. Let’s imagine you’ve got an app that connects to various panel boards of three different manufacturing plant. Each plant has a different set of electrical boards with different sensors to measure the temperature, humidity, and pressure, as well as other parameters.
We intend to collect the data from all the panel boards of each plant and store the records in one CSV file. However, at some point, we still want to be able to separate all these records stored in a CSV file into three different databases.
First, we’ll have to ensure that we have these databases ready and that all the required tables are in place. Our plant names are “Bitumen,” “Cement,” and “Drum mix plant,’ so let’s create a separate database for each plant named db_bitumenplant, db_cementplant, and db_drummixplant. Each database should have a table named PanelReadings.
You can use dbForge Studio for PostgreSQL and this detailed tutorial to prepare the databases. Here is the screenshot of the created database and tables we are going to use in this guide as a sample.
Next, let’s use the SSIS package to copy data from CSV to the PostgreSQL database. To do that, we are going to perform the following steps:
- Create a new SSIS project and add a data flow task in the control flow task.
- Configure a flat file source to use your CSV file.
- The data from the CSV file will be redirected based on the Site name. To achieve that, we will use SSIS conditional split.
- Configure the Devart SSIS connection manager and SSIS destination for PostgreSQL.
Let’s start with configuring the new data source connection for PostgreSQL.
Setting up your SSIS environment
1. Let’s create an integration services project. Open Visual Studio 2022 and select the Integration services project.

For this use case, the project name will be Export Panel board readings.

2. Once the project is created, let’s make a package that will extract data from CSV and load it into the PostgreSQL database.
Configuration of the flat file source
Now, it’s time to configure the Flat file source.
1. Drag the data flow task and drop it on the Control flow designer. Rename it to Export Panel Readings to database.

2. Drag and drop flat file source in the Data flow task designer and rename it to CSV File.

3. To configure the Flat file source connection, double-click on Flat file source. A dialog box named Flat file source editor is going to open up.
4. Click New. Another dialog box named Flat file connection editor will appear. Here, you can enter the details of the CSV files, such as file location, delimiters, and other format parameters.
We have created a sample CSV file named site_panel_sensor_data and saved it in C:\CSV Files directory. Here is the sample data.
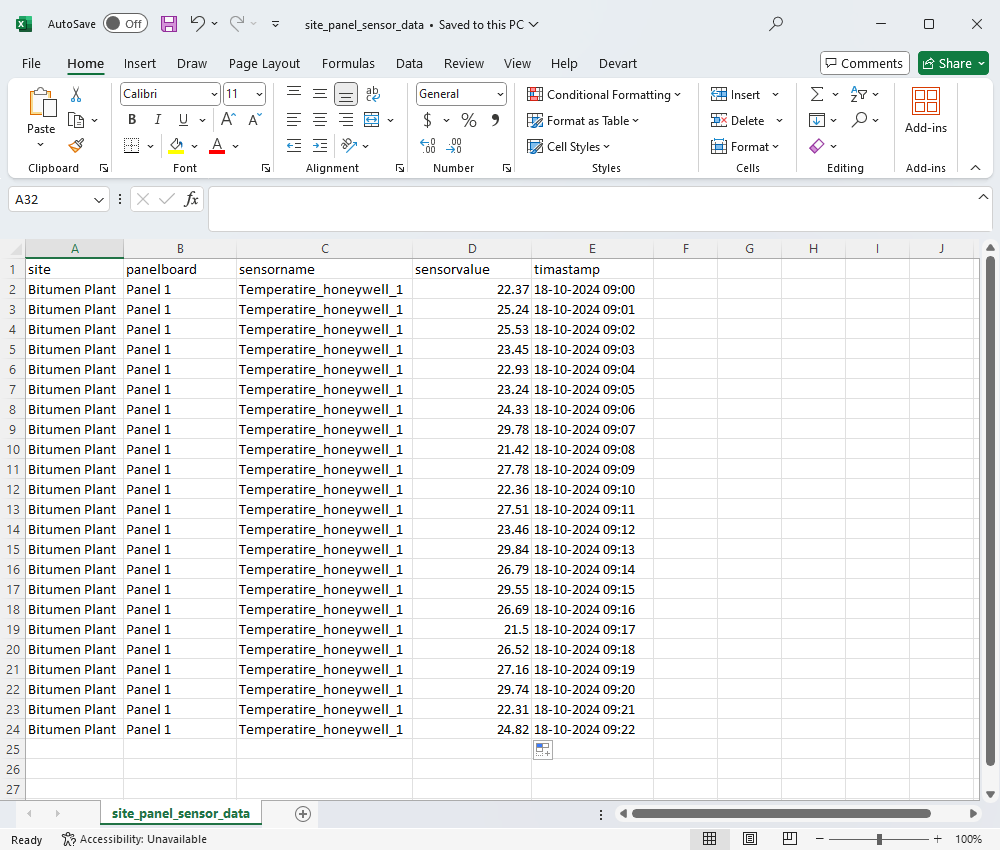
5. Now, enter the full path to the CSV file in the location text box. Do not change other parameters. Check the screenshot below for reference.
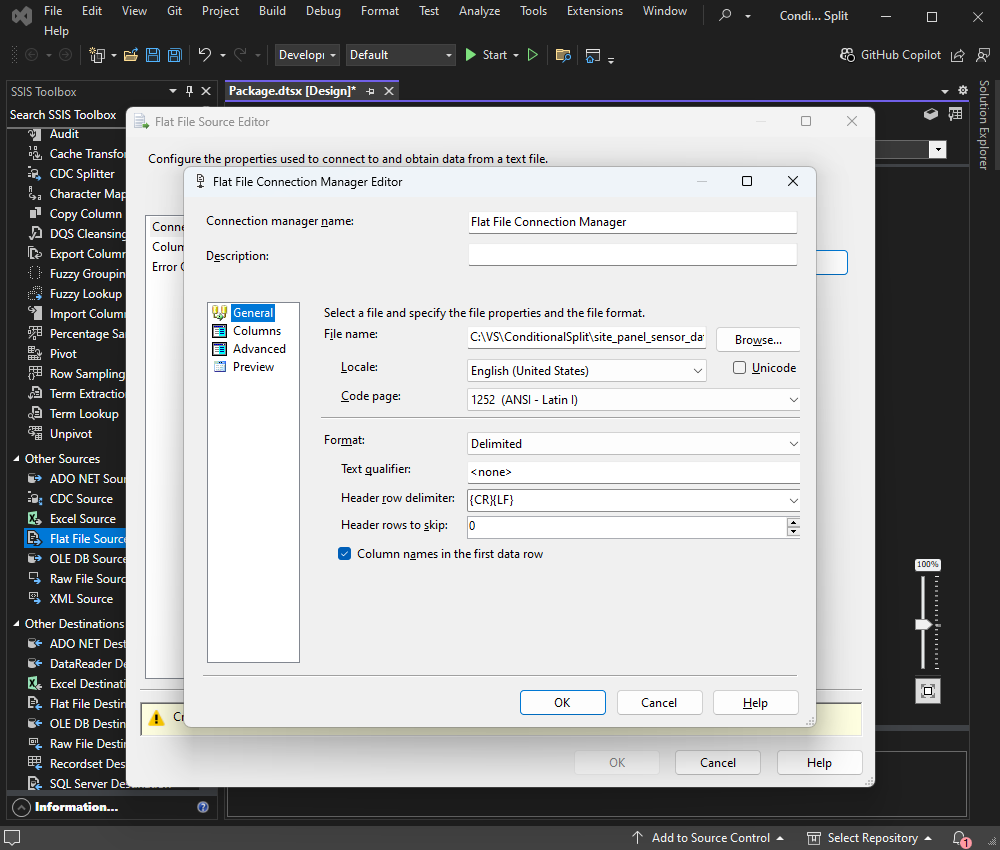
6. To review the columns and data of the CSV file, click Preview.

7. Click the OK button to save the configuration and close the dialog box.
Now, let’s configure the conditional split transformation.
Conditional split transformation
Our use cases require us to store the data of the Bitumen plant in the db_bitumenplant database, the database of the Cement plant should be stored in db_cementplant, and the data from the DrumMixPlant should be stored in the db_drummixplant database.
Let’s also keep the alert logs of the Bitumen plant in a separate table named panelreadingsalert.
Here is the script to create a table.
CREATE TABLE IF NOT EXISTS panelreadingsalert (
  "Site" CHARACTER VARYING(50),
  "PanelBoard" CHARACTER VARYING(50),
  "Sensor" CHARACTER VARYING(500),
  "Value" DOUBLE PRECISION
) WITH (OIDS = FALSE);
Now, let’s configure the conditional split transformation.
1. Drag the Conditional Split from the SSIS Toolbox and drop it in the data flow task designer window.
2. Rename it to Split data. The input of the conditional split is a flat file source. Hence, drag the arrow from the flat file source and drop it on conditional split transformation. Check the screenshot below for reference.
3. Double-click on your conditional split. A dialog box named conditional split transformation editor will appear. In the dialog box, you will see three sections.
- Section A. The first section contains the details of the columns that are derived from the flat file source.
- Section 2. The second section contains the various operators and functions that can be used to create the conditions.
- Section 3. It is a grid in which you can specify the desired conditions.
Here is a screenshot of dialog box.
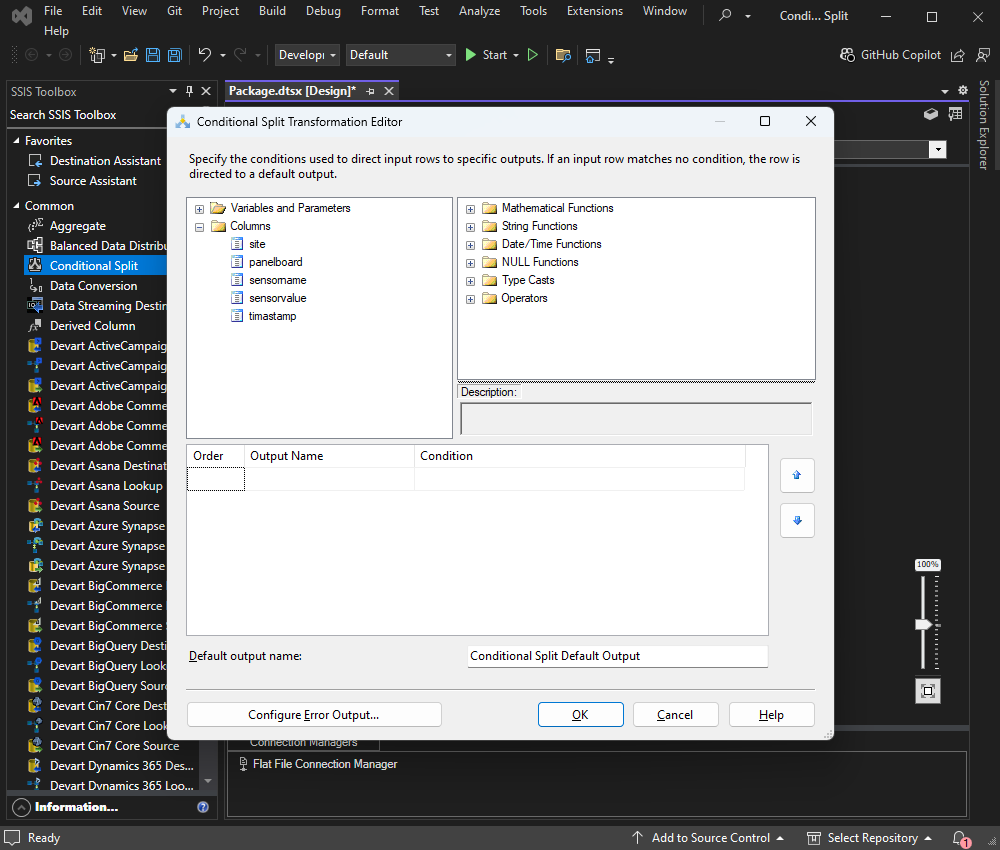
We want to split the data based on the value of the Site column. Thus, the data of the Bitumen plant will be stored in the db_bitumenplant database, the data of the Cement plant will be stored in db_cementplant, and the data of the DrumMixPlant will be stored in the db_drummixplant database accordingly. To split the data, we will use the equals to (==) operator.
1. To add the condition, first, expand columns from Section A.
2. Drag the Site column and drop it in the Condition column of the Section C grid view.
Check the screenshot below for reference.
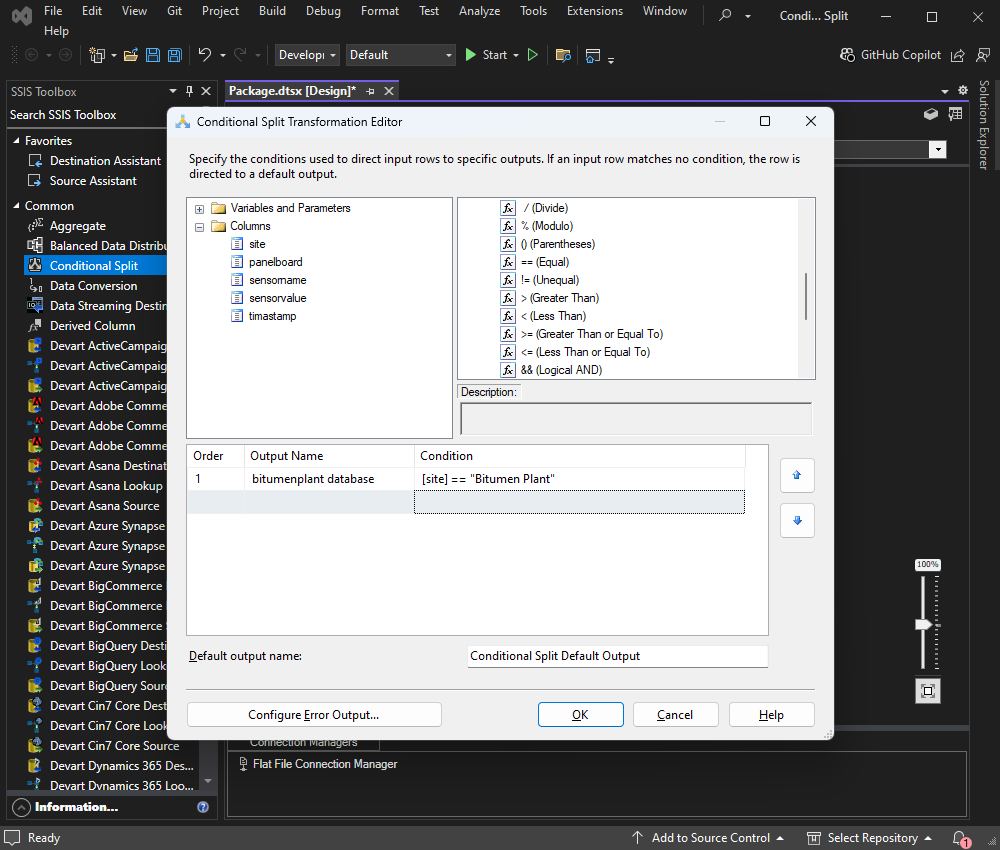
3. Similarly, configure another two conditions to route the Panel board data to the db_cementplant and db_drummixplant databases.
Additionally, let’s imagine that you want to store the alert log in a separate table of db_bitumenplant. When the value of the temperature sensor is higher than 28.0 degrees Celsius, you want to consider the value as an alert and store it in a table named panelreadingsalert in db_bitumenplant.
For that, let’s combine the following three conditions:
1. Site == Bitumen plant,
2. Sensor == Temperature_Honeywell_1
3. Value >28
All these conditions will be combined using the logical end (&&) operator.
The condition text is [“site”] == “Bitumen plant” && [“sensorname”]==”Temperature_Honeywell_1″&& [“sensorvalue”]>”28″.
Check the screenshot below to see how it works.
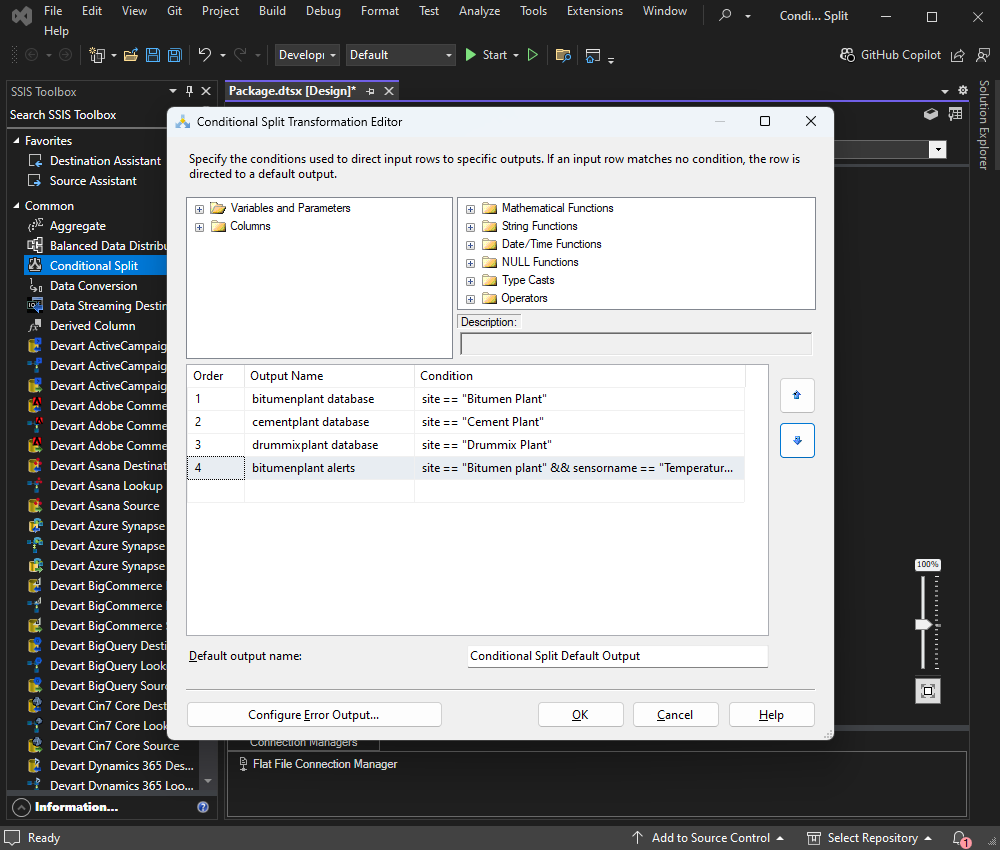
While creating two different conditions on the same column (an overlapping condition), you should consider the order in which they will be applied.
In our case, we have created two conditions on the Site column. The first condition was site== ”Bitumen Plant,” and the second condition was [“site”] == “Bitumen Plant” && [“sensorname”] == “Temperature_Honeywell_1” && [“sensorvalue”] > “28”.
In this case, when you run the SSIS package, the records that satisfy the first condition will be routed to the PostgreSQL database. Consequently, no records satisfy the fourth condition because the first condition has already been processed.
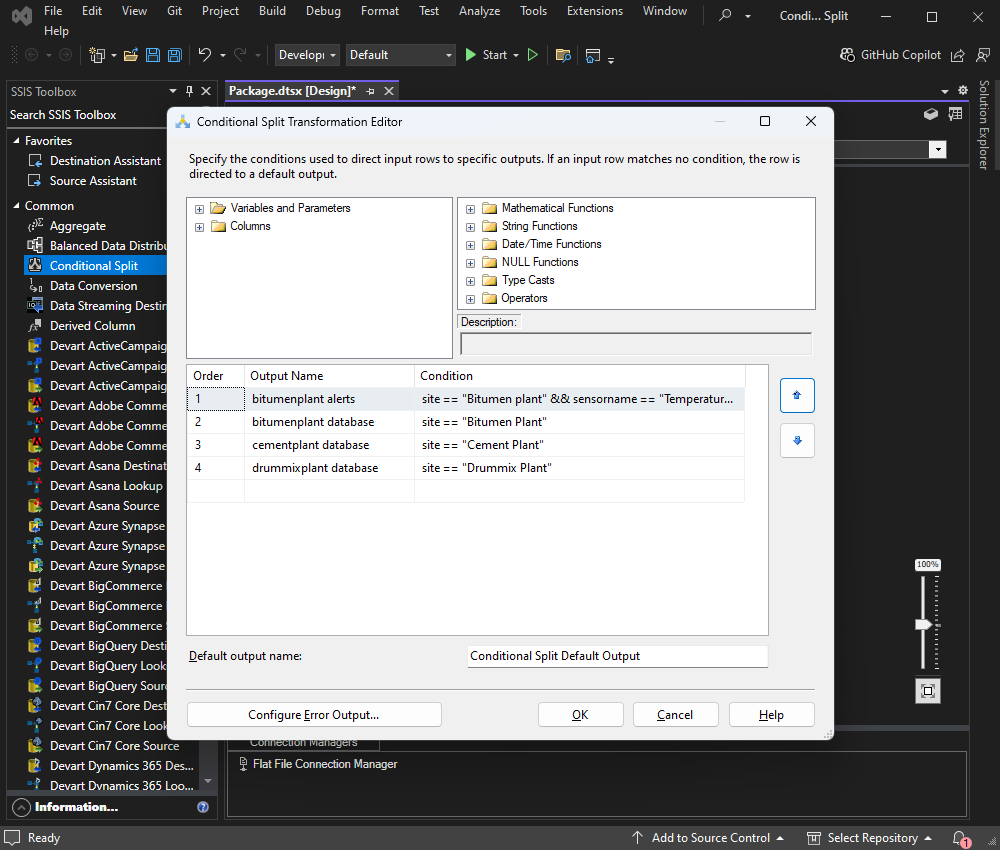
To resolve this issue, we must ensure that the specific conditions are evaluated before broader ones. Therefore, the fourth condition must be moved to the top of the conditions list.
The order of conditions can be adjusted by using the arrow buttons next to the condition list in the Conditional Split editor.
Now, let’s learn how to direct data to different destinations.
Directing data to different destinations
Once the conditions are defined, let’s configure the output of the conditional split. Let’s imagine that you are storing the data in a PostgreSQL database and you are using the Devart PostgreSQL destination. First, let’s configure the Devart PostgreSQL destination.
Configuration of the Devart SSIS connection manager for PostgreSQL
1. Right-click in the connection manager and select the New Connection option.

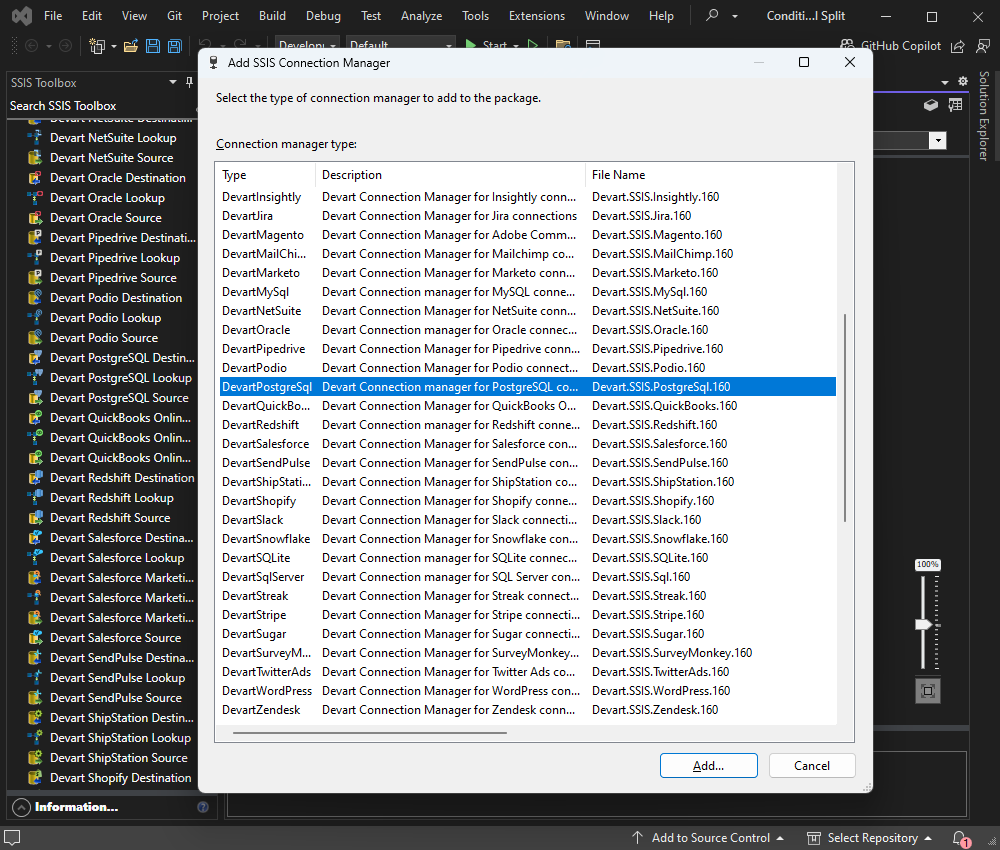
2. A dialog box named Add SSIS Connection Manager will open up. Here, you’ll see the list of connection managers. Select DevartPostgreSQL and click Add.
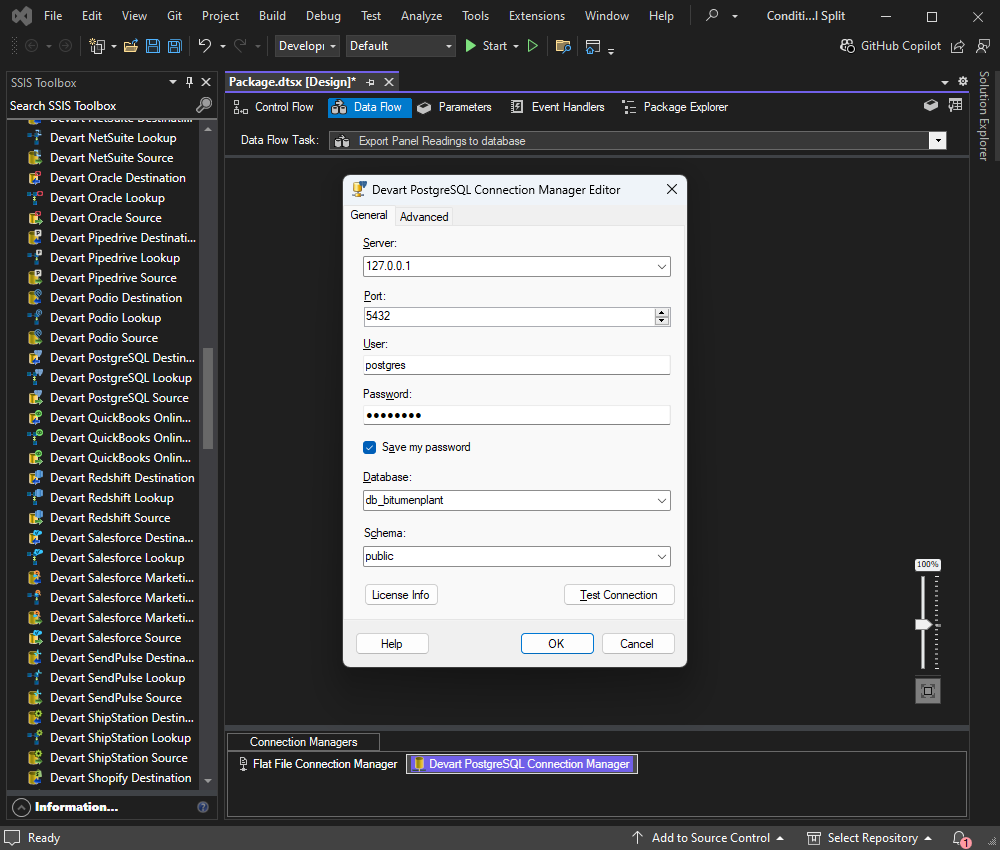
3. Another dialog box named Devart PostgreSQL Connection Manager Editor will appear. Here, you should specify the connection parameters to connect to PostgreSQL:
- Server. Provide the servername on which PostgreSQL is installed. In our case, I have specified localhost.
- Port. Enter a valid port to connect to the PostgreSQL database.
- User. Enter the username and password to connect to the database.
- Database. Specify the name of the database that you want to use. In our case, the database name is db_bitumenplant.
- Schema. Specify the schema in which the table is created. The panelreading table is created in a public schema.
4. Now, click OK to save the connection and close the dialog box.
Similarly, you can now configure the Devart connection manager for two more databases. The only change will be the database name in the connection manager editor.

5. Now, let’s configure the Devart destination for PostgreSQL. To do that, drag and drop four Devart PostgreSQL destinations from the SSIS Toolbox to the Data flow task designer window and rename them to Bitumen Plant, Cement Plant, Drum mix plant, and Bitumen Plant Alerts.
To redirect the output, drag the arrow from the conditional split and drop it on the Devart destination for PostgreSQL. Another dialog box named Input and Output selection will open up. In the dialog box, look for the names of all conditions configured in your conditional split.
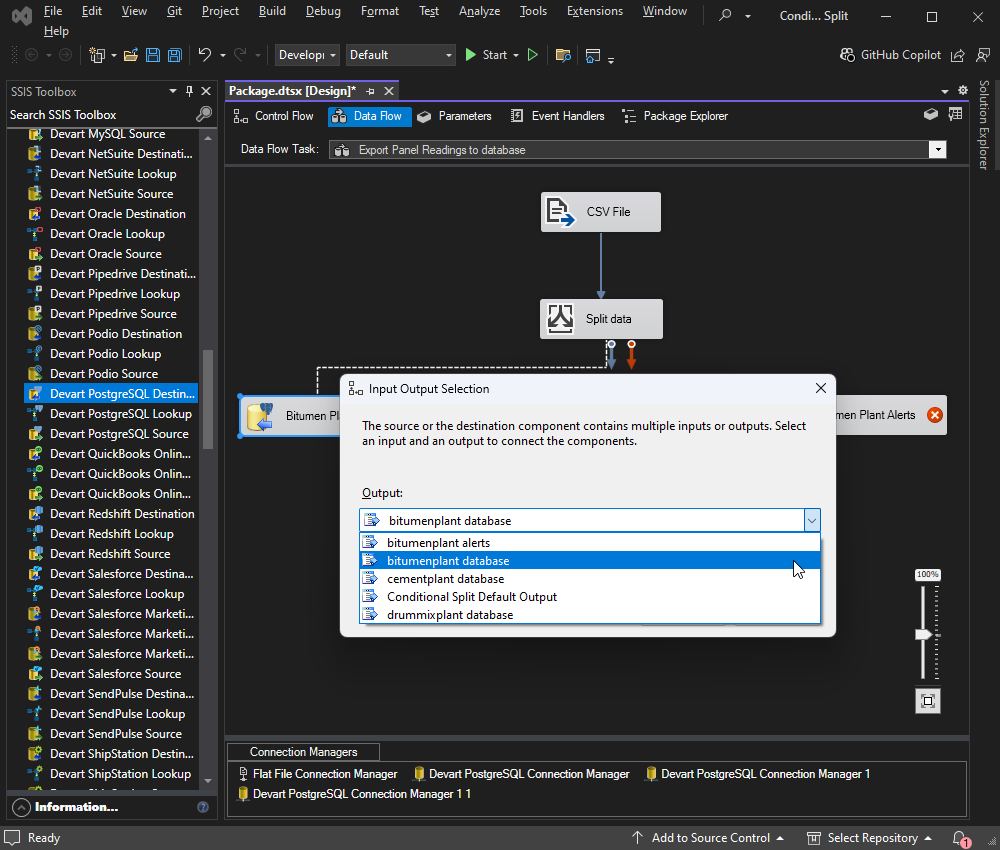
The output of the conditional split will be the input for the Devart PostgreSQL destination, which should be configured as follows:
| Conditional split output | PostgreSQL destination name |
|---|---|
| bitumenplant database | Bitumen Plant |
| cementplant database | Cement Plant |
| drummixplant database | Drum Mix Plant |
| bitumenplant alerts | Bitumen Plant Alert |
6. Next, select the table name you want to export the data. To do that, double-click on PostgreSQL Destination Editor. A dialog box named Advanced editor for Devart PostgreSQL Destination will launch. Here, you can configure various parameters used to perform the following tasks.
- Select connection manager.
- Connect to the PostgreSQL database.
- Select the tables in the destination database and perform the bulk insert and other DDL operations.
- Map out the source and destination columns.
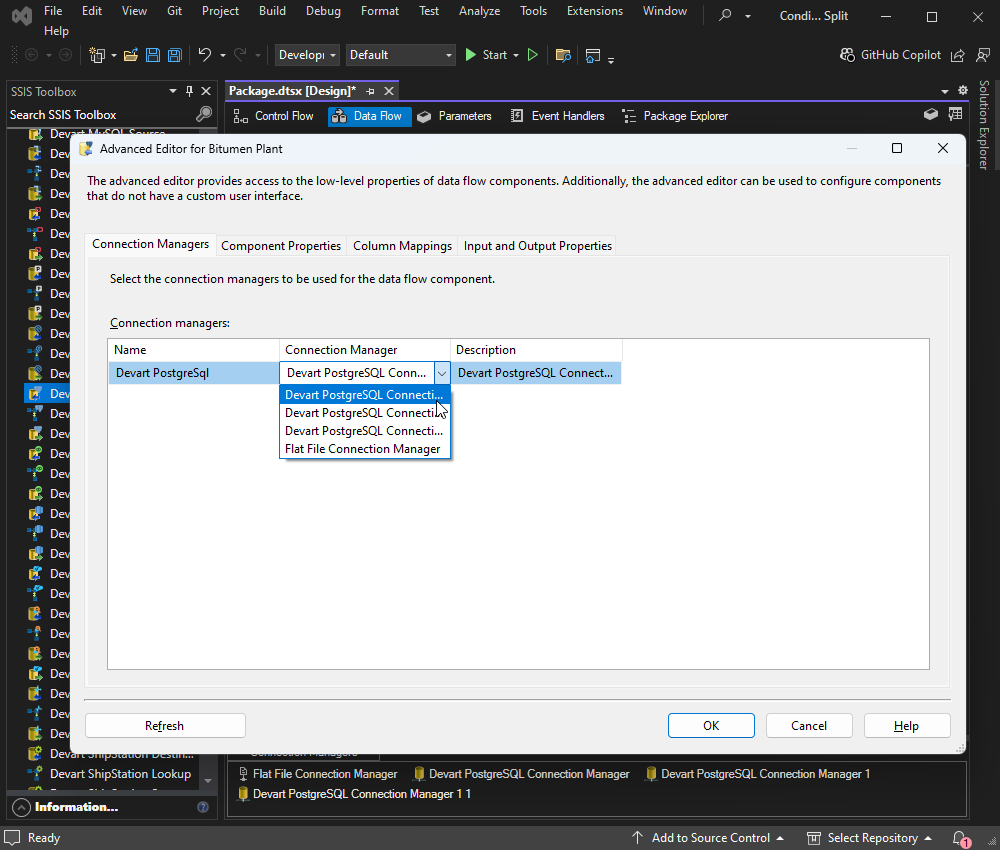
7. Select the connection manager that is used to access the db_bitumenplant. To do that, select the appropriate connection manager from the connection manager drop-down list.
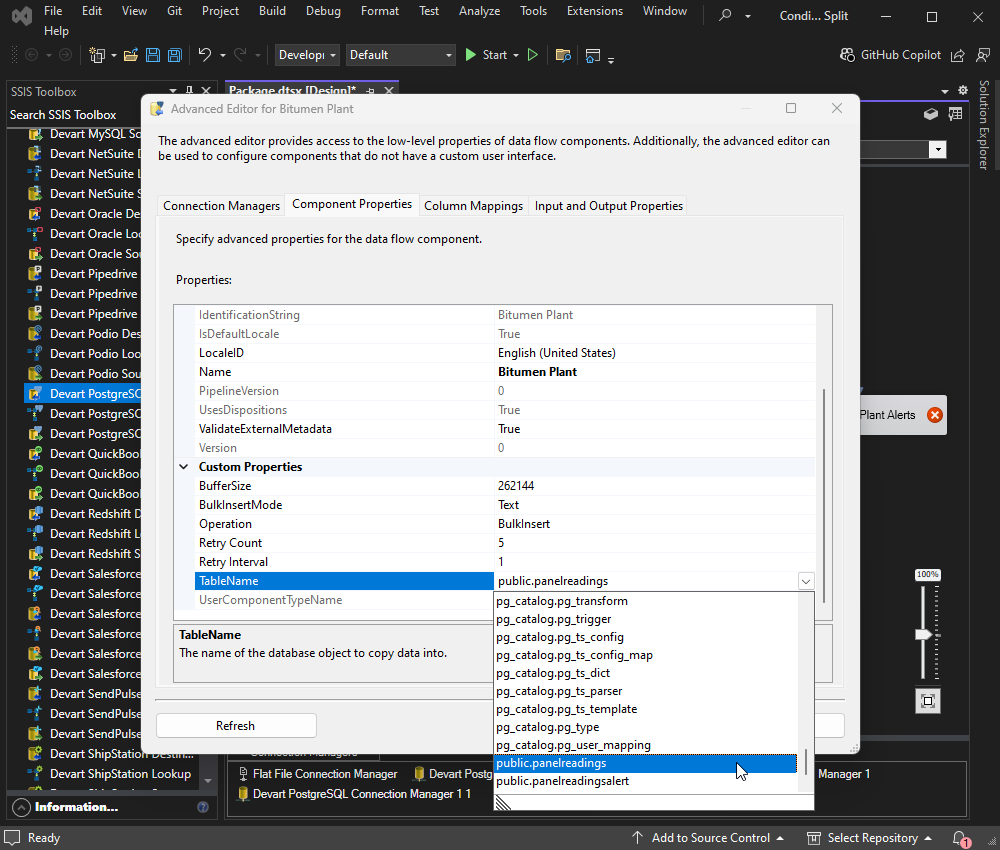
8. Next, you have to select the destination table. Click the Component Properties tab. Select the public.panelreadings table from the TableName drop-down box grid view.
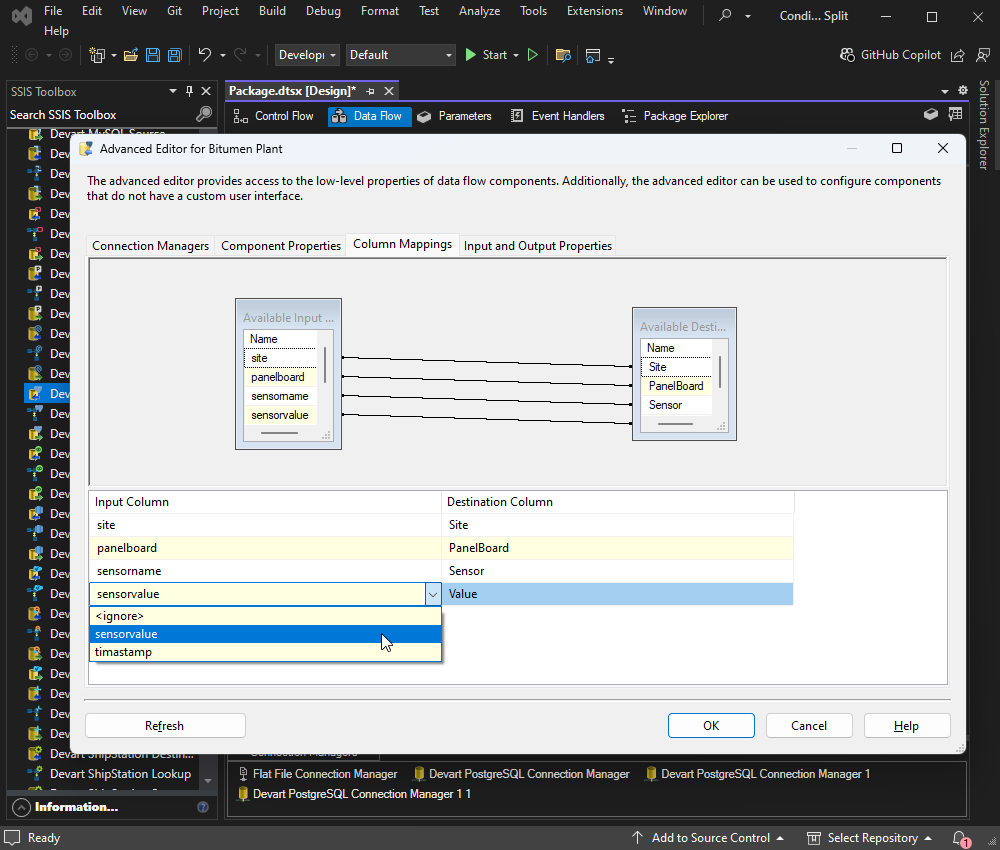
9. Finally, let’s map out the source and destination columns. Open the Column mapping tab. Here, you can see a list of input and output columns. If the column name of source and destination match, the system will automatically map the columns. But we have different names; thus, we’ll have to select the appropriate column names in the Input Column grid view.
10. Click OK to save the PostgreSQL Destination and close the dialog box. Similarly feel free to configure the output of the other three destinations. The final SSIS package will look as in the screenshot below.

11. After that, feel free to execute the SSIS package.
Testing and debugging your SSIS package
Now, let us execute the SSIS package and verify that the database has been exported correctly. To execute the package, click the Start button in the menu bar.

The package execution will start. You’ll be able to view the status in Package Explorer. And, once the package executes successfully, it will look like in the following screenshot.

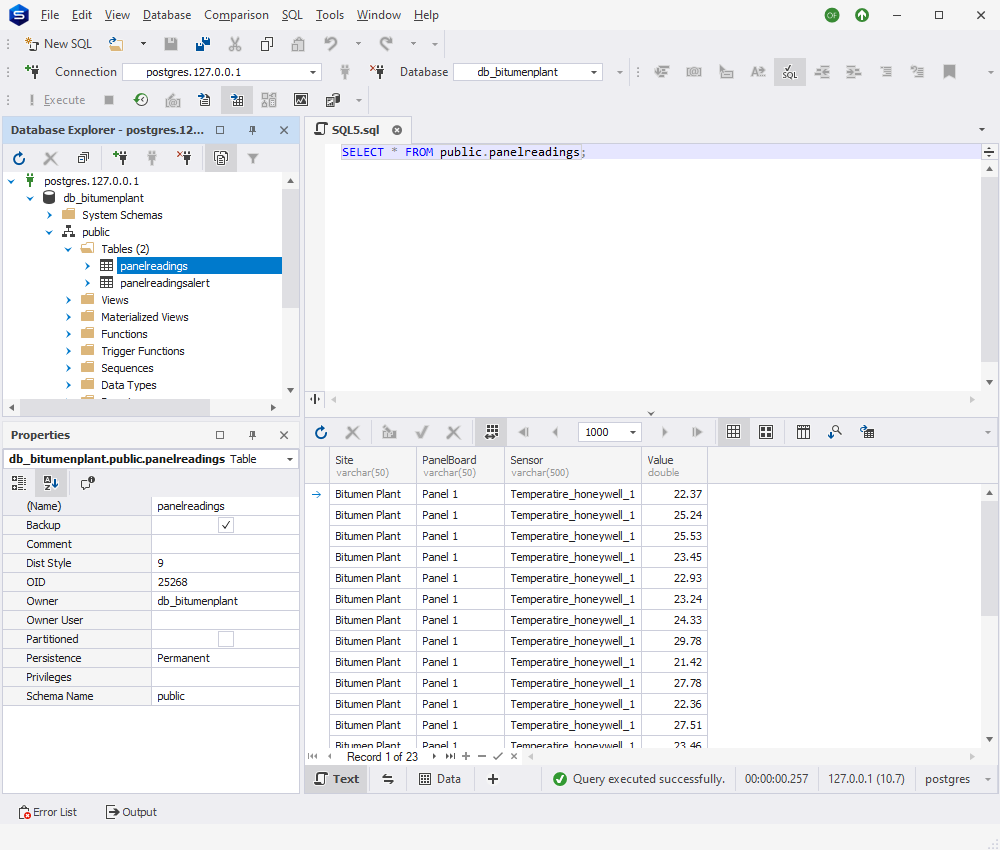
As you can see, the package has transferred the data from the CSV file to the PostgreSQL database. Let’s verify that the data has been appropriately copied. To do that, let’s run the queries in the db_bitumenplant, db_cementplant, and db_drummixplant databases.
Open dbForge for PostgreSQL, navigate to the panelreadings table, and review the rows imported from the CSV file.
Conclusion
From this article, you have learned how to use SSIS conditional split to direct data to multiple destinations based on a real-life use case. Feel free to use this method in your daily routine to simplify data analysis and reporting or empower applications that use different databases and tables to retrieve the data. All you need to do to use the conditional split in SSIS is to define the split condition — once you’re done, you can redirect your data to the intended destinations easily. Moreover, with SSIS Data Flow Components for PostgreSQL from Devart, data import, integrations, and source syncs become hassle-free. Get a 30-day trial of SSIS Data Flow Components for PostgreSQL for free to see how it works!


