
The article covers the basic syntax of a MySQL SELECT statement and provides examples that show how to use a MySQL SELECT statement to retrieve data from tables.
The primary task in database management is writing and executing queries – commands for retrieving and manipulating data in databases. Users describe the tasks via these queries, and the database management system performs all the physical operations.
Among the most widely used MySQL queries, one would certainly name CREATE, UPDATE, and DELETE. However, when we need to apply any changes to the database, we first must define the “target”. For that, we turn to the SELECT statement, which is one of the MySQL operation pillars.
Introduction to MySQL SELECT
MySQL SELECT statement queries the database according to the criteria set by the operator and returns the rows/columns that match those criteria. With the help of this MySQL query data method, database administrators can retrieve, group, summarize and analyze data. An absolute majority of all MySQL queries begin with the SELECT query.
This query is neutral – its performance does not produce effects on the database, except for some specific cases which we’ll expose further.
MySQL SELECT Statement Syntax
The SELECT query follows the standard syntax:
SELECT column_to_select FROM table_to_select WHERE conditions;Or, you may see the following format:
SELECT column_to_select
FROM table_to_select
WHERE conditions;It does not matter if you write this query in one line or column, with each keyword starting a new line. It is a matter of personal preferences and convenience only. Many specialists prefer the “column” format because it makes the query easier to read and understand.
Let’s dig deeper into the statement syntax to understand how to write the SELECT query in MySQL.
- SELECT is the keyword that starts the query and instructs MySQL on what task it must perform.
- FROM is a mandatory clause that specifies the table or tables to select the data from (if you apply to multiple tables, you must separate their names by commas or use the JOIN method).
- WHERE is an optional condition, though it is very frequent in MySQL SELECT statements – it specifies the criteria to define the necessary data and return it.
- Tip: To ensure you’re querying the correct data source, you can check databases in MySQL using the SHOW DATABASES; command. It displays all databases accessible to your MySQL user account.
When MySQL evaluates the SELECT command, it always starts from evaluating the FROM clause and then proceeds to the SELECT clause.
At the end of the statement, you have to put a semicolon (;) as the statement delimiter in MySQL. Often, queries consist of several commands. Then, you separate them by semicolons, thus telling MySQL to execute all those commands individually.
Note: SQL is not case-sensitive, so you may write the entire query in low case. The code will work correctly. Writing clauses keywords in upper case is a formatting method to improve the code readability for users.
Besides the FROM and WHERE clauses, the MySQL SELECT query can include other optional clauses:
- GROUP BY organizes the retrieved data by grouping them by columns.
- HAVING relates to GROUP BY. When this clause is applied, it selects and returns only those rows having the specified conditions TRUE.
- ORDER BY sorts the records in the returned result-set.
- DISTINCT removes duplicates from the result-set.
- LIMIT controls the number of rows retrieved by the query.
- ALL returns all matching rows.
- HIGH_PRIORITY determines that MySQL must execute the SELECT statement before all the UPDATE operators waiting for the same resource.
SELECT * – “asterisk” – is a replacement for the ALL clause and quite a popular method. However, it also has its catches.
MySQL SELECT * returns all data even from those columns that you don’t use and don’t need for this query. This may overload the network traffic and produce unnecessary I/O.
One more problem, if the table gets changed, for instance, someone adds new columns without notifying you, SELECT * will bring you the data you did not expect, spoiling your plans and results.
The solution is to always specify the target column names to retrieve the data from.
Tip: To inspect available tables before running a SELECT query, use the MySQL SHOW TABLES command. It lists all tables in the currently selected database and helps you identify the correct data sources.
MySQL SELECT Examples
The simplest case of using the MySQL SELECT command is retrieving all data in a table according to a particular criterion. Have a look at the following example:
SELECT *
FROM book_prices
WHERE quantity >= 15;
We use the “asterisk” option to get all fields from the book_prices table with the quantity greater or equal to 15.
If we want to select specific fields from the table, we must specify them in the SELECT statements:
SELECT book_title, quantity, author_name, book_price
FROM books
WHERE price < 15
ORDER BY price ASC;
This command returns the data on the book titles, quantities of items, and names of the authors for the books with a price less than $15. The results will be present in ascending order.
MySQL SELECT query with JOIN
In most cases, databases contain multiple tables with different data. In your work, you often need to retrieve the data from several tables simultaneously. The SELECT query in MySQL offers two options. The first one is to define which tables the command should refer to. You specify the column names after the FROM clause and separate them by commas. The second option is to use the JOIN clause.
JOIN combines several tables to retrieve their data with a single query. When you include JOIN into the MySQL SELECT statement, the syntax is the following:
SELECT table1.column1, table2.column2
FROM table1
JOIN table2
ON table1.related_column=table2.related_column;
Assume we want to know the names of certain customers and which orders they made. Have a look at the code:
SELECT order_details.order_id, customers.customer_name
FROM customers
INNER JOIN order_details
ON customers.customer_id = order_details.customer_id;
The query joins the tables containing the order details with the table containing the customers’ names. The condition determining which data to give is the customer_id value. This SELECT command will return the rows from the two joined tables where the customer_id values match. Also, you can watch this video tutorial:
MySQL SELECT INTO – a specific case of usage
As mentioned at the beginning of this article, using the SELECT clause in MySQL does not affect the database like changing the stored data. However, there is a case when using this command has a more substantial impact.
The SELECT … INTO statement serves to create new tables and populate tables with data.
The standard syntax of this MySQL statement is as follows:
SELECT column1, column2, column3, ...
INTO table1
FROM table2
WHERE condition;
In this statement, note the following components:
- The list of columns after the SELECT clause in the MySQL query specifies which columns we want to take and insert into a new table.
- A table1 should be the name of a table that we’ll create and populate with the data from columns after the SELECT keyword. Note that we won’t replace any existing table with this method – we create a new table with a unique name.
- A table2 stands for the “source” table where we’ll take the data to insert into the new table. Also, with the help of JOINs, data from multiple tables can be retrieved and inserted into the new table.
- WHERE is an optional condition for filtering retrieved records.
To retrieve all columns from a table and copy them into a new one, use the following syntax:
SELECT *
INTO table1
FROM table2
WHERE condition;
To retrieve some columns from the table and copy them into a new table, use the following syntax:
SELECT column1, column2, column3, ...
INTO table1
FROM table2
WHERE condition;
Use JOIN to copy the data from several tables into a new table:
SELECT Customers.CustomerName, Orders.OrderID
INTO CustomersOrderBackup2021
FROM Customers
LEFT JOIN Orders ON Customers.CustomerID = Orders.CustomerID;
A specific case of using the SELECT … INTO command is writing the selected data into files. It helps to save some data separately for further reference. Also, this statement works as a part of Events processes, creating error logs and application event logs this way.
SELECT … INTO OUTFILE writes the data to a file in a specific output format. This method suggests using columns and line terminators to ensure the specified format. Note: You need the FILE privilege to use this command, as it creates a file on the server host.
SELECT … INTO DUMPFILE writes a single row to a file without using any formatting.
A standard example of the SELECT … INTO syntax is as follows:
SELECT order_id, unit_price, customer_id
FROM order_details
WHERE quantity < 200
ORDER BY customer_id
INTO OUTFILE 'orders.txt'
     FIELDS TERMINATED BY ','
     LINES TERMINATED BY '\n';
This query selects particular data from the table containing details of orders – it returns the data on the orders, prices, and customers’ IDs where quantity is less than 200. The results sorted by the customers’ IDs will be stored in a new file called orders.txt.
Write and execute MySQL SELECT statements with dbForge Studio for MySQL
Writing queries to work with MySQL databases is a routine, but still a tiresome task, let alone all other necessary database-related activities. Fortunately, it does not have to be manual. Lots of professional MySQL database management tools help in doing all those tasks. Among them, it is worth mentioning the Devart tools from the dbForge for MySQL product line. The multi-functional dbForge Studio for MySQL does everything you need if your scope is MySQL databases.
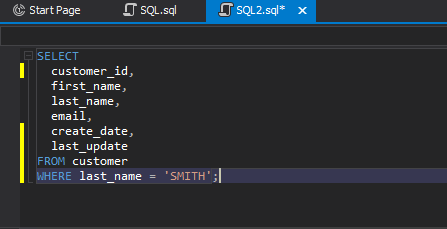
Assume we need to retrieve some information about a customer (for example, Mary Smith) from the customer database. In this case, we will include the WHERE clause into the SELECT statement. In dbForge Studio for MySQL, we can use the Generate Script As feature to get information from the MySQL table. Alternatively, users who prefer a GUI-based approach can build queries using the MySQL visual query builder, simplifying SELECT statement construction without manually writing SQL.
To retrieve information about the customer, do the following:
1. In Database Explorer, right-click the required table and select Generate Script As > SELECT > To New SQL Window. The SQL code editor opens containing the automatically generated SELECT script.

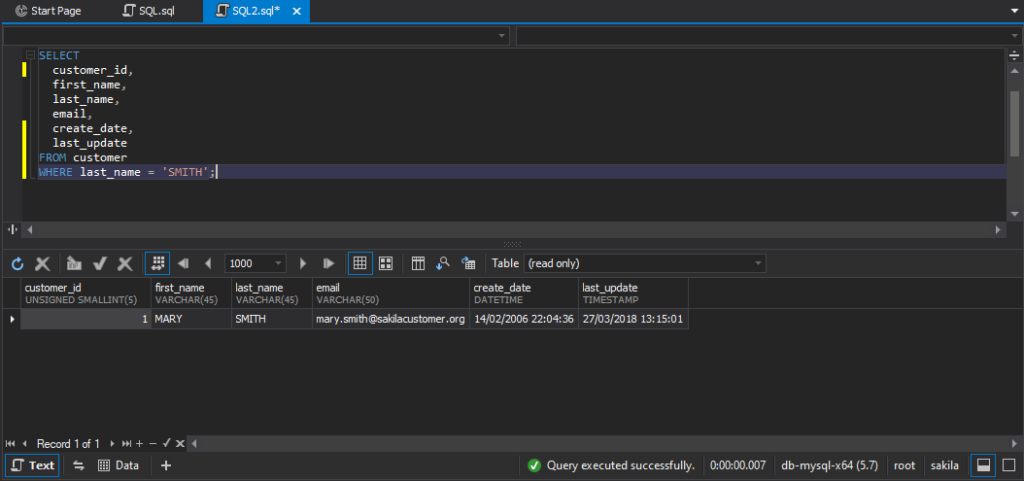
2. In the SQL code editor, add the WHERE condition with the specified value to filter the retrieved data and click Execute.
The statement outputs information about Mary Smith that is stored in the MySQL table and displays it on the grid.
Conclusion
In the article, we have reviewed the MySQL SELECT statement, its syntax, and provided examples that show how to write and use it in dbForge Studio for MySQL. The query is multifunctional and can be also used to get a database.
Also, one of the tool’s advantages is that it allows you to monitor query performance and improve it by keeping table and index statistics up-to-date with MySQL ANALYZE TABLE.
Download a free 30-day trial version of dbForge Studio for MySQL to evaluate all features and capabilities the tool provides.