")
Developing web-based applications often requires a robust, scalable, and efficient database solution that can handle dynamic data needs. Azure SQL Server provides developers with a cloud-based platform that fulfills these requirements. By combining Azure SQL Server with modern web development technologies, developers can build powerful, data-driven web applications that offer distinctive user experiences.
Contents
- Understanding Azure SQL Server for web development
- Setting up Azure SQL Server for Java-based web UI
- Creating a simple Java project
- Building UI to access Azure SQL data
- Build and deploy the Java project
- Introducing dbForge Studio for SQL Server
- Developing a web UI in Java with Azure and dbForge Studio
- Conclusion
Understanding Azure SQL Server for web development
Basics of Azure SQL Server
Azure SQL Server is a cloud-based relational database service provided by Microsoft, designed to offer powerful database capabilities and flexibility for various application needs. It is part of the broader Azure cloud platform and boasts several deployment options to suit different project requirements. Azure SQL Database is a fully managed service that ensures high availability, automated backups, and dynamic scalability. It is ideal for applications that need to scale efficiently and handle substantial workloads without manual intervention.
With features like elastic pools, which manage performance across multiple databases within a single resource pool, and automatic tuning, which continuously monitors queries and provides optimization recommendations, Azure SQL effectively handles scalability and performance needs. Its dynamic scaling capabilities ensure that resources adjust automatically based on demand.
Security is a major focus of Azure SQL Server, which offers advanced threat protection to provide alerts on suspicious activities and potential vulnerabilities. Data encryption features, such as Transparent Data Encryption (TDE) for data at rest and Always Encrypted for sensitive data, help protect information from unauthorized access. Additionally, Azure SQL Server meets a wide array of compliance certifications and regulatory requirements, providing confidence that the data is handled securely.
Management of Azure SQL Server is streamlined through automated maintenance tasks like backups, patching, and updates, reducing the operational burden on developers and database administrators. Monitoring and alerts are facilitated through tools like Azure Monitor and Application Insights, which provide detailed performance tracking and alerting capabilities.
All in all, Azure SQL Server provides a powerful, scalable, and secure platform for managing relational databases in the cloud, supporting a wide range of application needs with its flexible deployment options and robust feature set.
Benefits for web developers
Azure SQL Database is an excellent choice for developing web applications for several compelling reasons.
Simplified development. As a fully managed database service, Azure SQL eliminates the need for developers to handle routine maintenance tasks such as backups, patching, and updates. This allows developers to focus more on application development and less on database administration, significantly boosting productivity.
High availability and reliability. Both of these are built into the service, providing robust disaster recovery options and ensuring minimal downtime. This is crucial for web applications that require continuous availability and dependability.
Scalability. Azure SQL Database ensures that web applications can handle varying workloads seamlessly, maintaining optimal performance even during traffic spikes.
Enhanced security. The powerful security features of Azure SQL help protect sensitive data and ensure that applications meet regulatory requirements, providing peace of mind to both developers and users.
Cost efficiency. The cost efficiency of Azure SQL Database is another significant benefit. With its flexible, pay-as-you-go pricing model, developers only pay for the resources they use, which helps manage costs effectively, making the platform suitable for projects of all sizes.
Rich integration capabilities. Azure SQL Database supports a variety of development tools and environments, such as Visual Studio and Visual Studio Code, which enhances the development experience and ensures a smooth workflow. It easily integrates with other Azure services, such as Azure Functions, Logic Apps, and Cognitive Services, to build comprehensive, scalable web applications. What is more – extensive support for APIs and connectors enables smooth integration with third-party services and applications.
DevOps and CI/CD support. Azure SQL Database makes it easy to set up Continuous Integration/Continuous Deployment pipelines with Azure DevOps, automating the deployment process and ensuring efficient, reliable releases. Additionally, it offers smooth integration with Git repositories, thus facilitating effective version control and collaboration among development teams.
Setting up Azure SQL Server for Java-based web UI
Preparing the Azure environment
1. Go to Azure Portal and sign in with your Microsoft account.
2. Click the menu icon and select Create a resource.
3. In the Databases pane, under Azure SQL, click Create.
4. Next, under SQL databases, click Create.
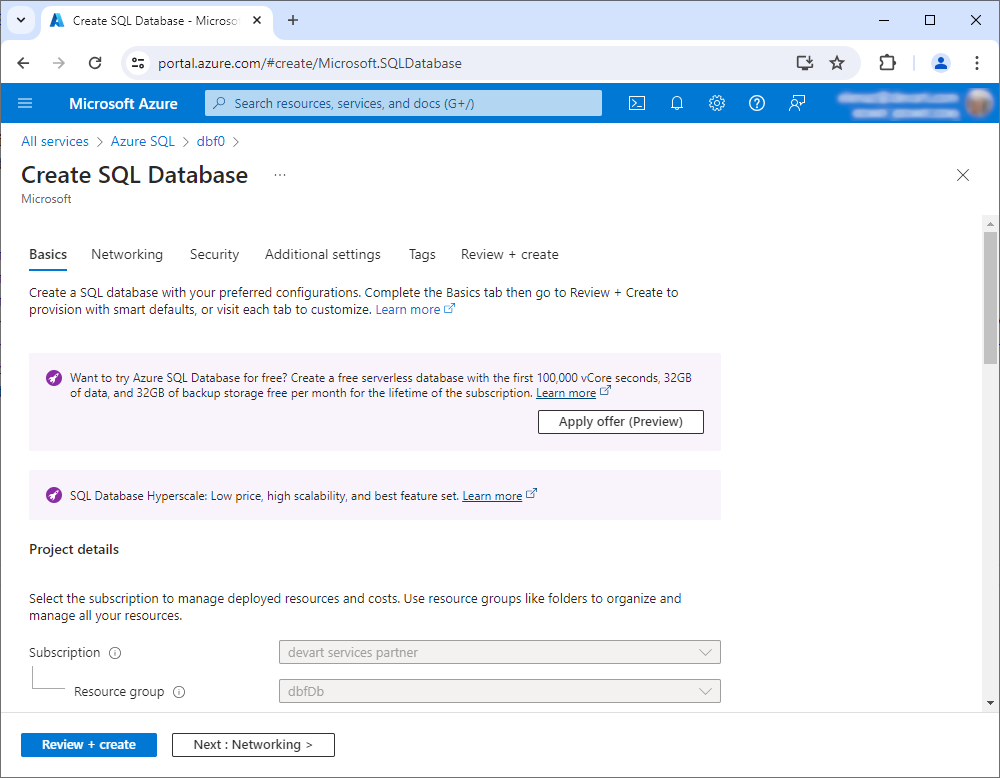
5. On the Basics tab of the Create SQL Database form, configure Project details and Database details.
6. Select Next: Networking at the bottom of the page.
7. On the Networking tab, for Connectivity method, select Public endpoint.
8. For Firewall rules, set Add current client IP address to Yes. Leave Allow Azure services and resources to access this server set to No.
9. Continue configuring the new database as needed. Once finished, click Review + create at the bottom of the page.
Your Azure SQL database is now ready, and you can populate it with data.
Creating a simple Java project
In this article, we will create a simple Maven Java web application that retrieves data from an Azure database and is hosted using Tomcat.
Step 1: Set up your Maven project
We will use Maven’s archetype to create a basic web application. First, ensure you have Maven and the JDK installed. Then, open your terminal or command prompt and execute the following command:
mvn archetype:generate -DgroupId=com.example -DartifactId=JDBCSampleAzureSQL -DarchetypeArtifactId=maven-archetype-webapp -DinteractiveMode=falseThis command creates a new directory JDBCSampleAzureSQL with a standard Maven project structure.
Next, update the pom.xml file to include dependencies for JDBC, the SQL Server driver, and Servlet API.
<!--  Servlet API dependency  -->
<dependency>
<groupId>javax.servlet</groupId>
<artifactId>javax.servlet-api</artifactId>
<version>4.0.1</version>
<scope>provided</scope>
</dependency>
<!--  JDBC driver for SQL Server  -->
<dependency>
<groupId>com.microsoft.sqlserver</groupId>
<artifactId>mssql-jdbc</artifactId>
<version>9.2.1.jre11</version>
</dependency>
Step 2: Configure an Azure SQL database for Java integration
Configuring an Azure SQL database for integration with Java applications involves several steps to ensure seamless connectivity and efficient data operations. This will allow Java applications to interact with Azure SQL database using JDBC (Java Database Connectivity), taking the most of Azure’s rich feature set.
2.1 Set up JDBC Driver
To connect your Java application to Azure SQL Database, you will need the appropriate JDBC driver. Microsoft provides a JDBC driver specifically for SQL Server, which is fully compatible with Azure SQL Database. Download and include this driver in your project’s library.
2.2 Configure connection string
First, you need to get the connection string from Azure Portal. For this:
- Go to your Azure SQL Database in the Azure Portal.
- In the database overview, you locate the Connection strings section.
- Navigate to the JDBC tab to view the JDBC connection string format.
It will look something like this:
jdbc:sqlserver://dbf0.database.windows.net:1433;database=JordanSanders;user=devart@dbf0;password=your_password_here;encrypt=true;trustServerCertificate=false;hostNameInCertificate=*.database.windows.net;loginTimeout=30;2.3 Ensure network access
To ensure that your local IP address is allowed to access the Azure SQL Database, you need to configure the firewall settings in the Azure Portal.
1. In the Azure Portal, go to the Resource groups section and select the resource group that contains your SQL server.
2. Click your SQL server name to open its management page.
3. On the SQL Server management page, select the Networking option located in the left-hand menu in the Security section.
4. On the Networking page, in the Firewall rules section, click Add your client IPv4 address. This will detect your current IPv4 address and add it to the allowed list.
5. After adding your IP address or range, click Save to apply the changes.
2.4 Optional: Verify the created connection from the app
To verify that the connection to the Azure SQL Database works, we will create a test connection class. This class will not be used in our actual Java project; it is solely for testing purposes.
Create database connection class
In the src/main/java/com/example directory, create a new Java class file named App.java. You can do this via your IDE or manually by creating a file with the corresponding extension.
Add the following code to the App.java file. This code will use the JDBC driver to establish a connection to the Azure SQL Database.
package com.example;

import java.sql.Connection;
import java.sql.DriverManager;
import java.sql.SQLException;

public class App {

	private static final String JDBC_CONNECTION_STRING = "jdbc:sqlserver://your_azure_server_address;"
			+ "database=database_name;" + "user=user_name;" + "password=your_password;" + "encrypt=true;"
			+ "trustServerCertificate=false;" + "loginTimeout=30;";

	public static void main(String[] args) {

		try {
			Connection connection = DriverManager.getConnection(JDBC_CONNECTION_STRING);
			System.out.println("Connection established successfully.");
			connection.close();
		} catch (SQLException e) {
			System.out.println("Failed to establish connection.");
			e.printStackTrace();
		}
	}
}
To verify the connection after adding the App class, you need to compile the Java project (as described below). Then, run the App test connection class. If the connection is successful, you should see: Connection established successfully.
Building UI to access Azure SQL data
Now, you are ready to begin building a user interface that will allow you to access and interact with the data hosted in the Azure SQL database. This will enable you to retrieve and display the database data through a web application.
Create entities
Entities in a Java project represent the core objects or data models that interact with a database. They encapsulate data and behavior, serving as a bridge between the application and the database. For our Java project, we will create two entity classes for managing Azure SQL data – Employee and HRDatabaseRepository.
1. Create the Employee class
The Employee class is a part of the application that represents a record in the HR database. It encapsulates the attributes of an employee, such as their ID, first name, last name, email, department, and hire date.
package com.example.entities;

import java.sql.Date;

/**
 * Represent an employee in an HR database.
 */
public class Employee {

	private final int id;
	private final String firstName;
	private final String lastName;
	private final String email;
	private final String department;
	private final Date hireDate;

	/**
	 * Initializes a new instance of the Employee class.
	 *
	 * @param id         - the identifier of an employee
	 * @param firstName  - the employee's first name
	 * @param lastName   - the employee's last name
	 * @param email      - the employee's email address
	 * @param department - the department an employee belongs to
	 * @param hireDate   - the date an employee was hired at
	 */
	public Employee(int id, String firstName, String lastName, String email, String department, Date hireDate) {

		this.id = id;
		this.firstName = firstName;
		this.lastName = lastName;
		this.email = email;
		this.department = department;
		this.hireDate = hireDate;
	}

	/**
	 * Gets the identifier for an employee.
	 *
	 * @return the identifier of an employee
	 */
	public int getId() {

		return this.id;
	}

	/**
	 * Gets the first name for an employee.
	 *
	 * @return the employee's first name
	 */
	public String getFirstName() {

		return this.firstName;
	}

	/**
	 * Gets the last name for an employee.
	 *
	 * @return the employee's last name
	 */
	public String getLastName() {

		return this.lastName;
	}

	/**
	 * Gets the email address for an employee.
	 *
	 * @return the employee's email address
	 */
	public String getEmail() {

		return this.email;
	}

	/**
	 * Gets the department an employee belongs to.
	 *
	 * @return the department an employee belongs to
	 */
	public String getDepartment() {

		return this.department;
	}

	/**
	 * Gets the date an employee was hired at.
	 *
	 * @return the date an employee was hired at
	 */
	public Date getHireDate() {

		return this.hireDate;
	}
}
2. Create the HRDatabaseRepository class
The HRDatabaseRepository class handles the database operations related to employees. It uses JDBC to connect to the Azure SQL database, fetch employee records, and close connections properly.
package com.example.entities;

import java.sql.Connection;
import java.sql.DriverManager;
import java.sql.ResultSet;
import java.sql.SQLException;
import java.sql.Statement;
import java.util.ArrayList;

/**
 * Represents a data access layer for human resources database.
 */
public class HRDatabaseRepository {

	private static final String JDBC_CONNECTION_STRING = "jdbc:sqlserver://your_azure_server_address;"
			+ "database=database_name;" + "user=user_name;" + "password=your_password;" + "encrypt=true;"
			+ "trustServerCertificate=false;" + "loginTimeout=30;";

	/**
	 * Initializes a new instance of the HumanResourcesDatabaseRepository class.
	 *
	 * @throws ClassNotFoundException
	 */
	public HRDatabaseRepository() throws ClassNotFoundException {

		// Load the JDBC driver
		Class.forName("com.microsoft.sqlserver.jdbc.SQLServerDriver");
	}

	/**
	 * Fetches information on employees from the human resources database.
	 *
	 * @return a collection of employees fetched from the database
	 * @throws SQLException an error has occurred when accessing the human resources database.
	 */
	public Iterable<Employee> fetchEmployees() throws SQLException {

		ArrayList<Employee> retVal = new ArrayList<Employee>();
		Connection connection = this.getConnection();
		Statement selectStatement = null;
		ResultSet resultSet = null;

		try {
			selectStatement = connection.createStatement();
			resultSet = selectStatement
					.executeQuery("SELECT EmployeeID, FirstName, LastName, Email, Department, HireDate FROM Employees");

			while (resultSet.next()) {
				retVal.add(new Employee(resultSet.getInt("EmployeeID"), resultSet.getString("FirstName"),
						resultSet.getString("LastName"), resultSet.getString("Email"),
						resultSet.getString("Department"), resultSet.getDate("HireDate")));
			}
		} finally {

			if (resultSet != null) {
				resultSet.close();
			}

			if (selectStatement != null) {
				selectStatement.close();
			}

			connection.close();
		}

		return retVal;
	}

	private Connection getConnection() throws SQLException {

		return DriverManager.getConnection(JDBC_CONNECTION_STRING);
	}
}
Create the Servlet class
Next, you need to create the Servlet class that will run on a server and handle client requests by generating dynamic content, such as HTML pages. It is an essential component for web applications to interact with clients, process requests, access databases, and generate responses dynamically.
In our case, to create a simple listing from the database hosted in Microsoft Azure, in the same src/main/java/com/example directory, we create a Servlet class – EmployeesServlet – with the following code:
package com.example;

import java.io.IOException;
import java.io.PrintWriter;
import java.sql.SQLException;

import javax.servlet.ServletException;
import javax.servlet.http.HttpServlet;
import javax.servlet.http.HttpServletRequest;
import javax.servlet.http.HttpServletResponse;

import com.example.entities.Employee;
import com.example.entities.HRDatabaseRepository;

public class EmployeesServlet extends HttpServlet {

	/**
	 * Serialization ID.
	 */
	private static final long serialVersionUID = -409752557084947443L;

	@Override
	protected void doGet(HttpServletRequest request, HttpServletResponse response) throws ServletException, IOException {

		response.setContentType("text/html");
		PrintWriter out = response.getWriter();
		out.println("<html><body>");

		try {
			HRDatabaseRepository repository = new HRDatabaseRepository();
			Iterable<Employee> employees = repository.fetchEmployees();

			out.println("<h1>Employees</h1>");
			out.println("<table border='1'><tr><th>ID</th><th>First Name</th><th>Last Name</th><th>Email</th><th>Department</th><th>Hire Date</th></tr>");

			for (Employee employee : employees) {
				out.println("<tr>"
						+ "<td>" + employee.getId() + "</td>"
						+ "<td>" + employee.getFirstName() + "</td>"
						+ "<td>" + employee.getLastName() + "</td>"
						+ "<td>" + employee.getEmail() + "</td>"
						+ "<td>" + employee.getDepartment() + "</td>"
						+ "<td>" + employee.getHireDate() + "</td>"
						+ "</tr>");
			}

			out.println("</table>");
		} catch (SQLException | ClassNotFoundException e) {
			out.println("<p>");
			out.println("An error has occurred while trying to access the human resources database. " + e.getLocalizedMessage() + "<br/>");
			e.printStackTrace(out);
			out.println("</p>");
		} finally {
			out.println("</body></html>");
		}
		out.close();
	}
}
Step 3: Define Servlet and Servlet mapping
Now, you need to configure src/main/webapp/WEB-INF/web.xml to register your servlet. In our case, it looks as follows:
<web-app xmlns="http://xmlns.jcp.org/xml/ns/javaee" xmlns:xsi="http://www.w3.org/2001/XMLSchema-instance" xsi:schemaLocation="http://xmlns.jcp.org/xml/ns/javaee http://xmlns.jcp.org/xml/ns/javaee/web-app_4_0.xsd" version="4.0">
<servlet>
<servlet-name>EmployeesServlet</servlet-name>
<servlet-class>com.example.EmployeesServlet</servlet-class>
</servlet>
<servlet-mapping>
<servlet-name>EmployeesServlet</servlet-name>
<url-pattern>/Employees</url-pattern>
</servlet-mapping>
</web-app>
Where:
<servlet-name>: Matches the name in the servlet declaration.<url-pattern>: Specifies the URL pattern that the servlet will respond to. In our case, accessing/employeeswill invokeEmployeesServlet.
Project structure
We have created and uploaded our JDBCSampleAzureSQL demo project to a Git repository to demonstrate its structure and organization. You can explore the repository to examine the project’s layout, including configuration files and source code.
Build and deploy the Java project
To deploy our Java web application, we will use Tomcat – an open-source Java Servlet Container developed by the Apache Software Foundation (ASF). It implements several Java EE specifications including Java Servlet, JavaServer Pages (JSP), Java EL, and WebSocket, and provides a “pure Java” HTTP web server environment for Java code to run in. But, first, we need to build our project using Maven.
Build the Project
To package your web application into a deployable format (WAR file), you need to build it. This process involves compiling the Java source code, including any resources (like JSP files and configuration files), and bundling them into a WAR file. Here’s how it’s done:
1. Open your command line interface (CLI) and navigate to the directory where your project’s pom.xml file is located.
cd path/to/your/JavaApp2. Execute the Maven package command:
mvn packageThis command tells Maven to execute the build lifecycle up to the package phase. It compiles your code, executes any tests (if configured), and then packages the compiled code into a WAR file. The resulting WAR file will be located in the target/ directory of your project.
Deploy to Tomcat
Once you have your WAR file, the next step is to deploy it to a Tomcat server:
1. Find the WAR file in the target/ directory. It will be named after your artifact ID in the pom.xml. In our case, its JDBCSampleAzureSQL.
2. Copy the WAR file to Tomcat. You need to move this WAR file to the webapps directory of your Tomcat installation. This can be done using a simple file copy command or through a file explorer. Tomcat automatically deploys WAR files placed in its webapps directory. When Tomcat is running, it will detect the new WAR file, unpack it, and load the application.
Start Tomcat
To access your deployed application, you need to start the Tomcat server if it isn’t already running:
1. Go to the bin directory within your Tomcat installation:
cd /path/to/tomcat/bin/
2. Start Tomcat:
On Unix/Linux/Mac: ./startup.sh
On Windows: startup.bat
These scripts start the Tomcat server. You should see the output in the CLI indicating that Tomcat is starting. Additionally, log files in the logs directory of the Tomcat installation provide detailed output and error messages related to server operation and application deployment.
Access the application
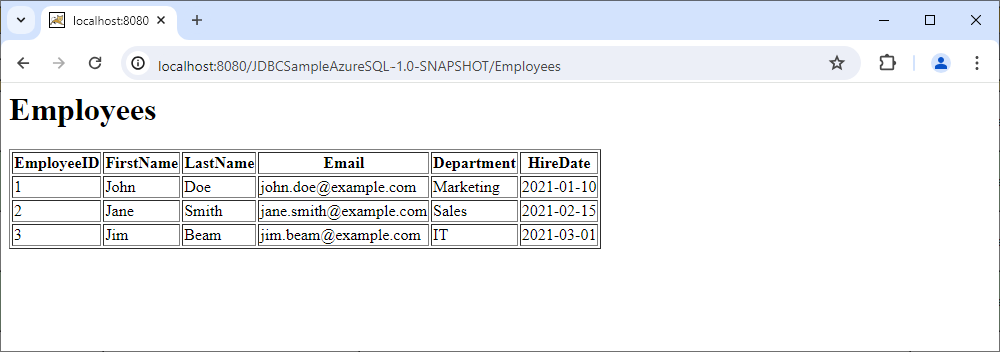
With Tomcat running and your application deployed, you can access it via a web browser. For this, open your web browser and enter the URL to your application. This is how the URL looks like in our case: http://localhost:8080/JDBCSampleAzureSQL-1.0-SNAPSHOT/Employees
Here, 8080 is the default port for Tomcat. If you configured Tomcat to use a different port, replace 8080 with that port number.
Alright, let’s open our web app. As you can see, it displays the query results from the Employees table from the Azure database in the web UI. This means that our implementation has been successful.
Introducing dbForge Studio for SQL Server
dbForge Studio for SQL Server is a powerful integrated development environment (IDE) designed for SQL Server management, administration, development, data reporting, and analysis. Developed by Devart, dbForge Studio provides a comprehensive suite of tools to streamline various tasks associated with SQL Server databases, making it an essential tool for database developers, administrators, and analysts.

Key Features
- Database development
- Code completion and SQL formatting: Enhances productivity by providing intelligent code completion and customizable SQL formatting.
- Code snippets: Allows users to insert frequently used code templates to accelerate development.
- Visual Query Builder: Enables the creation of complex SQL queries without writing code manually, using a drag-and-drop interface.
- Database management
- Object management: Facilitates the creation, modification, and deletion of database objects like tables, views, procedures, and triggers.
- Schema comparison and synchronization: Compares and synchronizes database schemas between different environments, ensuring consistency.
- Data comparison and synchronization: Compares and synchronizes data between databases, making data migration and updates easy.
- Database administration
- Backup and Restore: Simplifies backup and restore operations with customizable backup options and scheduling.
- User management: Manages SQL Server users and roles, and assigns permissions with ease.
- Data analysis and reporting
- Data Import and Export: Supports importing and exporting data in various formats (e.g., CSV, Excel, XML) to and from SQL Server databases.
- Data reporting: Generates comprehensive data reports with a variety of reporting tools and customizable templates.
- Pivot Tables: Provides pivot table functionality for advanced data analysis and visualization.
- Performance tuning and monitoring
- Query Profiler: Analyzes and optimizes SQL queries by identifying performance bottlenecks and suggesting improvements.
- Database monitoring: Monitors SQL Server performance metrics, helping identify and resolve performance issues proactively.
Developing a web UI in Java with Azure and dbForge Studio
dbForge Studio for SQL Server can significantly enhance the process of developing a web UI in Java with Azure by streamlining database management, development, and integration tasks. As a comprehensive IDE, dbForge Studio offers a suite of tools that facilitate the efficient handling of Azure SQL Database, thereby supporting the backend requirements of a web application.
When developing a web UI in Java that interacts with an Azure SQL Database, dbForge Studio simplifies the initial setup and ongoing management of the database. The visual design tools allow developers to create and modify database schemas, tables, and other objects without needing to write extensive SQL scripts. This accelerates the database design phase and ensures that the schema is optimized for the application’s requirements.
Additionally, dbForge Studio provides robust data import and export capabilities, making it easy to populate the database with initial data or extract data for analysis and reporting. This is particularly useful when migrating existing datasets to the Azure SQL Database or when integrating external data sources.
The IDE also supports advanced features such as schema comparison and synchronization, which are crucial when managing multiple environments (development, testing, production). This ensures consistency across different stages of the application lifecycle and simplifies the deployment process.
For Java developers, dbForge Studio’s SQL coding assistance, including code completion and formatting, enhances productivity by reducing the time spent on writing and debugging SQL queries. The integration of these queries into the Java application is streamlined, as developers can test and optimize their SQL code directly within dbForge Studio before embedding it into their Java codebase.
Conclusion
dbForge Studio for SQL Server provides a robust set of tools that support the entire database lifecycle, from design and development to deployment and maintenance. Its integration with Azure SQL Database and the enhanced productivity features make it an invaluable asset for Java developers building web UIs that rely on a well-managed and optimized database backend.
Ready to streamline your database management and boost your development productivity? Try dbForge Studio for SQL Server today!