
The SQL SELECT statement is used to fetch data from a database. It’s also one of the most commonly asked topics in SQL interview questions, making it essential to understand thoroughly. This statement defines what data to retrieve, where to find it, and how to format it before returning the result.
In most cases, the SELECT query is run with FROM. SELECT specifies columns, and FROM indicates a table where these columns are located.
Overview of the SELECT command
The basic syntax of the statement is as follows:
SELECT <column1>, <column2>, ...
FROM <table>;Parameters:
<column1>,<column2>: the names of the columns you want to select data from<table>: the name of the table where the specified columns are located
In this section, we’ll explore different ways to use the SELECT query with examples based on the employees table. To start, create the table by executing the CREATE TABLE query:
CREATE TABLE employees (
    employee_id INT PRIMARY KEY IDENTITY(1,1),
    first_name VARCHAR(50) NOT NULL,
    last_name VARCHAR(50) NOT NULL,
    email VARCHAR(100) UNIQUE NOT NULL,
    hire_date DATE NOT NULL,
    job_title VARCHAR(100),
    salary DECIMAL(10, 2),
    manager_id INT,
    FOREIGN KEY (manager_id) REFERENCES employees(employee_id)
);
Then, populate the table with the sample data:
INSERT INTO employees (first_name, last_name, email, hire_date, job_title, salary, manager_id) VALUES
('John', 'Doe', '[email protected]', '2020-01-15', 'Software Engineer', 75000.00, NULL),
('Jane', 'Smith', '[email protected]', '2019-06-01', 'Project Manager', 90000.00, 1),
('Emily', 'Davis', '[email protected]', '2021-03-10', 'QA Engineer', 65000.00, 1),
('Michael', 'Brown', '[email protected]', '2018-11-20', 'DevOps Engineer', 80000.00, 1),
('Sarah', 'Johnson', '[email protected]', '2020-02-25', 'HR Manager', 85000.00, NULL),
('William', 'Wilson', '[email protected]', '2017-08-15', 'HR Assistant', 50000.00, 5),
('Olivia', 'Jones', '[email protected]', '2021-07-01', 'Accountant', 60000.00, NULL),
('Liam', 'Garcia', '[email protected]', '2019-12-10', 'Financial Analyst', 65000.00, 7),
('Sophia', 'Martinez', '[email protected]', '2018-10-05', 'Marketing Manager', 75000.00, NULL),
('James', 'Anderson', '[email protected]', '2021-09-15', 'Sales Manager', 80000.00, NULL),
('Charlotte', 'Taylor', '[email protected]', '2020-04-20', 'Sales Representative', 55000.00, 10),
('Benjamin', 'Moore', '[email protected]', '2017-03-30', 'Data Analyst', 70000.00, NULL),
('Amelia', 'White', '[email protected]', '2021-11-10', 'UX Designer', 65000.00, NULL),
('Lucas', 'Harris', '[email protected]', '2020-01-05', 'UI Designer', 62000.00, 13),
('Isabella', 'Clark', '[email protected]', '2018-05-25', 'Product Manager', 85000.00, NULL),
('Mason', 'Lewis', '[email protected]', '2019-09-10', 'Business Analyst', 72000.00, 15),
('Mia', 'Walker', '[email protected]', '2021-08-30', 'Customer Support', 50000.00, NULL),
('Ethan', 'King', '[email protected]', '2020-06-15', 'Technical Support', 55000.00, 17),
('Ava', 'Scott', '[email protected]', '2018-12-20', 'Operations Manager', 80000.00, NULL),
('Daniel', 'Green', '[email protected]', '2019-04-10', 'Logistics Coordinator', 60000.00, 19);
The employees table will be as follows:
SELECT statement options
SQL SELECT has different clauses to manage the data output. They are: FROM, AS, GROUP BY, HAVING, INTO, ORDER BY, * (asterisk). Let’s see how we can use each clause within the SELECT syntax.
FROM clause
The FROM clause is used to specify a table name where a necessary column with data is located.
Syntax:
SELECT <column>
FROM <table>; Parameters:
-
<column>: the name of the column you want to select data from -
<table>: the name of the table where a specified column is located
Let us select specific columns from the employees table. To do this, execute the SELECT query by explicitly listing the columns to retrieve:
SELECT
  employee_id
 ,first_name
 ,last_name
 ,hire_date
 ,job_title
FROM development.dbo.employees;
The result will look as follows:

To extend the functionality of the FROM clause, you can use the SELECT TOP in SQL Server.
AS clause
The AS clause is used to create a temporary name for the column headings. This method allows for clearer column headings. AS is optional and can be present in the query for readability purposes.
Syntax:
SELECT <column> [ AS <new_column> ]
FROM <table> [ AS <new_table> ];
OR
SELECT <column> [ <new_column> ]
FROM <table> [ <new_table> ]; Parameters:
<column>: the name of the column to be renamed<new_column>: a new name that must be assigned to the column<table>: the name of the table to be renamed<new_table>: a new name that must be assigned to the table
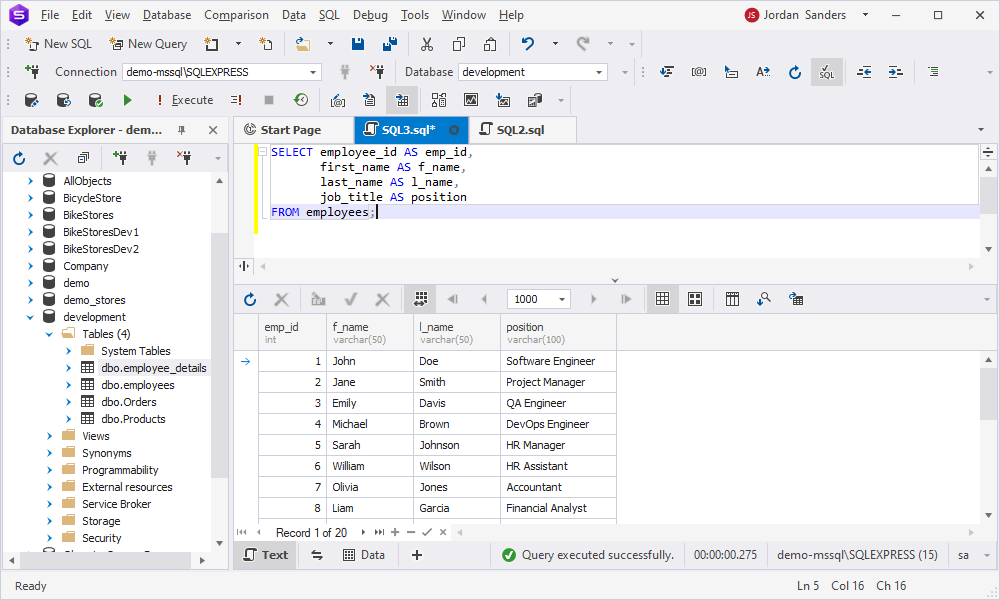
Suppose we want to retrieve specific columns from the employees table and rename them in the result set as follows:
SELECT employee_id AS emp_id,
       first_name AS f_name,
       last_name AS l_name,
       job_title AS position
FROM employees;
In the output, we’ll get the following:
The GROUP BY clause is used to group rows that have the same values in specified columns. It’s commonly used when using aggregate functions in SQL, such as COUNT, MAX, MIN, SUM, or AVG, to perform calculations on each group rather than on the full result set.
Below are a few key points to remember about GROUP BY. This clause:
- Returns one record per group.
- Must appear after the WHERE clause and before the ORDER BY clause in a query.
Syntax:
SELECT <column1>, SUM(<column2>)
FROM <table>
GROUP BY <grouping_column>;Parameters:
<column1>: the name of the column you want to select data from<column2>: the name of a numeric column you want to retrieve a total sum from<table>: the name of the table where a specified column is located<grouping_column>: the name of the column by which the results will be grouped
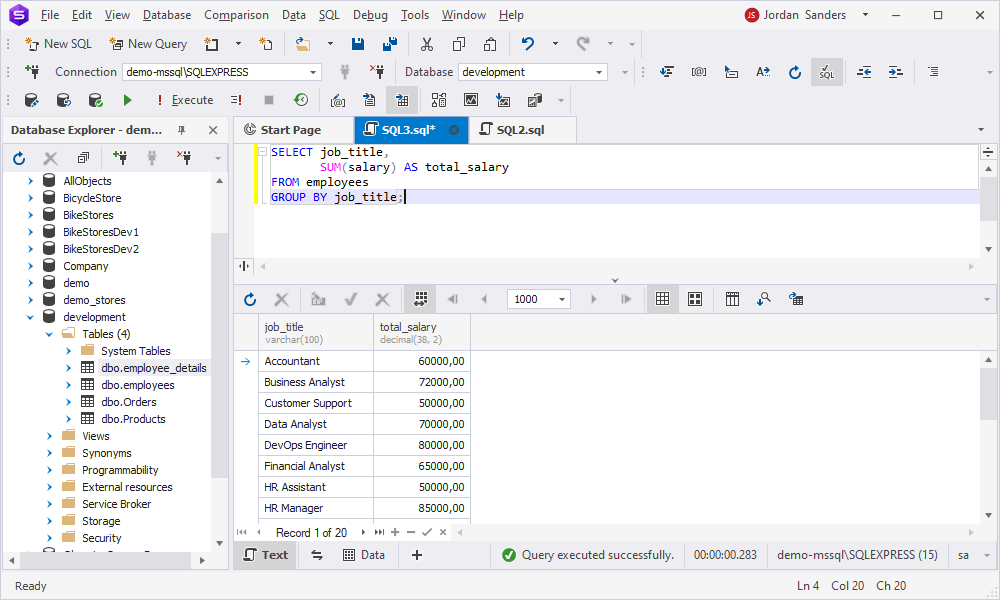
Let us calculate the total salary for each job title based on the employees table:
SELECT job_title,
       SUM(salary) AS total_salary
FROM employees
GROUP BY job_title;
Learn more about best practices of creating subqueries to master complex syntax.
In the output, the results are grouped by job title. The SUM(salary) function calculates the total salary for each job title, and the aggregated salary is displayed under the column name – total_salary.
HAVING clause
The HAVING clause is used to specify a search condition and is typically combined with the GROUP BY clause.
Syntax:
SELECT <column1>, SUM(<column2>)
FROM <table>
GROUP BY <grouping_column>
HAVING <condition>;Parameters:
-
<column1>: the name of the column you want to select data from -
<column2>: the name of a numeric column you want to retrieve a total sum from -
<table>: the name of the table where a specified column is located -
<grouping_column>: the name of the column by which the results will be grouped <condition>: an additional search condition that will be applied for aggregated results
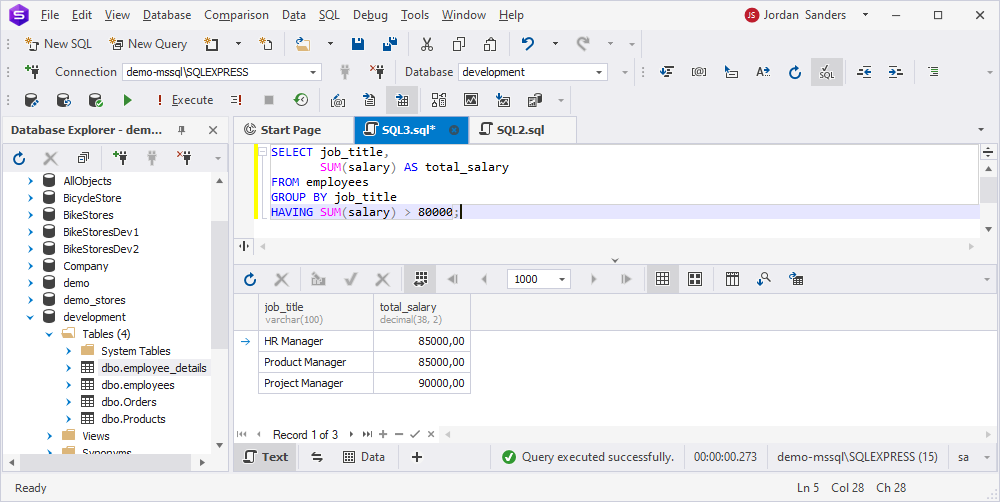
For example, find job titles with a total salary greater than $80,000:
SELECT job_title,
       SUM(salary) AS total_salary
FROM employees
GROUP BY job_title
HAVING SUM(salary) > 80000;
The results are grouped by job title and filtered to include only job titles where the total salary exceeds $80,000.
INTO clause
The INTO clause is used to create a new table and copy the retrieved results into it.
Syntax:
SELECT <column> INTO <new_table>
FROM <table>
WHERE <condition>;Parameters:
-
<column>: the name of the column you want to select and copy into a new table <new_table>: the name of a new table to be created for further copying a specified column<table>: the name of the table where a specified column is located<condition>: a condition for filtering and fetching only the necessary records
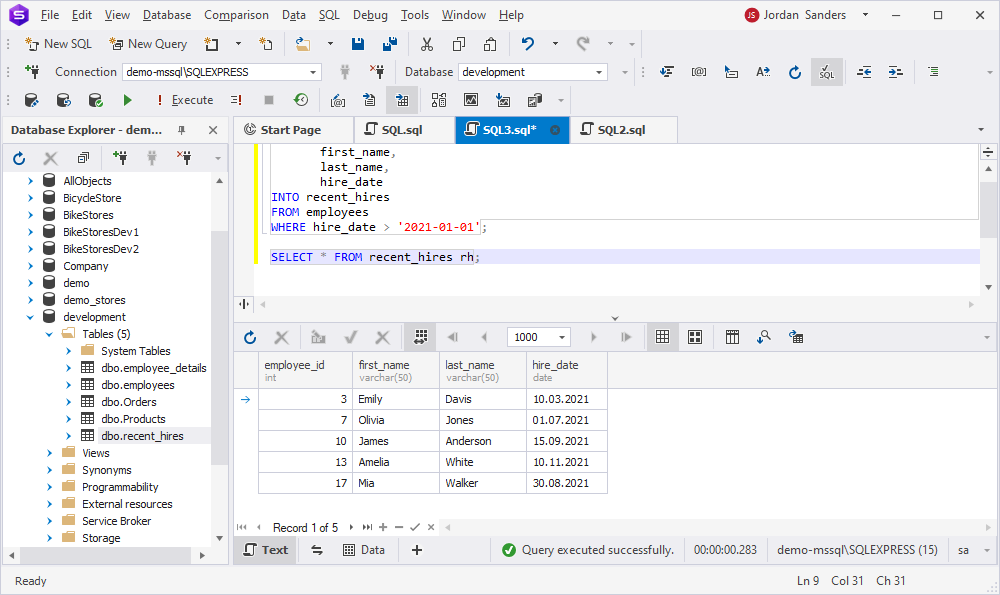
Suppose we want to create a new table – recent_hires – that lists employees from the employees table who were hired after January 1, 2021. The table will contain such columns as employee_id, first_name, last_name, and hire_date.
SELECT employee_id,
       first_name,
       last_name,
       hire_date
INTO recent_hires
FROM employees
WHERE hire_date > '2021-01-01';
Now, retrieve the data from the new table by running the SELECT query. It returns the following result:
ORDER BY clause
The ORDER BY clause is used to filter retrieved results. The sorting can be organized in ascending (a default option) and descending order.
Syntax:
SELECT <column1>
FROM <table>
ORDER BY <column2>;Parameters:
-
<column1>: the name of the column you want to select data from -
<table>: the name of the table where a specified column is located <column2>: the name of the column to sort retrieved results
To see how it works, execute the following query:
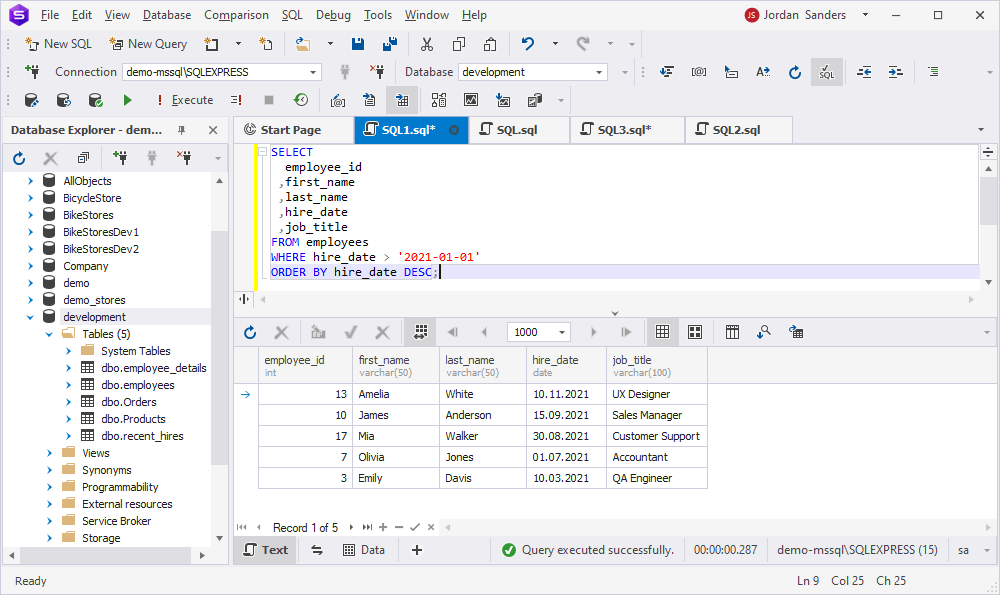
It filters the results to include only employees hired after January 1, 2021 and sorts them by hire_date in descending order using the ORDER BY clause.
Asterisk
* (asterisk) is used to get all columns and rows from a table.
Syntax:
SELECT *
FROM <table>;Parameters:
<table>: the name of the table you want to fetch all available columns and rows from
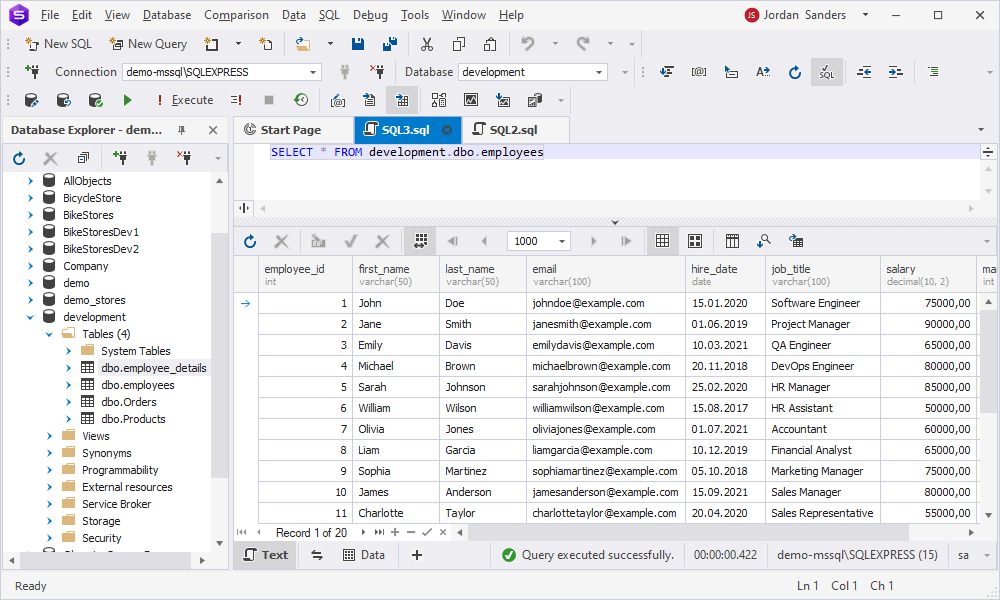
For example, retrieve all columns from the employees table by executing the SELECT query:
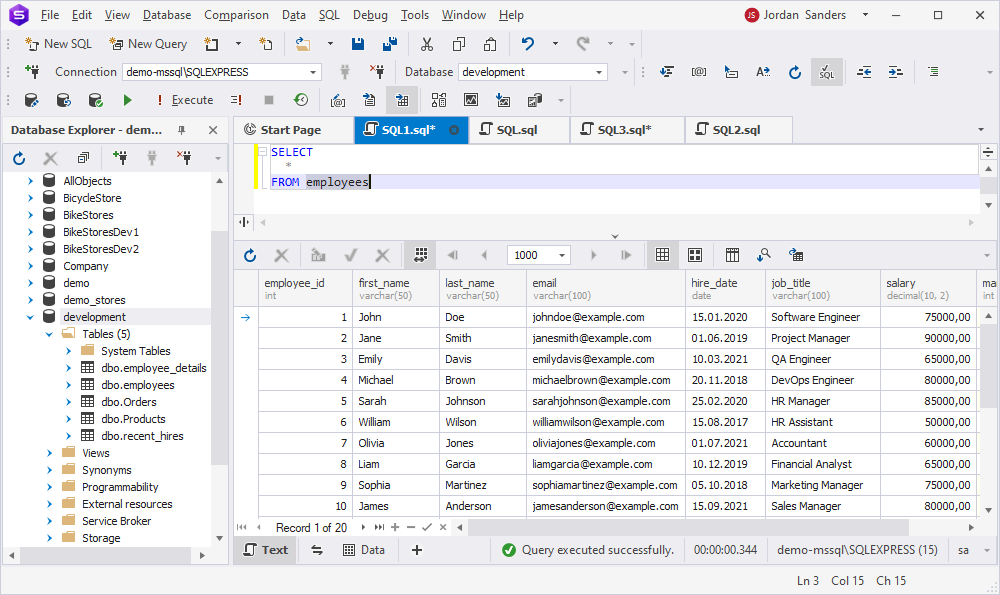
The query will return all columns that exist in the specified table.
Wondering how to optimize queries to increase execution speed? Check SQL query plans performance tuning tips.
Try it yourself with dbForge Studio
dbForge Studio for SQL Server is an ultimate tool for managing, developing, and deploying SQL Server databases. Here is a list of features that help you understand why someone might choose dbForge Studio over other tools, for example, SQL Server Management Studio:
- Intuitive and user-friendly interface that offers customizable layouts, better organization of tools, and advanced visual editors that can simplify complex tasks.
- Advanced SQL coding assistance (intelligent code completion, formatting, refactoring).
- Visual query building and data comparison tools.
- Database diagrams, schema comparison and synchronization.
- Data export/import wizards with support for 14 formats.
- Reporting and data visualization tools.
- Multi-tabbed interface for working with multiple databases and queries simultaneously.
- Automated and scheduled tasks, such as database backup and schema comparison.
- Support for different version control systems, including Git, Subversion (SVN), Microsoft Azure DevOps (Team Foundation Version Control (TFVC)), Perforce (P4), Mercurial, and SourceGear Vault.
- Dedicated customer support and regular updates.
You can try all these features and capabilities of dbForge Studio by downloading and installing the tool.
Watch this video to learn how to accelerate your daily database-related operations and boost your productivity with the ultimate tools available in dbForge Studio.
Let’s see how to retrieve data from a table using the features of dbForge Studio for SQL Server.
SELECT statements with dbForge Studio for SQL Server
With dbForge Studio for SQL Server, you can retrieve data from a table in three simple ways. Let’s review each of them.
Using the Code completion feature
1. In the SQL Editor, start typing SELECT. The suggestion list will appear.
2. Double-click SELECT:
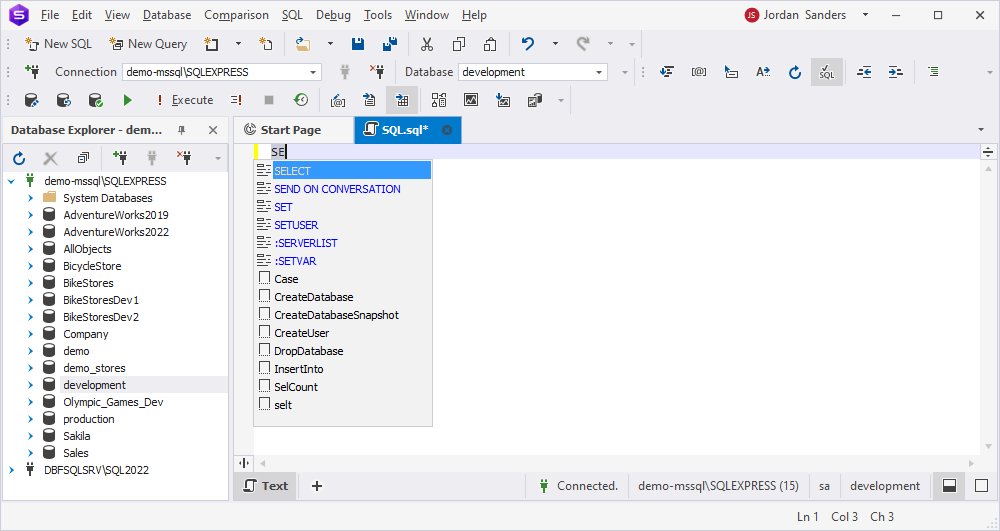
3. Fill the query and click Execute on the standard toolbar.
Using the Generate Script As option
1. In Database Explorer, right-click the necessary table and navigate to Generate Script As > SELECT > To New SQL Window:

2. In the SQL document that opens, adjust the query and click Execute on the standard toolbar.
Using the Retrieve Data option
This method allows getting all columns from a required table.
In Database Explorer, right-click the necessary table and select Retrieve Data:
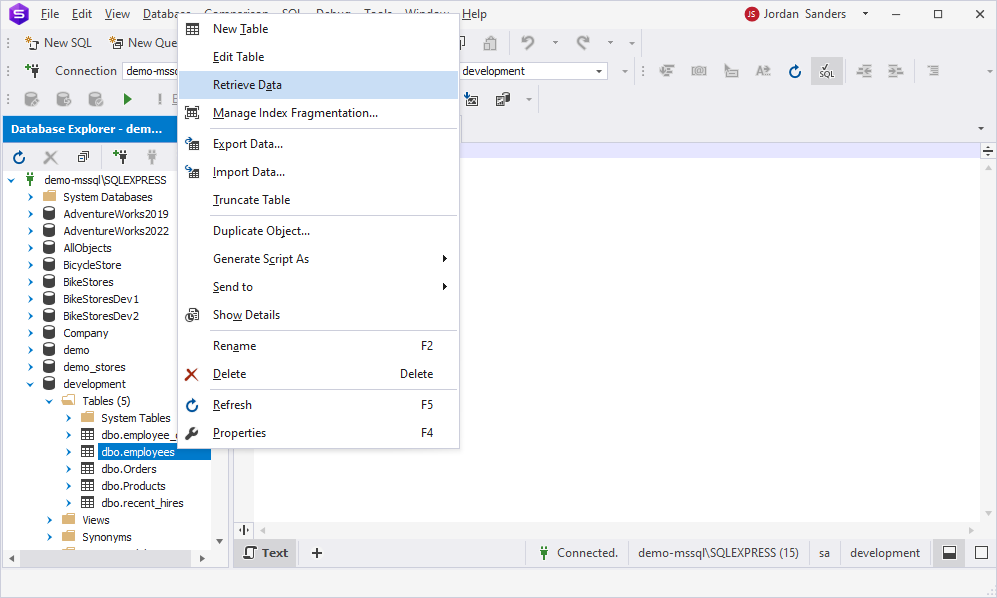
And voila, you will be able to see the data from all columns available in the table.
Further learning
- SQL Server Tutorials
- How to Run a Query in SQL
- dbForge Studio Documentation
- dbForge Studio Video Tutorials
- Devart Academy