
Consider a scenario where you already have an API live and being used by users. Let’s assume you want to enhance existing API capabilities while maintaining existing functionality. While some users may still use the older API, others prefer a version with new or improved features. So, you need a way to build and manage multiple versions of your APIs. This strategy is also known as API versioning.
This article discusses how you can implement API Versioning in ASP.NET 6 applications. In this article, we’ll connect to PostgreSQL using dotConnect for PostgreSQL which is high performance and enhanced data provider for PostgreSQL that is built on top of ADO.NET and can work on both connected and disconnected modes.

Pre-requisites
You’ll need the following tools to deal with code examples:
- Visual Studio 2022 Community Edition
- PostgreSQL database
- Postman API Client
- dotConnect for PostgreSQL
What Are We Building Here?
In this article, we’ll be writing integration tests to test APIs built using ASP.NET 6. Here are the steps we’ll follow throughout this article to accomplish this:
- What is API Versioning?
- Create an ASP.NET 6 Core Web API project in Visual Studio 2022
- Add the Devart.Data.PostgreSQL and Microsoft.AspNetCore.Mvc.Versioning NuGet packages to the project
- Configure API Versioning
- Write a simple controller and its associated classes
- Implement API Versioning
- Execute the Application and Test the Endpoints using Postman
What is API Versioning?
API versioning is a strategy used to keep track of changes to API over time. Versioning your API is a good practice when developing REST-based APIs since change is inevitable. When client requirements or demands change, you often need to implement a significant change or update in your API to cater to it, resulting in a new version of the existing API.
Keeping track of API versions is essential for providing stability and reliability. By using API versioning, developers can keep track of all the different versions they have released and ensure they can keep up with the changing requirements. You can take advantage of API Versioning to maintain backward compatibility and also deprecate earlier versions of your API if needed.
Why Is API Versioning Required?
API versioning helps maintain your API’s backward compatibility as you change it over time. By versioning your API, you can control which clients have access to which API versions and ensure that older clients continue to work with your API even as you add new features or make breaking changes.
Another benefit of API Versioning is that you will not need to force your application’s users to upgrade to a newer version. API Versioning can help avoid compatibility issues when several versions of the API are used, help improve quality and reliability and manage updates in an efficient manner.
API versioning also allows you to experiment with new features or changes without affecting all of your users at once. You can release a new API version to a subset of users, get feedback, and then roll it out more widely if it is successful. This allows you to move more quickly when making changes to your API while maintaining high stability and reliability for your users.
Create a new ASP.NET 6 Core Web API Project
In this section, we’ll learn how to create a new ASP.NET 6 Core Web API project in Visual Studio 2022.
Now, follow the steps outlined below:
- Open Visual Studio 2022.
- Click Create a new project.
- Select ASP.NET Core Web API and click Next.
- Specify the project name and location to store that project in your system. Optionally, checkmark the Place solution and project in the same directory checkbox.
- Click Next.
- In the Additional information window, select .NET 6.0 (Long-term support) as the project version.
- Disable the Configure for HTTPS and Enable Docker Support options (uncheck them).
- Since we’ll not be using authentication in this example, select the Authentication type as None.
- Since we won’t use Open API in this example, deselect the Enable OpenAPI support checkbox.
- Since we’ll not be using minimal APIs in this example, ensure that the Use controllers (uncheck to use minimal APIs) are checked.
- Leave the Do not use top-level statements checkbox unchecked.
- Click Create to finish the process.
We’ll use this project in this article.
Install NuGet Package(s) into the API Project
We’ll need to install two packages in our project. These are the dotConnect for PostgreSql and ASP.NET Core API Versioning packages. dotConnect for PostgreSQL is a high-performance data provider for PostgreSQL built on ADO.NET technology that provides a comprehensive solution for building PostgreSQL-based database applications. The ASP.NET Core API Versioning package provides built-in support for API Versioning in ASP.NET Core applications.
You can install these packages either from the NuGet Package Manager tool inside Visual Studio or, from the NuGet Package Manager console using the following command:
PM> Install-Package Devart.Data.PostgreSql
PM> Install-Package Microsoft.AspNetCore.Mvc.Versioning
Configure API Versioning
Now that the API Versioning package has been installed onto the project, the next step is to configure it. The following code shows how you can configure API Versioning in ASP.NET Core:
builder.Services.AddApiVersioning(config =>
{
    config.DefaultApiVersion = new ApiVersion(1, 0);
    config.AssumeDefaultVersionWhenUnspecified = true;
    config.ReportApiVersions = true;
});
Create the Database
You can create a database using the pgadmin tool. To create a database using this Launch this tool, follow the steps given below:
- Launch the pgadmin tool
- Expand the Servers section
- Select Databases
- Right-click and click Create -> Database…
- Specify the name of the database as Demo and leave the other options to their default values
- Click Save to complete the process
Create a database table
Select and expand the database you just created
Select Schemas -> Tables
Right-click on Tables and select Create -> Table…
The table script is given below for your reference:
CREATE TABLE Author (
	ID SERIAL PRIMARY KEY,
	FIRSTNAME VARCHAR ( 50 ) NOT NULL,
	LASTNAME VARCHAR ( 50 ) NOT NULL,
	ADDRESS VARCHAR ( 255 ) NOT NULL
);
We’ll use this database in the subsequent sections of this article to demonstrate how we can work with Integration Tests in ASP.NET Core using dotConnect for PostgreSQL.
Add a few records to the Author table
Now, run the following script in your database to insert a few records in the Author table:
INSERT INTO Author(firstname, lastname, address)
VALUES ('Joydip', 'Kanjilal', 'Hyderabad, India');

INSERT INTO Author(firstname, lastname, address)
VALUES ('Steve', 'Smith', 'Chicago, USA');

INSERT INTO Author(firstname, lastname, address)
VALUES ('Debanjan', 'Banerjee', 'London, UK');
Create the Model Class
Create a solution folder in the Solution Explorer window and name it as Models. As a next step, create a new file named Author.cs and write the following code there:
public class Author
    {
        public int Id { get; set; }
        public string FirstName { get; set; }
        public string LastName { get; set; }
        public string Address { get; set; }
    }
Create the AuthorRepository Class
The IAuthorRepository interface would look like this:
    public interface IAuthorRepository
    {
        public List<Author> GetAuthors();
    }
Note that for the sake of simplicity, we’ve only one method in the IAuthorRepository interface. The AuthorRepository class implements the GetAuthors method of the IAuthorRepository interface and encapsulates all database operations.
    public class AuthorRepository : IAuthorRepository
    {
        public List<Author> GetAuthors()
        {
            try
            {
                List<Author> authors = new List<Author>();
                using (PgSqlConnection pgSqlConnection =
                 new PgSqlConnection("User Id = postgres; Password = sa123#;" +
                 "host=localhost;database=Demo"))
                {
                    using (PgSqlCommand pgSqlCommand = new PgSqlCommand())
                    {
                        pgSqlCommand.CommandText =
                        "Select * From public.Author";
                        pgSqlCommand.Connection = pgSqlConnection;
                        if (pgSqlConnection.State !=
                        System.Data.ConnectionState.Open)
                            pgSqlConnection.Open();
                        using (PgSqlDataReader pgSqlReader =
                         pgSqlCommand.ExecuteReader())
                        {
                            while (pgSqlReader.Read())
                            {
                                Author author = new Author();
                                author.Id =
                                 pgSqlReader.GetInt32(0);
                               author.FirstName =
                                 pgSqlReader.GetString(1);
                               author.LastName =
                                 pgSqlReader.GetString(2);
                               author.Address =
                                 pgSqlReader.GetString(3);
                            }
                        }
                    }
                }
                return authors;
            }
            catch
            {
                throw;
            }
        }
    }
Create the AuthorController Class
Next, select and right-click on the Controllers solution folder and create a new controller class called AuthorController with the following code in there:
    [Route("api/[controller]")]
    [ApiController]

    public class AuthorController : ControllerBase
    {
        private readonly IAuthorRepository _authorRepository;
        public AuthorController(IAuthorRepository AuthorRepository)
        {
            _authorRepository = AuthorRepository;
        }

        [HttpGet(“GetAuthors”)]
        public List<Author> GetAuthors()
        {
            return _authorRepository.GetAuthors();
        }
    }
An instance of IAuthorRepository is injected into the constructor of AuthorController. Adding an IAuthorRepository instance to the services container requires the following code in the Program.cs file:
builder.Services.AddScoped<IAuthorRepository, AuthorRepository>();When you run this application and invoke the HTTP Get endpoint of the AuthorController, all the records of the Author table will be returned.
The Need for a New Version
Now, suppose you need data for only the Id, FirstName and LastName fields of the Author entity while preserving the existing functionality. In other words, you don’t need data pertaining to the Address field of the Author entity anymore but keep the existing functionality intact. Enter API Versioning.
Let us now update the source code to adapt to the required changes. The following source code shows the AuthorNew class which is a replica of the Author class but sans the Address field:
public class AuthorNew
    {
        public int Id { get; set; }
        public string FirstName { get; set; }
        public string LastName { get; set; }
    }
The following code snippet shows the IAuthorRepository interface with an additional method named GetAuthorsNew:
 public interface IAuthorRepository
    {
        public List<Author> GetAuthors();
        public List<AuthorNew> GetAuthorsNew();
    }
As the name suggests, the GetAuthorsNew method of the AuthorRepository class returns a list of AuthorNew instances:
public List<AuthorNew> GetAuthorsNew()
        {
            try
            {
                List<AuthorNew> authors = new List<AuthorNew>();
                using (PgSqlConnection pgSqlConnection =
                 new PgSqlConnection("User Id = postgres; Password = sa123#;" +
                 "host=localhost;database=Demo;"))
                {
                    using (PgSqlCommand pgSqlCommand = new PgSqlCommand())
                    {
                        pgSqlCommand.CommandText =
                        "Select * From public.Author";
                        pgSqlCommand.Connection = pgSqlConnection;
                        if (pgSqlConnection.State !=
                        System.Data.ConnectionState.Open)
                            pgSqlConnection.Open();
                        using (PgSqlDataReader pgSqlReader =
                         pgSqlCommand.ExecuteReader())
                        {
                            while (pgSqlReader.Read())
                            {
                                AuthorNew author = new AuthorNew();
                                author.Id =
                                  pgSqlReader.GetInt32(0);
                                author.FirstName =
                                  pgSqlReader.GetString(1);
                                author.LastName =
                                  pgSqlReader.GetString(2);
                                author.Address =
                                  pgSqlReader.GetString(3);
                            }
                        }
                    }
                }
                return authors;
            }
            catch
            {
                throw;
            }
        }
[HttpGet("GetAuthorsNew")]
public List<AuthorNew> GetAuthorsNew()
{
return _authorRepository.GetAuthorsNew();
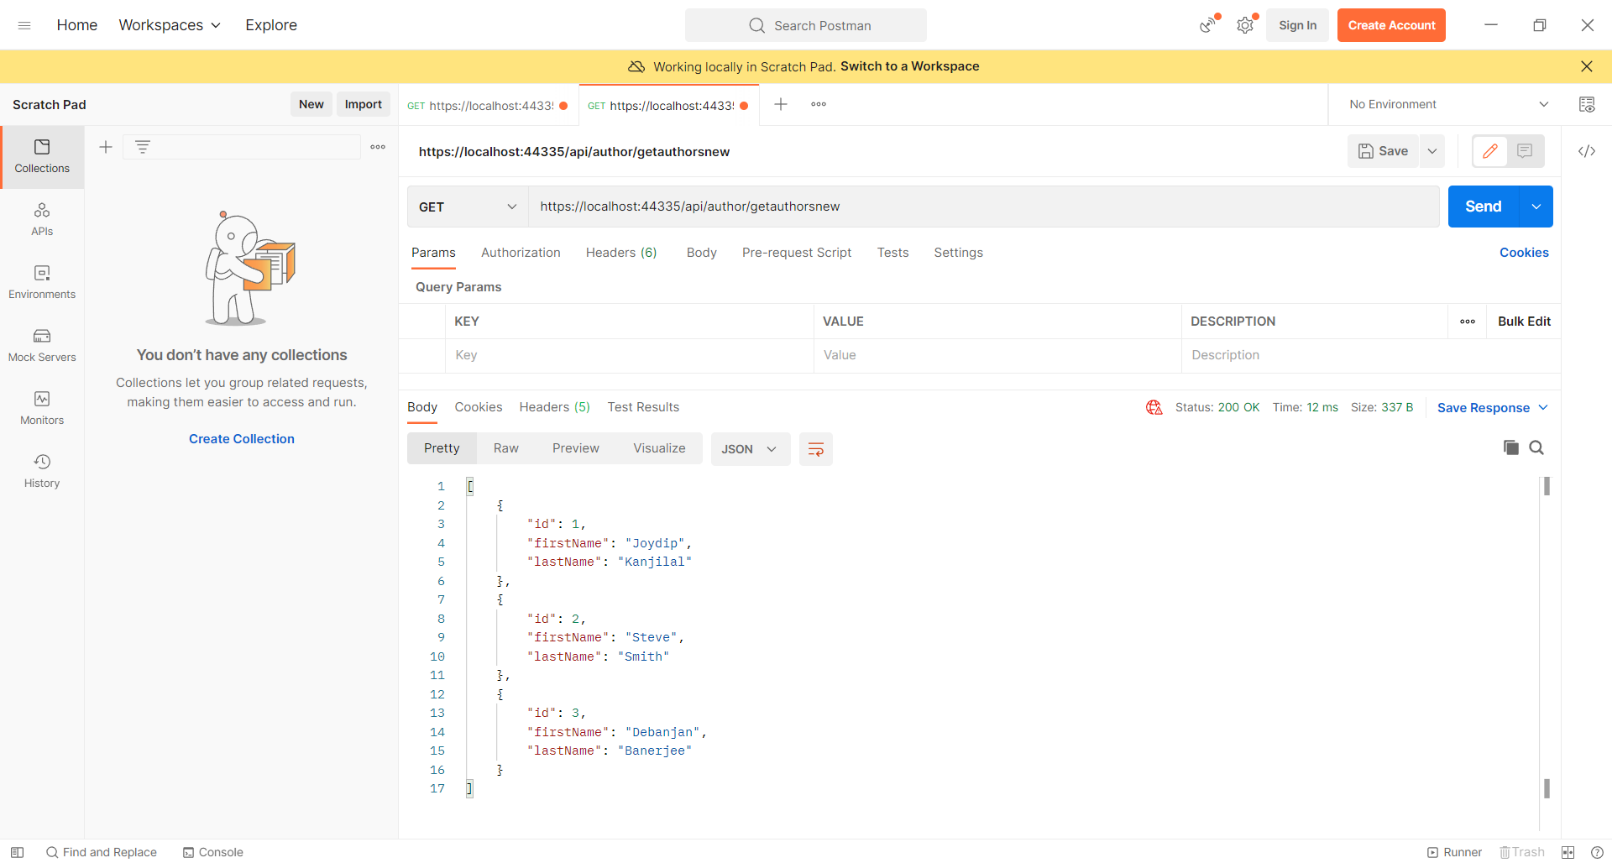
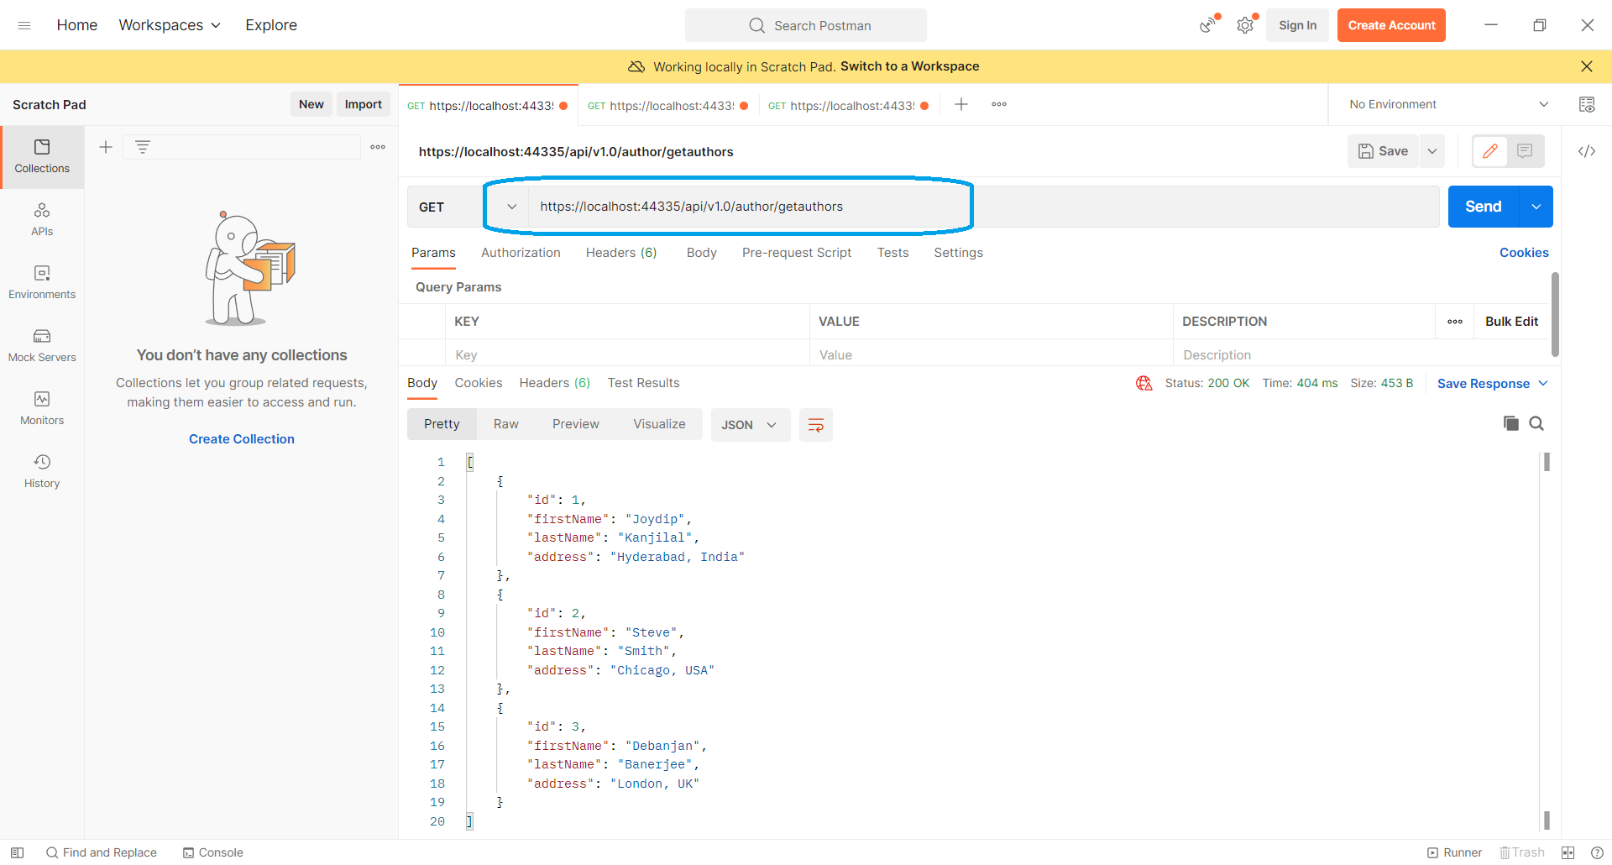
}Now, if you run the application and invoke the GetAuthors endpoint using an API client such as Postman, the list of authors will be displayed:

Similarly, if you invoke the GetAuthorsNew endpoint, the list of instances of the AuthorNew class will be displayed:
Specifying Versioning Information in ASP.NET Core
There are several ways in which you can use versioning in ASP.NET Core applications:
Using Versioning in the Controllers
The following code snippet shows how you can use API Versioning in your controllers.
  [Route("api/[controller]")]
    [ApiController]
    [ApiVersion("1.0")]
    [ApiVersion("1.1")]
    [ApiVersion("2.0")]

    public class AuthorController : ControllerBase
    {
        //Code omitted for brevity
    }
Using API Versioning in Action Methods
To use API Versioning in your action methods, you can use the following code:
   [HttpGet("GetAuthorsNew")]
        [MapToApiVersion("2.0")]
        public List<AuthorNew> GetAuthorsNew()
        {
            return _authorRepository.GetAuthorsNew();
        }
Passing Version Information in ASP.NET Core
Once versioning has been applied on your controllers and/or action methods, you should pass the versioning information to invoke the endpoints.
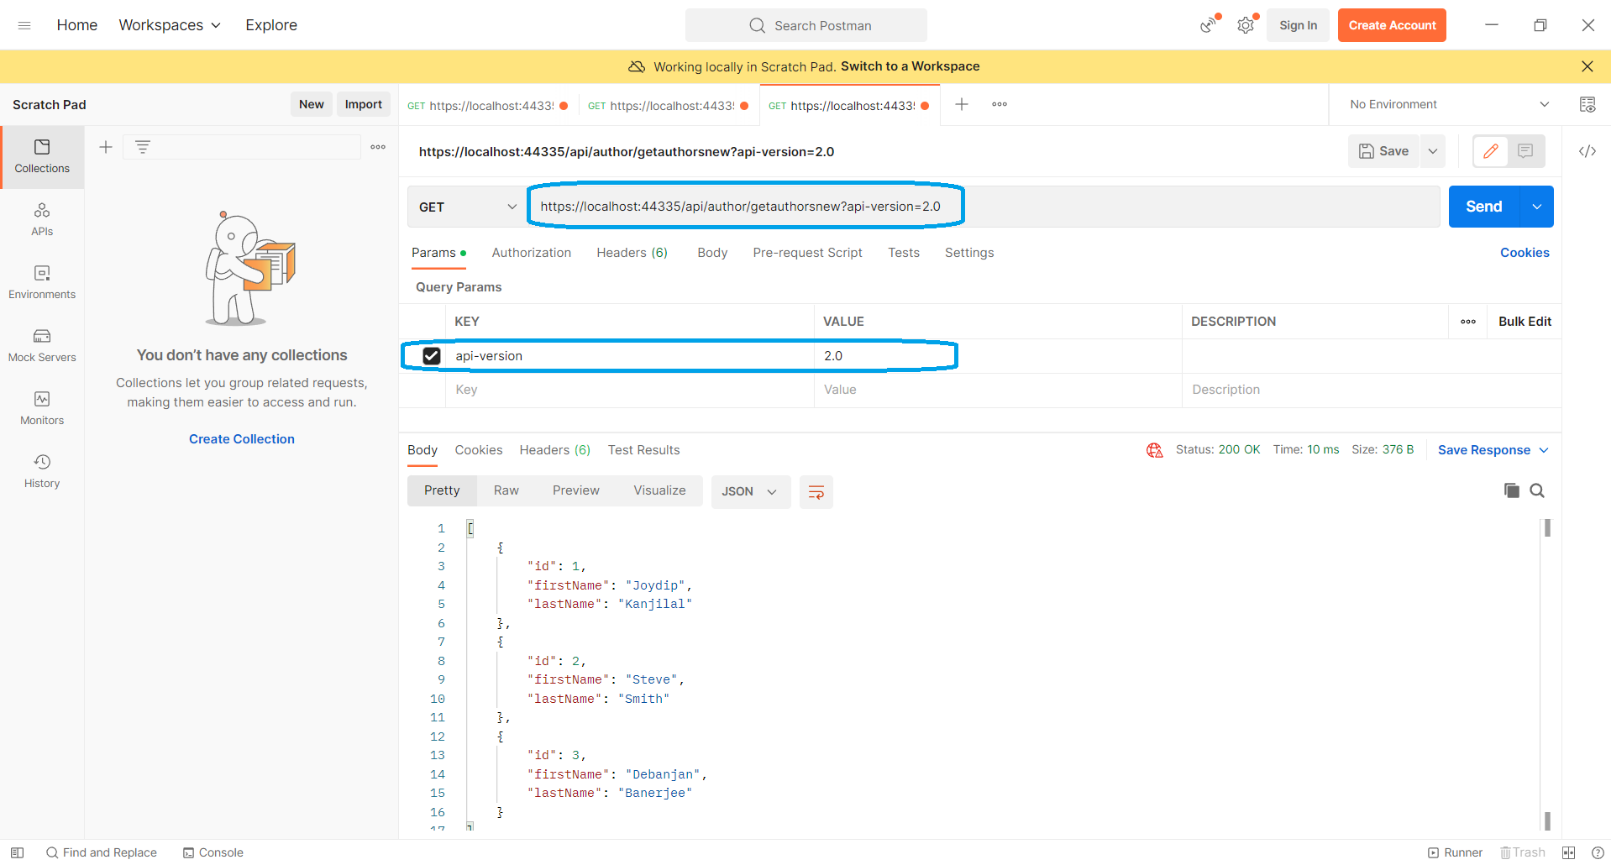
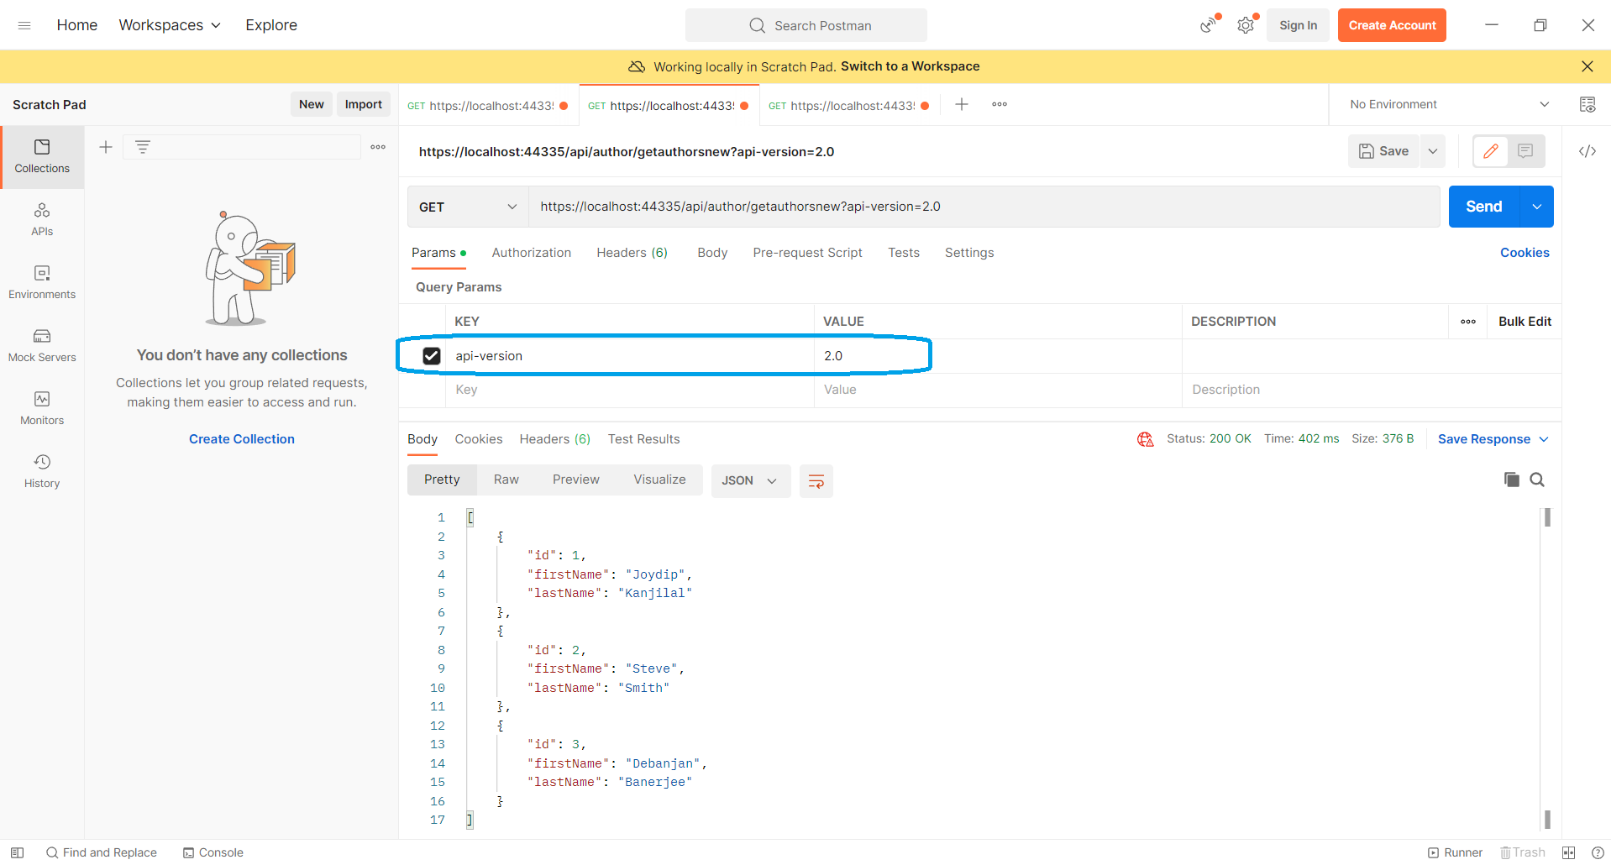
Passing Version Information via QueryString
Note that the GetAuthorsNew action method has been mapped to Api Version 2.0. The DefaultApiVersion has been set as 1.0 in the Program.cs file.
Hence, if you’ve not passed this version when calling the endpoint, the following error will be displayed:
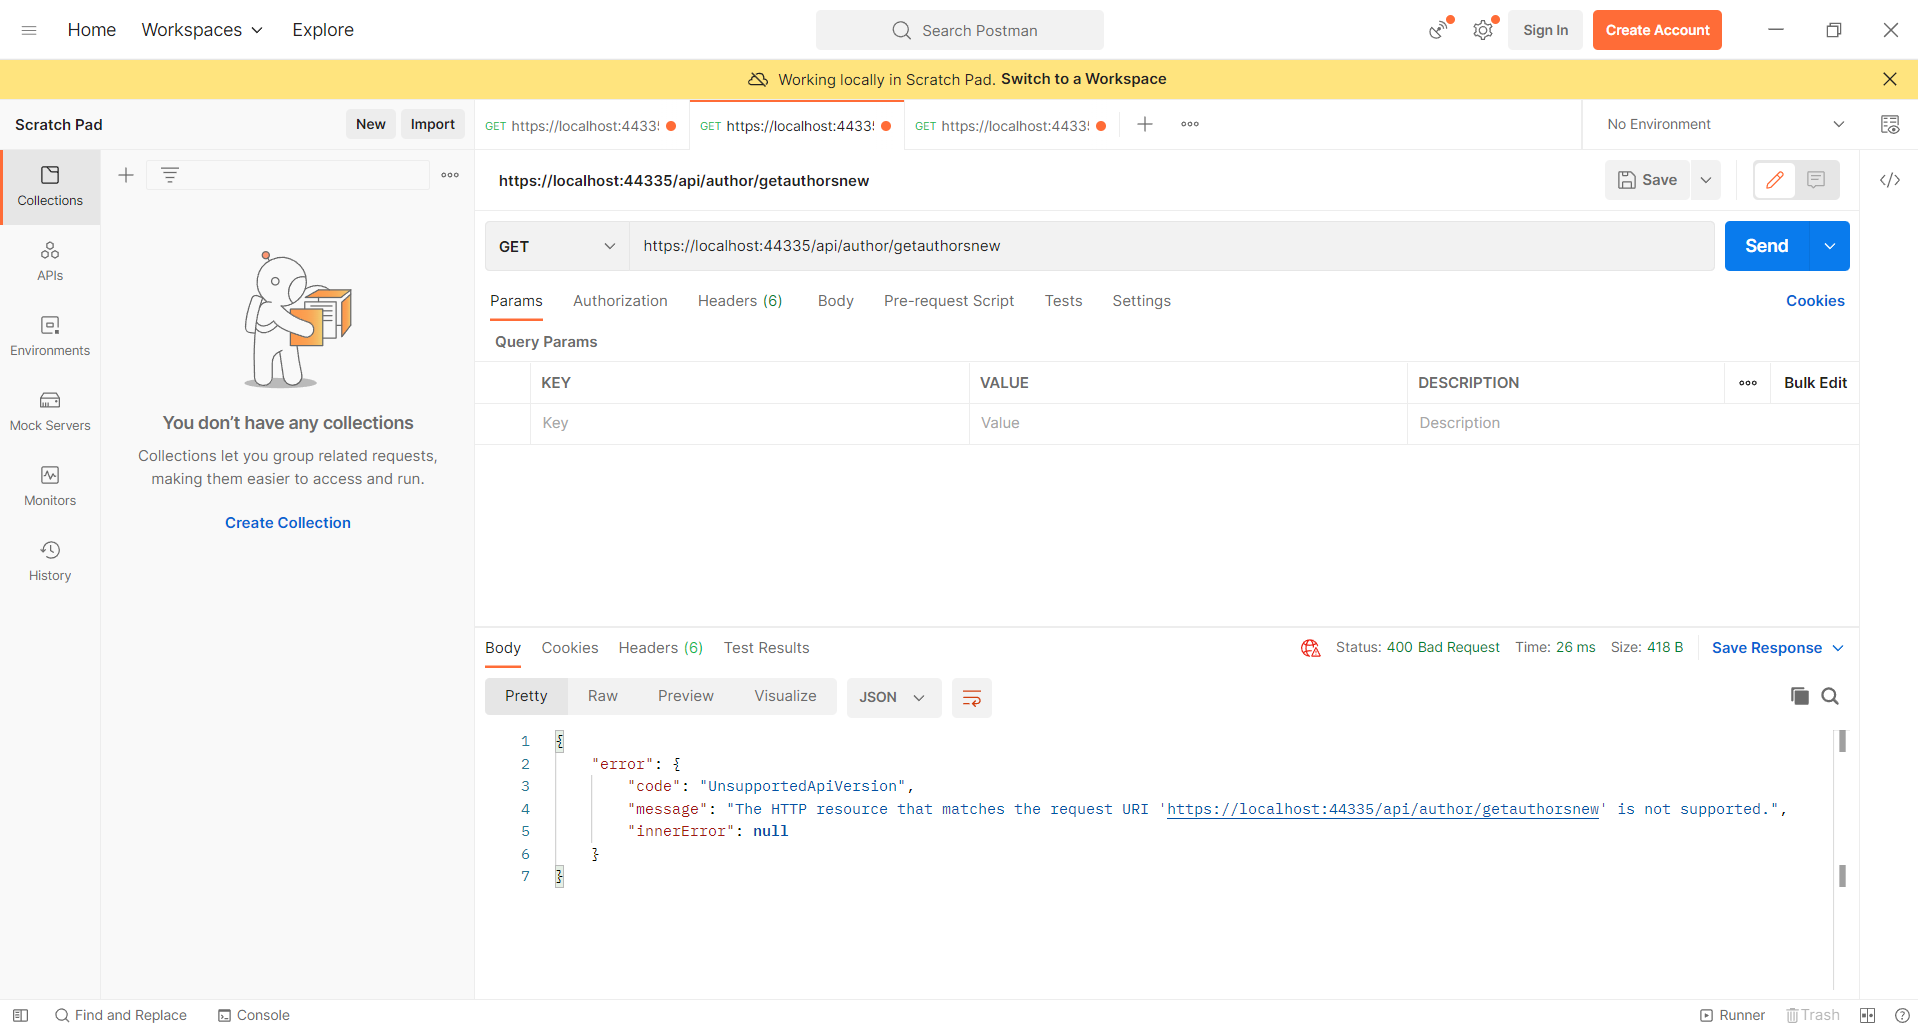
To resolve this, you should pass the correct version i.e., 2.0 when calling this endpoint:
Passing Version Information via HTTP Headers
You can also pass version information via HTTP Headers. To do this, simply add a key named API-version and set the value as 2.0 (since this is the version with which you’ve mapped the action method) as shown here:
Passing Version Information via URLs
You can also pass version information via the URL as part of the route. The following code shows how you can use this versioning strategy – note how the route information is specified in the controller:
[Route("api/v{version:apiVersion}/[controller]")]
[ApiController]
[ApiVersion("1.0")]
[ApiVersion("1.1")]
[ApiVersion("2.0")]
public class AuthorController : ControllerBase
{
      //Code omitted for brevity
}
Summary
Whether you’re building a public or private API, understanding the basics of versioning is essential for successful API development and deployment. With proper planning and implementation, you can ensure that all versions of your API remain relevant and meet changing requirements and customers’ demands.
When building APIs, you must remember that change is inevitable in APIs since they have to accommodate changes in customer needs over time. As a result, you must have a strategy that can cope with the changes you will be experiencing.