DataSnap technology overview
The DataSnap technology (previously known as MIDAS) allows development of client–server applications, specifically applications using databases, that work via Internet, local network, or on a local PC. For connection, DataSnap allows using the TCP/IP protocol, as well as HTTP and HTTPS. For backward compatibility, COM/DCOM support also remains.
Besides, DataSnap allows development of applications for both PC and mobile devices based on iOS, Android and Windows Phone.
In addition, DataSnap supports secure connection capabilities using JSON, as well as use of filters for data encryption and compression for enhanced security.
This technology also supports the asynchronous method of all client applications notification about changes made on a server.
DataSnap is available and allows multi–tier application development in both Delphi and C++Builder.
Three–tier databases overview
Three–tier architecture involves the following application components:
Client — an interface component (usually graphical), that introduces the first tier, the end–user application itself. The first tier mustn’t be related to the database directly, be loaded by the main business–logic and store application status.
Elementary business logic should be and usually is introduced at the first tier: authorization interface, encryption algorithms, checking for input data validity, simple operations (sorting, grouping, values count) with data already stored on the server.
Application server is represented at the second tier. The second tier includes the major business logic part. And it excludes fragments, that are exported to clients and the ones implemented at the DB server level: stored procedures and triggers.
DB server provides data storing and is introduced at the third tier. Usually, it is a relational or object–oriented DBMS. While the third tier is a database along with stored procedures, triggers, and a scheme describing the application in terms of relational model, the second tier is designed as program interface binding client components with the database application logic.
In the simplest configuration, the application server can be combined with the database server physically on the same computer, to which one or more clients connect via the network.
In the “ideal” configuration, the database server is located on a dedicated computer, to which one or more application servers are connected via the network, to which, in turn, clients are connected.
Application server structure
Application server encapsulates most of the business logic of the distributed application and provides client access to the database.
The main part of the application server is the remote data module.
Firstly, like a normal data module, it is a platform for placement of non–visual data access components and provider components. Connection components, transactions, and components, that encapsulate datasets, placed in the remote data module, provide three–tier applications with connection to the database server. It can be such sets of components as UniDAC, ODAC, SDAC, MyDAC, IBDAC, PgDAC, LiteDAC.
Secondly, the remote data module implements the main features of the application server based on providing customers with the IAppServer interface or its descendant. For this, the remote data module must contain the required number of TDataSetProvider provider components. These components transfer data packages to the client application, or rather to TClientDataSet components, and also provide access to the methods of the interface. Each component encapsulating the dataset designed for transfer to the client must be associated with a provider component.
Client application structure
The client application in the three–tier model should have only a minimal set of necessary functions, delegating the majority of data processing operations to the application server. Above all, the remote client application must provide access to the application server.
The DataSnap connection components are used for this. They provide the IAppServer interface used by provider components on the server side and by TClientDataSet components on the client side for data packages transfer. To work with datasets, the TClientDataSet components are used in the data caching mode.
In their structure a client application and a database application are alike. Client connections to the application server are performed by the DataSnap components. These components interact with the remote data module, included to the server, using the IAppServer interface methods.
Also, in the client application, there can be used additional, defined by a developer, methods of the remote data module interface, inherited from the IAppServer interface. Connection to the application server is provided by MIDAS.DLL, required on the client computer.
Like a normal DB application, the distributed multi–tier application client should contain components encapsulating datasets, that are associated with visual data display components. Obviously, the server dataset should be copied by the client application to a local buffer. Thereat, an effective procedure of data loading by comparably small portions should be used, that allows to significantly reduce the load on transfer channel between application client and server.
Data caching and encryption in the client application is achieved by the specialized component — TClientDataSet, the remote ascendant of which is TDataSet. Besides methods inherited from descendants, the TClientDataSet class encapsulates a number of additional functions, that simplify the data control. To retrieve the server dataset, the TClientDataSet component interacts with the TDataSetProvider component using the IProviderSupport interface methods.
Application server creation using UniDAC
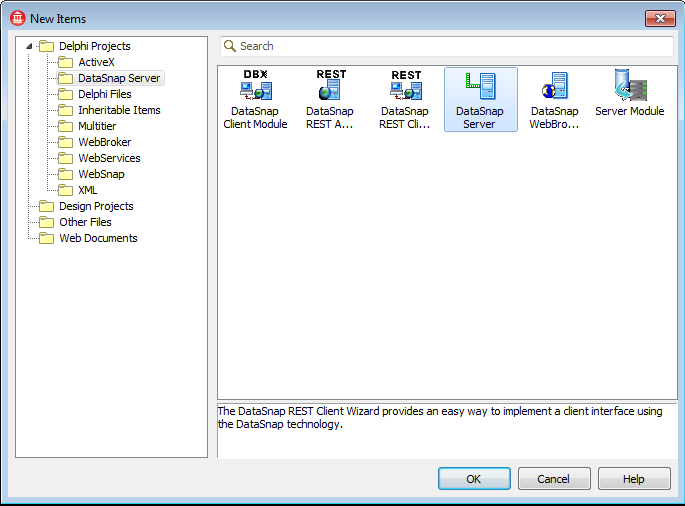
1. Create a new project:
Main menu –> File > New > Other –> Delphi Projects –> DataSnap Server –> DataSnap Server;
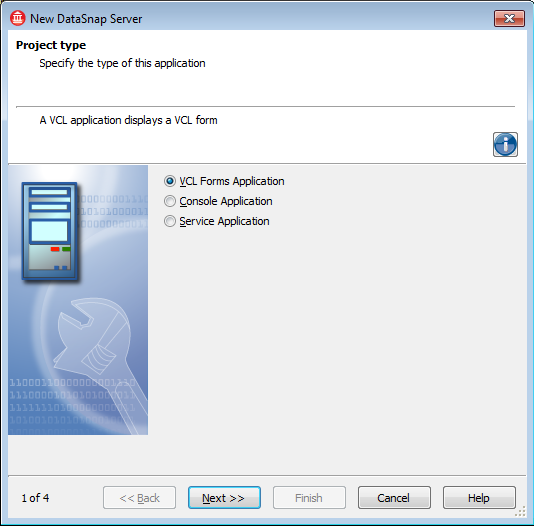
2. Next, select the server application type. It can be a window application (ideal at the stage of development and debugging), a console application or a service (the most suitable option for the final release). Select VCL Forms Application.
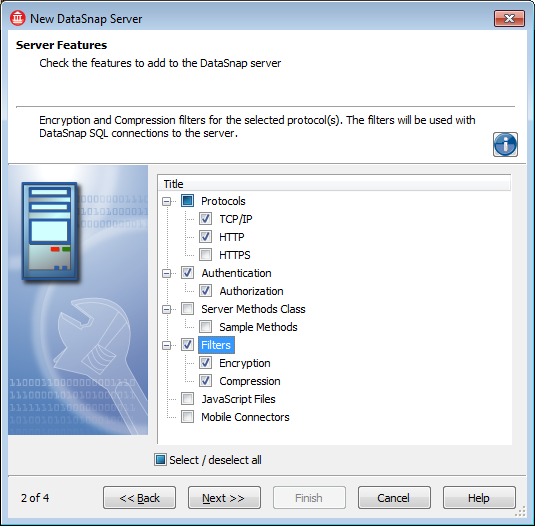
3. Now the future server characteristics should be specified. These are the used protocols (TCP/IP, HTTP, HTTPS), filters for processing client–to–server sent and received data, that are used for data encryption and compression. For these filters work on the PC, the libeay32.dll and ssleay32.dll libraries must be present on the client and server, they can be found in the %PROGRAMFILES%EmbarcaderoRAD StudioXX.0binSubVersion directory.
The next are authentication and authorization. The first procedure takes place at the stage of client connection to the server, and the second one — when invoking remote methods (server class methods).
If to check Authentication, then the TDSAuthenticationManager component will be added to the server container responsible for authentication (as well as for authorization).
The next option (Server Method Class) allows to create a module, in which the server methods will be stored.
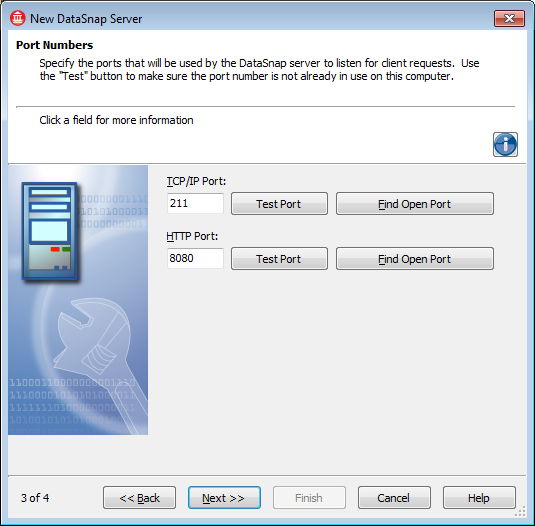
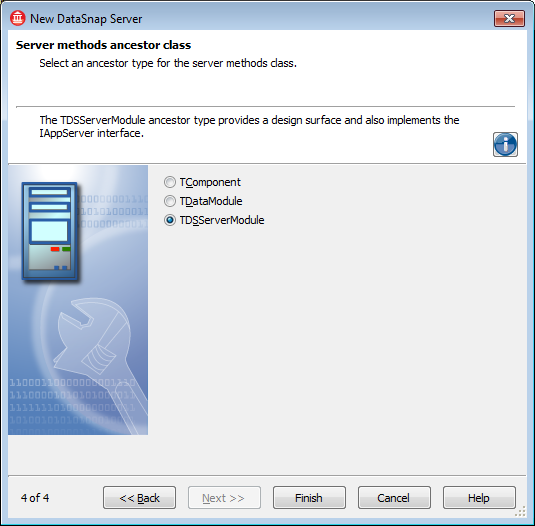
4. Now the wizard offers to set the numbers of server ports for selected protocols.
5. Next the parent object class should be selected, which will include server methods. Select TDSServerModule
6. The newly created project contains three *.pas files.
- uServer.pas — the main server form;
- uServerMethods.pas — contains server methods;
- uServerContainer.pas — contains elements for the DataSnap server implementation.
After all the performed steps, the server container must contain 5 components. Short description of these components:

- DSServer — controls data transfer and server classes;
- DSServerClass — defines the server class with public methods invoked by the client application;
- DSHTTPService — provides access to the server via the HTTP protocol;
- DSAuthenticationManager — allows users authentication and authorization on connection to the server and invoking of server methods;
- DSTCPServerTransport — provides access to the server via the TCP/IP protocol.
Set the HideDSAdmin property of the TDSServer component to True, that will allow to hide the DSAdmin class administrative server methods.
And set the Autostart property to False (the server mustn’t run automatically).
Set the LifeCycle property of the TDSServerClass component to the Session property, in this case, a unique session is created for each user connection, and as a result, its own class example is provided for each connection.
Create an OnUserAuthenticate event in the TDSAuthenticationManager component, where user will be verified when attempting to connect to the server.
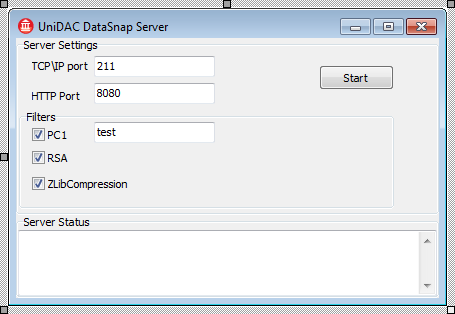
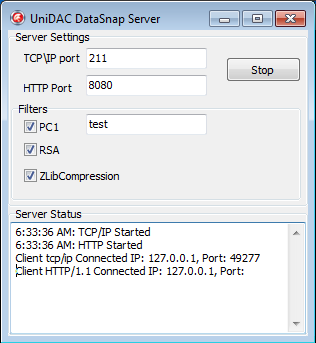
On the main form of the server place components responsible for server settings and start, as well as for displaying short event log: server start/stop, client connection/disconnection. Much more detailed logs can be kept in the real application, but we won’t go into details here. So place the components onto the form as shown in the figure. Before running the server, the ports must be specified, that will listen to the server (and to which the client will connect), for the TCP/IP and HTTP protocols, as well as using encryption and compression should be set for transferring information between the client and server.
Write a handler of the OnClick event for the Start button in the following way:
procedure TfMainServer.btStartClick(Sender: TObject);
begin
  if not ServerContainer.DSServer.Started then begin
    ServerContainer.DSTCPServerTransport.Port := StrToInt(edTCPIPPort.Text);
    ServerContainer.DSHTTPService.DSPort := StrToInt(edHTTPPort.Text);
    ServerContainer.DSServer.Start;
    mStatus.Lines.Add(Format('%s: TCP/IP Started', [TimeToStr(now)]));
    ServerContainer.DSHTTPService.Start;
    mStatus.Lines.Add(Format('%s: HTTP Started', [TimeToStr(now)]));
    btStart.Caption := 'Stop';
  end
  else begin
    ServerContainer.DSHTTPService.Stop;
    mStatus.Lines.Add(Format('%s: HTTP Stoped', [TimeToStr(now)]));
    ServerContainer.DSServer.Stop;
    mStatus.Lines.Add(Format('%s: TCP/IP Stoped', [TimeToStr(now)]));
    btStart.Caption := 'Start';
  end;
end;
On this button click, the selected parameters will be set and both servers will be started, on the second click — servers will be stopped.
In the TDSServer component events, implement the OnConnect and OnDisconnect events to log clients connection/disconnection to/from the server and display the client info.
procedure TServerContainer.DSServerConnect(DSConnectEventObject: TDSConnectEventObject);
var
  ci: TDBXClientInfo;
begin
  ci := DSConnectEventObject.ChannelInfo.ClientInfo;
  fMainServer.mStatus.Lines.Add(Format('Client %s Connected IP: %s, Port: %s', [ci.Protocol, ci.IpAddress, ci.ClientPort]));
end;

procedure TServerContainer.DSServerDisconnect(DSConnectEventObject: TDSConnectEventObject);
var
  ci: TDBXClientInfo;
begin
  ci := DSConnectEventObject.ChannelInfo.ClientInfo;
  fMainServer.mStatus.Lines.Add(Format('Client %s Disconnected IP: %s, Port: %s', [ci.Protocol, ci.IpAddress, ci.ClientPort]));
end;
Since our server is to interact with the DB, we should set up connection with DB using UniDAC, as well as implement queries and procedures for work with data.
The required DB objects should be created on the server, there are scripts for creating and filling the needed objects below. We will use a PostgreSQL DB in this sample, but, since UniDAC is a set of universal components, this project can work with any DB.
CREATE TABLE dept
(
  deptno serial NOT NULL,
  dname character varying(14),
  loc character varying(13),
  cnt integer,
  CONSTRAINT "PK_MASTER" PRIMARY KEY (deptno)
);

CREATE TABLE emp
(
  empno serial NOT NULL,
  ename character varying(10),
  job character varying(9),
  mgr integer,
  hiredate timestamp without time zone,
  sal real,
  comm real,
  deptno integer NOT NULL,
  CONSTRAINT "PK_DETAIL" PRIMARY KEY (deptno, empno)
);

CREATE TABLE users
(
  id numeric NOT NULL,
  username character(20) NOT NULL,
  passwd character(20) NOT NULL,
  CONSTRAINT pk_users_id PRIMARY KEY (id),
  CONSTRAINT uq_users_name UNIQUE (username)
);

CREATE OR REPLACE FUNCTION sp_check_user(a_username character DEFAULT ''::bpchar, a_passwd character DEFAULT ''::bpchar)
  RETURNS boolean AS
$BODY$BEGIN
IF EXISTS (SELECT 1 FROM users WHERE username = a_username AND passwd = a_passwd) THEN
RETURN True;
ELSE
RETURN False;
END IF;
END;
$BODY$
  LANGUAGE plpgsql;

CREATE OR REPLACE FUNCTION sp_dept_modify(a_deptno numeric DEFAULT (-1), a_dname character DEFAULT ''::bpchar, a_loc character DEFAULT ''::bpchar, a_op_type numeric DEFAULT 0)
  RETURNS void AS
$BODY$begin
  case a_op_type
    when 0 then delete from dept where deptno = a_deptno;
    when 1 then insert into dept (deptno, dname, loc) values (a_deptno, a_dname, a_loc);
    else update dept set dname = a_dname, loc = a_loc where deptno = a_deptno;
  end case;
end;$BODY$
  LANGUAGE plpgsql;

CREATE OR REPLACE FUNCTION sp_emp_modify(a_empno numeric DEFAULT (-1), a_ename character DEFAULT ''::bpchar, a_job character DEFAULT ''::bpchar, a_mgr numeric DEFAULT 0, a_hiredate timestamp without time zone DEFAULT (now())::timestamp without time zone, a_sal numeric DEFAULT 0, a_comm numeric DEFAULT 0, a_deptno numeric DEFAULT (-1), a_op_type numeric DEFAULT 0)
  RETURNS void AS
$BODY$begin
  case a_op_type
    when 0 then delete from emp where empno = a_empno;
    when 1 then insert into emp (empno, ename, job, mgr, hiredate, sal, comm, deptno) values (a_empno, a_ename, a_job, a_mgr, a_hiredate, a_sal, a_comm, a_deptno);
    else update emp set ename = a_ename, job = a_job, mgr = a_mgr, hiredate = a_hiredate, sal = a_sal, comm = a_comm where empno = a_empno;
  end case;
end;$BODY$
  LANGUAGE plpgsql;
After creation of DB objects, we should place Universal Data Access Components into the uServerMethods module.
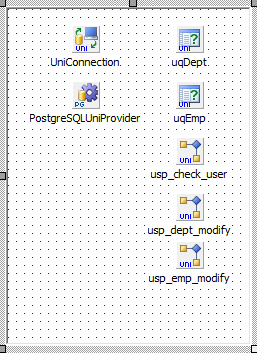
- UniConnection: a component for connection to the DB;
- UniQuery: a component for SQL commands execution and generating the result DataSet;
- UniStoredProc: a component for invoking stored procedures (in some DBs, for example SQLite, stored procedures are not supported, therefore another way of data modifying should be chosen in such DBs);
- PostgreSQLUniProvider: a component implementing interaction with the PostgreSQL server. If using another DB, an appropriate provider should be placed onto the form.
The following properties should be set in UniConnection to connect to the DB:
- Provider: an appropriate DB provider, PostgreSQL in this particular case;
- Server: the name or IP of the PC, on which the PostgreSQL server is installed;
- Port: the PostgreSQL port number, 5432 by default;
- Username, Password: the PostgreSQL user credentials;
- Database: the name of the database on the chosen server, where our objects are created, Postgres by default;
There also can be set additional parameters, such as Schema, Pooling, Protocol, SSL, and others, that depend on the server settings and affect the connection mode. The full description of all the properties and options can be found in the UniDAC documentation.
The tremendous advantage of UniDAC in contrast to other data access components is the fact that UniDAC allows working with the most widespread DBs in the Direct mode, that means no need to install any additional DB clients and use client libraries, since it works directly via the TCP/IP protocol.
After setting all the parameters, to check connection, the Connected property should be set to True — if there is no error, then all connection parameter settings are correct, and we can proceed configuring other components.
The components can be configured with both Object Inspector and Connection Editor, that can be invoked by double–click on the UniConnection component (this applies to other Universal Data Access Components as well).
The following components to be configured are UniQuery components, that run queries to our created tables and generate the result dataset sent to the client. These components has the main property — SQL, in which the SQL query is written. Since we have two tables in the DB, we have to use two UniQuery components.
In the first TUniQuery named uDept write a query to retrieve data from the Dept table:
SELECT * FROM DEPT
In the second TUniQuery named uEmp write a query to retrieve data from the Emp table:
SELECT * FROM EMP WHERE DEPTNO = :DEPTNO
Since the Emp table has Master–Detail relations (one–to–many) with the Dept table, we have to limit the fetch from the Emp table with the data corresponding to the current record in the Dept table. For this, the query contains an additional Where condition, by means of which data will be filtered.
Technically, Master–Detail relationship can be implemented in the client application as well, the question, where the relationship should be implemented (on the client or on the server), depends on the aims and task of a particular application, data volume, quality and size of a data channel, etc.)
To modify data in both tables, we will use stored procedures, which scripts are provided above.
Certainly, in real business applications these procedures are much more complex, however, to demonstrate UniDAC and DataSnap capabilities, these primitive procedures will be enough. For work with stored procedures, the UniStoredProc component is used, where the procedure name must be specified. Place two of such components onto the form with the names usp_dept_modify and usp_emp_modify to modify the Dept and Emp tables respectively. In the StoredProcName property set the procedure names sp_dept_modify and sp_emp_modify respectively. A query to invoke these procedures will be automatically generated, as well as appropriate parameters will be added for each procedure.
In addition, as we decided to implement user authentication when connecting to the application server, we need one more procedure, that will compare the credentials entered by a user with the ones stored on the server. Place one more UniStoredProc component (usp_check_user) onto the form and set its StoredProcName property to sp_check_user. This procedure will be used in the OnUserAuthenticate event for credentials verification — if invalid, user will be refused to connect to the server.
Enter the following code into the OnUserAuthenticate event:
ServerMethods.usp_check_user.ParamByName('a_username').AsString := User;
ServerMethods.usp_check_user.ParamByName('a_passwd').AsString := Password;
ServerMethods.usp_check_user.Execute;
valid := ServerMethods.usp_check_user.ParamByName('result').AsBoolean;
The parameter has a boolean value and is responsible for authentication. If the result of the sp_check_user procedure execution is True, this means the credentials are correct and the client will connect to the server, if False — no connection will be established.
Now we need to implement methods, that will return the datasets generated in UniQuery to the client, and the methods, that the client will use to modify data. In order for these methods to be available to the client, they must be declared in the Public section of the TServerMethods class, in the uServerMethods module. The following is these methods declaration:
function GetDept: TDataSet;
function GetEmp(DeptNo: integer = -1): TDataSet;
procedure DeptModify(DeptNo: integer = -1; DName: string = ''; Loc: string = ''; op_type: integer = 0);
procedure EmpModify(Empno: integer = -1; EName: string = ''; Job: string = ''; Mgr: integer = 0; HireDate: TDateTime = 0; Sal: double = 0; Comm: double = 0; Deptno:integer = -1; op_type: integer = 0);
procedure EmpModify(Empno: integer = -1; EName: string = ''; Job: string = ''; Mgr: integer = 0; HireDate: TDateTime = 0; Sal: double = 0; Comm: double = 0; Deptno:integer = -1; op_type: integer = 0);
Consider implementation of the methods.
This method executes the query specified in uqDept and returns the generated dataset to the client with data from the Dept table.
function TServerMethods.GetDept: TDataSet;
begin
  uqDept.Close;
  uqDept.Open;
  Result := uqDept;
end;
This method executes the query specified in uqEmpand returns the generated dataset to the client with data from the Emp table. When requesting this method from the client, a corresponding DEPTNO number will be specified to be used in the where condition for filtering employees by a required department.
function TServerMethods.GetEmp(DeptNo: integer): TDataSet;
begin
  uqEmp.Close;
  uqEmp.ParamByName('DEPTNO').AsInteger := DeptNo;
  uqEmp.Open;
  Result := uqEmp;
end;
This method is designed for modifying data in the Dept table, and it invokes the created procedure. To simplify the sample, one procedure is created for each DML (INSERT, UPDATE, DELETE) operation, that will run an appropriate operation dependently on the op_type parameter set in the client when invoking the server method, dependently on what we want to do: add, remove or edit data.
procedure TServerMethods.DeptModify(DeptNo: integer; DName: string;
  Loc: string; op_type: integer);
begin
  usp_dept_modify.ParamByName('a_deptno').AsInteger := DeptNo;
  usp_dept_modify.ParamByName('a_dname').AsString := DName;
  usp_dept_modify.ParamByName('a_loc').AsString := Loc;
  usp_dept_modify.ParamByName('a_op_type').AsInteger := op_type;
  usp_dept_modify.Execute;
end;
This method is similar to the previous one, but for the Emp table.
procedure TServerMethods.EmpModify(Empno: integer; EName, Job: string;
  Mgr: integer; HireDate: TDateTime; Sal, Comm: double; Deptno, op_type: integer);
begin
  usp_emp_modify.ParamByName('a_empno').AsInteger := Empno;
  usp_emp_modify.ParamByName('a_ename').AsString := EName;
  usp_emp_modify.ParamByName('a_job').AsString := Job;
  usp_emp_modify.ParamByName('a_mgr').AsInteger := Mgr;
  usp_emp_modify.ParamByName('a_hiredate').AsDateTime := HireDate;
  usp_emp_modify.ParamByName('a_sal').AsFloat := Sal;
  usp_emp_modify.ParamByName('a_Comm').AsFloat := Comm;
  usp_emp_modify.ParamByName('a_deptno').AsInteger := Deptno;
  usp_emp_modify.ParamByName('a_op_type').AsInteger := op_type;
  usp_emp_modify.Execute;
end;
In addition, it is necessary to add methods including data encryption and compression. These methods are implemented in the uServerContainer module and are given by the following:
function TServerContainer.AddFilter(ServerTransport: TDSServerTransport;
  Filter: String; Key: String = ''): boolean;
var
  filters: TTransportFilterCollection;
  i: integer;
begin
  Result := False;
  filters := ServerTransport.Filters;
  for i := 0 to filters.Count - 1 do
    if filters.FilterIdList[i] = Filter then
      exit;
  if Filter = 'PC1' then begin
    i := filters.AddFilter(TTransportCypherFilter.Create);
    filters.GetFilter(i).SetParameterValue('Key', Key);
  end
  else if Filter = 'RSA' then begin
    i := filters.AddFilter(TRSAFilter.Create);
    filters.GetFilter(i).SetParameterValue('UseGlobalKey', 'true');
    filters.GetFilter(i).SetParameterValue('KeyLength', '1024');
    filters.GetFilter(i).SetParameterValue('KeyExponent', '3');
  end
  else if Filter = 'ZLibCompression' then begin
    i := filters.AddFilter(TTransportCompressionFilter.Create);
    filters.GetFilter(i).SetParameterValue('CompressMoreThan', '1024');
  end;
  Result := True;
end;

procedure TServerContainer.RemoveFilter(ServerTransport: TDSServerTransport;
  Filter: String);
var
  i: integer;
begin
  for i := 0 to ServerTransport.Filters.Count - 1 do
    if ServerTransport.Filters.FilterIdList[i] = Filter then begin
      ServerTransport.Filters.RemoveFilter(i);
      exit;
    end;
end;
invoking of these methods occurs in the uServer module when checking appropriate CheckBoxes
procedure TfMainServer.FilterCheckBoxClick(Sender: TObject);
begin
  if not (Sender is TCheckBox) then
    exit;
  if TCheckBox(Sender).Checked then begin
    if not ServerContainer.AddFilter(ServerContainer.DSTCPServerTransport, TCheckBox(Sender).Caption, edPC1Key.Text) then
      MessageDlg(format('Cannot Add %s Filter For TCP/IP, Or Filter Already Exists.', [TCheckBox(Sender).Caption]), mtError, [mbOK], 0);
    if not ServerContainer.AddFilter(ServerContainer.DSHTTPService, TCheckBox(Sender).Caption, edPC1Key.Text) then
      MessageDlg(format('Cannot Add %s Filter For HTTP, Or Filter Already Exists.', [TCheckBox(Sender).Caption]), mtError, [mbOK], 0);
  end
  else begin
    ServerContainer.RemoveFilter(ServerContainer.DSTCPServerTransport, TCheckBox(Sender).Caption);
    ServerContainer.RemoveFilter(ServerContainer.DSHTTPService, TCheckBox(Sender).Caption);
  end;
end;
Assigning of the FilterCheckBoxClick method to the OnClick event of all CheckBoxes
procedure TfMainServer.FormCreate(Sender: TObject);
begin
  cbPC1.OnClick := FilterCheckBoxClick;
  cbRSA.OnClick := FilterCheckBoxClick;
  cbZlib.OnClick := FilterCheckBoxClick;
end;
Application back end development is finished at that. Now the application is to be compiled and built. If there is no errors on compilation and build, we can move to creation of the application front end.
Create VCL Form Application for the client application and add TDataModule, in which place the data access components:
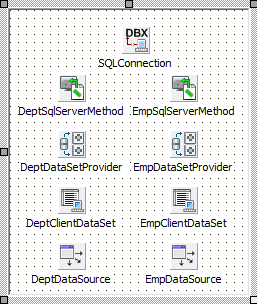
- SQLConnection: TSQLConnection;
- DeptSqlServerMethod: TSqlServerMethod;
- EmpSqlServerMethod: TSqlServerMethod;
- DeptDataSetProvider: TDataSetProvider;
- EmpDataSetProvider: TDataSetProvider;
- DeptClientDataSet: TClientDataSet;
- EmpClientDataSet: TClientDataSet;
- DeptDataSource: TDataSource;
- EmpDataSource: TDataSource;
- TSQLConnection — for connection to the DataSnap server;
- TsqlServerMethod — for sending queries to the server;
- TDataSetProvider — for binding TSqlServerMethod with TClientDataSet;
- TDataSource — for relating the generated dataset with data display visual components (DBGrid);
These components must be bound with each other:
TDataSource–>TClientDataSet–>TDataSetProvider–>TSQLServerMethod–>TSQLConnection
The Driver property of the TSQLConnection component should be set to Datasnap, the other options (protocol, port, host, etc.) will be set dynamically depending on the settings applied by a user.
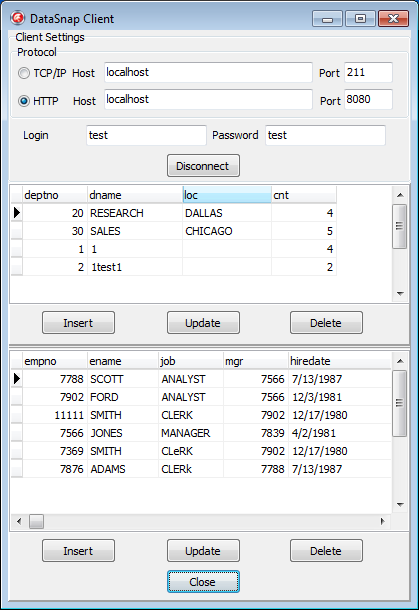
Place the components responsible for connection settings, data display and editing onto the main form as shown in the figure. Handlers for appropriate events will be implemented further.
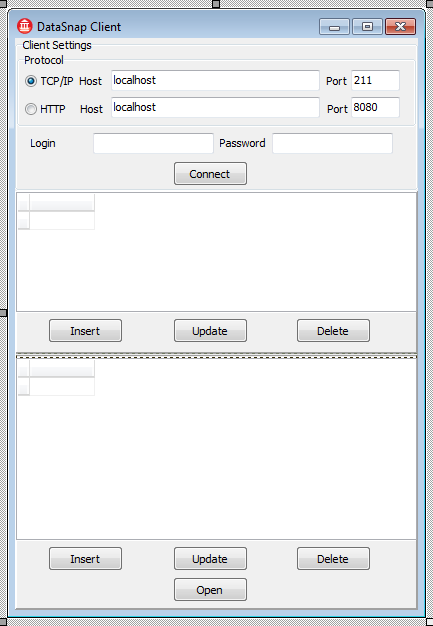

For binding of server methods with the client, a module should be created for implementation of DataSnap client classes. For this, we need to run the server application, go to the ClientDM form (TDataModule), open the context menu of the TSQLConnection component and select Generate DataSnap client classes. There will be automatically created a module containing all the methods of the server class available to the client.
Now write the code for an event responsible for client connection/disconnection. In this method, there should be set the connection parameters for the TSQLConnection component, and the server is connected to (the server must run at the moment).
procedure TfMainClient.btConnectClick(Sender: TObject);
begin
  if not DM.SQLConnection.Connected then begin
    DM.SQLConnection.Params.Values['CommunicationProtocol'] := IfThen(rgProtocol.ItemIndex = 0, 'tcp/ip', 'http');
    DM.SQLConnection.Params.Values['HostName'] := IfThen(rgProtocol.ItemIndex = 0, edTCPIPHost.Text, edHTTPHost.Text );
    DM.SQLConnection.Params.Values['Port'] := IfThen(rgProtocol.ItemIndex = 0, edTCPIPPort.Text, edHTTPPort.Text);
    DM.SQLConnection.Params.Values['DSAuthenticationUser'] := edLogin.Text;
    DM.SQLConnection.Params.Values['DSAuthenticationPassword'] := edPaswd.Text;
    DM.SQLConnection.Connected := True;
    btConnect.Caption := 'Disconnect';
  end
  else begin
    DM.SQLConnection.Connected := False;
    btConnect.Caption := 'Connect';
  end;
end;
For both TSQLServerMethod methods (DeptSqlServerMethod and EmpSqlServerMethod) the ServerMethodName property must be set to specify the method, which the component will refer to. Set these properties to TServerMethods.GetDept and TServerMethods.GetEmp respectively.
Now the code for the open dataset event should be written, it is given by:
procedure TfMainClient.btOpenClick(Sender: TObject);
begin
  if not DM.DeptClientDataSet.Active then begin
    DM.DeptClientDataSet.Open;
    DM.EmpSqlServerMethod.ParamByName('DeptNo').AsInteger := DM.DeptClientDataSet.FieldByName('DEPTNO').AsInteger;
    DM.EmpClientDataSet.Open;
    btOpen.Caption := 'Close';
  end
  else  begin
    DM.EmpClientDataSet.Close;
    DM.DeptClientDataSet.Close;
    btOpen.Caption := 'Open';
  end;
end;
In order for records in the client dataset to be modified when moving through the Master DataSet, the OnDataChange event should be implemented for the DeptDataSource component. The client dataset will be reopened in this event and retrieve the data corresponding to the current record in the Master DataSet:
procedure TDM.DeptDataSourceDataChange(Sender: TObject; Field: TField);
begin
  EmpClientDataSet.Close;
  EmpSqlServerMethod.ParamByName('DeptNo').AsInteger := DM.DeptClientDataSet.FieldByName('DEPTNO').AsInteger;
  EmpClientDataSet.Open;
end;
After this, we can run the application, connect to the server, and open the dataset. If everything is done correctly, records from both tables will be displayed in the application.
Besides displaying data, it is also necessary to provide for possibility to modify them (addition, editing, and deletion), these actions will be performed with the stored procedure, the text of which is provided above.
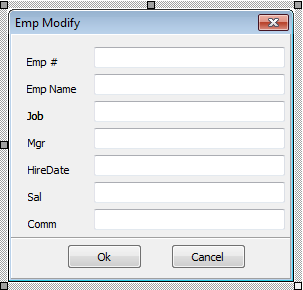
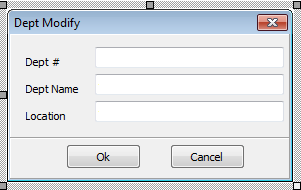
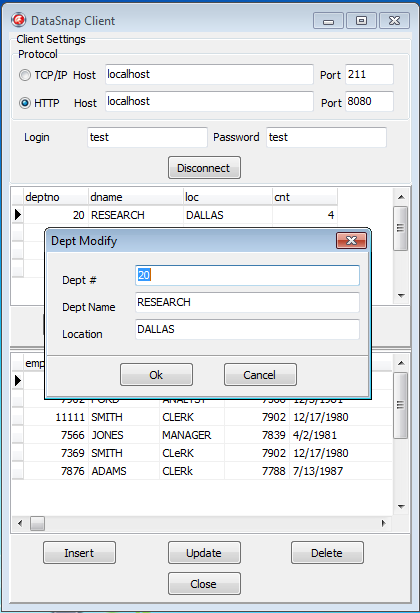
To modify each of the datasets, create editing forms as shown in the figures.
And add our properties for data setting:
//Dept
property Deptno: integer read GetDeptno write SetDeptno;
property DName: string read GetDName write SetDName;
property Loc: string read GetLoc write SetLoc;

//Emp
property EmpNo: integer read GetEmpno write SetEmpno;
property EName: string read GetEname write SetEname;
property Job: string read GetJob write SetJob;
property Mgr: integer read GetMgr write SetMgr;
property Hiredate: TDateTime read GetHiredate write SetHiredate;
property Sal: real read GetSal write SetSal;
property Comm: real read GetComm write SetComm;
To work with these forms in the main application form, it is necessary to implement the methods of invoking these forms, data transfer/retrieving, and result processing. These forms will be invoked as modal, therefore, dependently on the return result (ModalResult), we will either invoke an appropriate procedure or ignore changes.
procedure TfMainClient.btUpdateDeptClick(Sender: TObject);
var
  fModifyDept: TfModifyDept;
  ServerMethodsClient: TServerMethodsClient;
begin
  fModifyDept := TfModifyDept.Create(Self);
  try
    fModifyDept.Deptno := DM.DeptClientDataSet.FieldByName('Deptno').AsInteger;
    fModifyDept.DName := DM.DeptClientDataSet.FieldByName('dname').AsString;
    fModifyDept.Loc := DM.DeptClientDataSet.FieldByName('loc').AsString;
    fModifyDept.ShowModal;
    if fModifyDept.ModalResult = mrOk then begin
      ServerMethodsClient := TServerMethodsClient.Create(DM.SQLConnection.DBXConnection);
      try
        ServerMethodsClient.DeptModify(fModifyDept.Deptno, fModifyDept.DName, fModifyDept.Loc, 2);
        DM.Reopen;
      finally
        ServerMethodsClient.Free;
      end;
    end;
  finally
    fModifyDept.Free;
  end;
end;

procedure TfMainClient.btUpdateEmpClick(Sender: TObject);
var
  fModifyEmp: TfModifyEmp;
  ServerMethodsClient: TServerMethodsClient;
begin
  fModifyEmp := TfModifyEmp.Create(Self);
  try
    fModifyEmp.EmpNo := DM.EmpClientDataSet.FieldByName('Empno').AsInteger;
    fModifyEmp.EName := DM.EmpClientDataSet.FieldByName('Ename').AsString;
    fModifyEmp.Job := DM.EmpClientDataSet.FieldByName('job').AsString;
    fModifyEmp.Mgr := DM.EmpClientDataSet.FieldByName('Mgr').AsInteger;
    fModifyEmp.Hiredate := DM.EmpClientDataSet.FieldByName('Hiredate').AsDateTime;
    fModifyEmp.Sal := DM.EmpClientDataSet.FieldByName('Sal').AsFloat;
    fModifyEmp.Comm := DM.EmpClientDataSet.FieldByName('Comm').AsFloat;
    fModifyEmp.ShowModal;
    if fModifyEmp.ModalResult = mrOk then begin
      ServerMethodsClient := TServerMethodsClient.Create(DM.SQLConnection.DBXConnection);
      try
        ServerMethodsClient.EmpModify(fModifyEmp.EmpNo, fModifyEmp.EName, fModifyEmp.Job, fModifyEmp.Mgr, fModifyEmp.Hiredate, fModifyEmp.Sal, fModifyEmp.Comm, DM.DeptClientDataSet.FieldByName('Deptno').AsInteger, 3);
        DM.Reopen;
      finally
        ServerMethodsClient.Free;
      end;
    end;
  finally
    fModifyEmp.Free;
  end;
end;

procedure TfMainClient.tbInsertEmpClick(Sender: TObject);
var
  fModifyEmp: TfModifyEmp;
  ServerMethodsClient: TServerMethodsClient;
begin
  fModifyEmp := TfModifyEmp.Create(Self);
  try
    fModifyEmp.EmpNo := -1;
    fModifyEmp.ShowModal;
    if fModifyEmp.ModalResult = mrOk then begin
      ServerMethodsClient := TServerMethodsClient.Create(DM.SQLConnection.DBXConnection);
      try
        ServerMethodsClient.EmpModify(fModifyEmp.EmpNo, fModifyEmp.EName, fModifyEmp.Job, fModifyEmp.Mgr, fModifyEmp.Hiredate, fModifyEmp.Sal, fModifyEmp.Comm, DM.DeptClientDataSet.FieldByName('Deptno').AsInteger, 1);
        DM.Reopen;
      finally
        ServerMethodsClient.Free;
      end;
    end;
  finally
    fModifyEmp.Free;
  end;
end;
As the final result, we must get the following:
The running server:
The running client:
The data editor:
This sample demonstrates the basics of three–tier application development using UniDAC and the DataSnap technology. Naturally, real business applications are much more complex and massive, however, when developing them, the same basic methods and techniques as described here are used.
Here are the code sources: DataSnap.zip
Awesome folks!!
Thanks for this sample.
Thank You for sample
Maybe can give link download this sample project…???
Thanx
There is no downloadable demo for the moment.
Thank You….
Hello
Thanks great work, it help me getting a further.
There is a mistake in the addfilter part the add RSA is not correct;
else if Filter = 'RSA' then begini := filters.AddFilter(TTransportCypherFilter.Create);
...
end
should be (need to add DBXOpenSSL to the uses)
else if Filter = 'RSA' then begin
i := filters.AddFilter(TRSAFilter.Create);
...
end
otherwise you will just be adding a not working PC1 filter to the collection
regards
Henrik
Hmm, sorry about the above spelling :/
Another thing I have noticed, it appears that you can not change the PC1 key parameter and then read the changed value from the filters collection, e.g. like this.
sl := TStringList.Create;try
sl.Text := ServerContainer.DSTCPServerTransport.Filters.ToJSON;
sl.SaveToFile('serverjsonfilter2.txt');
finally
FreeAndNil(sl);
end;
it appears to keep a default assigned key from the PC1 key is being added.
Okay, I have fixed your code so now adding filters works correct (XE7) – it appears you cannot change the filters once added… but I’m not sure, but at least this gives me the expected result when I look at the filters afterwards.
function TServerContainer.AddFilter(ServerTransport: TDSServerTransport; Filter: String; Key: String = '') : boolean;var
filters: TTransportFilterCollection;
i: integer;
ARSAFilter : TRSAFilter;
APC1Filter : TTransportCypherFilter;
ATransportCompressionFilter : TTransportCompressionFilter;
begin
Result := False;
filters := ServerTransport.Filters;
for i := 0 to filters.Count - 1 do
if filters.FilterIdList[i] = Filter then
exit;
if Filter = 'PC1' then begin
APC1Filter := TTransportCypherFilter.Create;
APC1Filter.SetParameterValue('Key', Key);
i := filters.AddFilter(APC1Filter);
end
else if Filter = 'RSA' then begin
ARSAFilter := TRSAFilter.Create;
ARSAFilter.SetParameterValue('UseGlobalKey', 'true');
ARSAFilter.SetParameterValue('KeyLength', '512');
ARSAFilter.SetParameterValue('KeyExponent', '4');
i := filters.AddFilter(ARSAFilter);
end
else if Filter = 'ZLibCompression' then begin
ATransportCompressionFilter := TTransportCompressionFilter.Create;
ATransportCompressionFilter.SetParameterValue('CompressMoreThan', '2048'); //1024
i := filters.AddFilter(ATransportCompressionFilter);
end;
Result := True;
end;
Resulting filter read from the collection looks better now and reflects the parameters I have chosen and not the “default” values which you get with your code.
{"PC1":{"Key":"HenrikRocks"},"RSA":{"UseGlobalKey":"true","KeyLength":"512","KeyExponent":"4"},"ZLibCompression":{"CompressMoreThan":"2048"}}Thank you for the notice. We have updated the code with your corrections.
Would you mind to share this project source code ?
The post was updated. We have added the sources.
Why you did not use the transaction component in the example?
Thanks
We just wanted to describe using our components with the DataSnap technoly, and not to describe the whole process of working with all our components. However, we will add a sample of using Transaction as well.
If I change SELECT *… to SELECT code,name… I get the message:
˜Remote Error: Argument out of range˜
May you help me?
Thank’s a lot!
any chance of providing the functions in mysql
can I use mydac so delphi android connect to phpmyadmin in my web hosting?
You can use MyDAC to develop Android applications with direct access to MySQL server. As phpMyAdmin is a tool for MySQL administration and not a server itself, you will not be able to connect to it using MyDAC. Please note that Mobile Development is available only in Professional and MyDAC Trial Edition: https://www.devart.com/mydac/editions.html
Hello team,
the example is good and i use it in an application. it works fine but i have a problem. Maybe you have an idea whats going wrong.
When i transfer a complete Query with strings (defined e.g. varchar(100) ) in the way you describe in the example from the server to the client then the Clientdataset get only 51 characters from the strings of the table and not the complete 100 characters.
i have no idea whats going wrong there.
best regards
Gerhard
Hello, Gerhard!
Please describe the issue in more detail. Provide additional information about the DB server you are using including the information about the used charset. Compose and send us a small sample, execution of which causes the issue. Perhaps you can change the DataSnap.zip sample in such a way that it could visually demonstrate the mentioned issue. You can send any additional information via the e-support form (devart.com/company/contactform.html)
Hello Team, thanks for your response.
I am using UniDac in combination with MySQL and Delphi Rad Studio Architect 7 or 10.2.3.
in the Database of MySql (Server) i define a Table like this:
——————————————————————————-
MySQL Data Transfer
Source Host: localhost
Source Database: sophietool_gendb
Target Host: localhost
Target Database: sophietool_gendb
Date: 13.09.2018 15:26:32
*/
SET FOREIGN_KEY_CHECKS=0;
— —————————-
— Table structure for stmeldetexte
— —————————-
CREATE TABLE `stmeldetexte` (
`id` bigint(20) unsigned NOT NULL AUTO_INCREMENT,
`Datum` datetime NOT NULL DEFAULT ‘2018-09-01 12:00:00’ COMMENT ‘Datum der letzten Änderung’,
`Sp1` varchar(100) NOT NULL COMMENT ‘Meldungstexte Deutsch’,
`Sp2` varchar(100) NOT NULL COMMENT ‘MeldungsTexte Englisch’,
PRIMARY KEY (`id`)
) ENGINE=InnoDB AUTO_INCREMENT=16 DEFAULT CHARSET=utf8;
——————————————————————————————————-
and filled up the fields “sp1” and “sp2” with strings longer then 60 characters.
on the DataSnap Server i have a function defined like this:
function TServerMethods1.GetDaten(SqlText: UniCodeString): TDataSet;
begin
UDaten.Close;
UDaten.SQL.Text:=SqLText;
UDaten.Open;
Result := UDaten;
end;
On the Client i have a SQLServerMethod named “SqlSrvMData” -> DataSetProvider “DSPDatas” -> ClientDataSet “CSData”.
Defined like this:
procedure TDM.MeldeTexteAktualisieren;
begin //
SqlSrvMData.Params[0].AsString:=’Select * from StMeldeTexte order by ID’;
CSData.Open;
DML.LMeldeTexte.SQL.Text:=’Select * from StMeldeTexte order by ID’;
DML.LMeldeTexte.Open; DM.CSData.First;
while not DM.CSData.Eof do begin
case DML.LMeldeTexte.Locate(‘ID’,DM.CSData[‘ID’],[]) of
True: begin
if DML.LMeldeTexte[‘Datum’]DM.CSData[‘Datum’] then begin
DML.LMeldeTexte.Edit;
DML.LMeldeTexte[‘Datum’]:=DM.CSData[‘Datum’];
DML.LMeldeTexte[‘Sp1’]:=DM.CSData[‘Sp1’];
DML.LMeldeTexte[‘Sp2’]:=DM.CSData[‘Sp2’];
DML.LMeldeTexte.Post;
end;{if DML.LMeldeTexte[‘Datum’]DM.CSData[‘Datum’]}
end; // Locate=True
false: begin
DML.LMeldeTexte.Append;
DML.LMeldeTexte[‘ID’]:=DM.CSData[‘ID’];
DML.LMeldeTexte[‘Datum’]:=DM.CSData[‘Datum’];
DML.LMeldeTexte[‘Sp1’]:=DM.CSData[‘Sp1’];
DML.LMeldeTexte[‘Sp2’]:=DM.CSData[‘Sp2’];
DML.LMeldeTexte.Post;
end; // Locate=false
end;{case DML.LMeldeTexte.Locate(‘ID’,DM.CSData[‘ID’],[]) of}
DM.CSData.Next;
end;{while not DM.CSData.Eof}
CSData.Close;
DML.LMeldeTexte.Close;
end;
from the Result of the “CSData” i transfer all Records to a local Database (SQLLite3) to the Table “LMeldeTexte”.
when i debug the result of CSData and make it visible in a DBGrid allways all Data of the fields “Sp1” and “Sp2” have never more then 51 Characters.
i hope you can follow and understand the problem and find out whats wrong here.
best regards
Gerhard Wascinski