When you need to perform certain actions with each of the elements from an array that you don’t want to edit in any way, the SSIS forech loop container, a control flow task, comes in handy. Using it, you can easily iterate through items defined in a collection and automate processing them one by one. Eventually, this approach helps cut the time usually spent on manually handling each item from the dataset.
From this article, you’ll learn about the main components of the SSIS foreach loop, the types of enumerators you can use with it, and how to configure the foreach loop container to speed up your workflow with data. There are also detailed instructions on looping through the files with a real-world example you can use as a basis for your project. Keep reading this tutorial to master the SSIS foreach loop.
- Main components of the foreach loop
- Types of foreach loop enumerators
- SSIS foreach loop container configuration instructions
- Looping through files with foreach loop
- Test the SSIS package
- Devart SSIS components
- Conclusion
Main components of the foreach loop
In order to work, a Foreach Loop container should have three main components: enumerators, variables, and the task itself. Let’s break them down to understand what they do.
Enumerators represent the collection of objects that you want to iterate. It can be a collection of files, records of tables, or static items. Generally, enumerators serve as a guide for what to loop through.
Variables are used to map the current items of the collection and can be used to process the task within the loop. If we’re looping through files, the variable holds the file name we’re working on. If we’re looping through rows of data, the variable holds the current row.
A task is a component that specifies the task you want to perform within the foreach loop (e.g., you can move or transform data). The foreach loop performs these tasks for each item it’s going through.
For example, if you want to import data from hundreds of Excel or CSV files in a table, instead of defining connection strings for individual CSV files, you can use the foreach loop container. First, you’ll have to configure the Foreach file enumerator to iterate through all the files. Then, you’ll need to map a variable that will store the file name dynamically. Finally, you’ll have to configure a data flow task within the foreach loop to extract the data from the CSV file and insert it into the SQL table.
Types of foreach loop enumerators
There are four main types of Foreach Loop enumerators in SQL Server integration services. Let’s briefly explore each of them to understand how they work.
Foreach file enumerators
The foreach file enumerators loop through all the files created in a specified folder. With file enumerators, you can apply various filters to file names, extensions, etc. You can also choose to enumerate through folders and sub-folders.
You can use the foreach file enumerators to import data from a list of CSV or Excel files to SQL Server tables.
Foreach item enumerators
The foreach item enumerator is used to loop through the collection of items specified in the property of the enumerator. When using it, instead of pulling data from a folder or database, you manually define a list of items that you want to loop through. For instance, you can use the foreach Item enumerators to loop through specific values like hard-coded file names or paths or maybe database connection strings.
Foreach ADO enumerators
The foreach ADO enumerator is used to loop through the ADO recordset and process all records individually. An ADO record can result from a SELECT statement of SQL query. To configure the ADO enumerator, you will have to specify the SQL query that produces a valid result set. Then, configure the foreach loop to iterate through the records returned by the SELECT query. After that, you can put the task you want to execute on each record.
For example, if you want to email the shipment details to the customer who has placed the order, you can use the foreach ADO enumerator. It will use the customer ID to get the customer’s shipment details and email address and save the data in a variable. Next, you’ll have to configure an SSIS task that uses an email address stored in a variable to email the shipment details to individual customers.
Foreach variable enumerators
The foreach variable enumerator iterates through the objects stored in an SSIS variable, looping through a collection of values (any list of items, like filenames, numbers, or custom-made lists.) To use the foreach variable enumerator, first, you must declare a variable with appropriate values. For instance, the values can be a list of filenames or an array with specific values. Secondly, you’ll need to set up the foreach variable enumerator to loop through all values stored in a variable. Thirdly, you will have to create a variable (e.g., Current Item) and map the value of each item in the collection. Lastly, to make the foreach loop work, you’ll need to use the Current Item variable to perform a desired task.
This article will teach you how to export data from multiple CSV files to an SQL Server table. For demonstrational purposes, the example features five CSV files containing the details of different store sales. The CSV files were created in the C:\CSV Files directory. Each file contains the details of the sale in a different store. The file contains the product name, quality, price per product, total sale amount, and store ID properties.
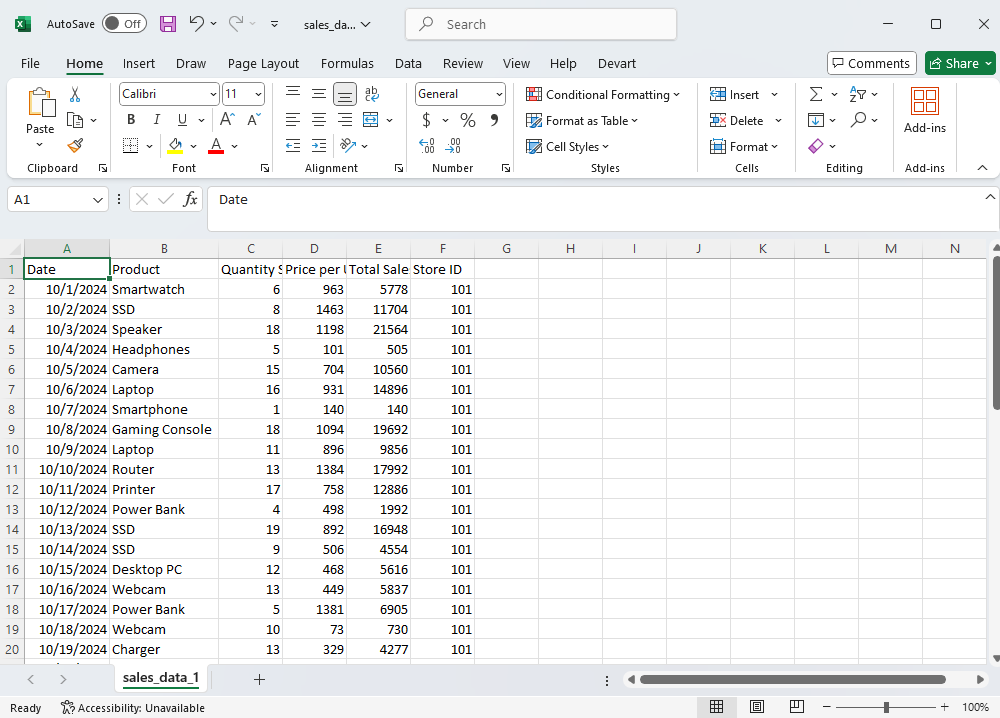
Also, this tutorial features a test SQL database named Sales. The database has a table named tblSales. To reproduce this tutorial, you can use the code below to create a table and a database.
use master
go
create database Sales
Go
use Sales
go
create table tblSales
(
Date datetime,
[Product] varchar(500),
[Quanityt Sold] int,
[Price per unit] int,
[Total Sales] int,
[Store ID] int
)
Since we are creating an SSIS package that inserts data from five CSV files to the tblSales in one execution, we will use the Foreach file enumerator.
SSIS foreach loop container configuration instructions
For a better understanding, let’s divide the configuration part into two sections. The first section will be dedicated to the step-by-step process of configuring the foreach loop container, and the second part will describe the configuration process of the data flow task.
Let’s learn how to configure the foreach loop container.
Configure foreach loop container
First, drag and drop the foreach loop container from the SSIS toolbox to control the flow designer pan and rename it to Fetch CSV Files.
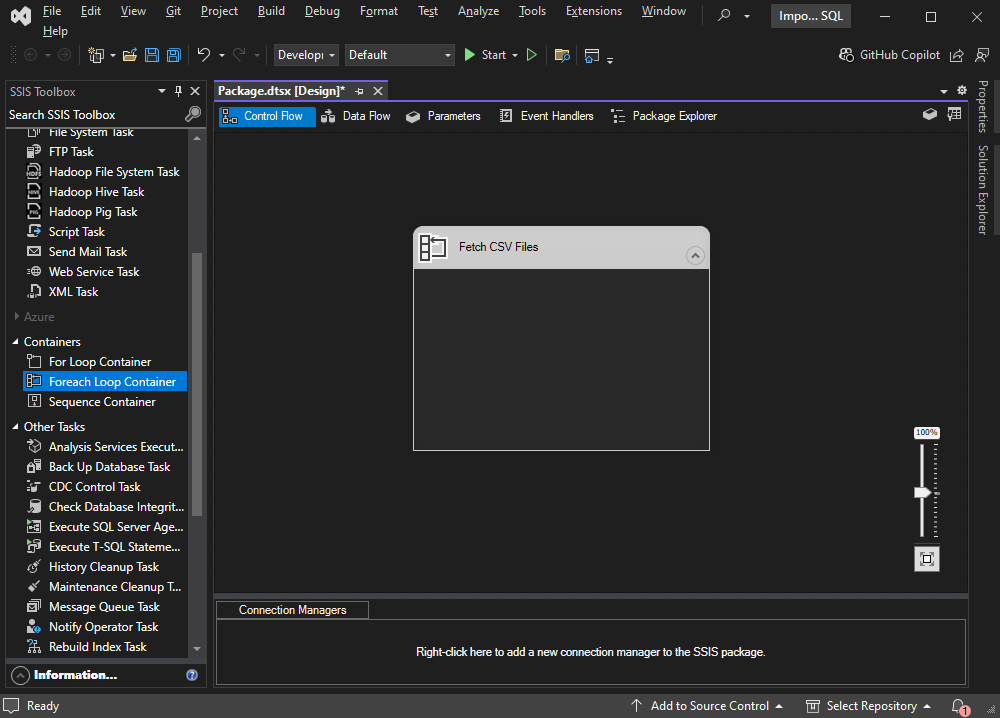
- Double-click the loop container. A dialog box named Foreach loop editor will open. Here, you can configure the required parameters.
- Select the type of foreach enumerator. To do that, select Collection from the left section, and in the right section, select Foreach File Enumerator.
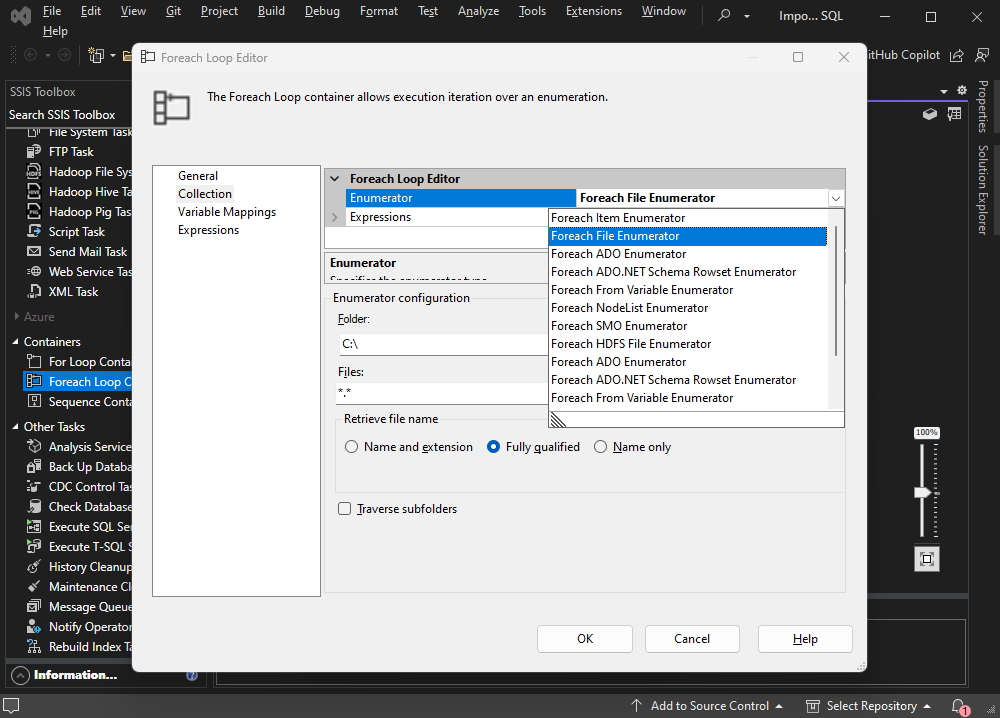
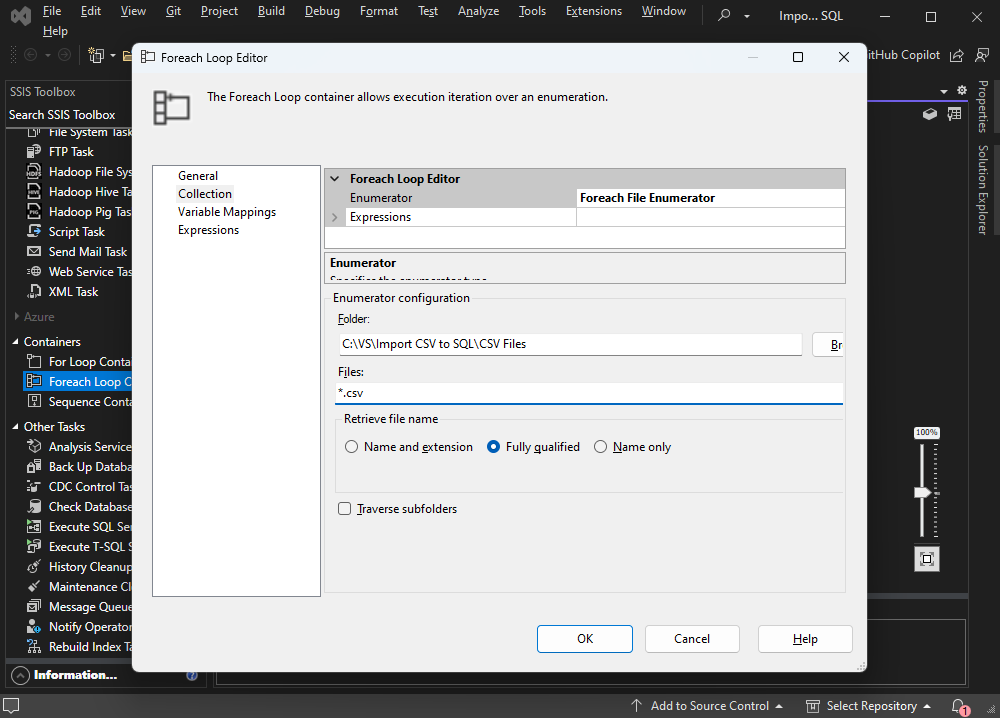
The package will read the data from the CSV files. Hence, the enumerator configuration parameters will be as follows:
- Folder. You have to specify the location of the files. The CSV files are in the C:\CSV Files directory, so you must add the C:\CSV Files path.
- Files. Specify the type of the files. We use CSV files, so you must enter *.csv in the Files text box.
- Retrieve file name. Define how you want to fetch the file name. We want to fetch the fully qualified file name, so, in this example, we select Fully qualified.
Since there’s no need to include the sub-folders in this example, the Traverse subfolders option is left unchecked.
Here is the screenshot for reference.
- Click Ok to save the configuration and close the dialog box.
Configure the Data Flow task
Next, let’s learn how to configure the Data Flow task to export data from CSV files to the SQL Server table.
- First, drag and drop the Data Flow Task from the SSIS toolbox and rename it to Export CSV to SQL Server. Double-click it to add essential configurations.
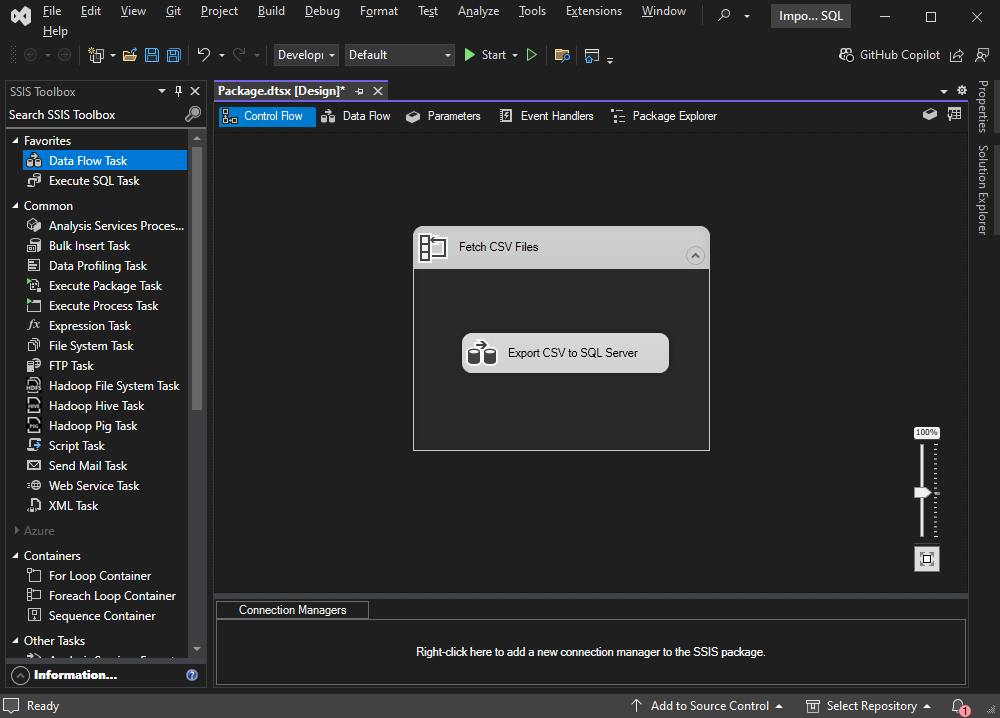
After the Data Flow designer pan opens, drag and drop Flat File Source and OLE DB Destination from SSIS Toolbox to Data Flow Designer. Rename Flat File Source to Sales CSV Files and OLE DB Destination to Sales Database.
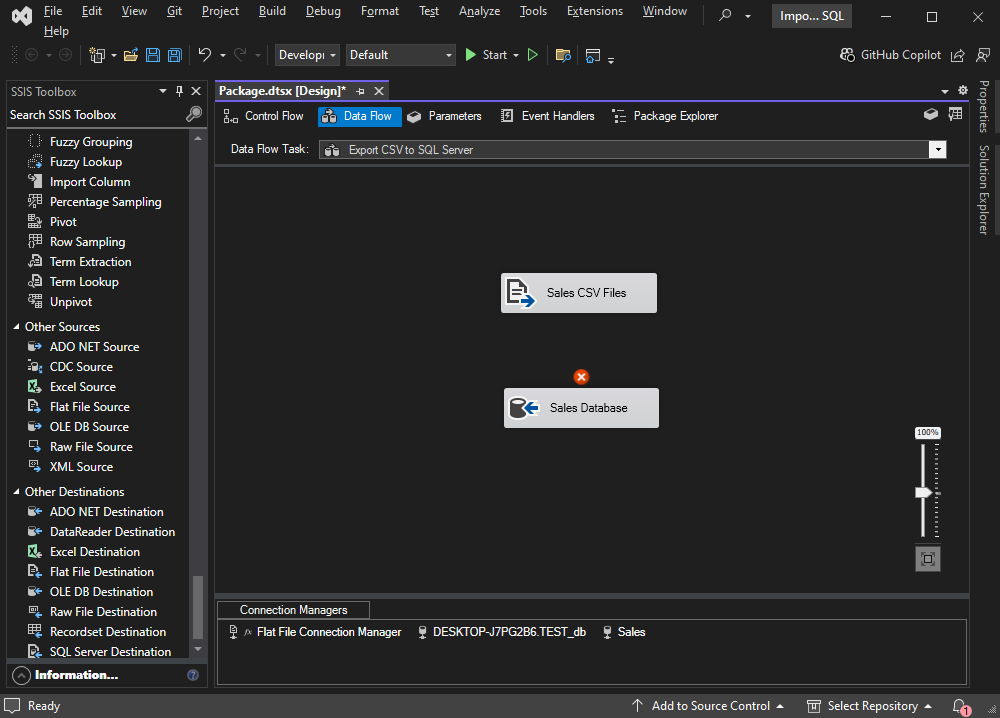
- Now, let’s configure the Flat File Source. To do that, double-click it. A dialog box named Flat File Source Editor will open.
- Here, you have to configure the Flat File connection manager. To do that, click New. Another dialog box will open. Here, you can specify the configuration parameters according to your requirements. For this demonstration, let’s add the file name of the CSV file you want to import. The value of the File name will be C:\CSV Files\sales_data_1.csv. Keep in mind that you shouldn’t change other values.
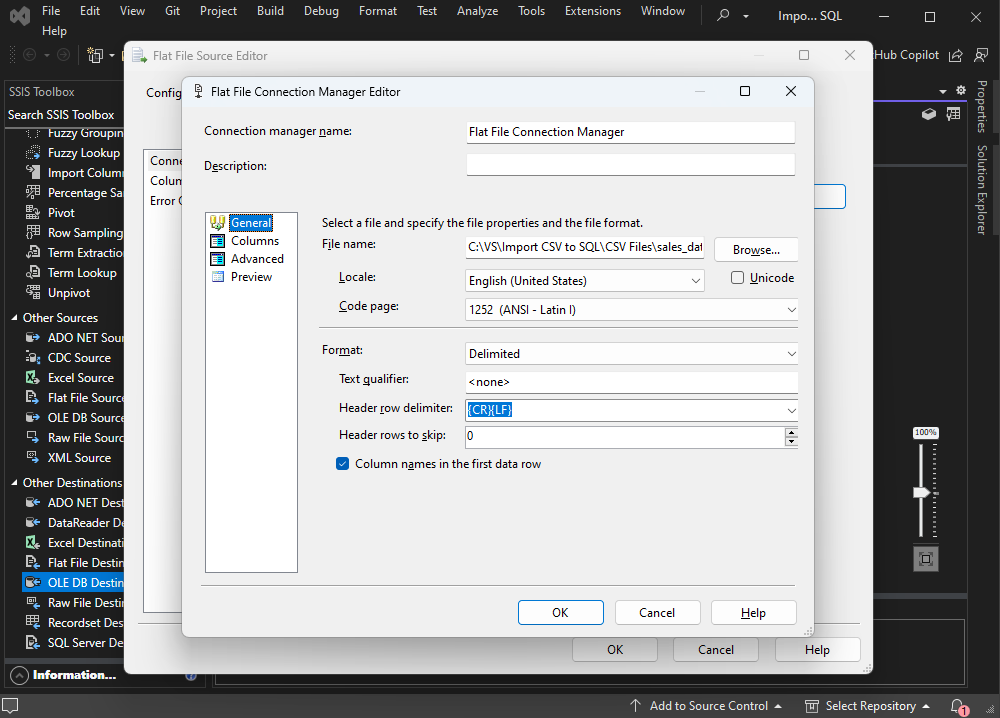
Next, click Preview to verify the content of the CSV file.
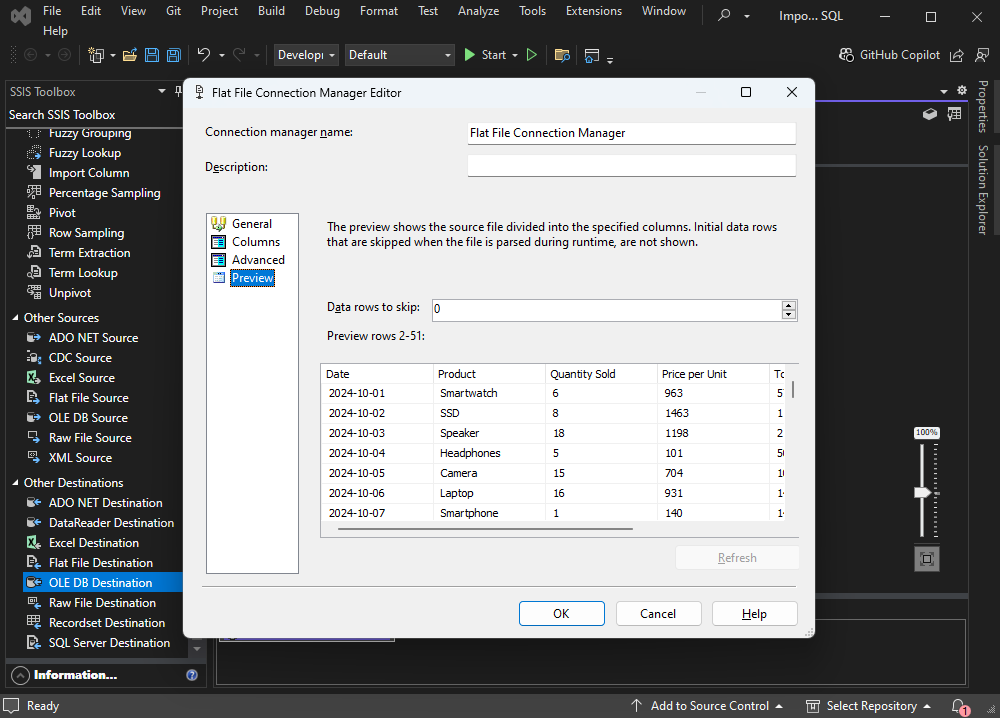
Click Ok to save the configuration, close the dialog box, and return to the Flat File Source Editor dialog box. There, you will see that the Flat File connection manager has been selected automatically.
Now, let us configure the OLE DB connection manager. Follow the instructions below to set up the configurations correctly.
- Double-click OLE DB destination. A dialog box named OLE DB destination editor will open, letting you configure the connection to the SQL Server database.
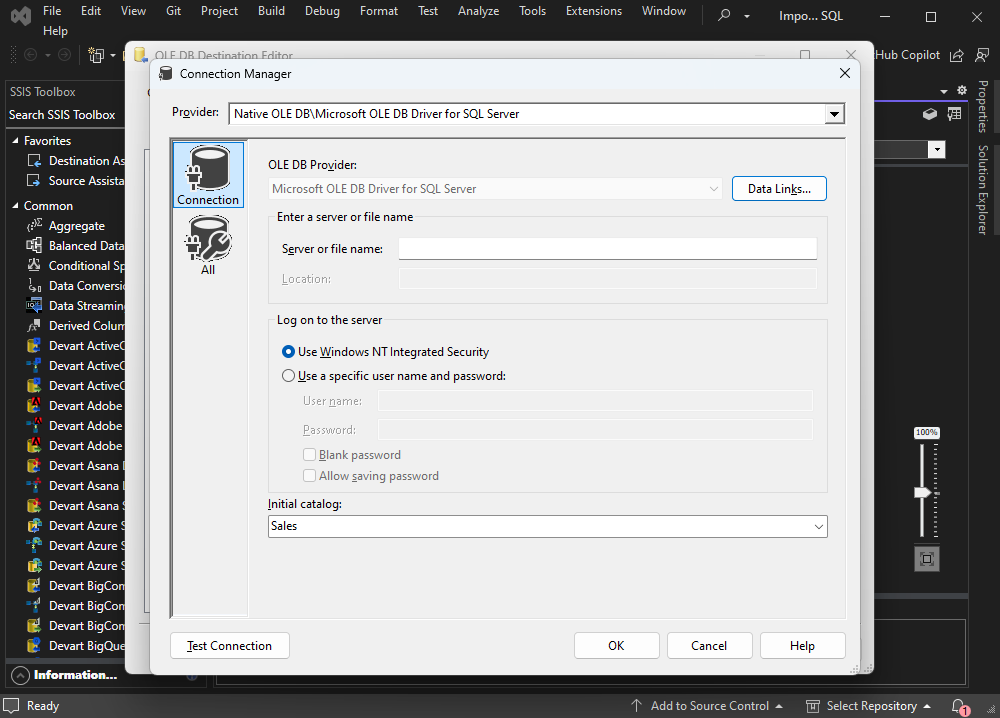
- Click New. Another dialog box will open. There, you’ll have to specify the SQL Server connection parameters according to your requirements.
For this demo, we are going to specify the configuration as shown below, but you can use your parameters instead.
- Server name or file name. Enter the name of the server on which the SQL Server is installed.
- Log on to the server. Specify the authentication method that you are using to connect the database. For instance, you can select Windows NT integrated security.
- Initial catalog. Specify the database name. In this article, we refer to the Sales database.
- Click Ok to complete the setup of the connection manager and close the dialog box.
Once you return to the OLE DB destination editor dialog box, you will see the OLE DB connection manager has been selected automatically. Now, you need to specify the additional parameters and options.
- Data access mode. Select Table or View – fast load.
- Name of table. Select tblSales from the list of tables.
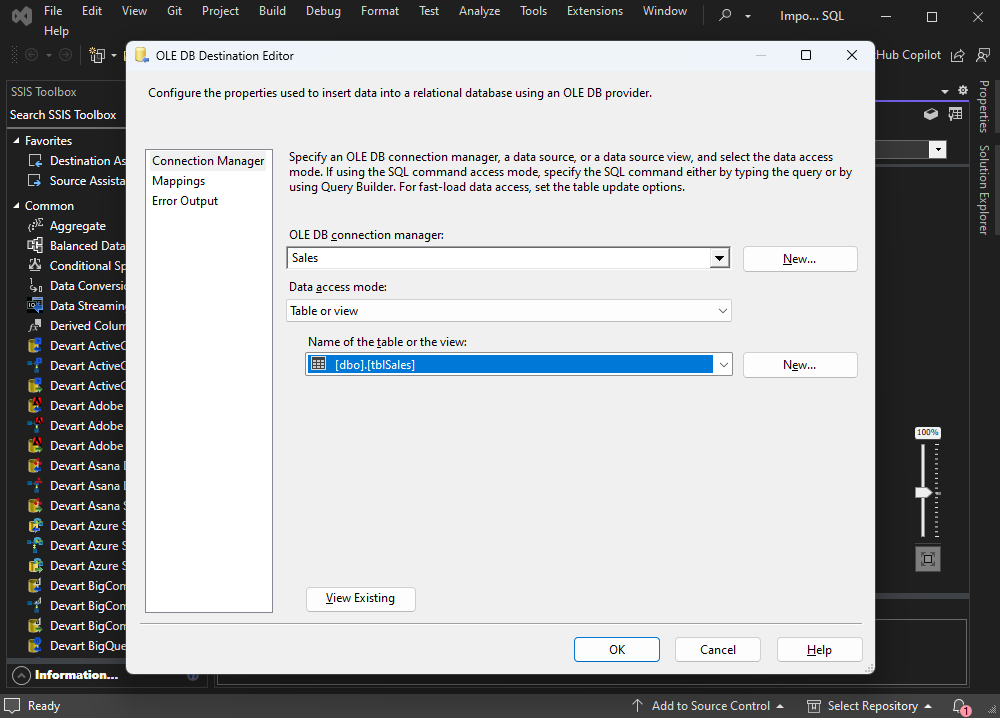
Click Ok to save the configuration and close the dialog box.
Now, let’s connect the Source and Destination. To do that, drag and drop the arrow from Flat file source to OLE DB destination.
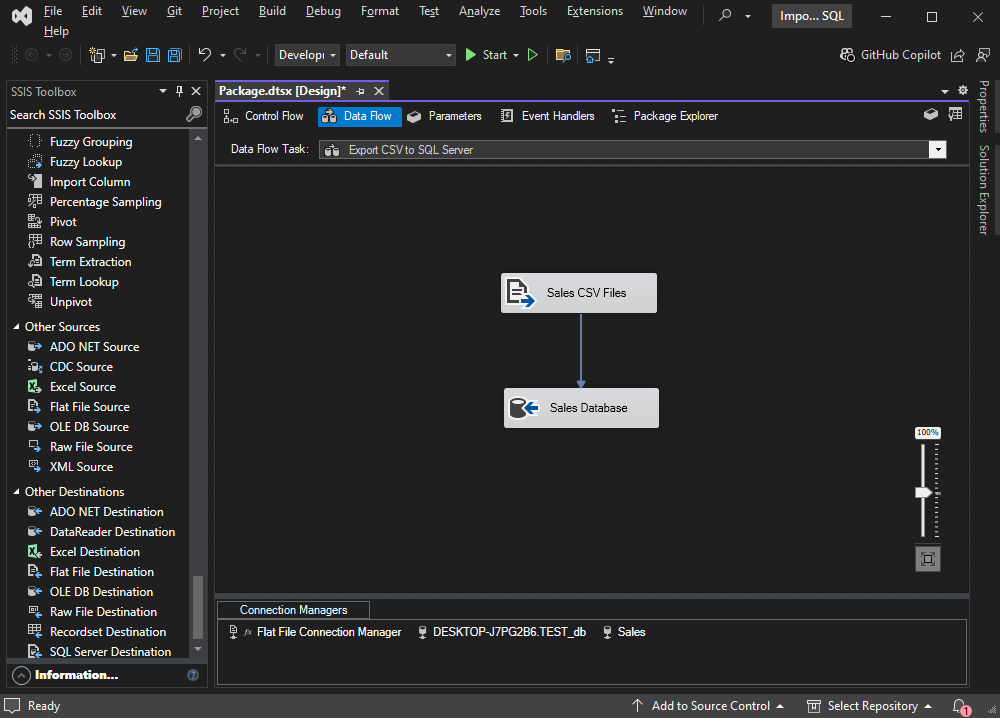
Now, it’s time to configure the variable to store the path of the CSV files.
Looping through files with foreach loop
When you want to use multiple files to process the data in the SSIS package, you have to configure a variable that should hold the file’s path. The variable will be defined in the Foreach Loop container, and it will be used in the Flat File Source component of the Data Flow task.
First, let’s configure an SSIS variable to hold the path of the CSV files.
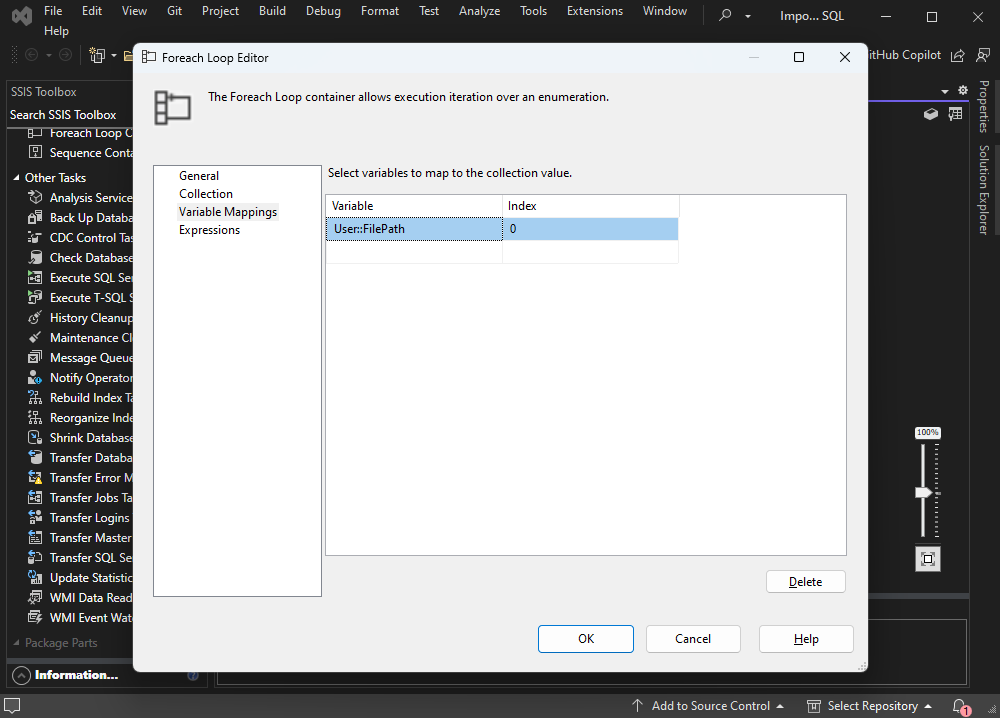
To do that, double-click the Foreach loop container. In the Foreach Loop Editor, select Variable Mappings. In a collection of variables grid view, select New variable. Another dialog box, Add variable, will open. Here, you can define the properties of a variable.
Set the values of the parameter as follows:
- Container: Select package.
- Name: Provide the appropriate name of a variable (e.g., FilePath).
- Namespace: Keep the User namespace without changes.
- Value Type: Select the datatype of the variable. In this example, we are storing the path name, so the Value type is going to be String.
- Value: Specify a value of the variable. For demonstrational purposes, we have set the fully qualified name of the first CSV file, which is C:\CSV Files\sales_data_1.csv.
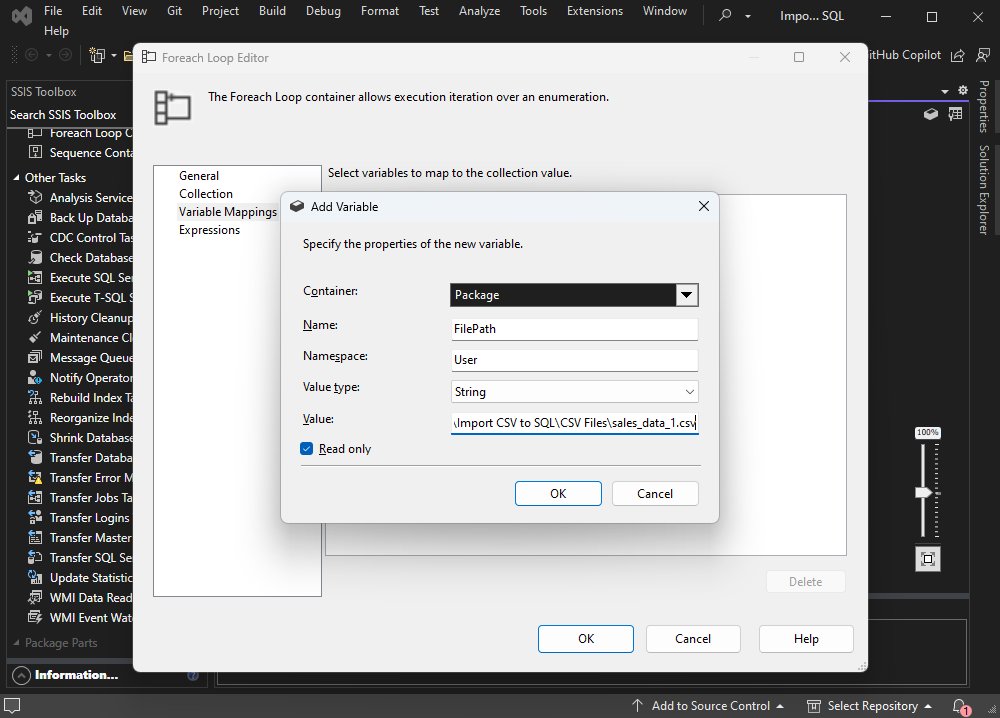
Click Ok to save the variable and close the dialog box. Back to the previous screen, you can see the variable has been created. Click Ok to close the dialog box.
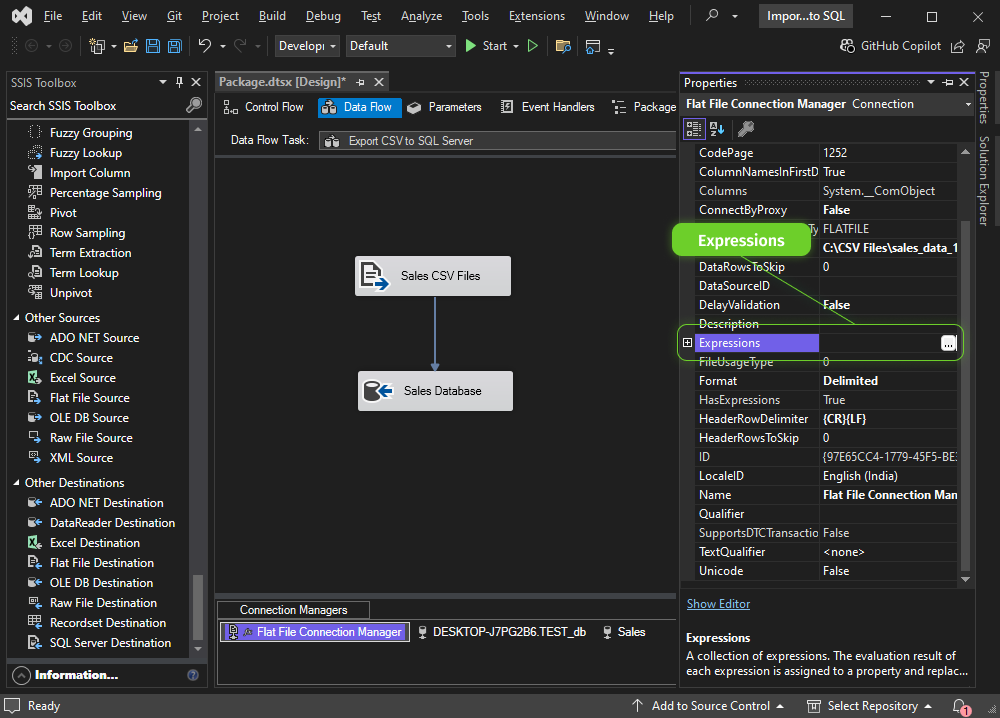
Now, let’s use the variable in the Flat file source. Open the Data Flow Designer and select Flat File Connection Manager in the Connection Manager pan. You can see the Properties of the flat file connection manager in the right pan. Click on Expression to proceed.
Another dialog box will open to define an expression for the connection manager property. As you want to assign the variable to the Connection String property, select ConnectionString from the property list and click on balloon (…) in the Expression column.
Let’s proceed to the dialog box named Expression Builder. Here, you need to define the expression for the connection string property. We are storing the CSV file path in the FilePath variable, so we will use it to build the expression. To do it, drag User::FilePath from the list of variables and drop it to an Expression text box.
Next, click Evaluate to view the value of a variable.
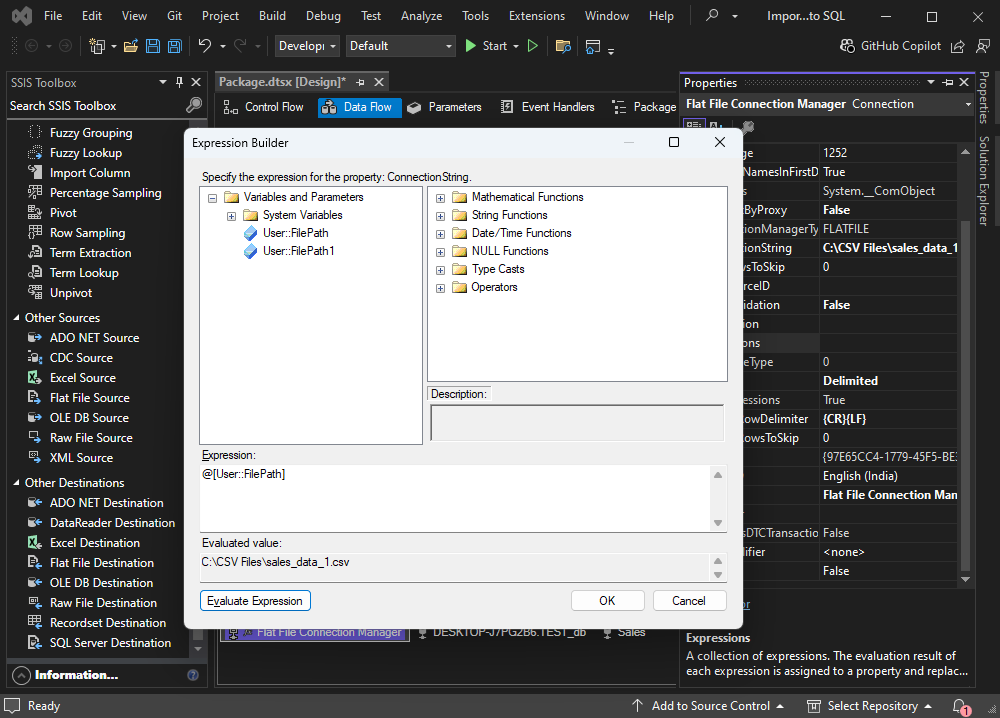
Click Ok to save the expression.
Now, let’s return to the Property Expression Editor dialog box. Here, you can see that Property expressions are configured properly.
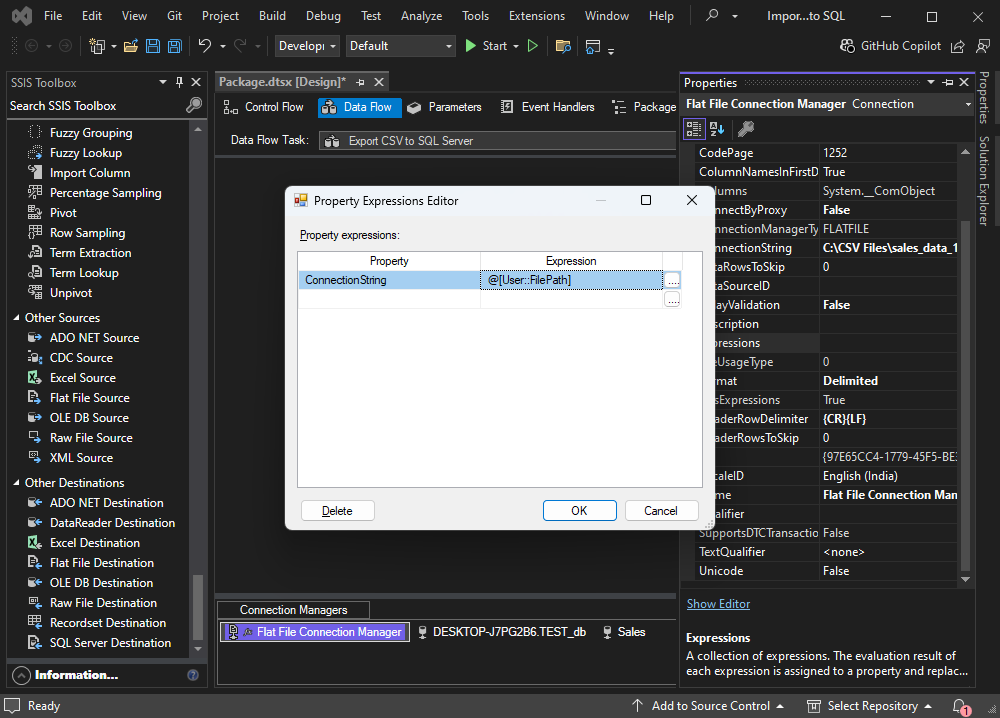
Click Ok to save the changes in the Flat File Connection Manager.
Test the SSIS Package
Now, in the control flow designer screen, drag the Data Flow task and drop it within the Foreach Loop container.
Click Execute. The package will be executed successfully.

Once the package is executed, execute the following queries to verify that data has been inserted in the tblSales table.
use Sales
go
select * from Sales.dbo.tblSales order by Product desc
Check the expected query output below.
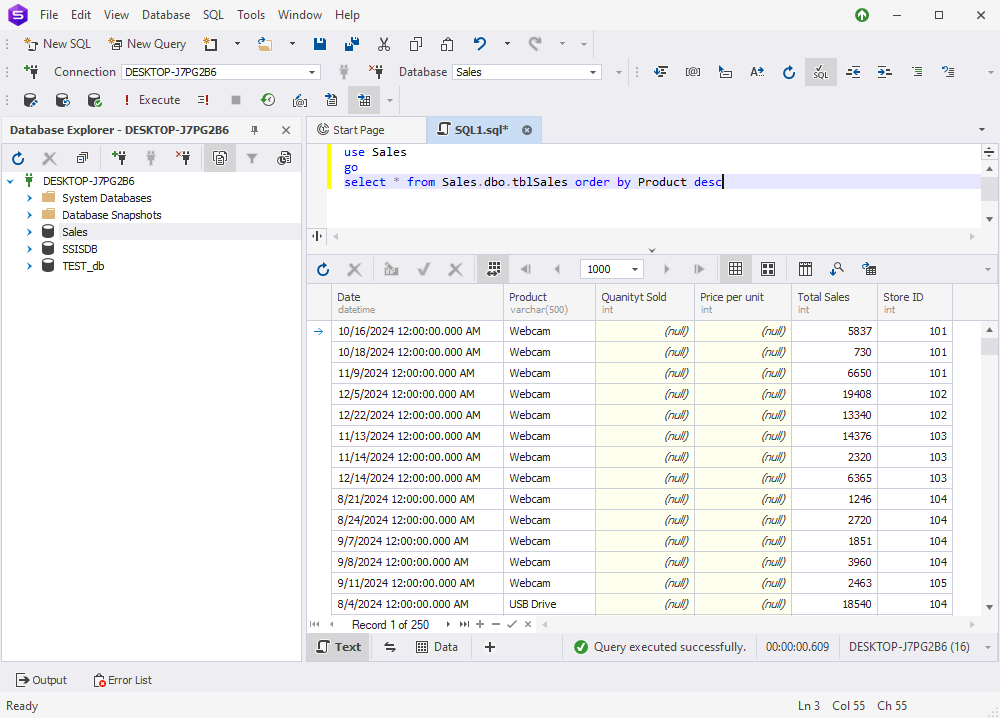
Let us check the product’s total sales for an individual store ID. Execute the following query.
use Sales
go
select Sum([Total Sales])StoreWiseSale, [Store ID] from Sales.dbo.tblSales group by [Store ID] order by
Sum([Total Sales]) asc
The query output will look as follows.
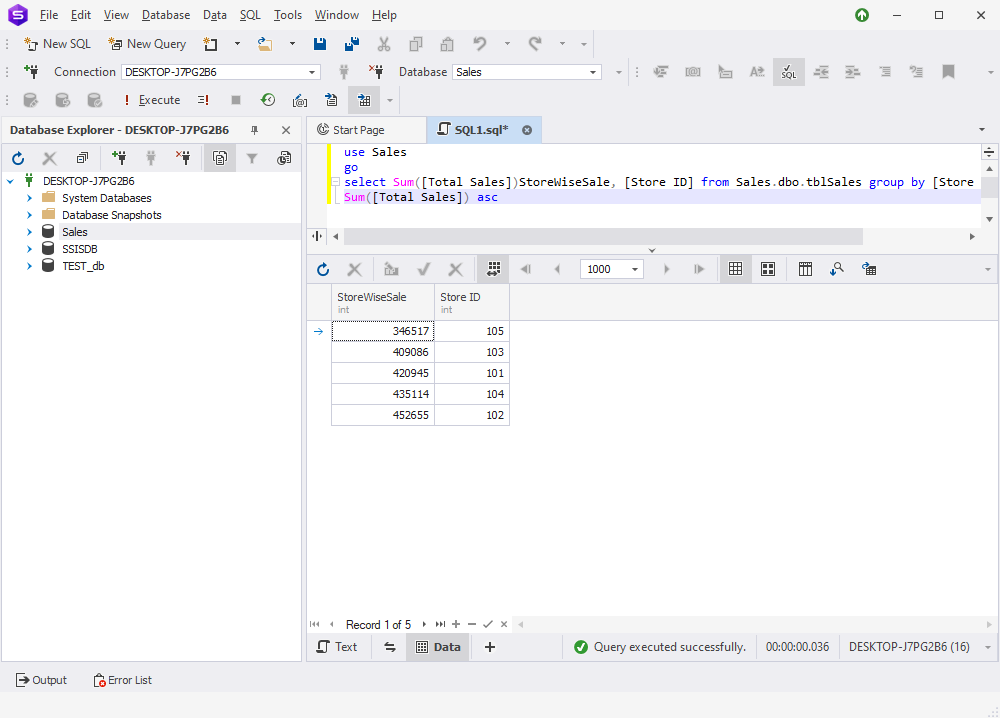
As you can see, the data of all CSV files has been inserted in the tblSales table.
Devart SSIS Components
Devart SSIS components provide an efficient and straightforward way to integrate and sync data between multiple data sources, be it a cloud app or a database, without having to write code, which makes these tools invaluable for streamlining data integration processes.
For instance, you can safely use the Data Flow Source component by Devart to configure the SELECT query, which we used in this article to retrieve data.
You also can use the Data Flow Destination component to speed up data loading, with per-row error processing, and turn to the Data Flow Lookup component to implement caching so that you won’t have to wait for the data from the row that was queried before, and will be able to use cached data from it instead.
With the Devart SSIS components, you can level up your data connectivity processes, facilitating:
- Data export and import from various sources in different formats
- Data synchronization between different sources
- Data migration from one app to another, from database to database, or from cloud up to RDBMS
- Integration of different data sources with a certain destination
Devart SISS components have everything you might need for fast data integration, supporting Extract Transform and Load processes. You can safely use these components to boost your experience when you use SSIS connectivity in your project.
Conclusion
SSIS foreach loop tasks are easy to handle once you know how to set them, and can help you save essential time when working with datasets from different sources. Feel free to use an example from this article to explore different enumerators, and check out a free trial of SSIS Components from Devart to boost your workflow.


