
Contents
- 1. Abbreviation
- 2. Objective
- 3. Technology Background
- 3.1. Python with Anaconda platform
- 3.2. Oracle Autonomous Data Warehouse Database
- 3.3. Devart ODBC for Oracle Driver
- 4. Prerequisites
- 5. Architecture
- 6. Install Devart ODBC for Oracle
- 7. Driver Configuration
- 7.1. Wallet Configuration
- 7.2. Window DNS Configuration
- 8. Create Data
- 9. Create ODBC Connection with pyodbc library
- 10. Build Credit Analytics
- 11. Conclusion

1. Abbreviation
| Oracle Cloud Infrastructure Console | OCI |
| Oracle Autonomous Data Warehouse | ADW |
2. Objective
This tutorial is to build Credit Card Analytics by leveraging Python, Devart ODBC for Oracle driver, and Oracle Autonomous Data Warehouse Database. You will execute your Python code with Anaconda what is a free and open-source platform. This article is not used to help you how to learn Python for building Credit Card Analytics or Prediction Analytics.
3. Technology Background
1. Python with Anaconda platform
Anaconda is a distribution of Python and R programming languages for scientific computing; it’s easy to simplify package management and deployment. It allows you to write and execute Python code easily and quickly; and it also comes with a large number of libraries / packages that you can use in your projects.
2. Oracle Autonomous Data Warehouse Database
Oracle Autonomous Data Warehouse (ADW) is fully-managed and offers high performance. It includes all of the performance of Oracle Database in the fully-managed environment that is turned and optimized for Data Warehouse workload. It means you don’t need to take more effort and resources (DBA role) to manage the database and optimize the workload.
Self-Driving
A user defines service levels, and the database makes them happen
Self-Securing
Protection from both external attacks and malicious internal users
Self-Repairing
Automated protection from all downtime
3. Devart ODBC for Oracle Driver
ODBC Driver for Oracle is a high-performance connectivity solution with enterprise-level features for accessing Oracle databases from ODBC-compliant reporting, analytics, BI, and ETL tools on both 32-bit and 64-bit Windows, macOS, and Linux. Our ODBC driver fully supports standard ODBC API functions and data types and enables easy and secure access to live Oracle data from anywhere.
A distinctive feature of this driver is the ease of establishing a connection – just specify the Host and Port of the Oracle server and there is no need to install and configure the Oracle Client.
4. Prerequisites
Before starting to connect Oracle database by using Devart ODBD for Oracle and building Credit Card Analytics, make sure to download the necessary tools and drivers:
- Click here to download the Anacondaapplication for Window OS
- Click here to download Devart ODBC for Oracle Driver
- Click here to download the Credit Card data
- Click here to understand how to provision ADW instances on Oracle Cloud
5. Architecture
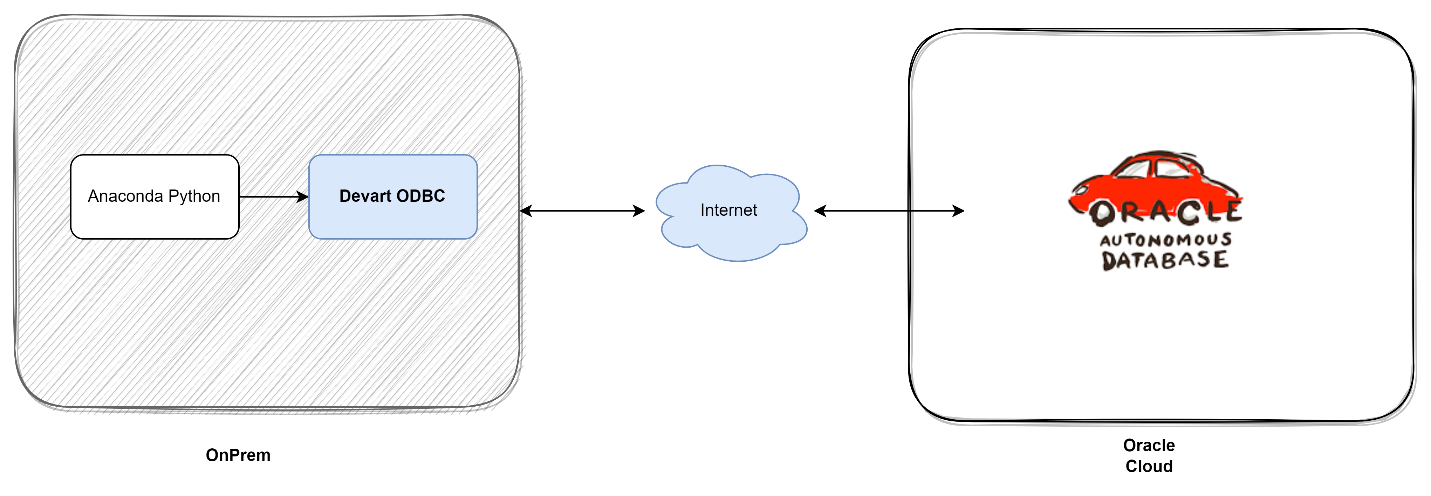
Anaconda Python uses Devart ODBC for Oracle driver to connect ADW that is hosted in Oracle Cloud, and query data for building analytics.
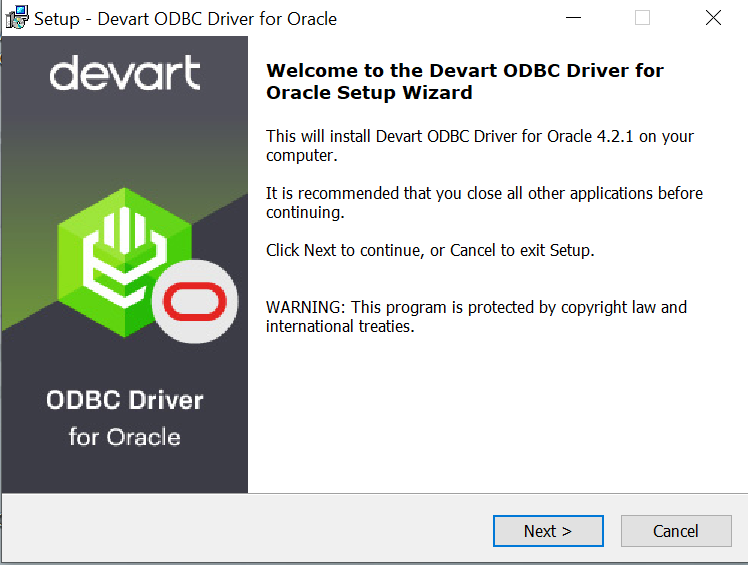
6. Install Devart ODBC for Oracle
Download and run the installer file to install
Follow the instruction

Select Destination Location

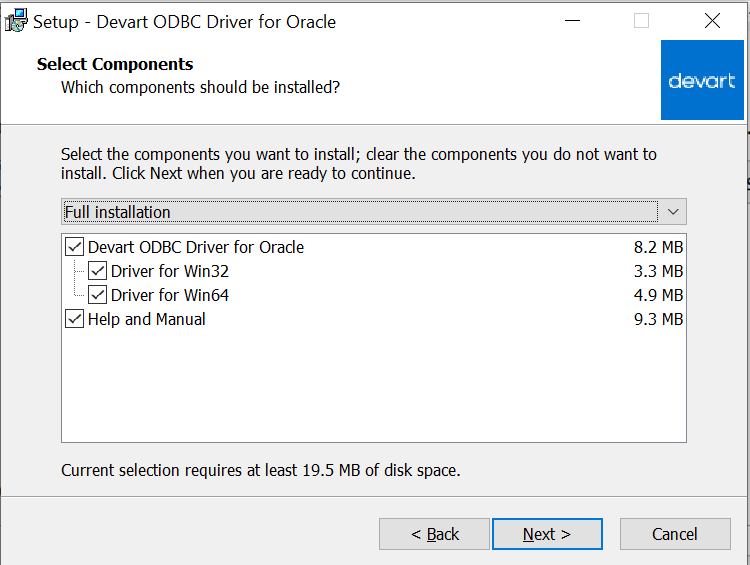
Select Components -> Full Installation
Click Next

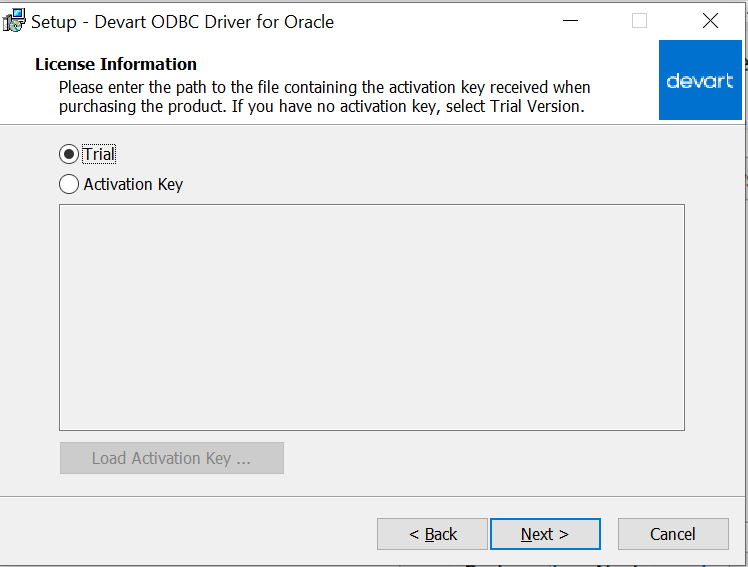
Click Next and enter the Activation Key or choose Trial option -> Next
Click Next to start the installation

After the installation is completed, we continue configuring the driver
7. Driver Configuration
In this step, we will need to configure Oracle Call Interface and Windows DNS
1. Wallet Configuration
- Download client credentials and store the file in a secure folder on your client computer by following the link https://docs.oracle.com/en/cloud/paas/autonomous-database/adbsa/connect-download-wallet.html#GUID-DED75E69-C303-409D-9128-5E10ADD47A35
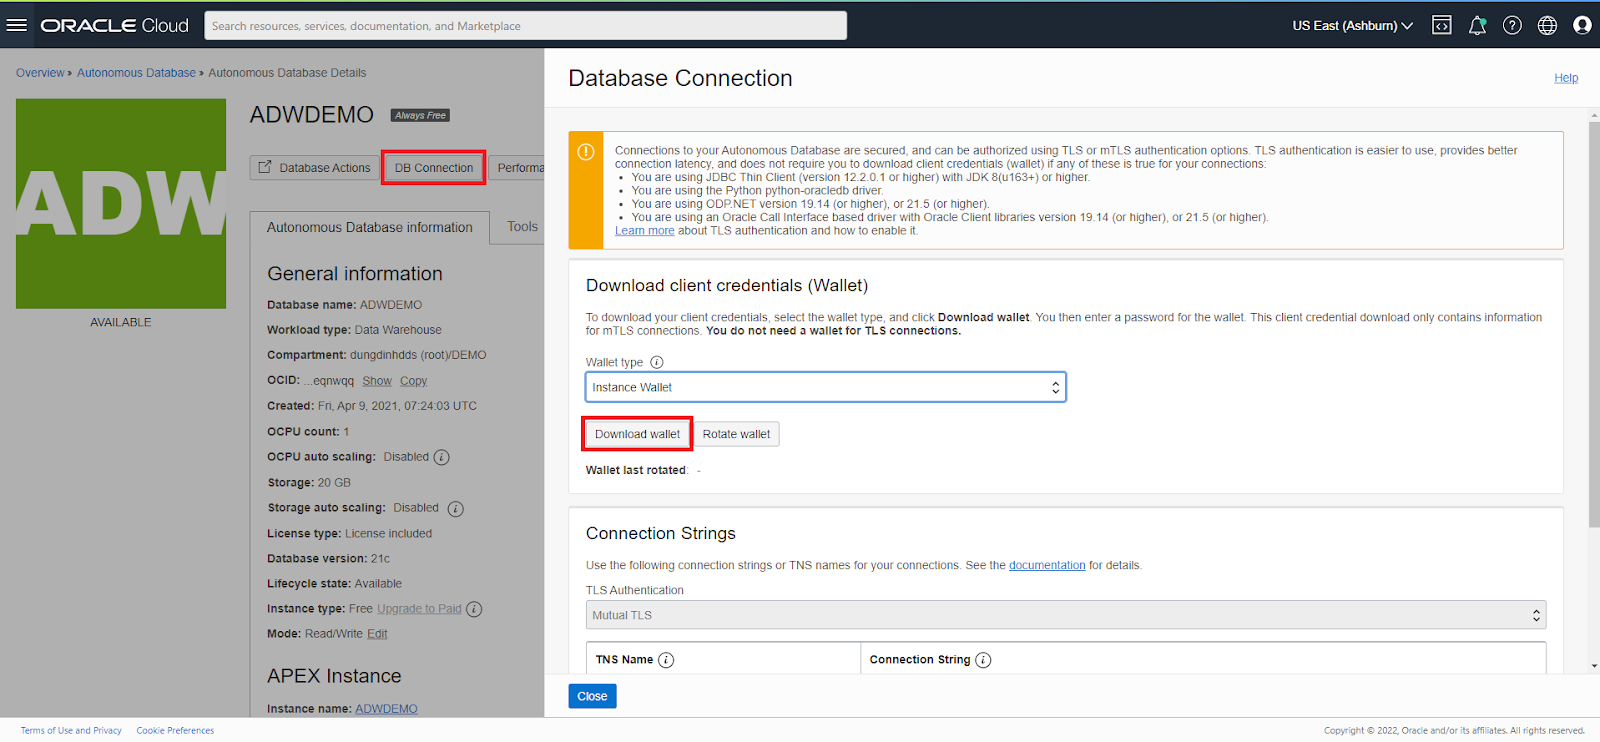
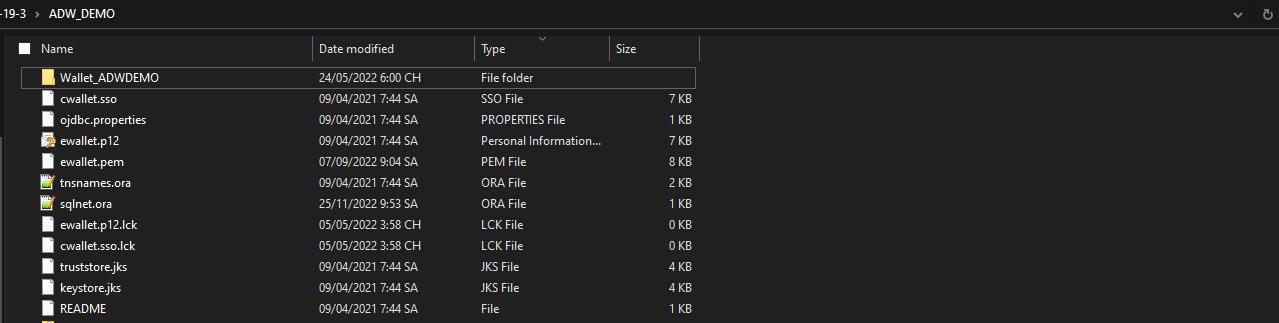
- Unzip/uncompress the credentials file into a secure folder on your client computer such as the folder C:\instantclient-basic-19-3\ADW_DEMO
- Create the TNS_ADMIN environment variable and set it to the location of the credentials file:
- Click Start, Run
- Type rundll32.exe sysdm.cpl,EditEnvironmentVariables

- Environment Variables window appears -> Click New…
- Enter Variable name: TNS_ADMIN
- Enter Variable value: C:\instantclient-basic-19-3\ADW_DEMO
- This folder is where the wallet file is uncompressed
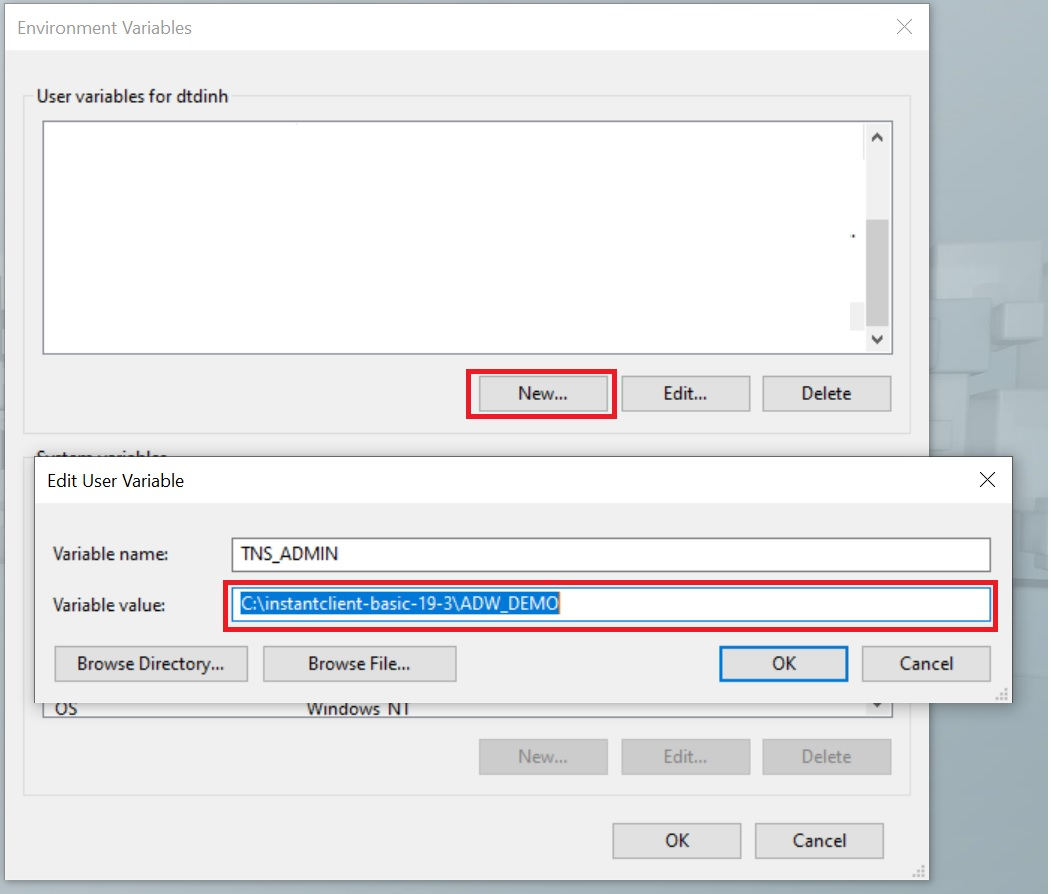
- Click OK -> Restart your computer to ensure the variable is created completely
2. Window DNS Configuration
- Click Start, Run
- Type the C:\WINDOWS\SysWOW64\odbcad32.exe if the system is 64bit to open ODBC Data Source Administrator
- Click on the Driver tab and make sure Devart ODBC Driver for Oracle is in the list of drivers

- Select the User DSN or System DSN tab.
- Click Add. The Create New Data Source dialogue will appear.

- Select Devart ODBC Driver for ODBC Driver for Oracle and click Finish. The driver setup dialogue will open.

- Enter the connection information in the appropriate fields. Check on the checkbox Direct, Oracle Client will not be required to download and install in our environment.
- Open tnsname.ora file in the folder where the wallet file is uncompressed. We will get the connection information in the file such as Host Name, Port, and Service Name. We will select one of three services to establish the DNS Configuration for Devart ODBC.
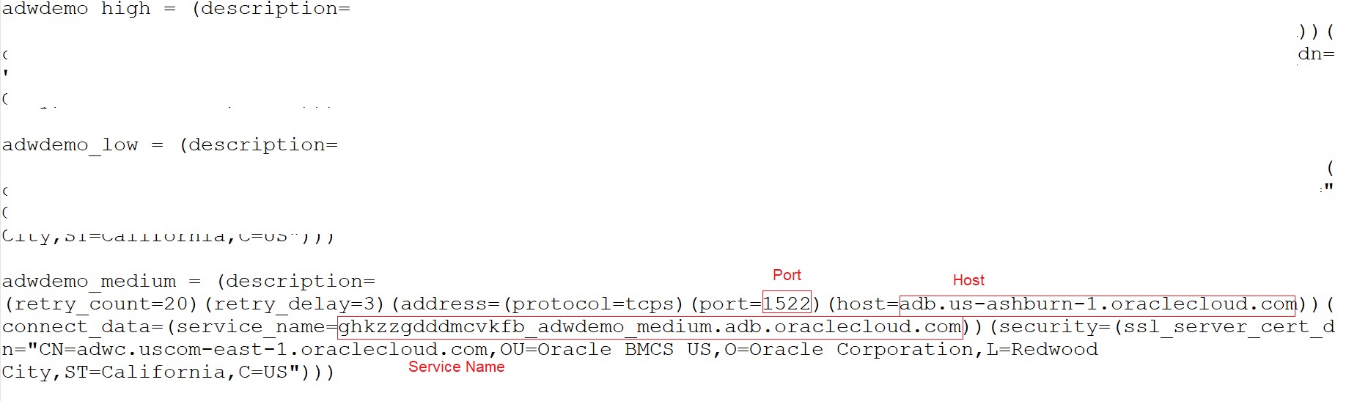
- Host: adb.us-ashburn-1.oraclecloud.com
- Port: 1522
- Service Name: ghkzzgdddmcvkfb_adwdemo_medium.adb.oraclecloud.com
- User ID: <database user schema created in ADW instance>
- Password: <enter password>
- The above information will be different and depend on your ADW instance provisioned
- Autonomous Data Warehouse by default supports Mutual TLS (mTLS) connections that clients connect through a TCPS (Secure TCP) database connection using standard TLS 1.2 with a trusted client certificate authority (CA) certificate. Certification authentication with Mutual TLS uses an encrypted key stored in a wallet on both the client (where the application is running) and the server (where your database service on the Autonomous Data Warehouse is running). It means we will need to provide the wallet file for Devart ODBC to ensure the secured connection
- Go to Security Settings -> SSL Options
- Wallet Path: path to cwallet.sso file. This file is located in the folder where the wallet file is uncompressed C:\instantclient-basic-19-3\ADW_DEMO\cwallet.sso
- Server Certificate DN: CN=adwc.uscom-east-1.oraclecloud.com,OU=Oracle BMCS US,O=Oracle Corporation,L=Redwood City,ST=California,C=US
- Server Certificate DN is extracted from tnsname.ora file that is the value of ssl_server_cert_dn
adwdemo_medium = (description= (retry_count=20)(retry_delay=3)(address=(protocol=tcps)(port=1522)(host=adb.us-ashburn-1.oraclecloud.com))(connect_data=(service_name=ghkzzgdddmcvkfb_adwdemo_medium.adb.oraclecloud.com))(security=(ssl_server_cert_dn=”CN=adwc.uscom-east-1.oraclecloud.com,OU=Oracle BMCS US,O=Oracle Corporation,L=Redwood City,ST=California,C=US“)))

- Click on Test Connection and make sure the connection is corrected.
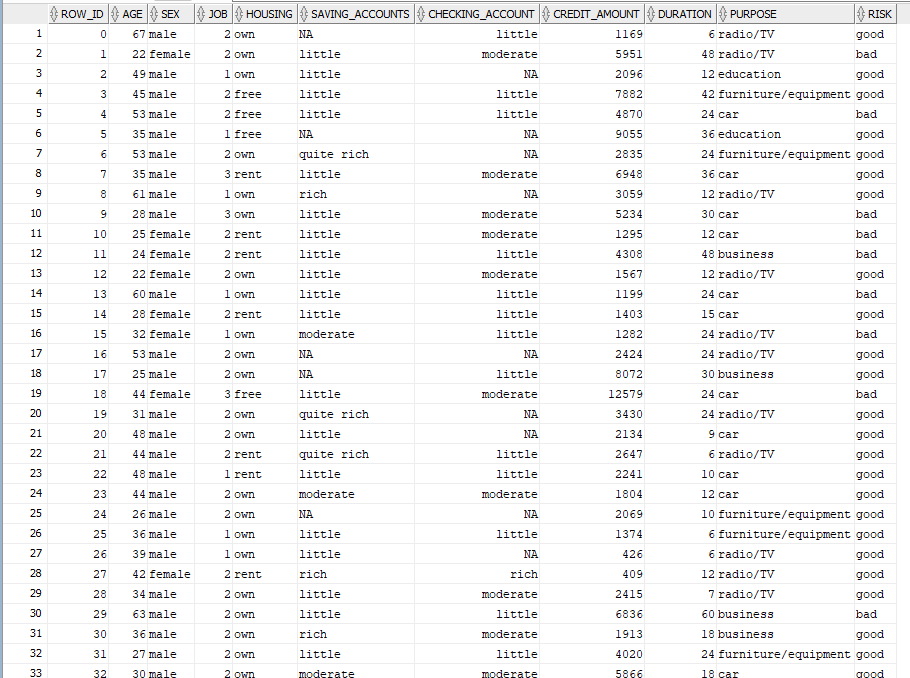
8. Create Data
- Now, we will load Credit Card data into ADW user schema
- Create a new table DW_CREDIT_DATA_F
- Import data
Metadata Definition
| COLUMN | DESCRIPTION | DATA TYPE |
| AGE | Age of Person | NUMBER(3,0) |
| SEX | Sex/Gender: male, female | VARCHAR2(20) |
| JOB | 0 – unskilled and non-resident1 – unskilled and resident2 – skilled3 – highly skilled | NUMBER(1,0) |
| HOUSING | Identify a person who owns a house or notown, rent, or free | VARCHAR2(50) |
| SAVING_ACCOUNTS | Kind of Saving Accountslittle, moderate, quite rich, rich | VARCHAR2(50) |
| CHECKING_ACCOUNT | NUMBER(22,7) | |
| CREDIT_AMOUNT | NUMBER(22,7) | |
| DURATION | Identify how long for cre | NUMBER(4,0) |
| PURPOSE | The purpose of usage:car, furniture/equipment, radio/TV, domestic appliances, repairs, education, business, vacation/others | VARCHAR2(150) |
| RISK | Value Target:goodbad | VARCHAR2(50) |
- SQL script to create a table
CREATE TABLE DW_CREDIT_DATA_F(

    ROW_ID                        NUMBER(10, 0),

    AGE                                NUMBER(3, 0),

    SEX                                 VARCHAR2(20),

    JOB                                 NUMBER(1, 0),

    HOUSING                       VARCHAR2(50),

    SAVING_ACCOUNTS    VARCHAR2(50),

    CHECKING_ACCOUNT VARCHAR2(50),

    CREDIT_AMOUNT        NUMBER(22, 7),

    DURATION                     NUMBER(4, 0),

    PURPOSE                        VARCHAR2(150),

    RISK                                 VARCHAR2(50)

)
9. Create ODBC Connection with pyodbc library
In this step, we will use Devart ODBC for Oracle driver to establish the connection bridge between Python and Oracle Database Engine by using pyodbc library
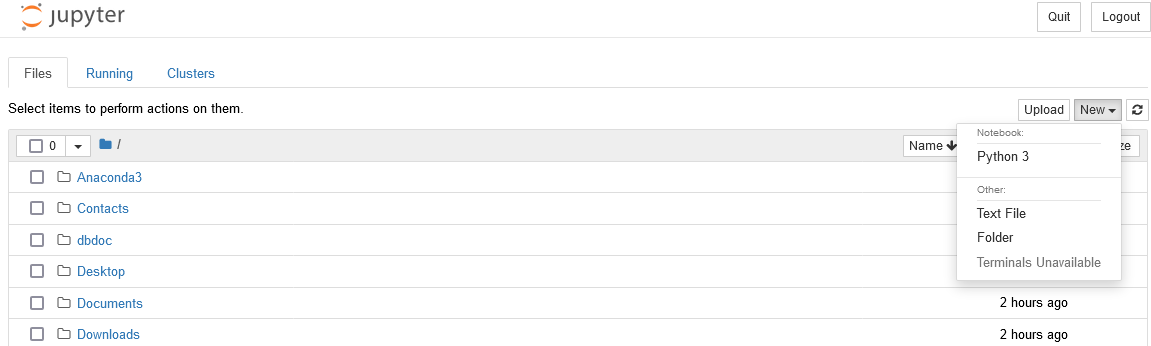
- Open Anaconda Navigator -> Click on jupyter notebook to create a new session
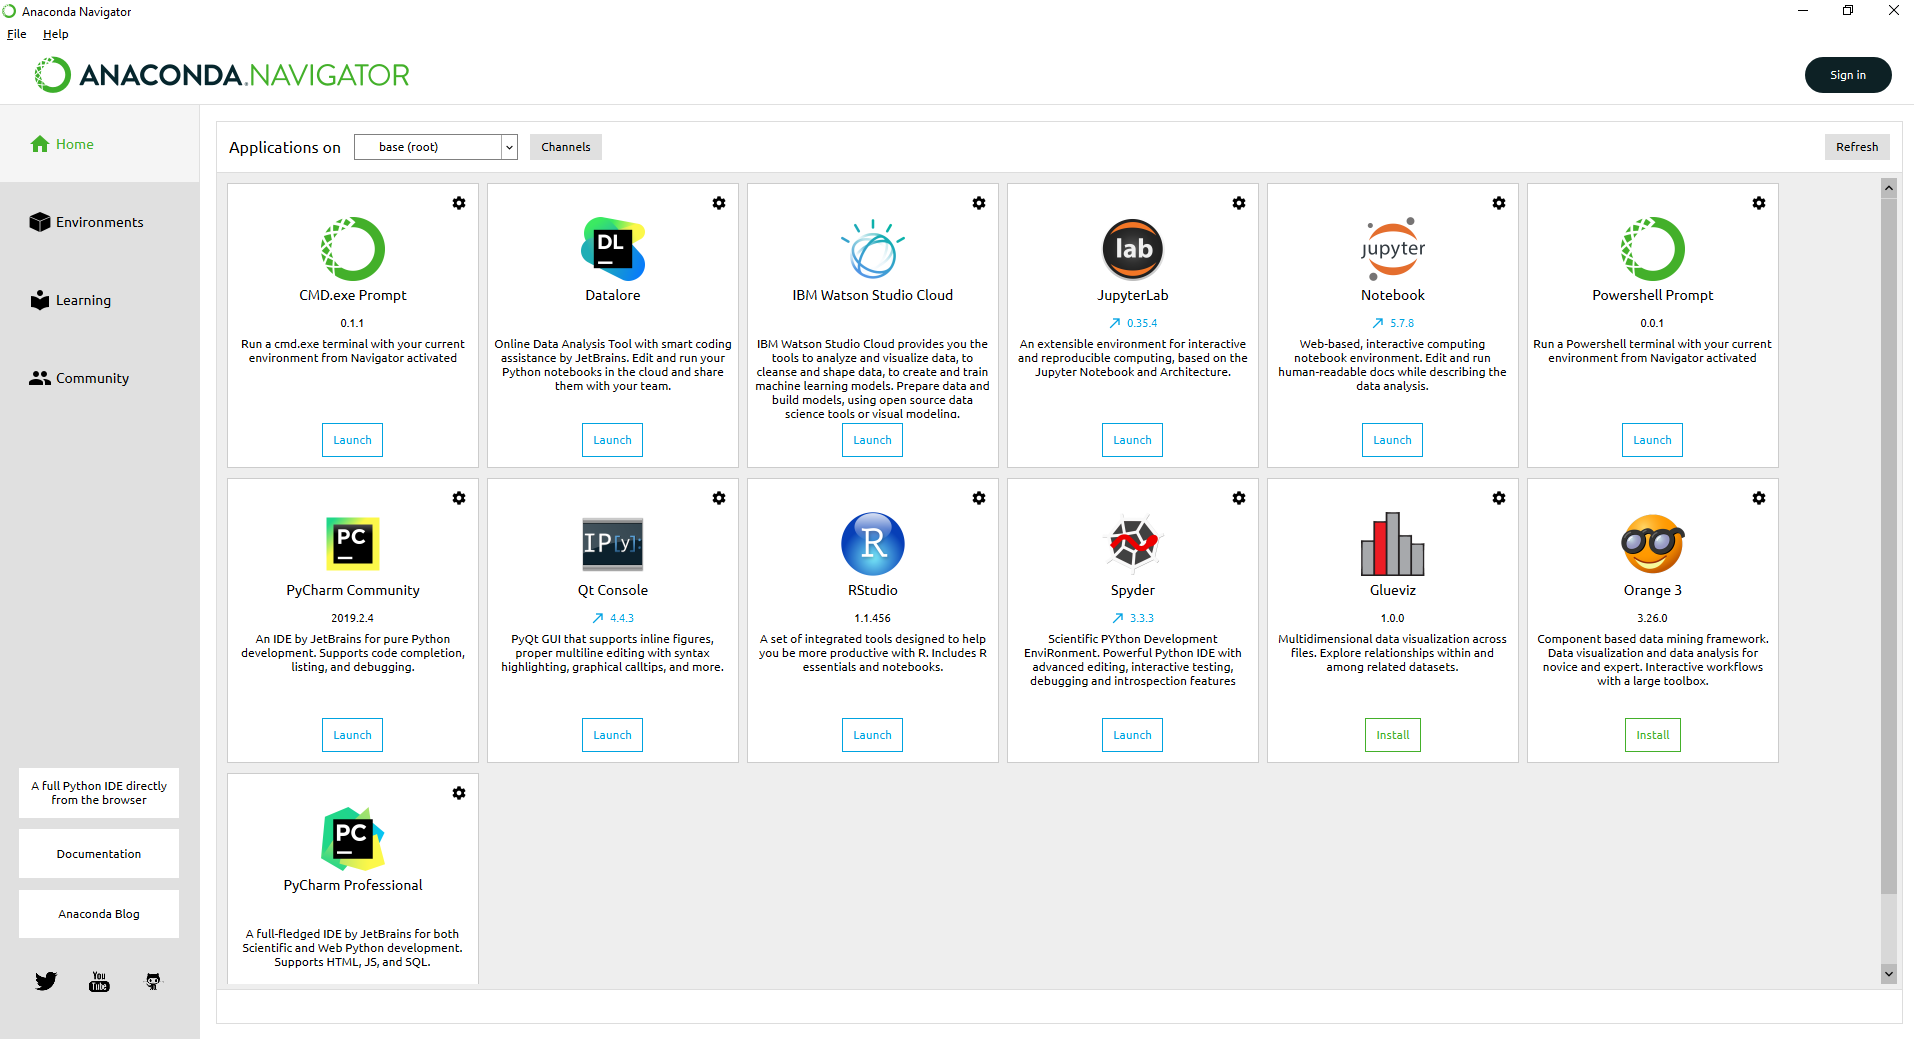
- You are redirected to a local web page -> Click on New -> Python 3
- To connect to Autonomous Database Warehouse (ADW), you need to use pyodbc library
- The connection string for pyodbc
DRIVER=Devart ODBC Driver for Oracle
Direct=True;Host=adb.us-ashburn-1.oraclecloud.com
Port=1522
Service Name=ghkzzgdddmcvkfb_adwdemo_low.adb.oraclecloud.com
User ID=<Your ADW Database User Name >
Password=<Your ADW Database User Password>
Use SSL=True
Wallet Path=<Path of cwallet.sso file> such C:\instantclient-basic-19-3\ADW_DEMO\cwallet.sso
Note: You must unzip the Wallet file after downloading it from Oracle ADW. Below is a full connection string
import pyodbc
import pyodbc
cnxn = pyodbc.connect("DRIVER=Devart ODBC Driver for Oracle;Direct=True;Host=adb.us-ashburn-1.oraclecloud.com;Port=1522;Service Name=ghkzzgdddmcvkfb_adwdemo_low.adb.oraclecloud.com;User ID=DEMO;Password=xxxxxxxxx;Use SSL=True;Wallet Path=C:\instantclient-basic-19-3\ADW_DEMO\cwallet.sso")
- Run to verify the connection
- To work with Devart ODBC Driver, pyodbc library supports the functions cursor.execute() and cursor.fetchone() to retrieve data from the database table.
cursor = cnxn.cursor()
cursor.execute("SELECT ROW_ID,AGE,SEX,JOB,HOUSING,SAVING_ACCOUNTS,CHECKING_ACCOUNT,CREDIT_AMOUNT,DURATION,PURPOSE,RISK FROM DW_CREDIT_DATA_F")
row = cursor.fetchone()
while row:
    print (row)
row = cursor.fetchone() 
- The connection is established successfully. You are ready to start the Build Credit Card based on Python language and data hosted in ADW.
10. Build Credit Analytics
- For building Credit Analytics, you need to load some libraries
#Load the librarys
import pandas as pd #To work with dataset
import numpy as np #Math library
import seaborn as sns #Graph library that use matplot in background
import matplotlib.pyplot as plt #to plot some parameters in seaborn
# it's a library that we work with plotly
import plotly.offline as py
py.init_notebook_mode(connected=True) # this code, allow us to work with offline plotly version
import plotly.graph_objs as go # it's like "plt" of matplot
import plotly.tools as tls # It's useful to we get some tools of plotly
import warnings # This library will be used to ignore some warnings
from collections import Counter # To do counter of some features
- If you encounter the issue “no module named ‘plotly’ jupyter notebook”, you need to close the current session of Jupyter Notebook; and go back Anaconda Navigator. Click on CMD.exe prompt, you are redirected to Window Command Prompt; then type the command
pip install plotly
- Then open a new Jupyter Notebook, the issue will be resolved
- Load table into a data frame by using read_sql function of Pandas library. This function requires two parameters: SQL Select statement and Connection
sql ='SELECT ROW_ID,AGE,SEX,JOB,HOUSING,SAVING_ACCOUNTS,CHECKING_ACCOUNT,CREDIT_AMOUNT,DURATION,PURPOSE,RISK FROM DW_CREDIT_DATA_F'
df_credit = pd.read_sql(sql,cnxn)
print(df_credit)
- Now, you might want to know the Age Distribution within Credit Risk (Good, Bad). The following code to create Histogram charts based on Age Category and Credit Card Risk
# Analysis Age Distribution within Risk Category
df_good = df_credit.loc[df_credit["RISK"] == 'good']['AGE'].values.tolist()
df_bad = df_credit.loc[df_credit["RISK"] == 'bad']['AGE'].values.tolist()
df_age = df_credit['AGE'].values.tolist()

#First plot
trace0 = go.Histogram(
    x=df_good,
    histnorm='probability',
    name="Good Credit"
)
#Second plot
trace1 = go.Histogram(
    x=df_bad,
    histnorm='probability',
    name="Bad Credit"
)
#Third plot
trace2 = go.Histogram(
    x=df_age,
    histnorm='probability',
    name="Overall Age"
)

#Creating the grid
fig = tls.make_subplots(rows=2, cols=2, specs=[[{}, {}], [{'colspan': 2}, None]],
                          subplot_titles=('Good','Bad', 'General Distribuition'))

#setting the figs
fig.append_trace(trace0, 1, 1)
fig.append_trace(trace1, 1, 2)
fig.append_trace(trace2, 2, 1)

fig['layout'].update(showlegend=True, title='Age Distribuition', bargap=0.05)
py.iplot(fig, filename='custom-sized-subplot-with-subplot-titles')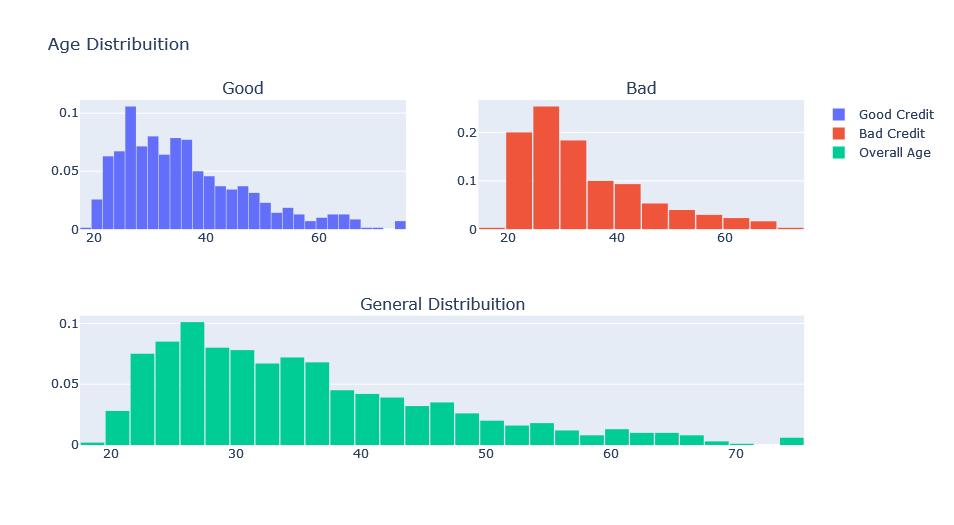
- The following code to create Boxlpot charts based on Age Category and Credit Amount
# List of Age Category
interval = (18, 25, 35, 60, 120)

cats = ['Student', 'Young', 'Adult', 'Senior']
df_credit["Age_cat"] = pd.cut(df_credit.AGE, interval, labels=cats)
# Create Box-plot visualizaton
fig, ax = plt.subplots(figsize=(20,10))
box = sns.boxplot(x=df_credit["Age_cat"],y=df_credit["CREDIT_AMOUNT"], hue=df_credit["RISK"], data=df_credit)
box.set_xticklabels(box.get_xticklabels(), rotation=45)
fig.subplots_adjust(bottom=0.5)
plt.tight_layout()
plt.show()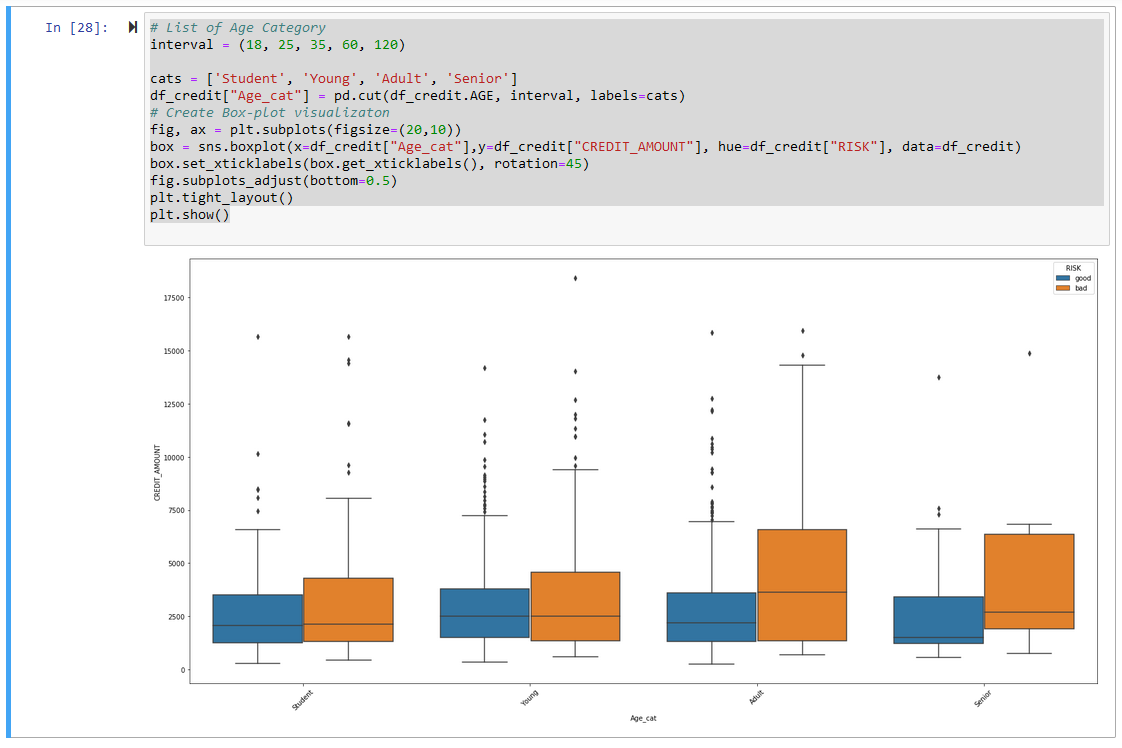
11. Conclusion
- If you are Data Analyst, Data Scientist…. and you are familiar with Python language. Devart ODBC Driver for Oracle and Python are good choices for your program because it’s easy for installing and configuring; you don’t need to spend more effort on how establishing the connection between Python and Oracle Autonomous Database / Oracle Database. Just install the Devart ODBC Driver for Oracle and start your Python Code.