
In database development, cloning data from one column to another is a common practice. Being a fundamental operation, it plays a pivotal role in ensuring data integrity, enabling efficient analysis, and facilitating various data management tasks. Whether it’s used for performing calculations, preserving backups, optimizing performance, or accommodating schema changes, understanding the process of cloning data in SQL tables is essential for developers seeking to harness the full potential of their databases.
In this article, we’ll learn how to clone data from one column to another within the same SQL Server table using T-SQL and the dbForge Data Compare tool.

Contents
- Reasons to clone data from one column to another in SQL tables
- Clone data between columns within the same SQL table using T-SQL
- Clone data between columns using dbForge Data Compare
Reasons to clone data from one column to another in SQL tables
There are several reasons to clone data from one column to another in a SQL table. Here are a few common scenarios:
- Calculation and transformation
Developers may need to perform calculations or transformations on the data in one column and store the results in another column. This ensures easier manipulation and analysis of the transformed data without altering the original values. - Data backup and archiving
Creating a copy of data from one column to another can serve as a backup or archival mechanism. It provides an additional layer of protection in case the original data gets modified, deleted, or corrupted. - Data redundancy and performance optimization
In some cases, duplicating data between columns can improve query performance. By pre-calculating or denormalizing data and storing it in a separate column, developers can avoid expensive computations during runtime and enhance overall system performance. - Data migration and schema changes
When modifying the structure or schema of a database table, developers may need to clone data from one column to another to ensure data compatibility or accommodate new requirements. - Historical tracking and audit trail
By cloning data from one column to another, developers can create a historical record or audit trail of changes. This allows for tracking and analysis of data evolution over time. - Data integration and data warehousing
When integrating data from multiple sources or consolidating data into a data warehouse, developers may clone data from one column to another to align data formats or combine related information.
As you can see, cloning data from one column to another provides developers with flexibility, performance optimization, data integrity, and historical tracking capabilities in various scenarios within a SQL table.
Before you begin
Before we start, here is a list of tips to help you make the cloning process smooth, as well as minimize any risk of data loss or integrity issues, and ensure data consistency:
- Create a backup of the table or database before making any modifications. This ensures that you have a copy of the original data in case of any unexpected issues during the cloning process.
- Check the compatibility of the data types between the source and destination columns. The data types must match or be converted to avoid any data truncation, loss, or type conversion errors.
- Consider any constraints defined on the columns, such as primary key, unique, or non-null constraints.
- Handle the cloning process within a transaction depending on the size and complexity of the data. You can roll back the transaction in case of any failures or errors.
- Connect to the SQL Server with a username having the ALTER permission to modify a SQL table granted.
Clone data between columns within the same SQL table using T-SQL
The UPDATE statement can be used to copy the data from one column to another using a T-SQL query. The syntax of the statement would be:
UPDATE table
SET new_column=old_column
WHERE conditions;- table is the name of the table to be updated.
- new_column is the name of the column to which the data will be copied.
- old_column is the name of the column from which the data will be copied.
- conditions are the conditions to be met for the UPDATE statement you want to execute. If no conditions are provided, all records in the table will be updated. This parameter is optional.
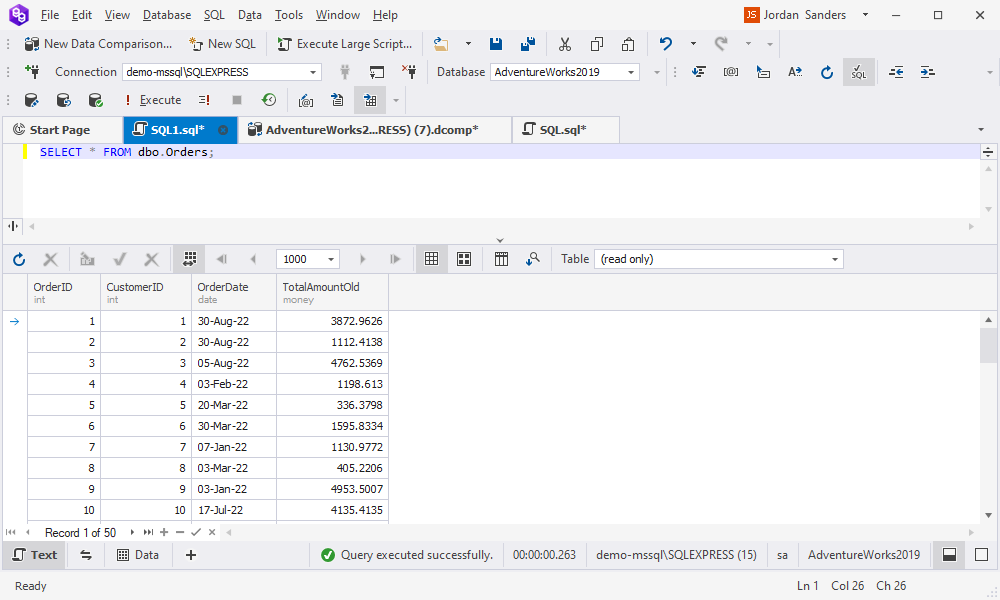
As a prerequisite, we have created the Orders table in the AdventureWorks2019 database to use in our example. Let’s execute the SELECT statement to view the data in the table.
Next, we’ll add a new empty column – TotalAmountNew, which will serve as a clone of the data from the TotalAmountOld column. It is important to note that the data type of the TotalAmountNew column should match the data type of the TotalAmountOld column to maintain consistency. To modify the table and add a new column, use the ALTER TABLE statement.
ALTER TABLE dbo.Orders
ADD TotalAmountNew MONEY;
Later on, if you need to change the data type or constraints of an existing column, such as resizing or allowing NULL values, you can use the ALTER COLUMN clause of the ALTER TABLE command, often referred to as the SQL ALTER COLUMN operation.
Now, we can copy the data from one column to another by executing the UPDATE statement.
UPDATE dbo.Orders
SET TotalAmountNew = TotalAmountOld;
After that, execute the SELECT statement to see whether the data has been cloned:
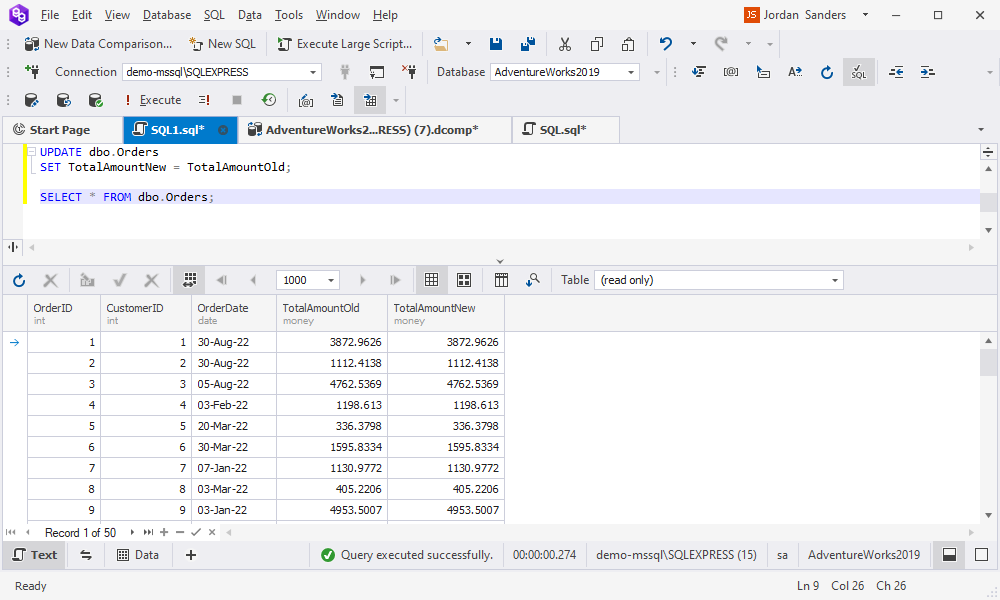
As you can see, the columns – TotalAmountNew and TotalAmountOld – display the same data.
And now, let’s explore how to copy the data from one column to another within the same SQL table using the dbForge Data Compare tool. This can be achieved with the Column Mapping feature, which allows mapping specific columns, even with different names.
Want to learn how to streamline copying of SQL databases? Check our detailed guide on the process based on dbForge Studio for SQL Server.
Clone data between the columns using dbForge Data Compare
The cloning process of data between two columns with the help of the dbForge tool includes two steps:
- Step 1: Data Comparison.
- Step 2: Data Synchronization.
As a prerequisite for this example, we have created the Sales table in the AdventureWorks2019 database:
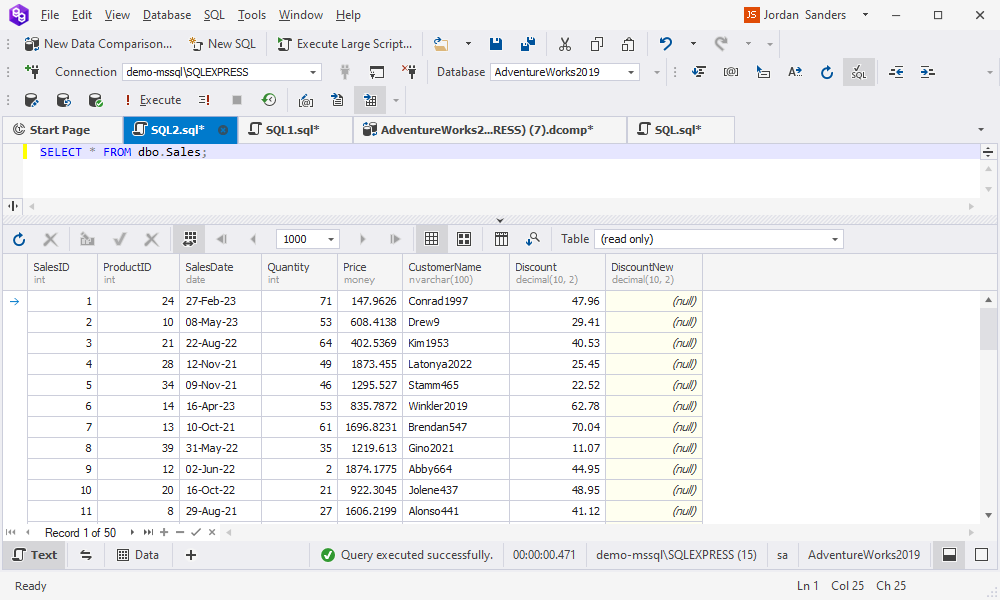
As you can see, the DiscountNew column has been intentionally created empty because it will display the cloned data later.
Step 1: Data Comparison.
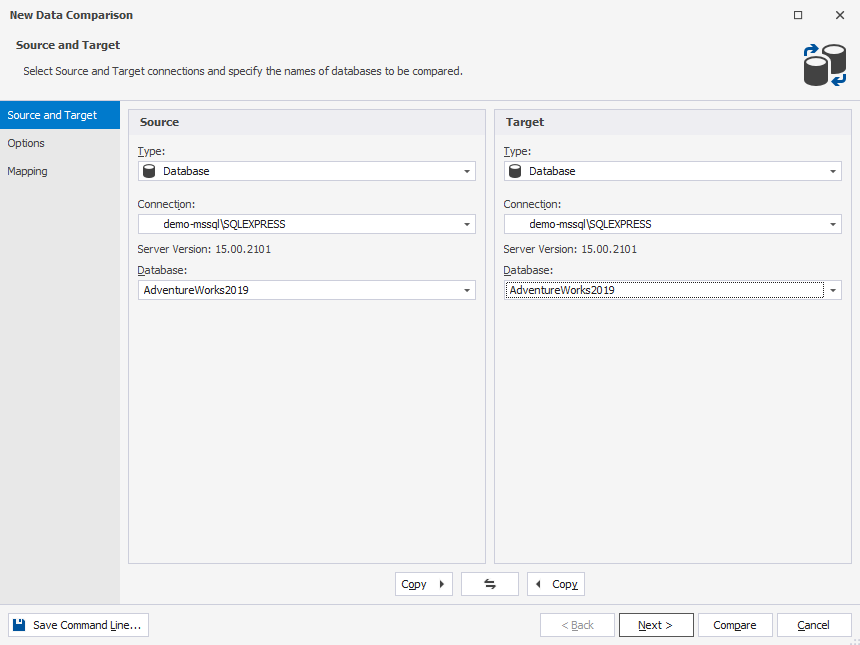
To get started, open dbForge Data Compare and click New Data Comparison. In the New Data Comparison wizard that opens, choose the same server connection and database as source and target.
Then, go to the Mapping page. By default, all objects are selected for data comparison. Since we want to compare the columns from the Sales table, we exclude the other objects by clearing the checkboxes next to them.
The Columns in Comparison grid column displays the number of columns to be compared for the selected database table. Click the More Options menu to open the Column Mapping dialog and specify the columns for comparison.
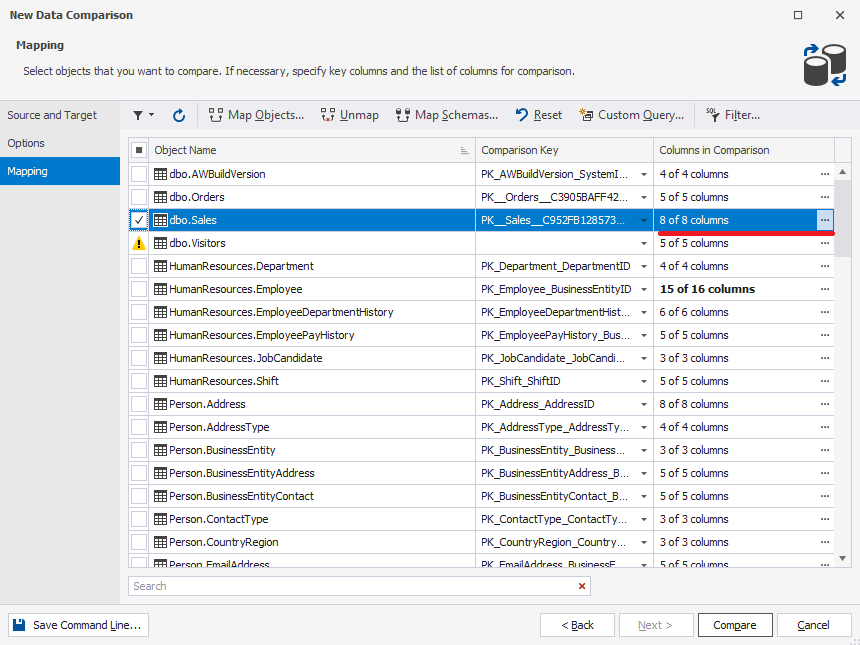
The Column Mapping dialog shows the source columns on the left and the destination columns on the right.
To proceed, clear the checkboxes next to all the columns except for the column with the primary key (SalesID) and the column from which the data will be copied (Discount). In the Select columns for comparison grid, do the following on the right:
- For the empty column – DiscountNew, select None.
- For the source Discount column, select the DiscountNew destination column that will contain the cloned data.
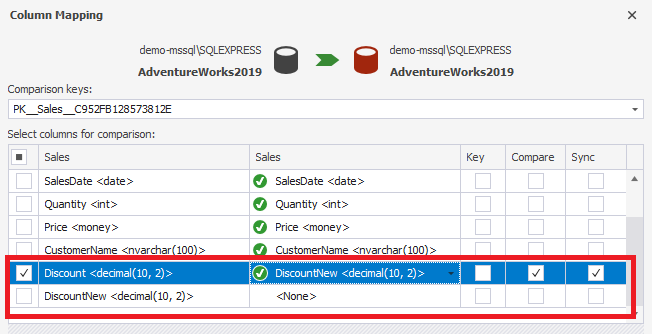
Once done, click OK to save the changes. In the New Data Comparison wizard, click Compare to execute the comparison.
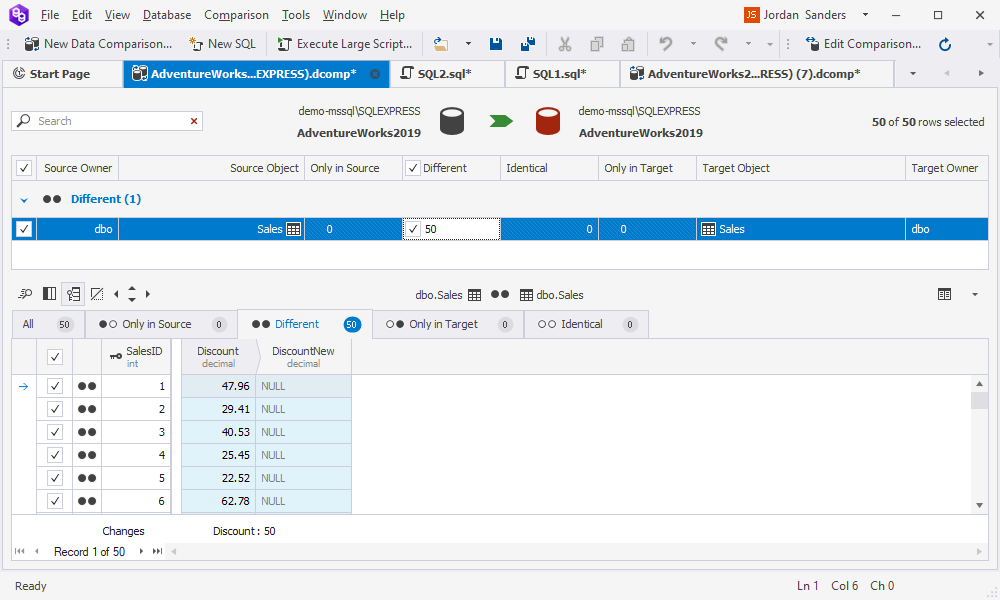
After the data sources have been successfully compared, the comparison results appear in the grid. The source and destination values that differ are displayed on the Different tab.
Step 2: Data Synchronization.
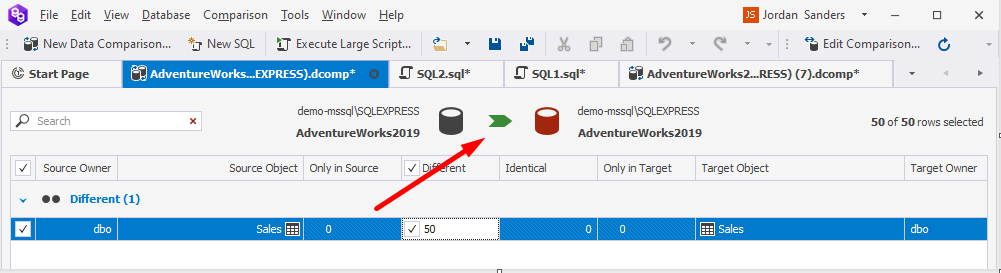
Now, we can run synchronization to finish the cloning process. To do this, click Synchronize data to the target database on top of the document.
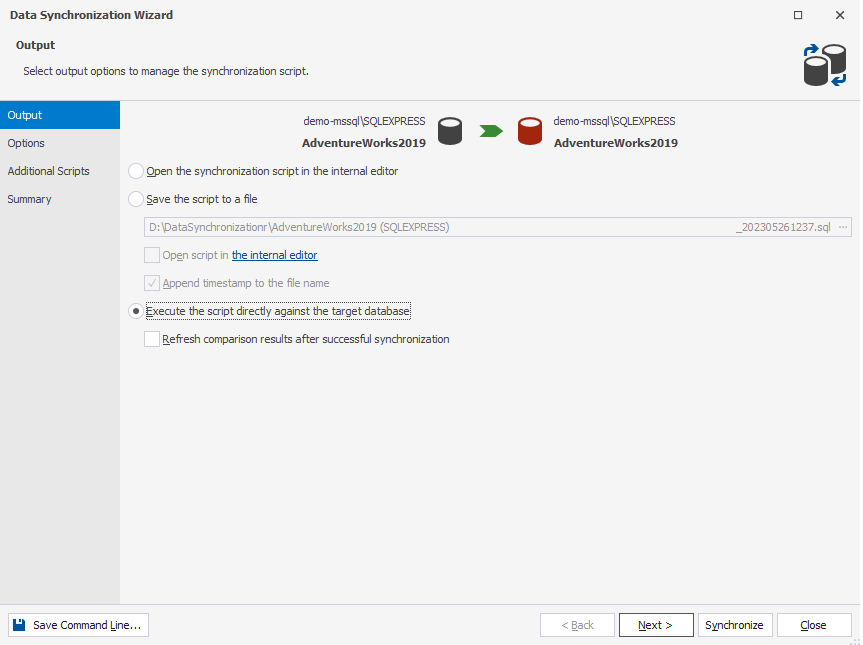
In the Data Synchronization Wizard that opens, select Execute the script directly against the target database and click Synchronize. In the pop-up window informing that you are about to modify the database on the specified server is displayed, click OK to confirm the action.
Let’s check whether the data from one column has been cloned to another column in the SQL table. To do this, run the SELECT statement.
In the output, we see that the values from the Discount column have been copied to the DiscountNew column.

Access data and schema comparison features along with SQL coding assitance, source control, database and table designer, and a full toolset for database management and administration within dbForge Studio for SQL Server.
Conclusion
To sum up, there are different ways to clone data between columns within the same SQL table, and which one to use depends on your specific needs. Still, we would like to note that the cloning process using dbForge Data Compare is simple and seamless and does not require extensive technical knowledge. This tool simplifies and accelerates routine operations, enhancing developers’ productivity significantly.
Download a fully-functional 30-day trial version of dbForge Data Compare for SQL Server to evaluate its advanced capabilities.
