
This article explains how to install and configure the ODBC Driver Manager on Windows, macOS, and Linux. Also, it shows how to configure the ODBC data source name.
Contents
What is an ODBC Driver Manager?
To explain what this driver manager is, take a look at the ODBC architecture in Figure 1.
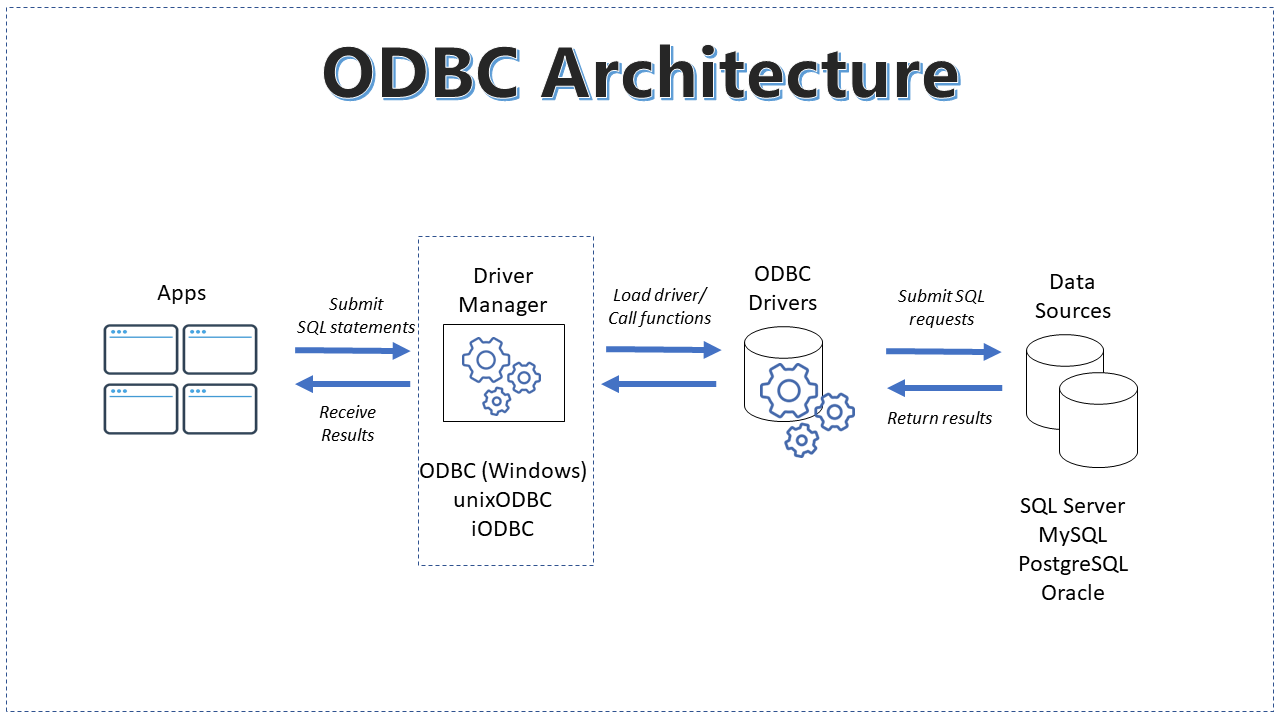
The ODBC driver manager manages communication between apps and ODBC drivers. To put it simply, this is what happens when your application starts connecting to your database:
- First, the app connects to a certain database using a connection string or an ODBC data source name.
- Then, the driver manager loads the correct ODBC driver based on the connection string.
- When the driver is loaded, the manager calls an SQLConnect or SQLDriverConnect function in the ODBC driver.
- The connect function in the driver establishes a connection to the database. The security credentials are passed from the connection string used by the application.
- Finally, the database responds by returning connection success or failure.
The application can now submit SQL statements through the driver manager. Then, they are submitted from the driver manager to the ODBC driver. And finally, into the database. The database will then return the results.
So, the ODBC driver manager performs the following:
- Provides an easy way to do common database tasks from your app. This is done uniformly regardless of the database product
- Loads and unloads ODBC drivers.
- Perform basic error handling.
- Calls ODBC driver functions.

How to Install ODBC Driver Manager
You can start using the ODBC driver manager after installing and configuring it. Let’s consider how to install the ODBC driver manager depending on the operating system.
Installing and Configuring an ODBC Driver Manager on Windows
ODBC driver manager for Windows already exists in modern Windows machines. Starting with Windows XP and Windows Server 2003, the driver manager for Windows is preinstalled. You don’t need to download and install it unless you’re using an older Windows operating system.
The driver manager for Windows is also pre-configured. So, all you need to do is to install ODBC drivers and configure data sources.
To connect to the ODBC data source, we use the ODBC Data Source Administrator. Here, we can see our ODBC driver manager in the About tab.
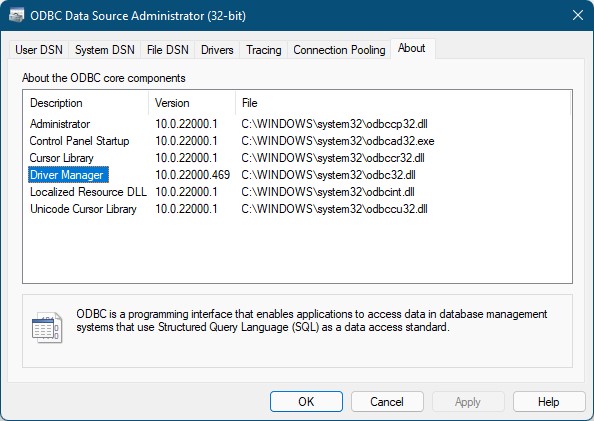
That’s the driver manager in Windows in a file called odbc32.dll. We can also see installed ODBC drivers in this app as shown in Figure 3 below.
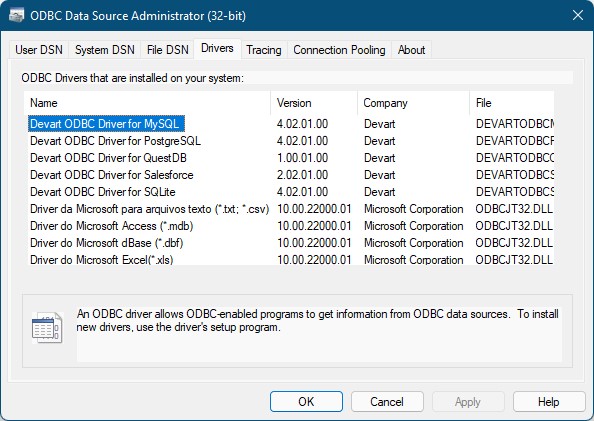
This list has a counterpart in the Windows registry as seen in Figure 4 below.

If you install another driver, an entry is added to the registry under ODBCINST.INI.
And we use these drivers to set up data source names or DSNs. When you configure a DSN, it is also stored in the Windows registry as shown in Figure 4. You can see this under the section ODBC.INI.
Note that there’s a separate odbcinst.ini and odbc.ini text files in C:\Windows. But for convenience, it is better to use the ODBC Data Source Administrator.
Installing and Configuring an ODBC Driver Manager on Linux
ODBC driver manager for Linux is unlike in Windows. You need to install it on your computer. In this case, we’re going to use the unixODBC driver manager and install it on the Ubuntu 20.04 LTS. So, Debian packages will be used to install ODBC drivers later.
What we need:
- The Terminal for installing unixODBC.
- Your favorite text editor for editing configuration files.
- Working installation of MySQL, PostgreSQL, and SQL Server.
- Devart ODBC drivers for MySQL, PostgreSQL, and SQL Server.
Now, don’t get intimidated by the Terminal. Many use this because if no one likes it, it won’t exist on all platforms. And sometimes, typing stuff is easier than clicking buttons.
So, let’s begin.
6 Painless Steps to Install and Configure an ODBC Driver Manager on Linux
Open the Terminal
There are a few ways to open the Terminal in Ubuntu.
The one is by clicking the Show Applications icon at the lower right corner of the screen. Then, search for Terminal, click its icon or press Enter when it appears in the search results.
Another is by pressing Ctrl-Alt-T. This option is easier and faster to do.
Download and Install UnixODBC
Download unixODBC source code. Note that it might need compilation, and if you want to get a compiled version, check this Linux RPM file. To install it, run the following command in the Terminal:
sudo apt-get install unixodbc unixodbc-devNote that you can install a compiled version of the unixODBC driver manager using a package manager that is suited to your operating system and distribution. For instance, on Red Hat Linux, you can use the yum command:
yum install unixODBC unixODBC-develWait until the installation completes.
Along with the installation of the driver manager comes a tester for DSNs called isql. Another is a tool called odbcinst that will help you with configurations. You will see these in action later. UnixODBC stores a list of drivers installed in a text file called odbcinst.ini. And all DSN configurations are stored in another file called odbc.ini. There’s no registry in Linux. So, this is the counterpart of the Windows registry entries you saw in Figure 4 earlier.
After installation, it’s still unusable until you install ODBC drivers.
Install ODBC Drivers
Open your favorite browser to download 3 Debian packages for the next ODBC drivers:
- MySQL. Select the ODBC Driver for MySQL 4.2 DEB x64. This is the 64-bit driver for MySQL.
- PostgreSQL. Select the ODBC Driver for PostgreSQL 4.2 DEB x64. This is the 64-bit driver for PostgreSQL.
- SQL Server. Select the ODBC Driver for SQL Server 4.2 DEB x64. This is the 64-bit driver for SQL Server.
Note the folder where you downloaded the packages.
Then, go to your download folder and double-click one of the DEB packages. You will see something like this in Figure 5.
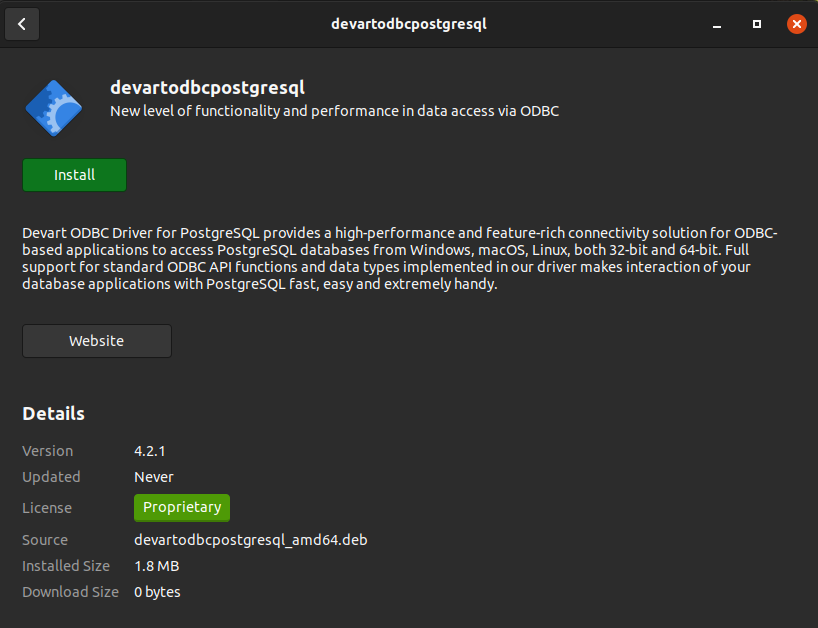
To install the driver, click the Install button and wait until installation finishes. The Install button changes to the Remove one if the installation is successfully completed. Then, install t he remaining two.
Note that you will install a trial version. But it’s worth every penny if you wish to buy a license.
Verify Installation
Next, verify the installation of the unixODBC and the ODBC drivers.
To verify the installed unixODBC, run the Terminal again. Then, type the following command:
odbcinst -jThen, you will see a similar configuration as in Figure 7 below.
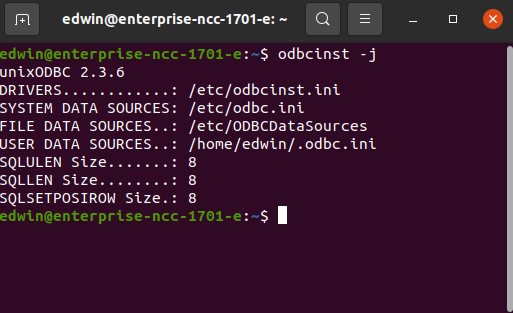
In Figure 6, you can also see the version of unixODBC and the path of the ODBC INI files for the drivers and data sources. Like in Windows, there’s a System, User, and File data source. You need the path of these files when you will configure data sources later. The configuration file paths are pre-configured upon installation of unixODBC. We chose not to change the path of these configuration files.
To review a list of all drivers installed earlier, run the following command in the Terminal.
odbcinst -q -dSee the result in Figure 7.
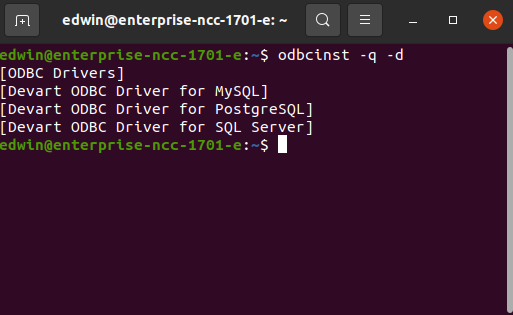
The drivers listed in Figure 8 also appear in the odbcinst.ini file. To check that out, view the file in your favorite text editor in Ubuntu. In our case, is gedit. Type it in the Terminal using the full path and file you saw in Figure 6 earlier.
Here’s the command for that.
gedit /etc/odbcinst.iniSee a screenshot of the output in Figure 8.
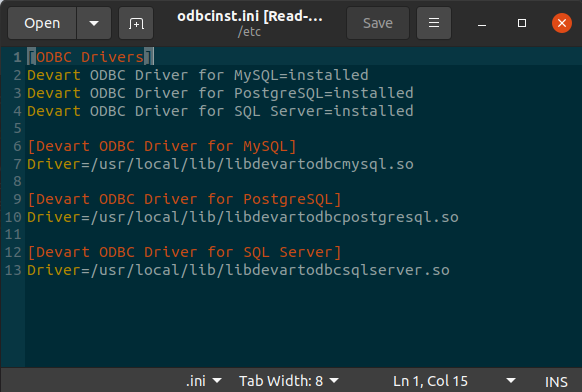
In Figure 8, you can see the names of the drivers we installed earlier and a list of the driver library files. All these components are inserted into the file during installation. You don’t need to configure them manually.
At this point, the unixODBC driver manager is installed and configured. And since ODBC drivers are also installed, it’s time to test connectivity to data sources.
Configure Data Source Names
Upon installation of the Devart ODBC drivers, 3 data source templates were added to the odbc.ini file. Check out Figure 9 to see what it looks like.
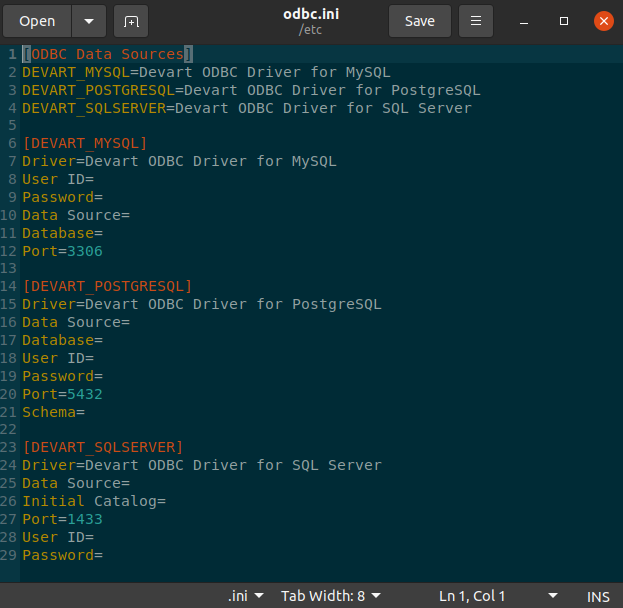
The blank data source configurations in Figure 6 are also a good starting point to configure data sources.
Configuring Data Sources using a Text Editor
To configure data sources, you need to fill up the blanks. Of course, you also need to have working installations of MySQL, PostgreSQL, and SQL Server. Figure 10 shows the configuration that we did with the gedit text editor.
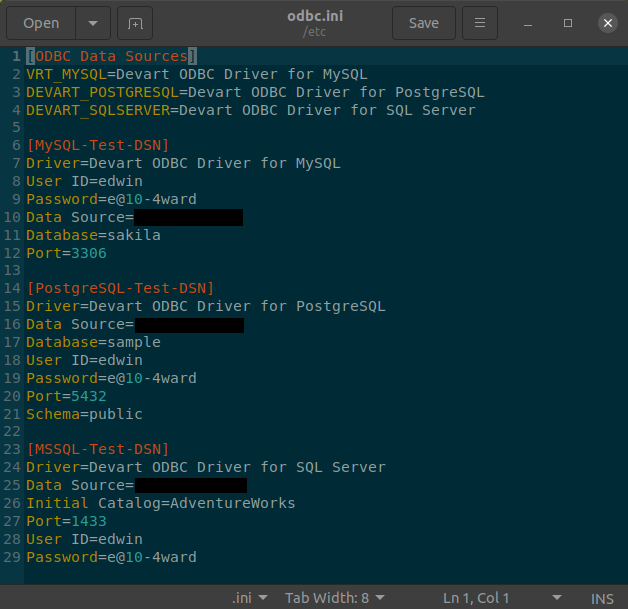
Let’s dissect each of the options.
- Data Source Name (DSN) – This is the first entry in configuring a data source. In Figure 10, the DSNs are MySQL-Test-DSN, PostgreSQL-Test-DSN, and MSSQL-Test-DSN.
- Driver – The driver entry defines what ODBC driver to use by the DSN.
- Data Source – This is the database server or where the database is installed. It can be a name or an IP address. (I used IP addresses in Figure 10 so I hid them)
- Database or Initial Catalog – The name of the database you want to access. The term ‘Initial Catalog’ is for SQL Server. The rest use the term ‘Database’.
- User ID and Password – The security credentials to access the database.
- Port – This is the port number used by each database product. In Figure 8, the port values are the default port numbers used by each database product.
- Schema – Specifies what schema the PostgreSQL database belongs to.
To verify if these data sources are recognized by unixODBC, run this command in the Terminal.
odbcinst -q -sAnd check the output in Figure 11.
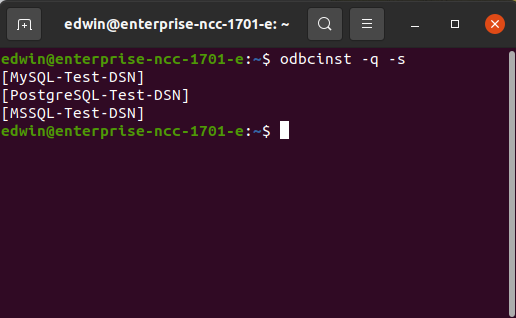
So, all 3 DSNs were recognized by unixODBC.
Testing the DSN Using the isql Command-Line Tool
To test the DSN, you need the isql command-line tool that comes with unixODBC. The syntax is:
isql <DSN>Let’s try this with the MySQL DSN. In the Terminal, run the command isql MySQL-Test-DSN. Once you’re connected, you will see a response. Then, you can try to run a simple query. See all these in Figure 12 below.
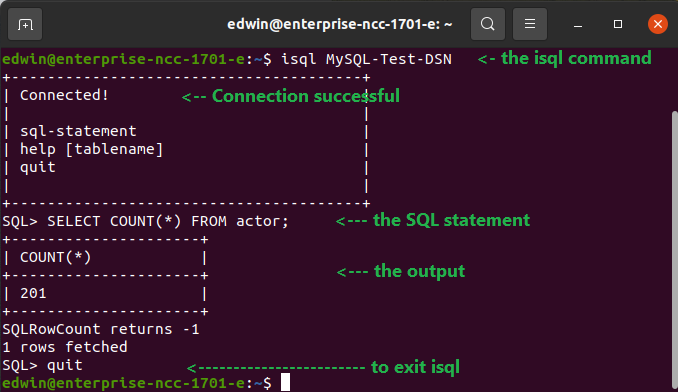
That’s it. It’s easy.
You can also try it with PostgreSQL and SQL Server.
So, if data sources are working, then your Linux ODBC driver manager is complete.
Learn more methods to test ODBC connection to ensure the stability of your architecture and reliability of data flow.
Installing and Configuring an ODBC Driver Manager on macOS
Now let’s consider how to install and configure an ODBC driver manager on macOS.
5 Trouble-free Steps to Install and Configure ODBC Driver Manager on macOS
It’s a cakewalk to install an ODBC driver manager on macOS using iODBC. Try the steps below.
The workstation used in the following examples uses Mac OS X Big Sur.
Download iODBC Driver Manager
Get the latest iODBC Driver Manager. The version used in the following examples is 3.52.15.
You need to download the file mxkozzzz.dmg. It’s a disk image file containing the package installer for iODBC.
Install iODBC Driver Manager
Then, double-click the disk image file mxkozzzz.dmg. A window will open. Then, you will see the iODBC-SDK.pkg package file. Open it to start the installation.
NOTE: Mac OS X will not allow you to open the package initially. You will see something similar to Figure 13 below.

To overcome this, right-click the iODBC-SDK.pkg. A context menu will appear. Then, select Open With. Then, select Installer (default). But you will still see the blocking message in Figure 18. But you now have an option to open it anyway. So, click Open.
Then, follow the on-screen instructions until the installation is complete.
Install ODBC Drivers
You need to configure data sources to test the driver manager. But first, you need to install ODBC drivers. In our example, we will consider the installation of ODBC Driver for PostgreSQL.
Note, that to download the package installers you need a Devart account.
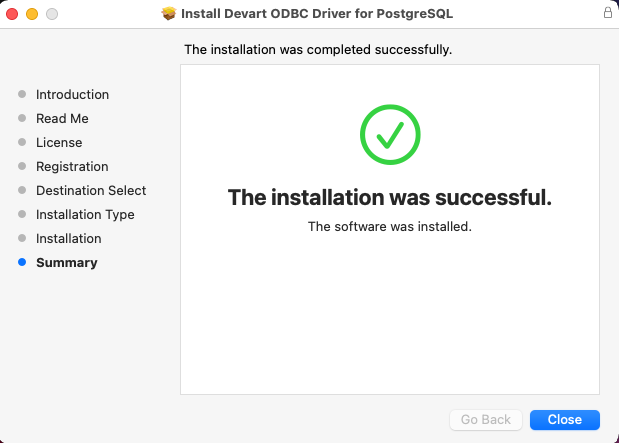
After the installation is completed, open the installer package of the ODBC driver for PostgreSQL by right-clicking it and clicking Open. A warning will appear to ask you if you want to install the package. So, click Allow to install the package. Then, follow the on-screen instructions. Agree with the Software license and proceed with the installation. Do the same with the ODBC driver for MySQL.

By the end of the installation, you will see a successful installation message.
Configuring Data Sources
The best part of using iODBC compared to unixODBC is the GUI interface. It’s almost the same as in Windows.
And that’s not all.
System DSN templates were included along with the installation of ODBC drivers. See Figure 21 below.

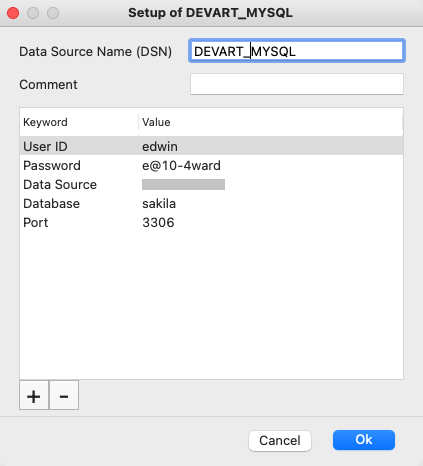
So, you can start with those templates to configure a MySQL connection. To do that, select the DEVART_MYSQL DSN and click Configure. You will see that the User ID, Password, and the rest are blank. Only the MySQL default port (3306) is filled-up. Add your credentials and test them against the sakila sample database.
Then, you can do the same thing for the DEVART_POSTGRESQL.
At this point, you are ready to test for database connectivity.
Test Connectivity in iODBC Data Source Administrator
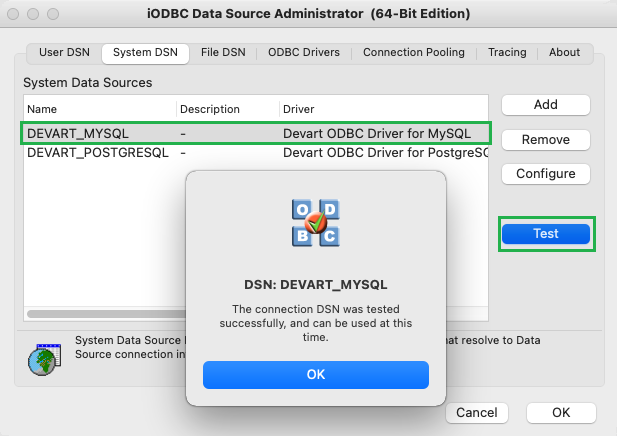
To test the connection to the MySQL data source, select the DEVART_MYSQL System DSN. Then, click Test. You will be asked for a Username and Password allowed in the MySQL database. If your credentials are correct, a success message will appear.
Then, do the same thing for DEVART_POSTGRESQL System DSN.
At this point, the iODBC Driver Manager is installed and configured correctly.
ODBC Driver manager installation in a nutshell
Regardless of the operating system you’re using, installing and configuring an ODBC driver manager is a straightforward process. Windows users benefit from a pre-installed driver manager that requires minimal setup, while Linux and macOS users can quickly install and configure their respective ODBC driver managers with just a few commands or clicks.
| Operating System | Installation Steps | Configuration Tools | Configuration Tools | DSN Setup |
|---|---|---|---|---|
| Windows | Pre-installed since XP; no manual installation needed. | ODBC Data Source Administrator | TRUE | TRUE |
| Linux | Install unixODBC via Terminal using ‘sudo apt install unixodbc’. | Text editor (e.g., gedit), Terminal tools (isql, odbcinst) | TRUE | TRUE |
| macOS | Download iODBC Driver Manager (mxkozzzz.dmg) and install via GUI. | iODBC Data Source Administrator | TRUE | TRUE |
Whether using the Windows ODBC Data Source Administrator, UnixODBC on Linux, or iODBC on macOS, the setup remains intuitive, allowing seamless database connectivity with minimal effort.
Check here to see how to install ODBC driver for xBase.
