The shift from on-premises to cloud services is a growing trend due to their cost-efficiency, scalability, and speed. Also, cloud providers handle platform maintenance. This means users can focus on their applications without concerns about availability, security, updates, patches, or backups.
Azure SQL is one of the most popular cloud platforms – the relational database-as-a-service, the SQL Server engine hosted in the Azure cloud. It allows for migrating any applications developed with SQL Server to the cloud easily and working on them using familiar tools and resources.
The Azure portal has its own query editor, but if you want to apply other tools, like SQL Server Management Studio (SSMS), you can easily connect to Azure SQL Database using this application, or other compatible apps. This article will explore connecting to Azure SQL Database with on-premises applications.

Contents
- Before we start: the Azure connection credentials and the firewall
- Connect to Azure using SQL Server Management Studio
- Connect to Azure using dbForge Studio for SQL Server
- Connect to Azure using Visual Studio
- Connect to Azure using Power BI
- Connect to Azure using PowerShell
- Conclusion
Before we start: the Azure connection credentials and the firewall
To connect to Azure from on-premises applications, you need an active Azure subscription and a database in the cloud. Then you can obtain the login credentials to use them when connecting to Azure from the on-premises applications.
How to retrieve the Azure connection credentials
If you never used Azure SQL, you need to start by creating a free account.
Azure Database provides a test database AdventureWorksLT that you can use as a sample. However, first, you need to create a single database to deploy that sample database and access its schema and data. Microsoft provides detailed instructions, so the task takes a couple of minutes.
Azure Database is a paid service, but it provides a free trial for 30 days, so you can try the functionality and evaluate it appropriately with that test database and other databases you’d like to work with.
When the empty database is created and the test AdventureWorksLT database is deployed, you get it as mySampleDatabase in your Azure account.
The username and password you set during the database creation process are the login details you require to connect to Azure SQL Database from other applications. In the Overview section, you will see the fully qualified server name next to Server name on the top:
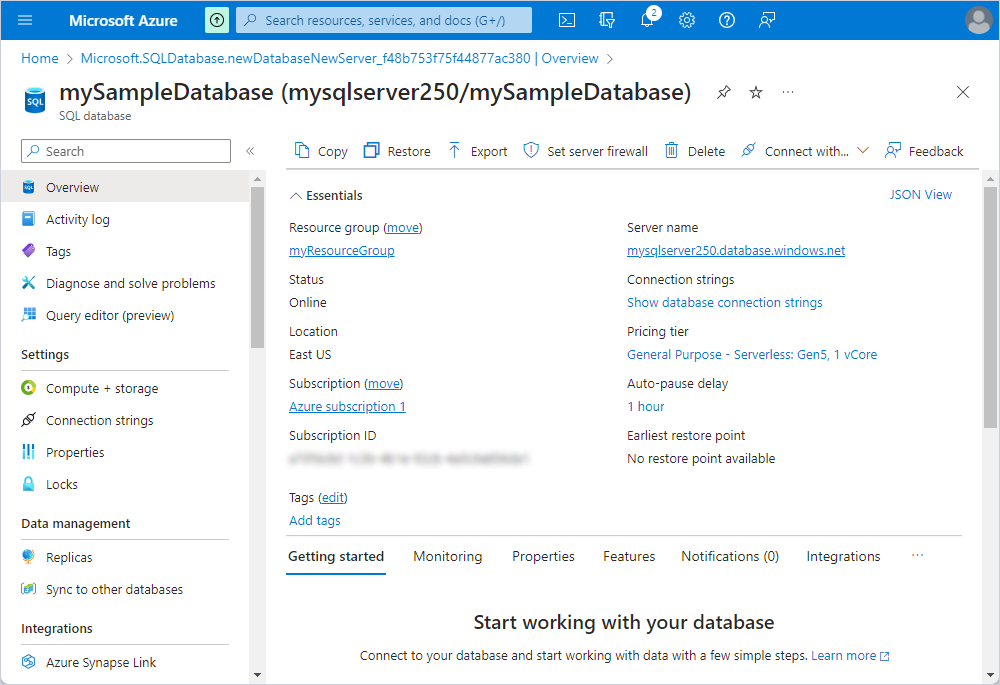
These details allow you to connect to the Azure SQL Database from other applications. However, there is one more mandatory step left – you need to configure the firewall.
How to configure the server firewall
Connections to Azure SQL Databases from outside the Azure environment are blocked by default. Azure establishes a server-level firewall for these databases. Therefore, to allow external access, you must set up a firewall rule specifying the permitted IP addresses or IP address ranges.
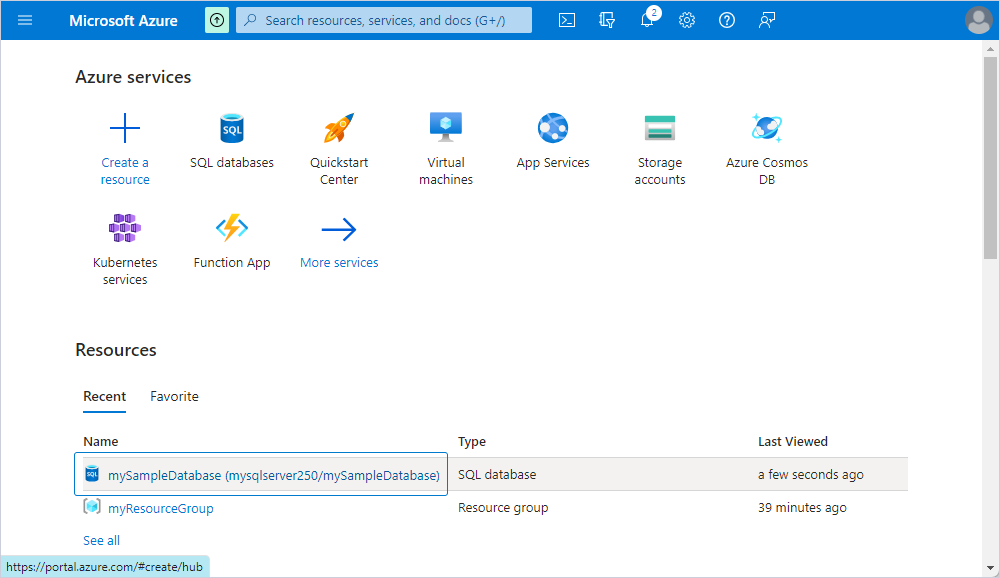
In your Azure account, navigate to the SQL databases section and then select mySampleDatabase.
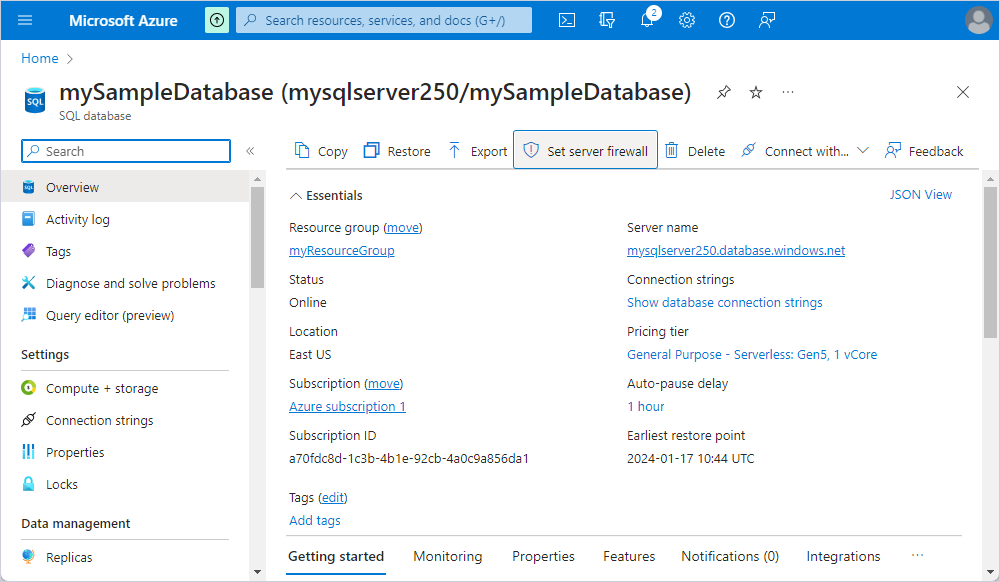
Click Set server firewall. By default, the platform shows the networks and existing firewall rules.
Click Add your client IP to configure a new firewall rule, and save the changes.
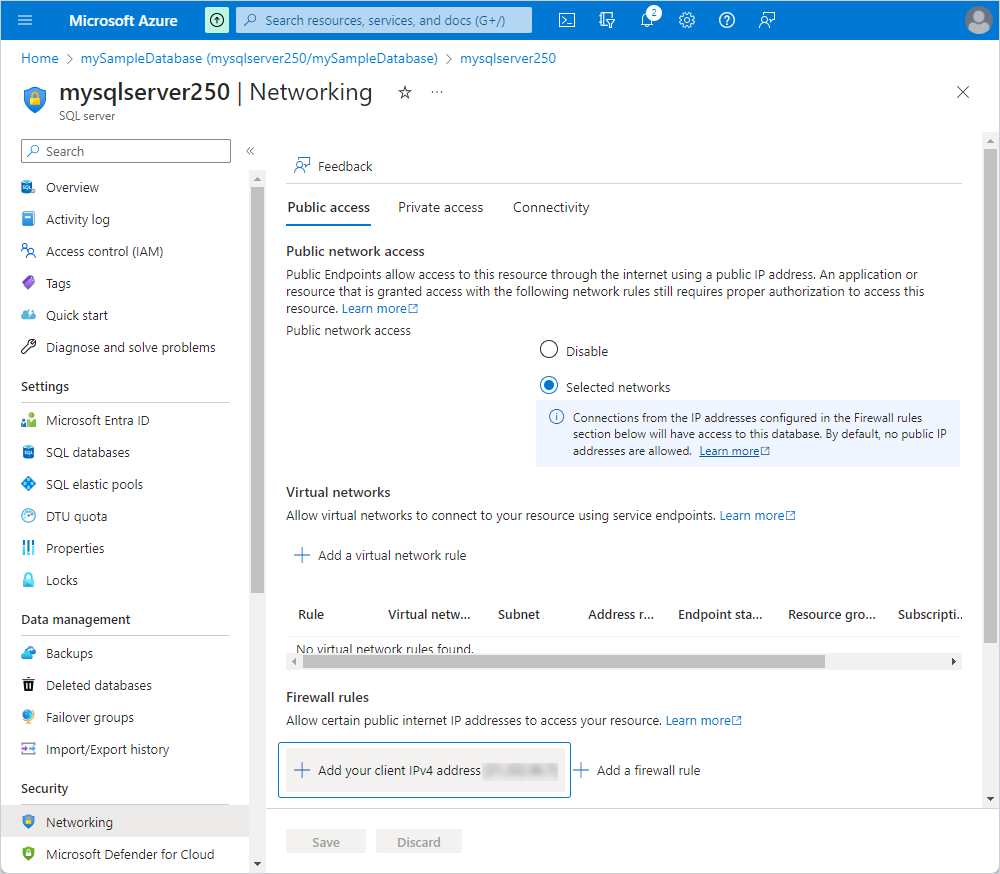
This rule ensures that Port 1433 (the server listens on this port) is open for the specified IP addresses. Also, you can configure any firewall rules for your environment by clicking Add a firewall rule.
Now, let us review how to connect to Azure SQL Database from on-premises tools.
Connect to Azure using SQL Server Management Studio
SQL Server Management Studio is the default integrated development environment for SQL Server databases, and if you are an Azure SQL user, there is no reason to reject SSMS. You can use it to connect SQL databases in Azure, query the databases, retrieve data, and perform other necessary operations.
Let’s examine how to connect Azure Database from SQL Management Studio. This process is in general similar to connection to other databases on-premise, but with some specificities that you should note.
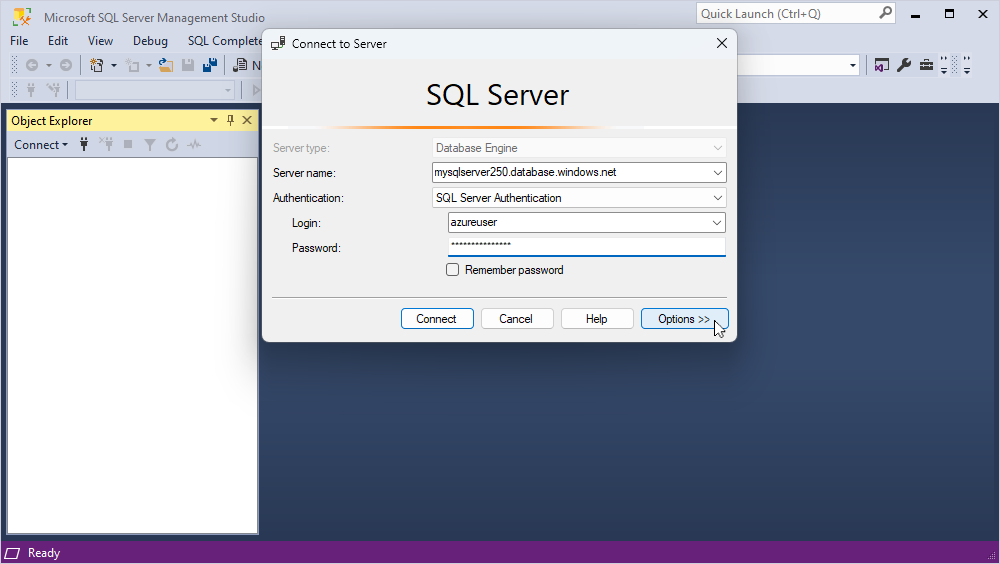
Open your SSMS and launch a new connection. Enter the following details:
| Server type: | Database engine |
| Server name: | the necessary fully qualified server name |
| Authentication: | SQL Server Authentication |
| Login: | the username you set during the database creation |
| Password: | your password |
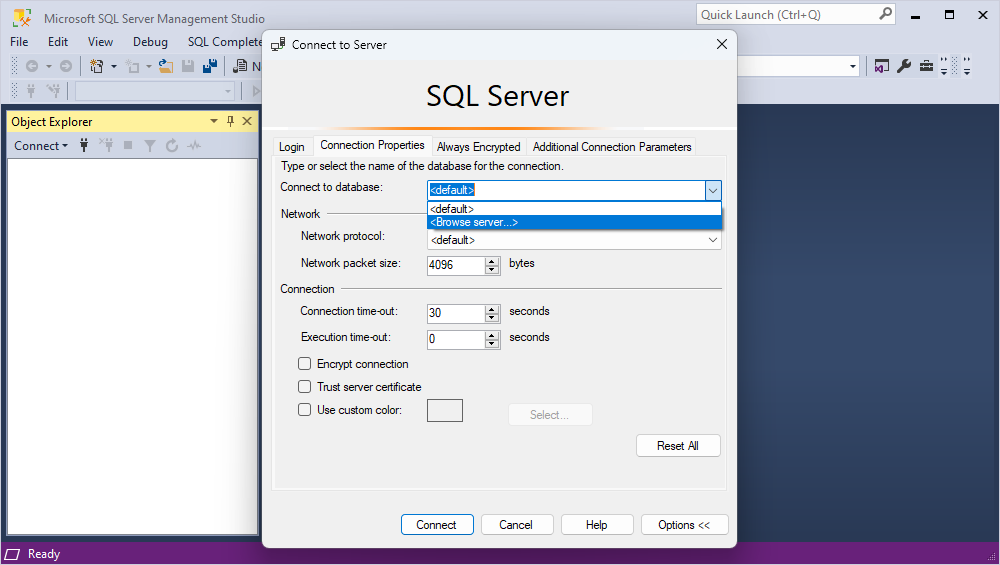
Then click Options > Connection Properties. You need to define the database to connect:
Select Browse from the menu.
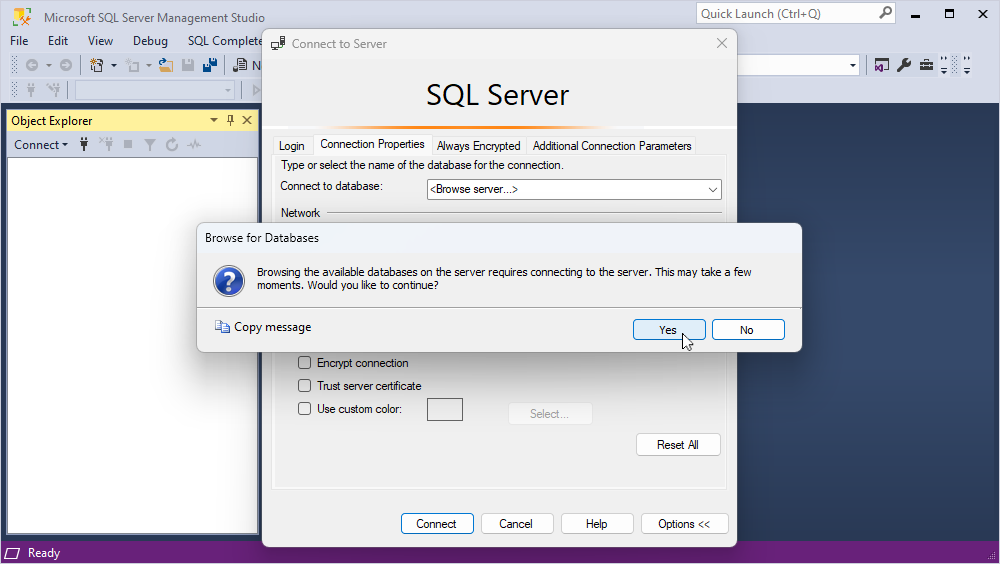
Confirm that you want to continue by clicking Yes.
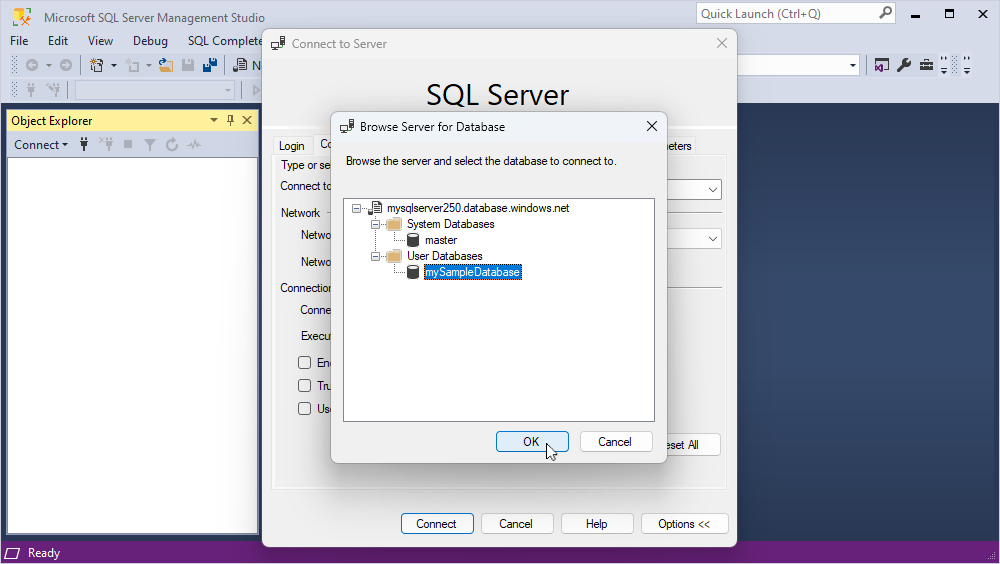
Select mySampleDatabase from the drop-down menu and click OK.
Click Connect. After that, SSMS connects to Azure SQL and shows the database in the Object Explorer pane. You can query that database in the same way as other databases in SSMS.
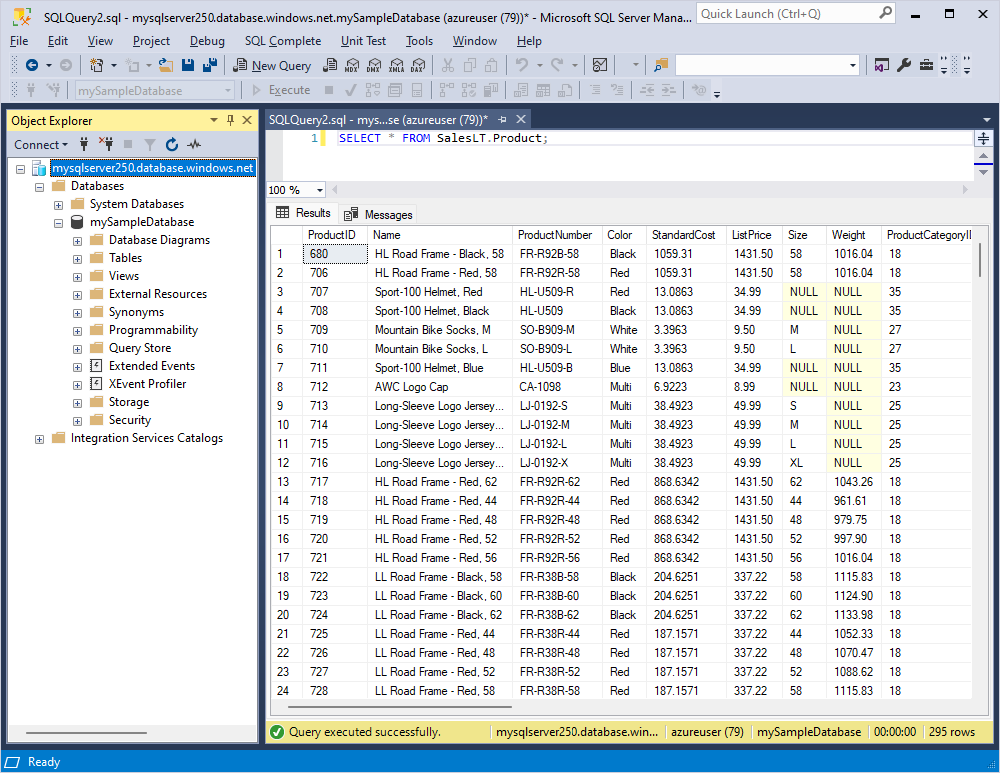
Important: The Azure SQL Database does not support the USE statement. In our scenario, we work with one SQL database in the cloud only, but if you have more of them, you need to establish a new connection for a new database if you want to switch between them in SSMS.
Connect to Azure using dbForge Studio for SQL Server
Many SQL Server pundits employ dbForge Studio for SQL Server as an SSMS alternative. The Studio is a multi-functional IDE that includes features and options that are not available in the default SSMS. Also, the Studio is fully compatible with Azure, so you can apply it to work with Azure SQL databases efficiently.
To connect to Azure SQL Database, establish a new connection in the Studio and enter the server name and your credentials. Click Connect.
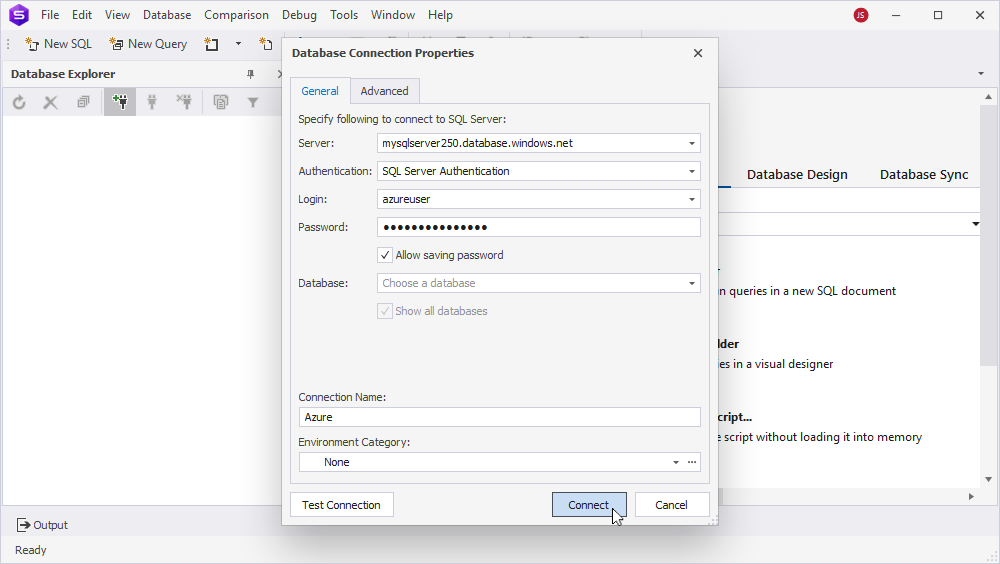
When the connection is established, you will see mySampleDatabase in the Object Explorer menu and will be able to query that database directly.
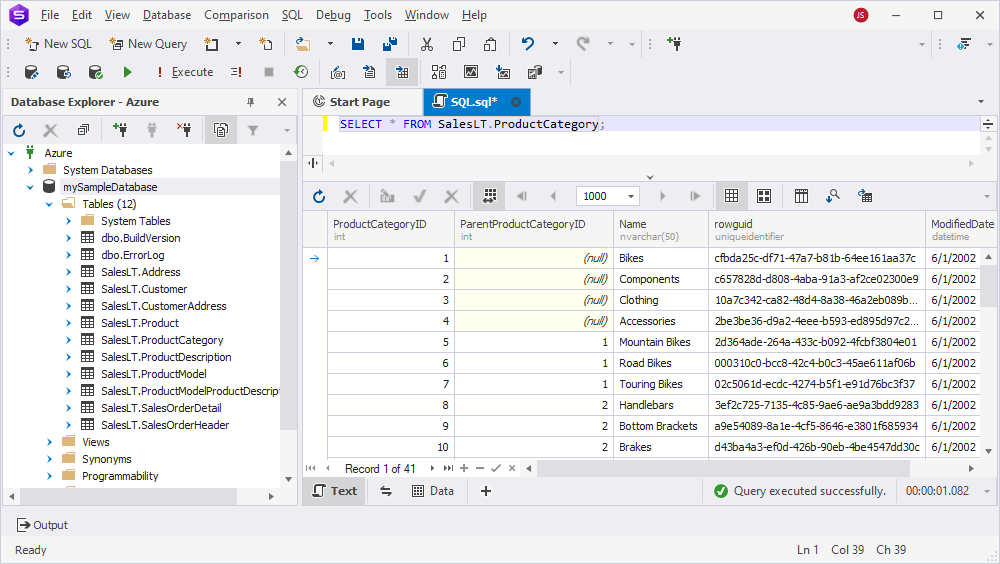
Connecting with Azure Active Directory authentication
dbForge Studio for SQL Server also supports connecting to the Azure Database with an Azure Active Directory authentication that grants more secure access. Users can use the following authentication types:
- Azure Active Directory – Universal with MFA support
- Azure Active Directory – Password
- Azure Active Directory – Integrated
The default option is Universal with MFA support. To use it, you need first of all register dbForge Studio for SQL Server as an Azure Active Directory application and get the application ID that will be generated during the registration process. After that, you will be able to connect to Azure Database with Azure Active Directory Universal with MFA support authentication.
Launch a new connection in the Studio: Database > New Connection > select Azure Active Directory – Universal with MFA support as the authentication type.
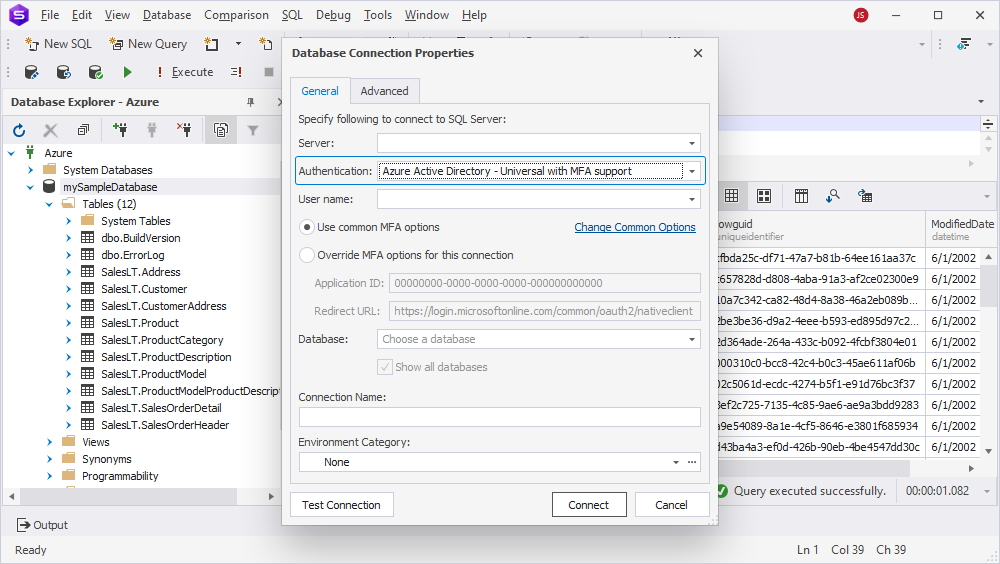
Enter the credentials details:
- Server: URL of the Azure SQL Server instance.
- User name: Azure Active Directory user with Azure SQL database permissions.
Select Use common MFA options and click Change Common Options.
In the new window, enter the Application ID and Redirect URL generated during the registration of dbForge Studio for SQL Server:
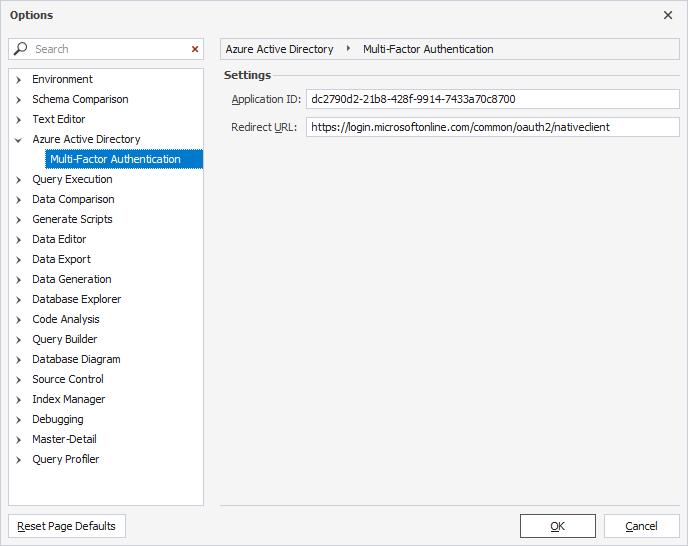
Note: If you want to insert an alternative application ID, choose Override MFA options for this connection at the previous step and enter the Application ID and Redirect URL.
Click OK to save the details, then click Connect to establish the connection.
You will be prompted to sign in to your account. In the Sign in window that will appear, enter the credentials for your Azure Active Directory account. After the successful login, you will get access to your databases in dbForge Studio for SQL Server.
The Studio also supports Azure Active Directory – Password and Azure Active Directory – Integrated authentication types, you can select one of those types and follow the detailed illustrated instructions to establish the connection.
Connect to Azure using Visual Studio
Azure SQL cloud platform is one of the popular resources for application developers, many of whom use Visual Studio. It allows performing all the development tasks with one solution as it provides the selection of the necessary tools and the possibility to write, modify, and debug the code, and then deploy the application.
You can connect to Azure SQL Server from Visual Studio and employ your favored tools to manage the databases and build applications based on those databases.
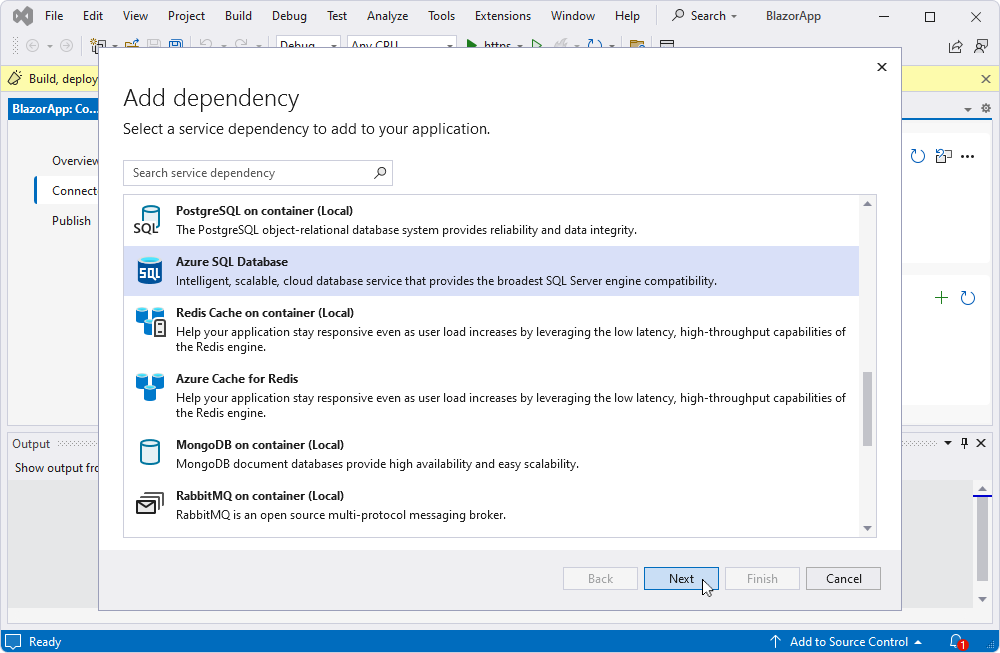
Open the project and navigate to the Connected Services > Service Dependencies. Choose Azure SQL Database.
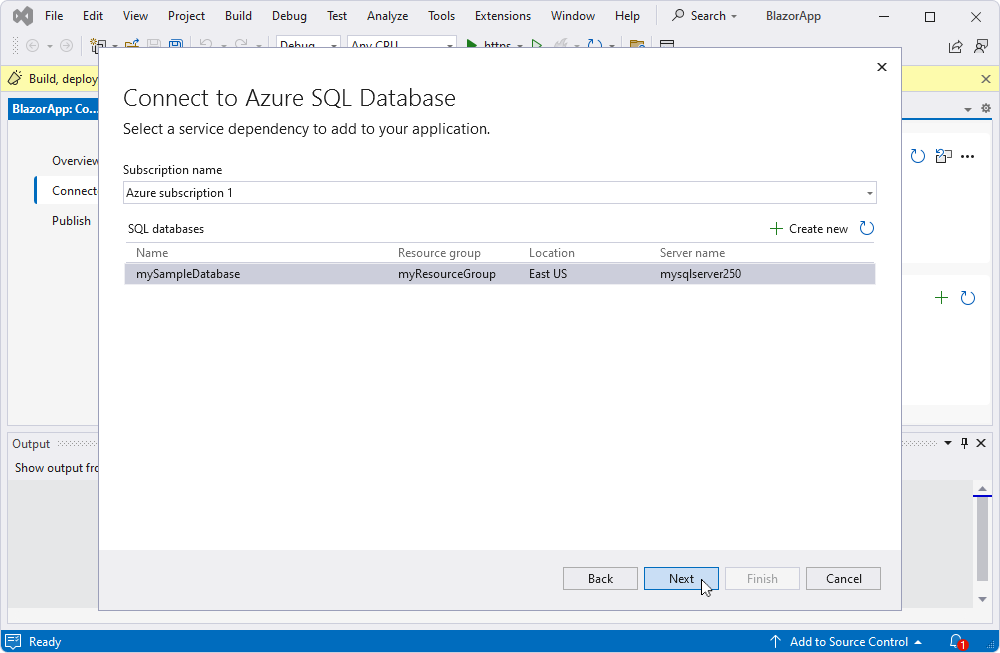
Select the database.
Provide the username and password. Click Finish.
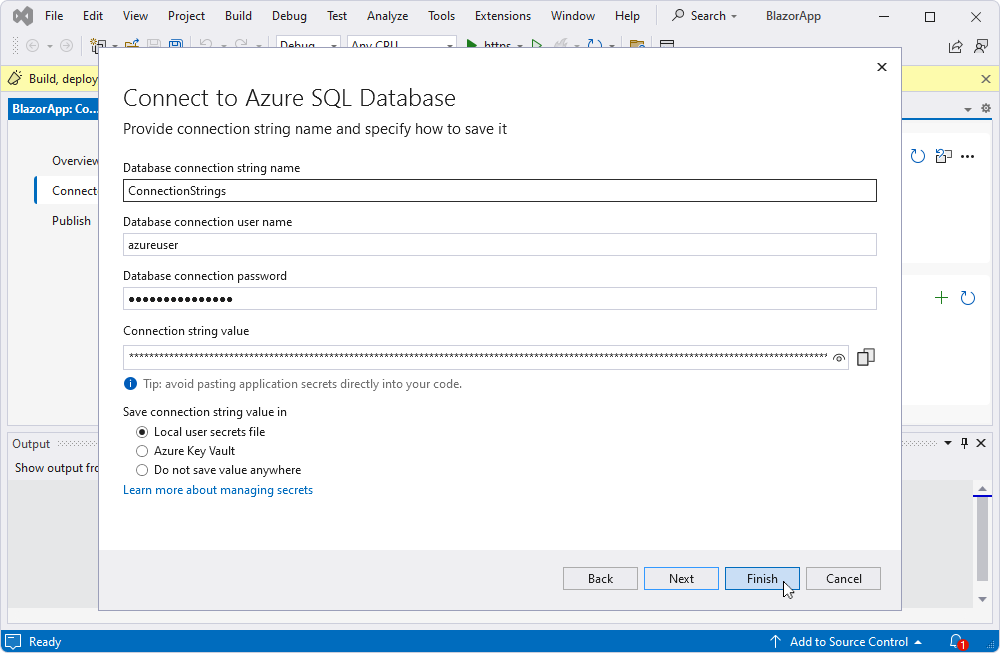
This way, Visual Studio connects to Azure SQL Database, so the developers can use the databases in the cloud.
Connect to Azure using Power BI
Microsoft created Power BI as a business intelligence platform that allows users to connect to various data sources and visualize the data and trends as well as transfer those visuals into other popular apps. Azure databases are one of the data sources supported by default, so let us review how to connect Azure SQL database to Power BI and use its data for analysis.
The Power BI service connects to Azure SQL Database via the desktop application. So, if you want to retrieve the data for analysis from your database in the cloud and apply the Power BI capacities to that data, you need to download Power BI Desktop first. After installing this application, you can retrieve data from the databases.
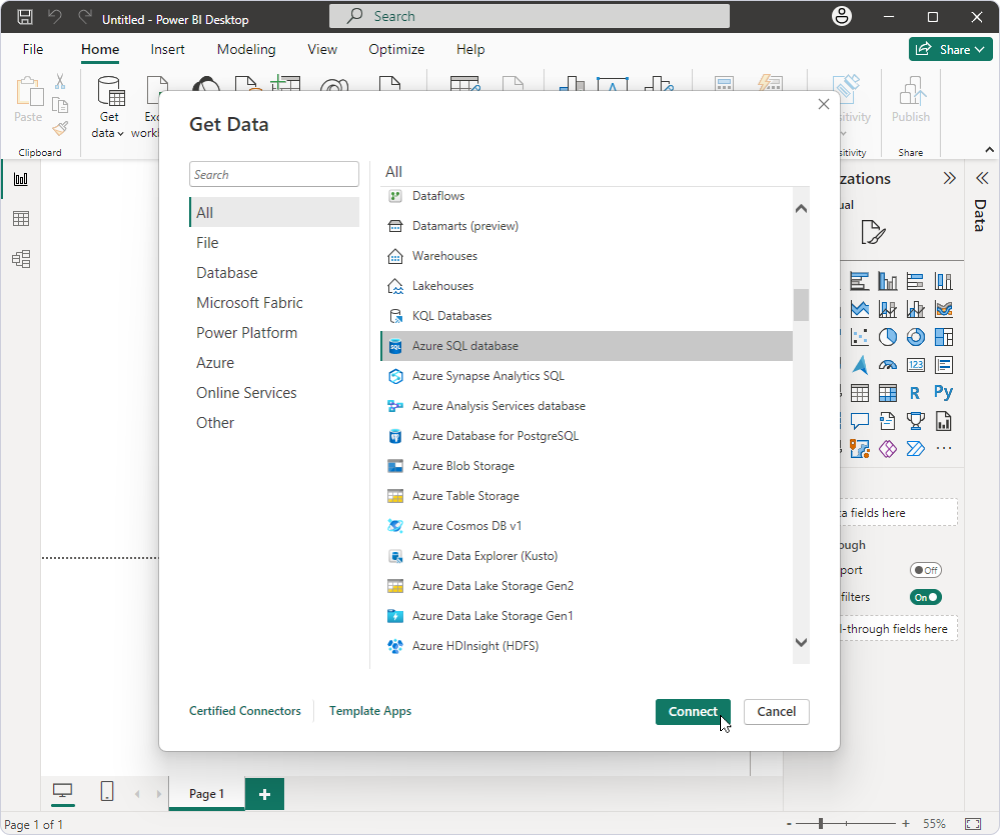
Open Power BI Desktop and click Get data > More. Choose Azure > Azure SQL Database. Click Connect.
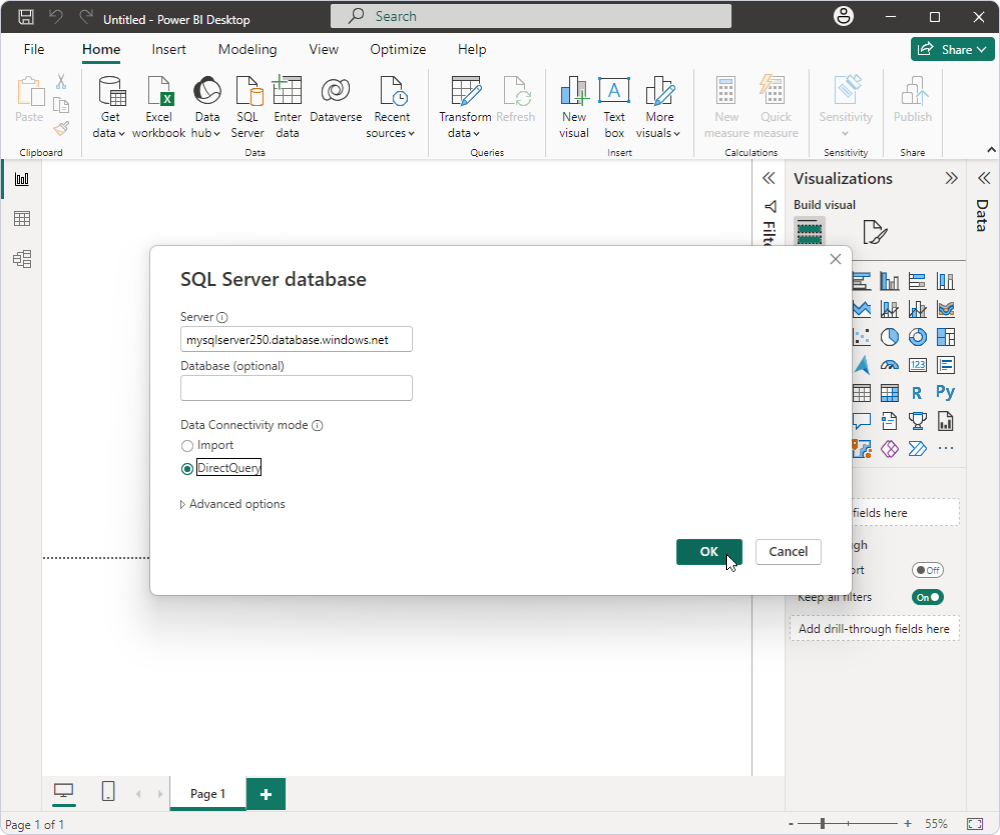
In the next window, enter the fully qualified server name, specify Direct Query as the data connectivity mode, and click OK.
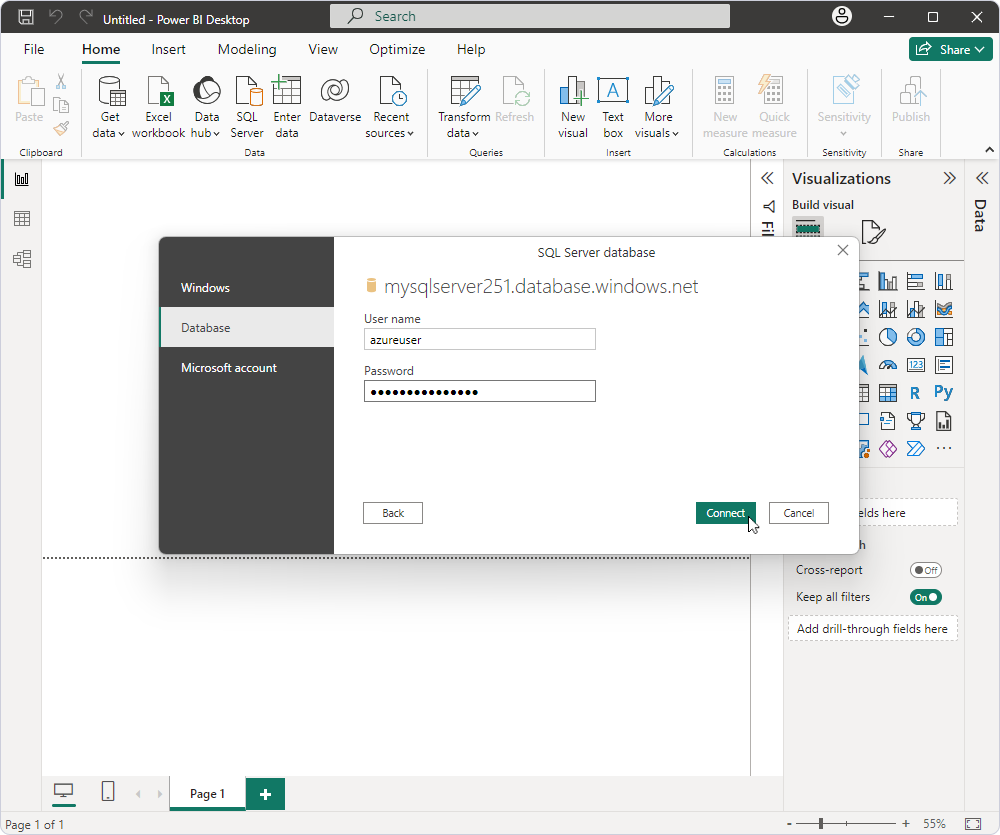
In the SQL Server database window, in the Database section, provide your Azure login credentials. Click Connect.
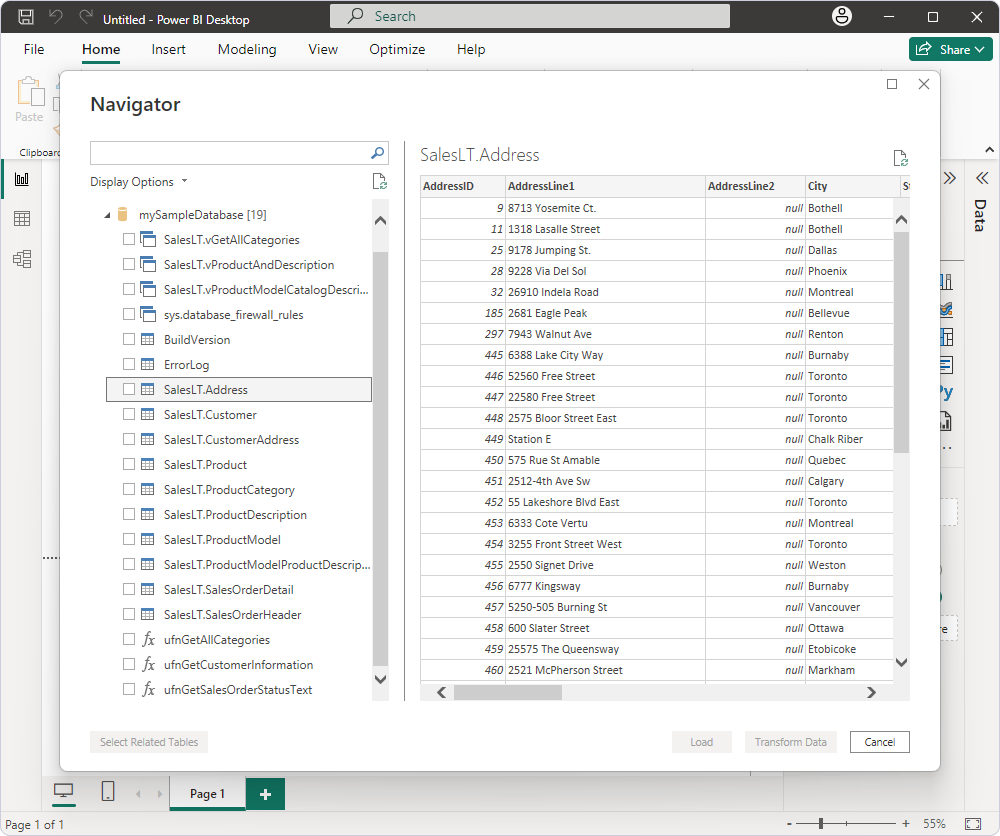
The Power BI Desktop solution connects to the Azure database and presents the data.
Connect to Azure using PowerShell
If you are a PowerShell devotee, you can connect to Azure SQL Database using PowerShell and manage and administer your databases and other Azure resources from the command line.
First of all, you need to install the Azure PowerShell module if you don’t have it already installed. With the module installed, open PowerShell and execute the below command to sign in to the Azure account.
Connect-AzAccount
You will be prompted to log in.
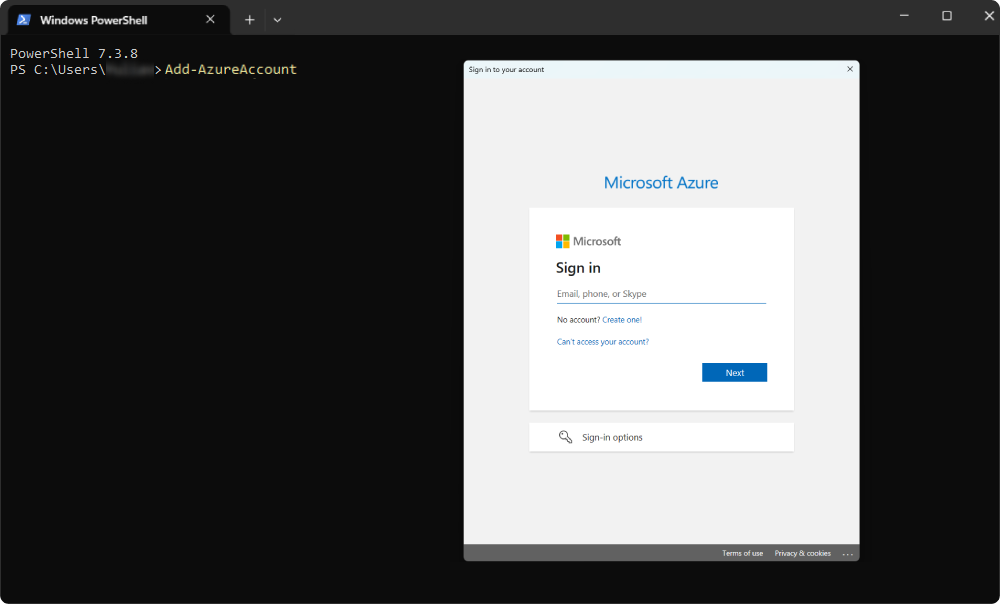
After getting connected, you can work with the Azure SQL Database from the command-line interface. For example, you can fetch the list of all databases on the server with the following command:
Get-AzSqlDatabase
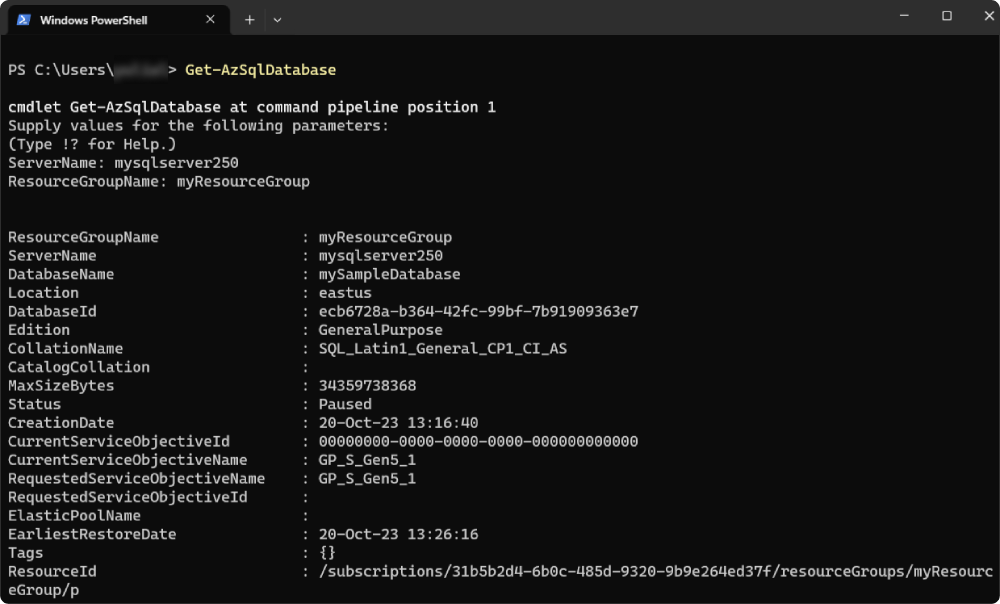
Further, you can manage your Azure SQL Database resources using the standard Azure-specific commands.
Learn how to export Azure SQL database with step-by-step instructions in this article.
Conclusion
Azure SQL Database is a preferred choice for many SQL Server users, particularly for database development. While the cloud platform offers a comprehensive set of online tools, it also accommodates users who prefer their trusted on-premises applications, such as SSMS, Visual Studio, or dbForge Studio for SQL Server.
Among these options, dbForge Studio for SQL Server stands out as one of the most robust SQL Server IDEs, with full support for Azure. This means you can seamlessly develop, manage, and administer databases in the cloud, harnessing all the capabilities of the Studio.
To experience the complete functionality of dbForge Studio for SQL Server in action, you can take advantage of our fully functional free trial, which is available for a 30-day period. This trial allows you to explore all features and options with unlimited databases, both in the cloud and on-premises.


