
Introduction
To store and retrieve data from the database, we’ll use dotConnect for PostgreSQL, a high-performance and enhanced data provider for PostgreSQL built on top of ADO.NET and can work on both connected and disconnected modes.
Pre-requisites
You’ll need the following tools to deal with code examples:
- Visual Studio 2022 Community Edition
- PostgreSQL
- dotConnect for PostgreSQL
You can download PostgreSQL from here: https://www.postgresql.org/download/
You can download a trial version of dotConnect for PostgreSQL from here: https://www.devart.com/dotconnect/postgresql/download.html
What Are We Building Here?
In this article, we’ll be building a simple application that will demonstrate how to customize HTTP 400 and 404 error responses in ASP.NET 6. Here are the steps we’ll follow throughout this article to accomplish this:
- Gain an understanding of Middleware in ASP.NET Core
- Create an ASP.NET 6 Core Web API project in Visual Studio 2022
- Add the Devart.Data.PostgreSql NuGet package to the API project
- Write a simple controller and its associated classes
- Create a custom middleware to handle HTTP 400 error responses
- Create another custom middleware to handle HTTP 404 error responses
- Run the Application
What is a Middleware?
In ASP.NET Core, a middleware is a component that sits between a web server and an application’s request/response pipeline, processing incoming requests and outgoing responses. In addition to inspecting and manipulating HTTP requests and responses, middleware components can handle authentication, logging, caching, compression, routing, and more.
The following code example shows a custom middleware:
public class MyCustomMiddleware
{
    private readonly RequestDelegate _next;

    public CustomBadRequestMiddleware(RequestDelegate next)
    {
        _next = next;
    }

    public async Task InvokeAsync(HttpContext context)
    {
        await _next(context);
        context.Response.Headers.Add("X-Custom-Header", "Hello World!");
    }
}
Create a new ASP.NET 6 Core Web API Project
In this section, we’ll learn how to create a new ASP.NET 6 Core Web API project in Visual Studio 2022.
Now, follow the steps outlined below:
- Open Visual Studio 2022.
- Click Create a new project.
- Select ASP.NET Core Web API and click Next.
- Specify the project name and location to store that project in your system. Optionally, checkmark the Place solution and project in the same directory checkbox.
- Click Next.
- In the Additional Information window, select .NET 6.0 (Long-term support) as the project version.
- Disable the Configure for HTTPS and Enable Docker Support options (uncheck them).
- Since we’ll not be using authentication in this example, select the Authentication type as None.
- Since we won’t use Open API in this example, deselect the Enable OpenAPI support checkbox.
- Since we’ll not be using minimal APIs in this example, ensure that the Use controllers (uncheck to use minimal APIs) is checked.
- Leave the Do not use top-level statements checkbox unchecked.
- Click Create to finish the process.
We’ll use this project in this article.
Install NuGet Package(s) into the API Project
In your API project, i.e., the project you just created, you should install the dotConnect for PostgreSql package in your project. dotConnect for PostgreSQL is a high-performance data provider for PostgreSQL built on ADO.NET technology that provides a comprehensive solution for building PostgreSQL-based database applications.
You can install this package either from the NuGet Package Manager tool inside Visual Studio or, from the NuGet Package Manager console using the following command:
PM> Install-Package Devart.Data.PostgreSqlCreate the Database
You can create a database using the pgadmin tool. To create a database using this Launch this tool, follow the steps given below:
- Launch the pgadmin tool
- Expand the Servers section
- Select Databases
- Right-click and click Create -> Database…
- Specify the name of the database and leave the other options to their default values
- Click Save to complete the process
Create a database table
Select and expand the database you just created
Select Schemas -> Tables
Right-click on Tables and select Create -> Table…
The table script is given below for your reference:
CREATE TABLE supplier (
	id serial PRIMARY KEY,
	firstname VARCHAR ( 50 ) NOT NULL,
	lastname VARCHAR ( 50 ) NOT NULL,
	address VARCHAR ( 255 ) NOT NULL
);
We’ll use this database in the subsequent sections of this article to demonstrate how we can work with Integration Tests in ASP.NET Core using dotConnect for PostgreSQL.
Add a few records to the Supplier table
Now, run the following script in your database to insert a few records in the supplier table:
INSERT INTO supplier(firstname, lastname, address)
VALUES ('James', 'Payne', 'London, UK');

INSERT INTO supplier(firstname, lastname, address)
VALUES ('Steve', 'Jones', 'Chicago, USA');

INSERT INTO supplier(firstname, lastname, address)
VALUES ('Samuel', 'Anderson', 'Dallas, USA');
Figure 1 below illustrates the pgAdmin editor where you can write and execute your scripts:
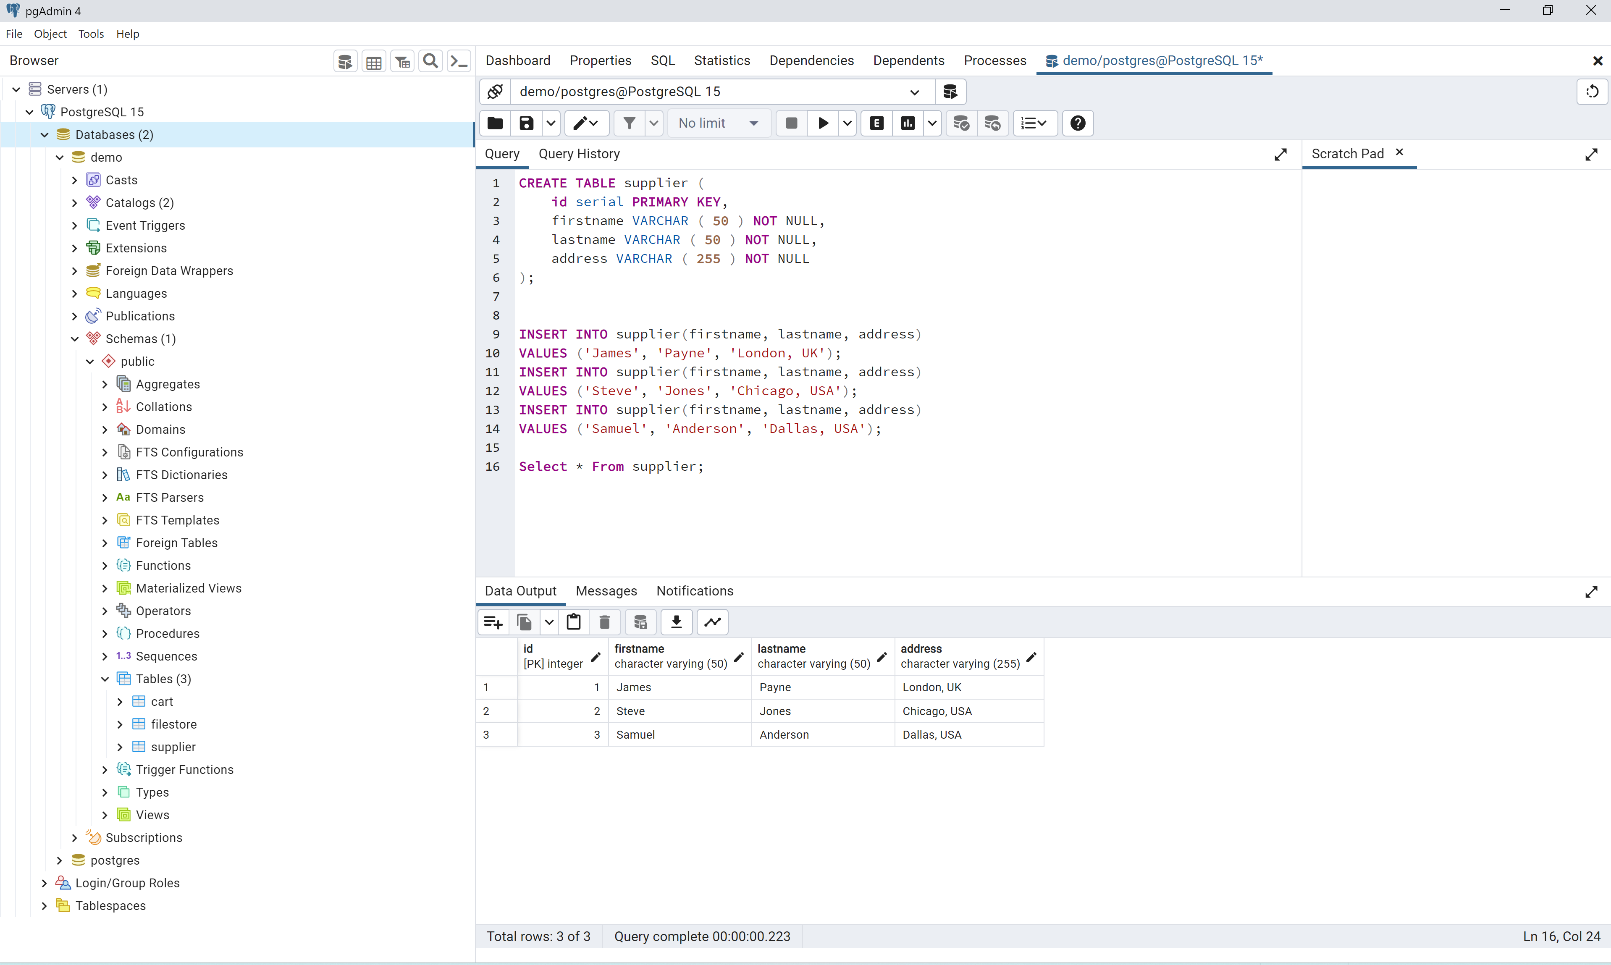
Figure 1: Records inserted into the supplier table
Create the Model Class
Create a solution folder in the Solution Explorer window and name it Models. Next, create a .cs file called Supplier.cs with the following code in there:
 public class Supplier
    {
        public int Id { get; set; }
        public string FirstName { get; set; }
        public string LastName { get; set; }
        public string Address { get; set; }
    }
Create the SupplierRepository Class
The ISupplierRepository interface would look like this:
    public interface ISupplierRepository
    {
        public List<Supplier> GetSuppliers();
    }
Note that for the sake of simplicity, we’ve only one method in the ISupplierRepository interface. The SupplierRepository class implements the GetSuppliers method of the ISupplierRepository interface and encapsulates all database operations.
public class SupplierRepository : ISupplierRepository
    {
        public List<Supplier> GetSuppliers()
        {
            try
            {
                List<Supplier> suppliers = new List<Supplier>();
                using (PgSqlConnection pgSqlConnection =
                 new PgSqlConnection("User Id = postgres; Password = sa123#;" +
                 "host=localhost;database=postgres;"))
                {
                    using (PgSqlCommand pgSqlCommand = new PgSqlCommand())
                    {
                        pgSqlCommand.CommandText =
                        "Select * From public.supplier";
                        pgSqlCommand.Connection = pgSqlConnection;
                        if (pgSqlConnection.State !=
                        System.Data.ConnectionState.Open)
                            pgSqlConnection.Open();
                        using (PgSqlDataReader pgSqlReader =
                         pgSqlCommand.ExecuteReader())
                        {
                            while (pgSqlReader.Read())
                            {
                                Supplier supplier = new Supplier();
                                supplier.Id =
                                 int.Parse(pgSqlReader.GetValue(0).ToString());
                                    supplier.FirstName =
                                 pgSqlReader.GetValue(1).ToString();
                                    supplier.LastName =
                                 pgSqlReader.GetValue(2).ToString();
                                    supplier.Address =
                                 pgSqlReader.GetValue(3).ToString();
                                suppliers.Add(supplier);
                            }
                        }
                    }
                }
                return suppliers;
            }
            catch
            {
                throw;
            }
        }
    }
Create the SupplierController Class
Next, select and right-click on the Controllers solution folder and create a new controller class called SupplierController with the following code in there:
[Route("api/[controller]")]
    [ApiController]

    public class SupplierController : ControllerBase
    {
        private readonly ISupplierRepository _supplierRepository;
        public SupplierController(ISupplierRepository supplierRepository)
        {
            _supplierRepository = supplierRepository;
        }

        [HttpGet]
        public List<Supplier> Get()
        {
            return _supplierRepository.GetSuppliers();
        }
    }
Note how an instance of type ISupplierRepository is injected in the constructor of the SupplierController class. Remember that you must add an instance of type ISupplierRepository to the services container using the following piece of code in the Program.cs file:
builder.Services.AddScoped<ISupplierRepository, SupplierRepository>();Executing the Application
When you execute the application and invoke the GetSuppliers endpoint, all records of the supplier database table will be displayed in your web browser. However, if you specify an endpoint that is not existing, you will encounter an HTTP 404 error. Alternatively, if the request is malformed, you will encounter a HTTP 400 error. In the sections that follow, we’ll examine how we can custom these errors, i.e., intercept the requests and customize HTTP 400 or HTTP 404 responses.
Customizing HTTP 400 Responses
When working with ASP.NET Core, you can customize HTTP 400 and 404 responses to handle errors in your application more gracefully. To do this, you should create a middleware component that intercepts the request and returns a custom response.
public class CustomBadRequestMiddleware
    {
        private readonly RequestDelegate _next;
        public CustomBadRequestMiddleware(RequestDelegate next)
        {
            _next = next;
        }
        public async Task InvokeAsync(HttpContext context)
        {
            await _next(context);
            if (context.Response.StatusCode == 400)
            {
                context.Response.ContentType = "application/json";
                string text = "The requested resource is not found...";
                var json = JsonSerializer.Serialize(text);
                await context.Response.WriteAsync(json);            }
        }
    }
In the preceding code example, the middleware checks if the response status code is 400. If so, the middleware sets the content type of response to JSON and returns a custom error message. To use this middleware, you should add it to the request processing pipeline in the Program.cs file as shown in the code snippet given below:
app.UseMiddleware<CustomNotFoundMiddleware>();Customizing HTTP 404 Responses
Similarly, to customize an HTTP 404 error, you can take advantage of another middleware component that can intercept the request and return a custom response, as shown below:
public class CustomBadRequestMiddleware
    {
        private readonly RequestDelegate _next;

        public CustomBadRequestMiddleware(RequestDelegate next)
        {
            _next = next;
        }
        public async Task InvokeAsync(HttpContext context)
        {
            await _next(context);
            if (context.Response.StatusCode == 400)
            {
                context.Response.ContentType = "application/json";
                string text = "Bad request...";
                var json = JsonSerializer.Serialize(text);
                await context.Response.WriteAsync(json);
            }
        }
    }
Similar to the previous example, the preceding code example demonstrates how the custom middleware checks to see if the response status code is 404. If so, the middleware component intercepts the request and sends a custom text message as a response. To add this middleware to the pipeline, you should use the following code in the Program.cs file of your project:
app.UseMiddleware<CustomNotFoundMiddleware>();License Key Validation Error
When you execute the application, you might run into license validation errors if no valid license key is available. If the license key validation fails, you will encounter a Devart.Common.LicenseException. To resolve this error, you must either have a license key and already be a user or install the installation file, which will install a trial key into the system.

Summary
You can provide customized, more meaningful messages by customizing the HTTP 400 and 404 error responses in your application. Note that we’ve used two different custom middleware classes to handle HTTP 400 and 404 error responses in this example. You can use one custom middleware class to handle this as well, but if you’re handling multiple HTTP error responses in a single custom middleware class, it not only breaks the single responsibility principle but also makes your code difficult t manage and maintain over time.