
When developing a software application based upon complex database structure, it is often necessary to run diverse business logic test scenarios on the same input data. That’s where the problem of repeated recovery of test data arises. This article offers the simplest way to automate the process using only one tool – dbForge Studio for MySQL.
Test data recovery is a time-consuming and labor-intensive process usually done manually. Therefore, its automation is essential in assuring a fast, reliable, and cost-effective delivery. But before embarking on a detailed walkthrough on how to automate the test data recovery process with the help of dbForge Studio for MySQL, let’s first gloss over some terms.
What is DevOps?
DevOps is quite new and rapidly spreading concept that describes a set of practices aimed at automating software development and delivery processes so that development and IT teams could shorten the entire service lifecycle and provide continuous delivery of high-quality software.
Why DevOps for databases?
Database changes are the main reason for delay when performing application deployments. Thus, database development automation aimed at increasing the speed of delivery of database changes leads to shorter iterations and definitely has a positive impact on the continuous delivery of software applications.
How to automate test data recovery with dbForge Studio for MySQL
Background:
Suppose, that our database source code is located on a remote repository, and the test data for it have to be generated or taken from other sources such as a script folder, another database, or a file.
Prerequisites:
- dbForge Studio for MySQL installed on the machine
- The necessary template files previously configured with dbForge Studio for MySQL (.scomp, .dcomp, .dit, and/or .dgen).
Step 1. Clone a repository
Suppose that in a remote Git repository there is a scripts folder we need to use as a data source for creating our database. First of all, we need to clone this remote repository to a local folder. In this worked example, we will clone the repository to D:\Temp\DevOps_MySQL\. Below is the CMD command for this operation:
git clone https://github.com/repository-name/sakila.git D:\Temp\DevOps_MySQLWhere:
repository-name
The name of the repository you want to clone
sakila
The name of the database containing the test data you want to use
Note:
Before running the above-mentioned command, make sure that the Git for Windows client is installed on your machine.
Step 2. Create or recreate the database on the server
Before deploying the database on the server, you need to create or recreate the database (drop the old database one and create a new one). That can be easily done with a database creation script, CMD, and dbForge Studio for MySQL. We are not going to labor the point in this article as these operations are pretty basic.
To create the sakila database on the server, we’ll use the following command-line script:
dbforgemysql.com /execute /connection:"User Id=%user-name%;password=%your-password%;Host=%your-host%" /inputfile "D:\Temp\DevOps_MySQL\Create_sakila2.sql"Please note, that you need to enter your own credentials to make this script work.
For those, who prefer the PowerShell operating environment, we provide the PS script as well:
.\dbforgemysql.com /execute /connection:"User Id=%user-name%;password=%your-password%;Host=%your-host%" /inputfile "D:\Temp\DevOps_MySQL\Create_Sakila2.sql"
if ($? -eq $true) { Write-host "Database sakila2 created" -ForegroundColor Cyan } else { Write-host "Error" -ForegroundColor Yellow }
Again, don’t forget to add your own credentials to the script.
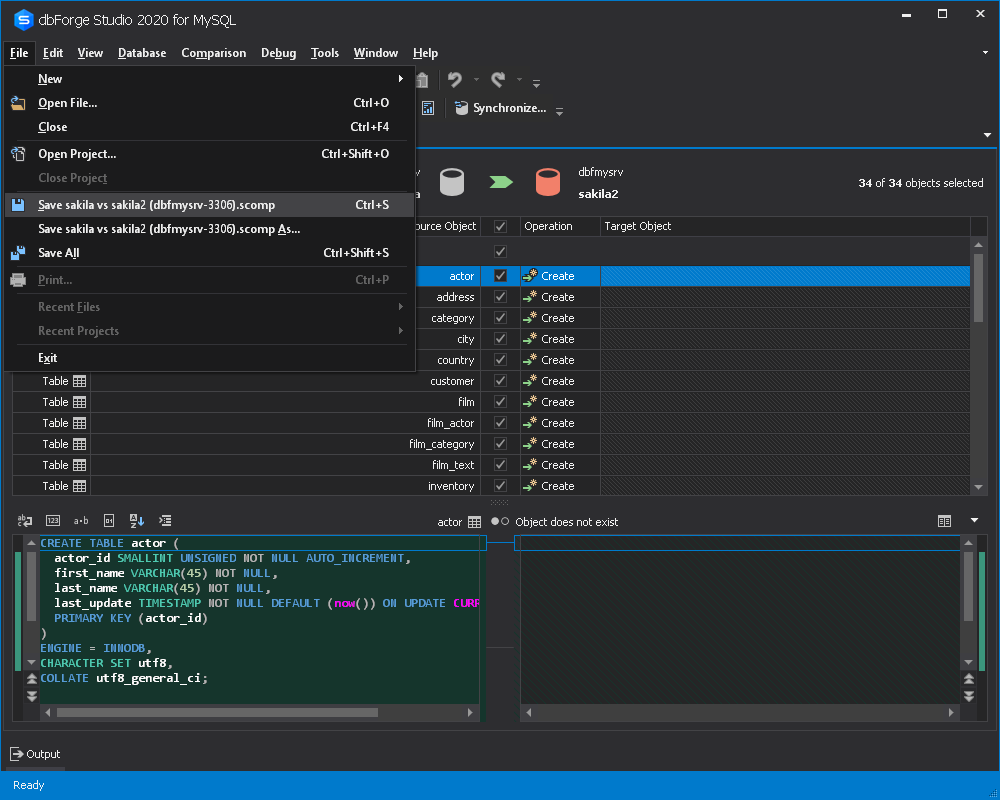
Step 3. Synchronize schemas between your local and remote databases
Below are the CMD and PS scripts to synchronize the schemas of your empty local sakila2 database with the remote sakila database. As a result of synchronization, all the tables, views, procedures, functions, and triggers that you’ve selected when configuring the template will be created.
CMD
dbforgemysql.com /schemacompare /compfile:"D:\Temp\DevOps_MySQL\sakila vs sakila2.scomp" /sync
@echo %ERRORLEVEL%
PS
.\dbforgemysql.com /schemacompare /compfile:"D:\Temp\DevOps_MySQL\sakila vs sakila2.scomp" /sync
if ($? -eq $true) { Write-host "Objects for sakila2 created" -ForegroundColor Cyan } else { Write-host "Error" -ForegroundColor Yellow }
Note:
The scripts provided imply that you’ve previously configured and saved the schema comparison template file (.scomp) to synchronize the specified databases. Please, don’t forget to use the Schema Comparison functionality of dbForge Studio for MySQL to prepare the file in question.
Step 4. Fill the database with data
In the previous step, we have restored the database structure. All we need now is to populate our database with test data. dbForge Studio for MySQL can boast three different tools you can use to fill the database with data. Since all the three can be invoked from the command line and, thus, can be used in the database automation process, we will consider each of them separately.
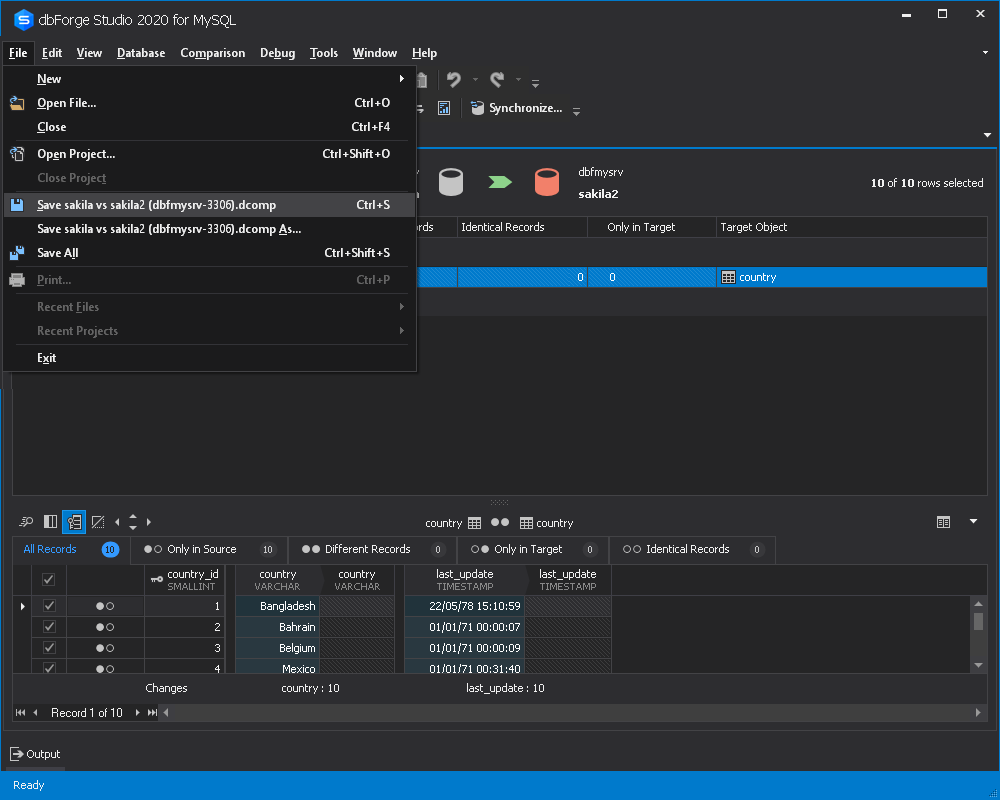
Populate the database using the Data Comparison functionality
You can easily restore the reference data located in your script folder or in another database using the advanced Date Comparison functionality built-into dbForge Studio for MySQL. Use the following scripts to insert data into the country table:
CMD
dbforgemysql.com /datacompare /compfile:"D:\Temp\DevOps_MySQL\country.dcomp" /sync
@echo %ERRORLEVEL%
PS
.\dbforgemysql.com /datacompare /compfile:"D:\Temp\DevOps_MySQL\country.dcomp" /sync
if ($? -eq $true) { Write-host "Data inserted in sakila2" -ForegroundColor Cyan } else { Write-host "Error" -ForegroundColor Yellow }
Note:
The scripts provided above imply that you’ve previously configured and saved the data comparison template file (.dcomp) to synchronize data in the specified databases. Please, don’t forget to prepare the file in question before running the script.
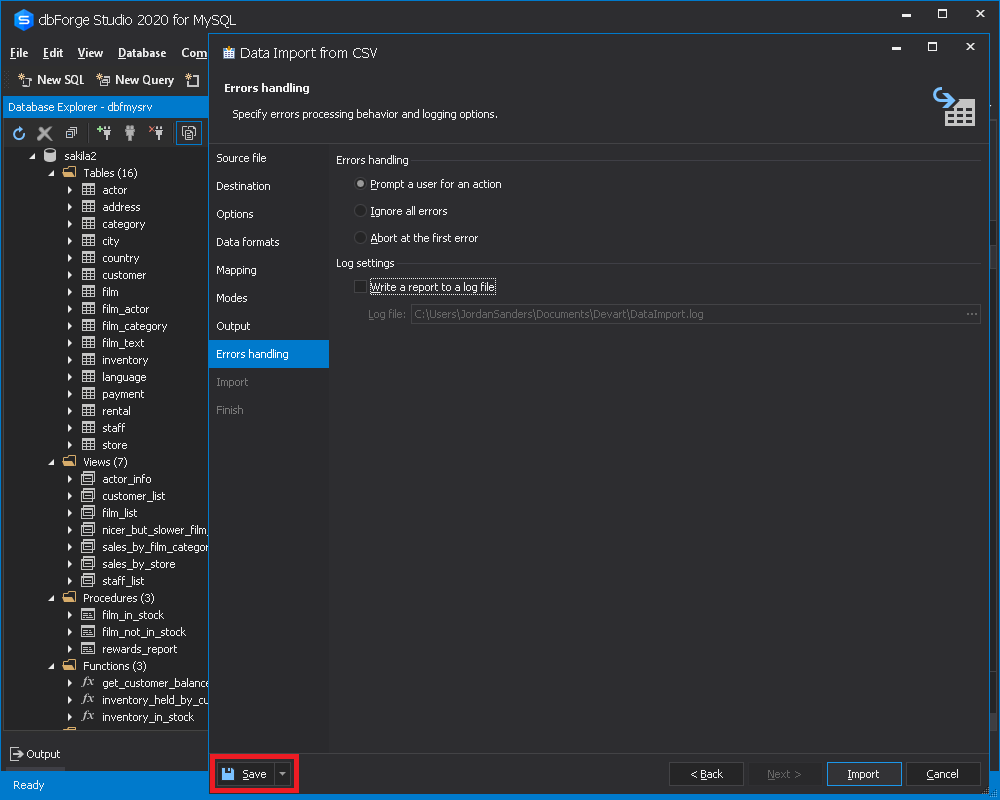
Populate the database using the Data Import/Export functionality
Data Import is the best option to fill the database with data if the reference data is stored not in the database itself, but in separate files. dbForge Studio for MySQL provides a simple and effective way to import this data directly into the tables you need, using the cutting-edge Data Import/Export functionality.
Use the following scripts to insert data into the address table:
CMD
dbforgemysql.com /dataimport /templatefile:"D:\Temp\DevOps_MySQL\address.dit"
@echo %ERRORLEVEL%
PS
.\dbforgemysql.com /dataimport /templatefile:"D:\Temp\DevOps_MySQL\address.dit"
if ($? -eq $true) { Write-host "Data inserted in sakila2" -ForegroundColor Cyan } else { Write-host "Error" -ForegroundColor Yellow }
Note:
The scripts provided above imply that you’ve previously configured and saved the data import template file (.dit) to import data into the specified tables. Please, don’t forget to prepare the file in question before running the script.
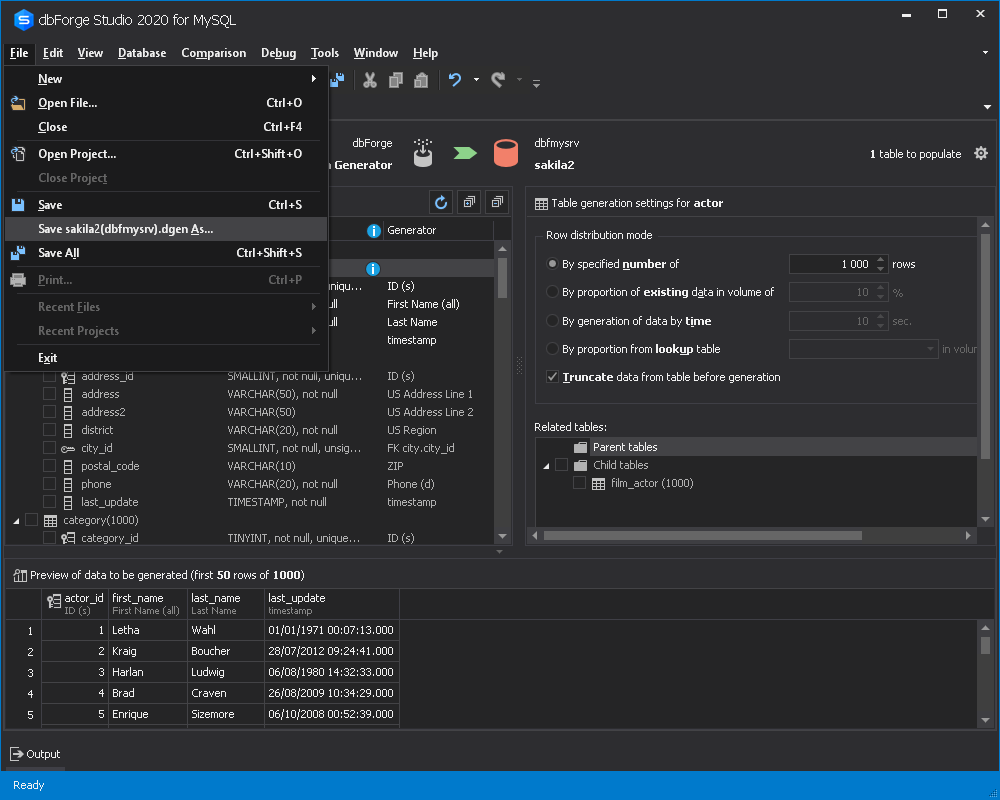
Populate the database using the Data Generator functionality
dbForge Studio for MySQL possesses powerful functionality for generating data. It is most suitable in situations where you need to populate the database with large amounts of realistic data, but you can not or don’t want to store this huge array of data on your disk. In this case, again, having previously configured the data generator template file (.dgen), you can use the following scripts to insert data into the actor table :
CMD
dbforgemysql.com /generatedata /projectfile:"D:\Temp\DevOps_MySQL\actor.dgen"
@echo %ERRORLEVEL%
PS
.\dbforgemysql.com /generatedata /projectfile:"D:\Temp\DevOps_MySQL\actor.dgen"
if ($? -eq $true) { Write-host "Data inserted in sakila2" -ForegroundColor Cyan } else { Write-host "Error" -ForegroundColor Yellow }
Note:
It is highly important to configure and save the data generator template file (.dgen) before running the scripts provided above.
All the scripts provided in the article return the exit status. As a result, if you compile the three scripts – for restoring the database structure, synchronizing database schemas, and populating the database, you’ll get a MySQL database automation script for restoring test data allowing you to monitor and control execution stages.
Conclusion
dbForge Studio for MySQL is a feature-rich IDE allowing you to extend the DevOps approach to your MySQL and MariaDB database development and deployment without much effort. Download dbForge Studio for MySQL and get your app development soar.