Delphi XE2 allows to develop iOS applications as well as applications for Win 32-bit, 64-bit, and Mac OS. In this article, we will try to explain how to develop iPhone apps in Delphi XE2. However, everything below can be used in application development for iPad and iPod, since they support iOS mobile platform as well.
iOS application development is a little bit different from development of common desktop applications, and it consists of two main stages:
- Application development in Delphi XE2
- Application compilation and building in Xcode on Mac OS
This is due to the fact that Delphi does not have a native compiler for iOS platform, and the FPC compiler should be used for compilation.
Also, note that an iOS application can only work with several databases (where no client library is required, or if there is a native client for iOS). This restriction is due to the fact that, according to the Apple policy, iOS applications must not be written using external dynamic libraries, if only they are not built into the iOS SDK or statically linked to the application itself (you can find more detailed information at the Apple site).
So, using Devart Data Access Components, it is possible to work with the following databases in iOS:
- SQLite (the library is supplied with iOS)
- MySQL in the direct mode (the client is not required)
- PostgreSQL in the direct mode (the client is not required)
We have used UniDAC for developing our sample application, and all three databases are used in it.
Also, you can develop DB applications for iOS using the following separate Devart products:
The process of application development using these products is similar to the one described below, except that you have to use the product-specific connection and query components instead of TUniConnection and TUniQuery listed in our code samples.
Application development in Delphi
At the first stage, a new iOS application can be created using “File -> New -> Other -> FireMonkey HD iOS Application” menu. A new iOS application can be created Then the application is designed similarly to any other application, i.e. you can place visual components on the form, implement application logic, etc.
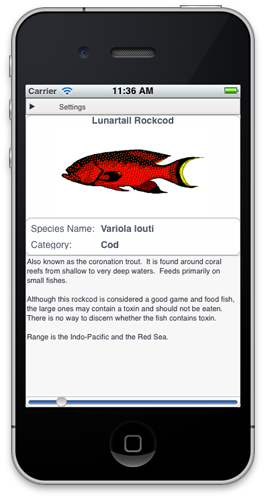
Our demo form can be seen below:
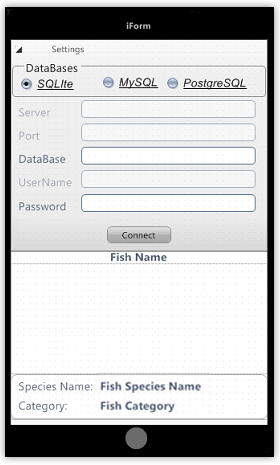
However, there are several restrictions in Delphi XE2 if your application needs to work with a database:
- Data-access components can not be placed on the form in design-time and have to be created, configured and released manually in runtime.
- There are some peculiarities when generating project-relative paths (for example, when setting a database name for the connection) in iOS.
- There is no possibility to set a link between data-access components and visual controls (for example, like connecting TStringGrid and a dataset with the LiveBindings mechanism in a trivial FireMonkey application). The process of displaying and editing data needs to be implemented manually.
Creating data-access components
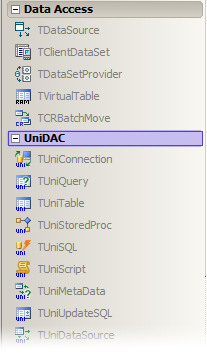
So, when developing your iOS application, you first see that all the data-access components on the Tool Palette are not available, as it is shown below:
In order to use UniDAC in our sample application, we have declared two variables in the private section of the form declaration, and then created the TUniConnection and TUniQuery instances in the OnClick event handler of the “Connect” button:
TiForm = class(TForm)
private
UniConnection: TUniConnection;
UniQuery: TUniQuery;
end;
...
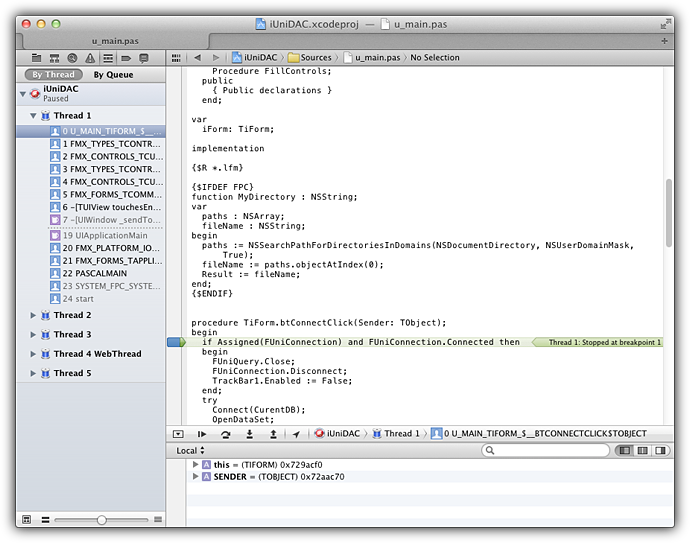
procedure TiForm.btConnectClick(Sender: TObject);
begin
if not Assigned(UniConnection) then
UniConnection := TUniConnection.Create(Self);
UniConnection.ProviderName := 'SQLite';
UniConnection.Database := GetDatabasePath + edDataBase.Text;
UniConnection.Connect;
if not Assigned(UniQuery) then
UniQuery := TUniQuery.Create(Self);
UniQuery.Connection := UniConnection;
UniQuery.SQL.Text := 'SELECT ID, Common_Name, Graphic, SpeciesName, Category, Notes FROM FISH';
UniQuery.Open;
end;
Setting the database path
As you can see, in the code sample above we have used some GetDatabasePath function when setting the UniConnection.Database property.
The point is that, under iOS, there is no ability to use usual ParamStr(0) function for obtaining the application path (for example, in order to generate a project-relative path to a database). In our sample application, we implemented the GetDatabasePath function as follows:
function GetDatabasePath: string;
{$IFDEF FPC}
var
  Paths : NSArray;
  FileName : NSString;
begin
  Paths := NSSearchPathForDirectoriesInDomains(NSDocumentDirectory, NSUserDomainMask, True);
  FileName := Paths.objectAtIndex(0);
  Result := String(FileName.UTF8String) + '/';
{$ELSE}
begin
  Result := ExtractFilePath(ParamStr(0));
{$ENDIF}
end;
When the application runs in Windows, the function will return the application path.
But, when the application runs in iOS, the function will return a path to the special Documents sub-folder located in the application root folder on the iOS device. The Documents sub-folder is automatically created for each iOS application when it is installed. All application data, including the database, has to be placed in this sub-folder.
Unfortunatelly, there is no possibility to include the database file into the project in order to place it into the Documents subfolder automatically when the application is installed. Therefore you will have to copy the database file to the iOS device manually after installing the application.
Retrieving and displaying data
Then, the task is to display the data retrieved by the query in visual controls. As it is described above, there is no possibility in Delphi XE2 to do this in a way like using a TDataSource component in VCL, or LiveBindings in FMX. Developer’s own methods are required to be implemented for each specific case to display and edit data.
In our sample application, we did not use any data-aware components like TDBGrid or TStringGrid, therefore we simply set visual controls properties with the values of the corresponding query fields when the trackbar at the botton of the form changes its position:
procedure TiForm.TrackBar1Change(Sender: TObject);
begin
  if Assigned(UniQuery) and UniQuery.Active then begin
    UniQuery.Locate('ID', VarArrayOf([Round(TrackBar1.Value + 1)]), [loPartialKey]);
    lbCommon_Name.Text := UniQuery.FieldByName('Common_Name').AsString;
    lbSpeciesName.Text := UniQuery.FieldByName('SpeciesName').AsString;
    lbCategory.Text := UniQuery.FieldByName('Category').AsString;
    meDescription.Text := UniQuery.FieldByName('Notes').AsString;
  end;
end;
Data can be displayed in a grid in a similar way. You can loop by the records in a dataset, and enter the values of each field into a corresponding cell of the grid, as follows:
var
  UniConnection: TUniConnection;
  UniQuery: TUniQuery;
  i: Integer;
begin
  UniConnection := TUniConnection.Create(nil);
  try
    UniConnection.ProviderName := 'SQLite';
    UniConnection.Database := GetDatabasePath + 'fish.db3';
    UniConnection.Connect;

    UniQuery := TUniQuery.Create(nil);
    try
      UniQuery.Connection := UniConnection;
      UniQuery.SQL.Text := 'Select Category, Common_Name, Notes from FISH';
      UniQuery.Open;

      while not UniQuery.Eof do begin
        for i := 0 to UniQuery.Fields.Count - 1 do
          StringGrid1.Cells[i, UniQuery.RecNo - 1] := UniQuery.Fields[i].AsString;
        UniQuery.Next;
      end;

    finally
      UniQuery.Free;
    end;

  finally
    UniConnection.Free;
  end;
end;
Data editing also needs to be performed manually, i.e. you should call the corresponding Insert/Update/Delete methods, fill in the fields of a dataset with the right values, and then call the Post method, etc.
Compilation and deployment
The second stage is compilation and deployment of applications directly to the iOS platform.
The stage consists of three steps:
- Creating an Xcode project for the Delphi project.
- Compiling the Xcode project on MacOS.
- Deploying the application to an iOS device.
Creating an Xcode project
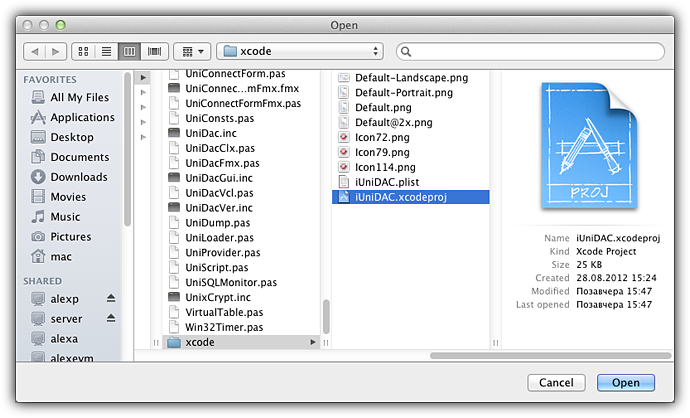
In order to compile a Delphi project on MacOS, a special Xcode project has to be created. The project consists of several additional files that are created in the “xcode” subfolder in the root folder of the project.
To create an Xcode project for the existing Delphi project, the dpr2Xcode.exe command-line utility is used. The utility is supplied with Delphi XE2 and located in the Bin folder.
To make the usage of the utility more handy, you can customize the IDE Tools menu.
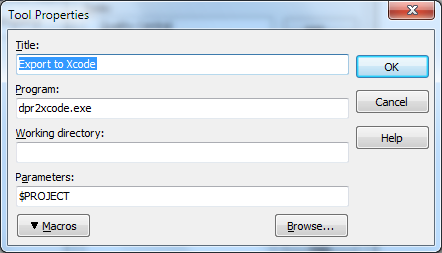
Open the “Tools-> Configure Tools” menu, press the “Add…” button and fill the properties as follows:
- Title: Export to Xcode
- Program: dpr2Xcode.exe
- Parameters: $PROJECT
Now you can open your iOS project in the IDE and use the “Tools -> Export to Xcode” menu to create an Xcode project. As it described before, after doing this, the “xcode” subfolder will be created in the root folder of the project.
Then, it is nessessary to copy all UniDAC source files into the iOS project root folder, because UniDAC files will also be required by the FPC compiler to build the project.
Compiling the Xcode project on MacOS
Now, the iOS project is ready to be compiled with Xcode on MacOS.
The MacOS system used for compiling must conform to the following requirements:
- Operating system: OS X 10.6 Snow Leopard or OS X 10.7 Lion
- Free Pascal version 2.6.0 installed on MacOS
- Xcode and the iOS SDK installed on MacOS
(We have verified Xcode versions 3.2.5 and 4.2, and iOS SDK versions 4.2.x, 4.3.x and 5.0) - the FireMonkey-iOS-XE2.dmg package installed on MacOS
(The package is required by FPC to compile Delphi projects. It is supplied with Delphi XE2 and located in the FireMonkey-iOS folder) - an iOS mobile device (iPhone, iPod or iPad) connected to the Mac via USB port
(If you don’t have one, you can test the application in the iOS device simulator included in Xcode)
So, if you have an appropriate MacOS system, you should copy the project folder to MacOS, open the project in Xcode, then select an appropriate output device in Xcode (a real iOS device or a simulator) and build the project.
When a simulator is chosen as an output device, then after the successfull building, the application will be opened in the simulator directly on the MacOS system.
When a real connected device is chosen as an output device, the application will be automatically transferred and installed on the device, and its label will appear on the device desktop.
Also, since all the source files are transferred to Mac OS, there is a possibility to debug the application directly in Xcode.
Deploying the application to an iOS device
The application deployment process is not the objective of this article, it is widely described in Internet. As mentioned above, you do not have to deploy any additional libraries with an application written using UniDAC, PgDAC, MyDAC, or LiteDAC.
Also note, that in order to develop applications on a real iPhone, iPod, or iPad, you have to sign up for the Apple’s paid iOS Developer Program and configure the device for development purposes. You can find out more about the iOS Developer Program here. Without this license, the application can be only tested in the iOS simulator included in Xcode.
Congratulations!
This article it’s perfect to probe the devart components.
Could you update the article for XE4? I am unable to make it work. Even so the dB Sems to be in documents the program does not find it.
Is there a way to update the dB via iTunes?
Please have a look at the How to Develop iOS Applications in Delphi XE4 Using Devart Data Access Components article.
Congrats!
Thank you! We hope the article was useful for you.