
Need to transfer SQL Server data between environments? Whether setting up CI/CD pipelines or preparing for a move to the cloud, you can have SQL Server export table to a script file to give you a portable, editable, and version-controlled format.
To help you get started, this guide shows you how to export SQL Server to SQL files using SQL Server Management Studio (SSMS), command-line tools like sqlcmd, and dbForge Studio for SQL Server.
Table of contents- Why exporting and importing data is crucial
- Methods to export and import data in SQL Server
- Script vs BACPAC vs SSIS: comparison table
- Common pitfalls
- Best practices
- Conclusion
- Frequently asked questions
Why exporting and importing data is crucial
Exporting and importing SQL Server data is essential for:
- Migrating environments: When moving between dev, staging, and production, teams rely on SQL script exports to preserve both schema and data with precision. This ensures environment parity without overreliance on backups or manual syncing.
- Versioning schemas: Developers use SQL exports to track schema changes in Git, providing full visibility into how a database evolves across sprints or releases. This reduces rollback risk and improves review cycles.
- Backups and disaster recovery: Full backups are essential, but DBAs often script specific tables or datasets for targeted recovery. When you within SQL Server export database to SQL file, it creates flexible restore points without needing to restore the entire system.
- CI/CD automation: In DevOps pipelines, if you use mssql export database to sql file, the processes are embedded into build steps, allowing teams to automate deployments, seed environments, and validate schema drift before production.
- Cloud and hybrid deployment readiness: Exporting SQL Server objects and data to scripts simplifies cloud onboarding. For teams transitioning to Azure SQL or hybrid environments, SQL script exports provide transparency and auditability that binary migrations lack.
Methods to export and import data in SQL Server
Exporting and importing SQL Server data can be done through graphical interfaces, command-line utilities, or advanced IDEs, each suited to different skill levels and automation needs. The right method depends on whether you’re exporting a full database, scripting a specific table, or integrating with CI/CD workflows.
What are the methods to export/import SQL Server data?
SQL Server offers several reliable ways to export and import data, depending on your workflow, whether you’re scripting one table, automating full exports, or working within a visual IDE.
Here’s a breakdown of the most common options to export SQL server database to SQL file.
| Method | Tool | Format | Ideal for |
|---|---|---|---|
| SSMS Export Wizard | SQL Server Management Studio (SSMS) | SQL Script | Visual, step-by-step export/import tasks |
| Command-Line Export | sqlcmd, bcp | SQL Script or flat file | Automated jobs, batch scripting, DevOps |
| IDE integration | dbForge Studio for SQL Server | SQL Script (GUI/CLI) | Version control, CI/CD pipelines, team workflows |
These SQL software support a wide range of use cases, from exporting individual SQL Server table data to SQL scripts to generating full-database script files for deployment, backup, or version control.
Each method offers flexibility in terms of how data is structured, exported, and restored, giving developers and DBAs control over format, encoding, and execution context.
Using SQL Server Management Studio (SSMS)
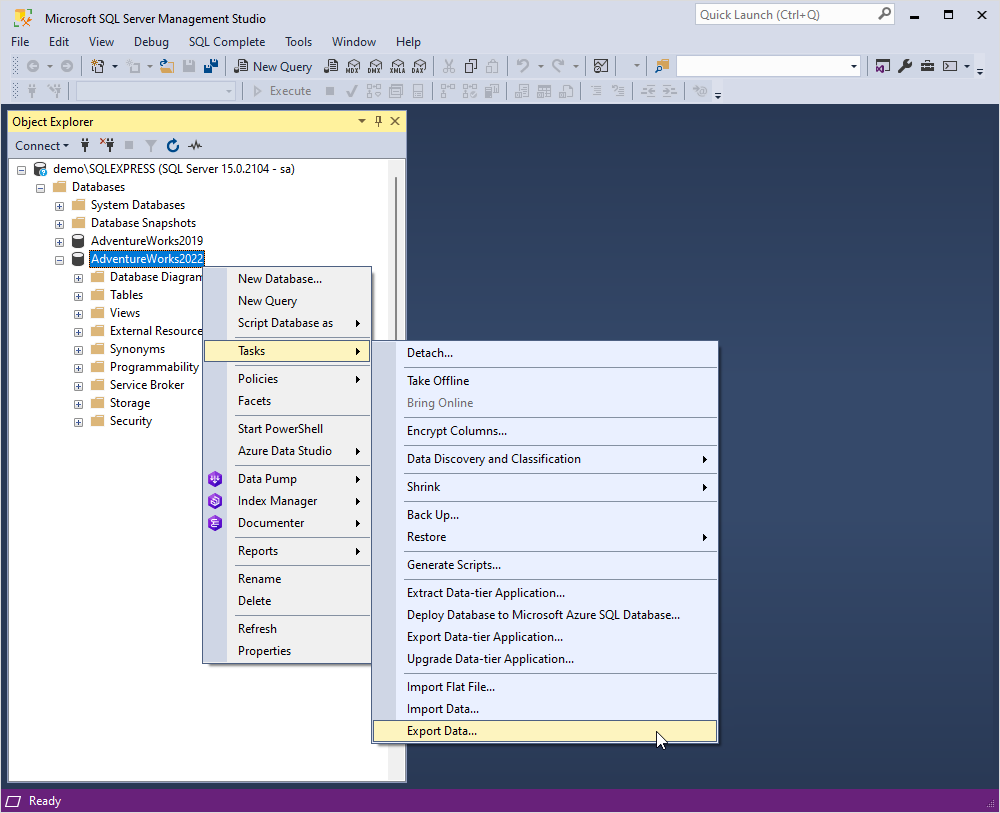
In order to start the SQL Server Import and Export Wizard in SSMS, follow these simple steps:
- In SQL Server Management Studio, connect to an instance of the SQL Server Database Engine.
- Expand Databases.
- Right-click a database.
- Point to Tasks.
- Click one of the following options.
- Import Data
- Export Data
The SQL Server Import and Export Wizard can copy data to and from the data sources listed in the table below:
| Data Source | Requirements | Additional Information |
|---|---|---|
| Enterprise databases |
|
SQL Server or SSDT installs the files needed to connect to SQL Server. For other enterprise databases like Oracle or IBM DB2, you need to have the client software installed. Microsoft provides drivers and providers for Oracle, and you can get the Microsoft OLEDB Provider for DB2 v5.0 for Microsoft SQL Server from the Microsoft SQL Server 2016 Feature Pack. |
| Text files (flat files) | No additional files required | |
| Microsoft Excel and Microsoft Access files |
|
Microsoft Office does not install all the files needed to connect to Excel and Access files. You need to download the Microsoft Access Database Engine 2016 Redistributable. |
| Azure data sources |
|
SQL Server Data Tools do not install the files needed to connect to Azure Blob Storage. You need to download the Microsoft SQL Server 2016 Integration Services Feature Pack for Azure. |
| Open source databases | Download additional files for specific databases (e.g., PostgreSQL, MySQL) |
For PostgreSQL, see Connect to a PostgreSQL Data Source. For MySQL, see Connect to a MySQL Data Source. |
| Any other data source with available driver or provider | Download additional files |
For sources with an ODBC driver available, see Connect to an ODBC Data Source. For sources with a .Net Framework Data Provider available, download the required files. For sources with an OLE DB Provider available, download the necessary files. |
| Third-party components for SSIS | May require additional files |
Third-party components providing source and destination capabilities for various data sources are sometimes marketed as add-on products for SQL Server Integration Services (SSIS). |

Export SQL Server data to a SQL script
In this article, we are going to have a look at the Data Pump solution, which is also a part of dbForge Studio for SQL Server. This tool is sure to facilitate data import and export as it offers advanced options, templates, and a number of widely used data formats for both export and import.
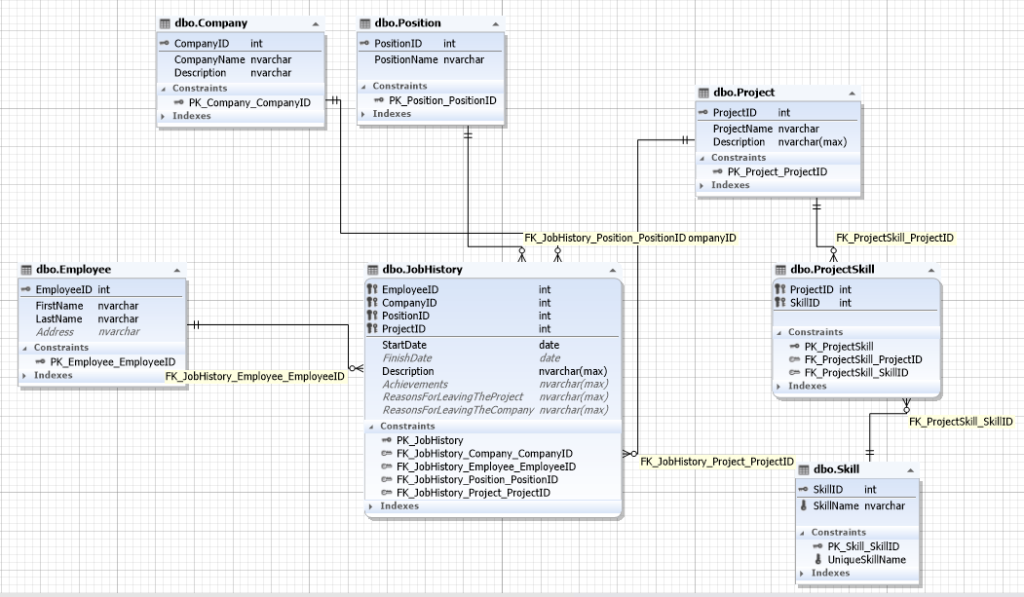
You can find a step-by-step guide to designing a database for a recruitment service right here.
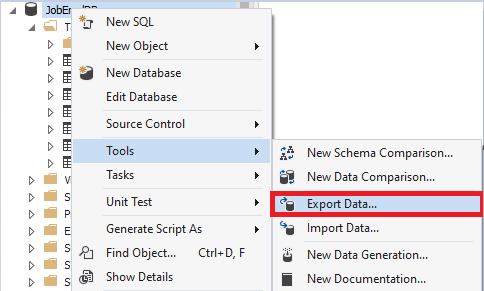
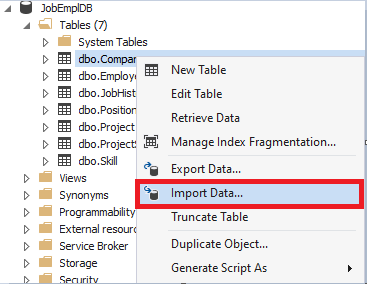
- Select data export on the database level
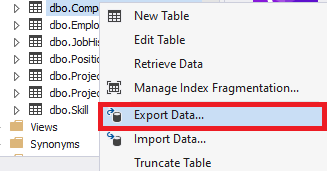
Select the required database and right-click the necessary table (if you need to export a specific table) or the database (if you need to export several tables) and select Export Data:

- Select data export on the table level

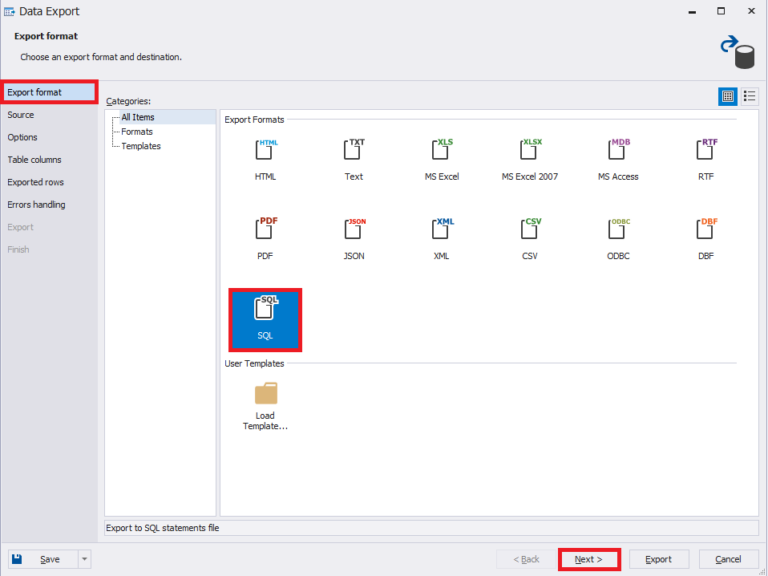
- Select the export format
Next, on the Export format page, you can choose from different formats of data export. We choose SQL scripts and press Next:

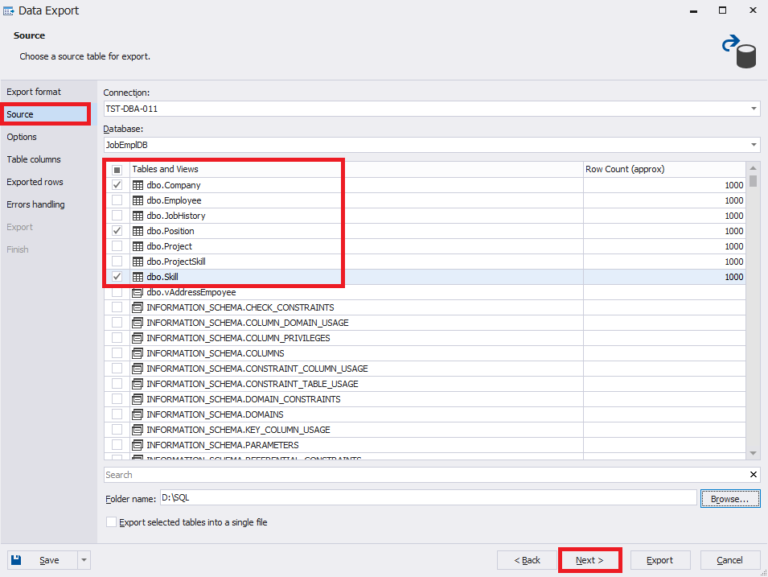
- Select data to export
Now, on the Source page, select the tables to export data from and press Next.
In this case, we select three directories:
1. Company is a list of companies.
2. Position is the list of positions.
3. Skill is a list of skills.
Note that it is possible to change the connection and the database whenever required.
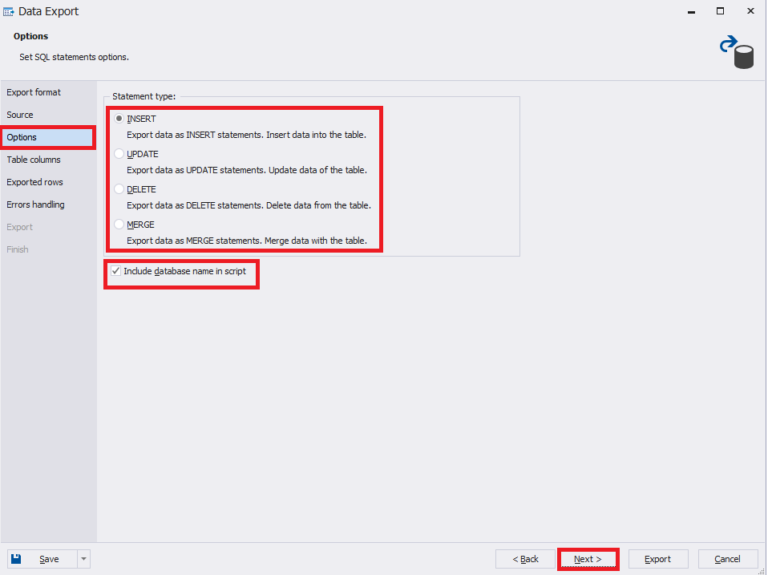
- Select the script generation method
Next, on the Options page, select the script generation method for data export and select if you need to include the database name in the script. Then, click Next.
Note that the window suggests 4 types of script generation for data export:
1. INSERT. The script for inserting data will be generated.
2. UPDATE. The script for updating data will be generated. That is, the matching key fields will be found, and the update will be performed.
3. DELETE. The script for deleting data will be generated. That is, all data that matches the exported data by key fields on the target database side will be deleted.
4. MERGE. The script for merging data will be generated. It will include the first two types: insert and update.
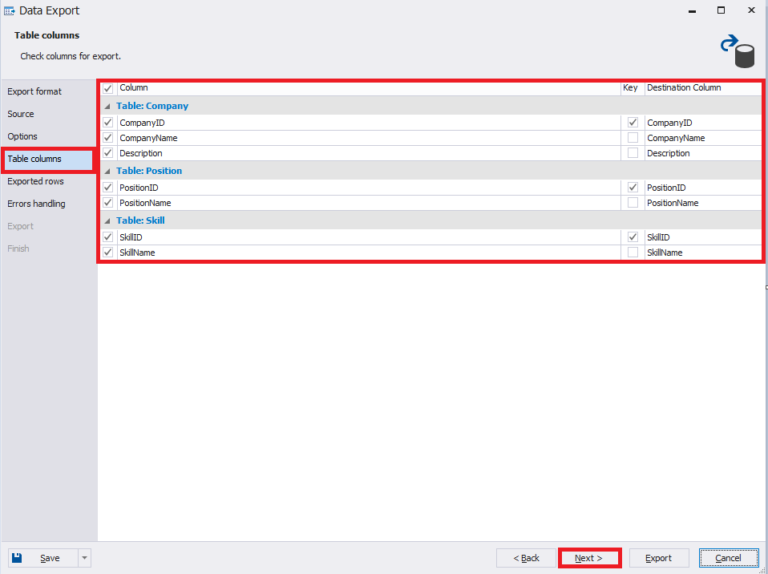
- Select columns and key fields for export
Now, on the Table columns page, you need to select the required columns and key fields for export (by default, we select all columns for export, and the key fields match the primary keys’ definitions of the corresponding tables). Then, click Next.

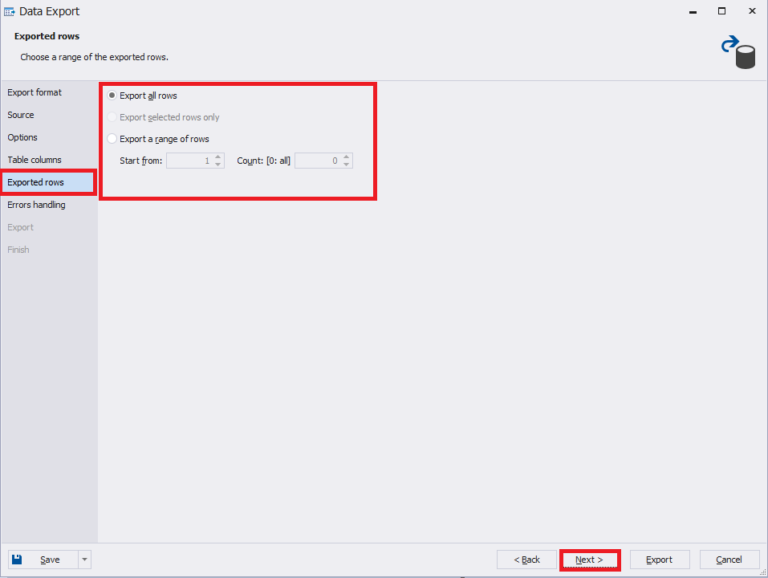
- Select data to be exported
Following that, on the Exported rows page, select which data to export and press Next.
Note that you can select all rows as well as an exact range of rows for data export.
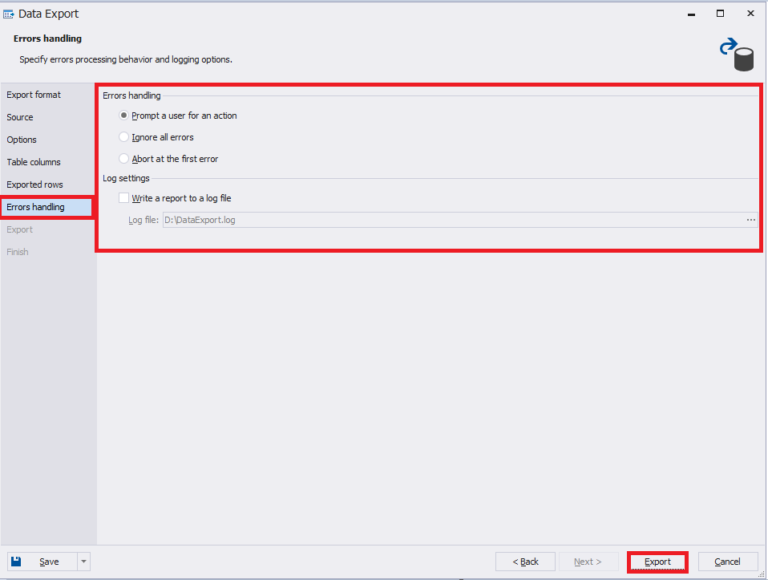
- Set errors handling page
Additionally, you can configure errors handling parameters on the Errors handling page.
Note that users often select the Write a report to a log file option when they need to analyze the report results. But to make it simple, leave the default options and click Export to start exporting data.
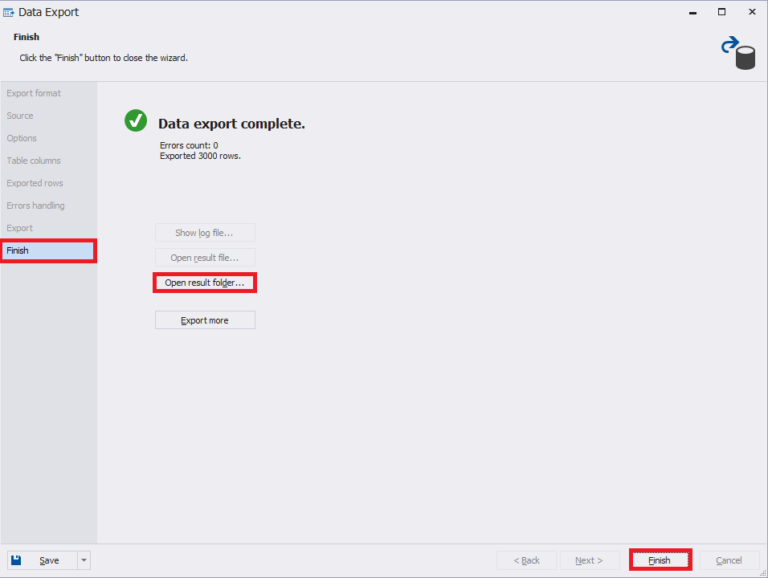
- Finish the export
When the export is complete, you can either click Finish or open the folder with generated scripts by pressing the Open result folder button:
- View the scripts
As a result, there will be 3 scripts generated for each directory table:


The T-SQL script is going to look the following way:
SET DATEFORMAT ymd
SET ARITHABORT, ANSI_PADDING, ANSI_WARNINGS, CONCAT_NULL_YIELDS_NULL, QUOTED_IDENTIFIER, ANSI_NULLS, NOCOUNT ON
SET NUMERIC_ROUNDABORT, IMPLICIT_TRANSACTIONS, XACT_ABORT OFF
GO

SET IDENTITY_INSERT JobEmplDB.dbo.Skill ON
GO
INSERT JobEmplDB.dbo.Skill(SkillID, SkillName) VALUES (689, N'C#')
...
INSERT JobEmplDB.dbo.Skill(SkillID, SkillName) VALUES (14, N'SQL')
GO
SET IDENTITY_INSERT JobEmplDB.dbo.Skill OFF
GO
You need to apply the generated scripts to the necessary target database.
Exporting via CLI (sqlcmd / bcp)
For DevOps and script-oriented workflows, SQL Server also supports command-line exports.
Example of using sqlcmd
sqlcmd -S YourServer -d YourDatabase -E -Q "SELECT * FROM dbo.YourTable" -o

"C:\Backup\YourTableData.sql"
Example of using bcp
bcp YourDatabase.dbo.YourTable out "C:\Backup\YourTableData.txt" -c -t, -S

YourServer -T
These options are ideal for automation pipelines or quick scripting tasks. But what if the data was saved in a different format? For that purpose, there is data import, which you can open by right-clicking the database or the desired table.
Selecting data import on the database level:
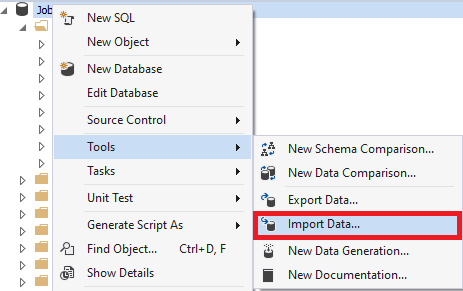
Selecting data import on the table level:
Keep going in a similar way as we have performed data export.
How to automate SQL Server data export/import to SQL scripts
Automating export and import processes helps ensure consistency across environments, especially in CI/CD pipelines or scheduled maintenance tasks.
While SQL Server Management Studio doesn’t offer built-in scheduling, you can automate exports using the tools below.
Option 1: PowerShell + sqlcmd
PowerShell provides full control over SQL export tasks, making it ideal for DevOps pipelines or scheduled data transfers.
Example script
$sqlServer = "YourServer"
$database = "YourDatabase"
$table = "YourTable"
$outputFile = "C:\Exports\$table.sql"

$sql = "SELECT * FROM dbo.$table"
sqlcmd -S $sqlServer -d $database -E -Q $sql -o $outputFile
Use Windows Task Scheduler or Windows Services to run this script on a daily, weekly, or deployment-triggered schedule.
Option 2: SQL Server Agent
If you’re using a non-Express edition of SQL Server, the built-in SQL Server Agent is a robust way to schedule recurring export and import jobs.
To automate with SQL Server Agent:
- Create a SQL Job
- Add a step to run a T-SQL script, PowerShell command, or executable
- Set a recurring schedule or trigger based on events
Pro tip: Use SQL Server Agent to export schema and data before deployments or to generate nightly SQL scripts for versioning.
Option 3: dbForge Studio for SQL Server CLI
dbForge Studio includes a command-line interface that lets you automate export operations using predefined templates.
An example of a command with a predefined template
datapump.com /dataexport /projectfile:"C:\MyExports\ExportSettings.dps" This approach is especially useful for:
- Running consistent exports across environments
- Integrating into CI/CD tools like Azure DevOps, TeamCity, or GitHub Actions
By automating SQL Server data exports to script files, you eliminate manual errors, accelerate testing cycles, and ensure repeatability across development, staging, and production.
Script vs BACPAC vs SSIS: comparison table
When exporting or importing SQL Server data, it’s important to choose the right method based on your goals, whether versioning schema changes, backing up production data, or running complex ETL pipelines.
The table below compares three common options: SQL Scripts, BACPAC files, and SSIS (SQL Server Integration Services).
| Feature | SQL Script (Generate scripts) | BACPAC file | SSIS (Integration services) |
|---|---|---|---|
| Data + schema support | Yes (configurable: schema, data, or both) | Yes | Yes |
| Customization | High (manual editing possible) | Low | Very High (ETL, transformations) |
| Reusability | Medium | High | High |
| Automation friendly | Moderate (sqlcmd, PowerShell, CLI tools) | High (deploy via Azure or SSMS) | Very High (via SSIS packages & scheduling) |
| DevOps integration | Good (Git + dbForge/SSMS CLI) | Limited | Moderate (requires setup & expertise) |
| Ideal for | Lightweight migrations, versioning | Full database export/import | Complex ETL and cross-server operations |
| Typical users | Developers, DBAs, version control scenarios | Admins, backup/restore workflows | Data engineers, ETL/BI specialists |
Takeaways:
- Use SQL scripts for versioning or lightweight, readable migrations.
- Choose BACPAC for full database moves, especially to/from Azure.
- Consider SSIS when handling large-scale transformations or integrating with other systems.
Common pitfalls
Avoid these common mistakes when exporting or importing SQL Server data:
- Exporting without schema dependencies: Failing to include constraints, indexes, or triggers can break functionality in the target environment. Always verify that your script includes all relevant schema elements when SQL Server export database to SQL file.
- Not validating the imported script: Running untested scripts in production can lead to data loss or corruption. Validate scripts in a staging environment before deploying.
- Using the wrong encoding for scripts: Incompatible encoding (e.g., ANSI vs UTF-8) can cause issues with special characters, especially in multilingual datasets.
- Mismatched data types between source and target: This often leads to truncation, rounding errors, or failed imports. Double-check column types before running export/import routines.
- Improper NULL value handling: If your target table doesn’t allow NULLs but the source includes them, you’ll run into insert errors. Plan for default values or schema adjustments.
- Overwriting production data unintentionally: Not specifying filters or ranges can overwrite critical data. Always preview row selections and backup the target environment first.
- Lack of error logging: Without proper logs, diagnosing failed exports/imports is nearly impossible. Enable logging in tools like dbForge solutions or within PowerShell scripts.
- Missing permissions: Users without the required privileges won’t be able to run export/import tasks, leading to silent failures or incomplete jobs.
By avoiding these mistakes, you reduce the risk of broken migrations, corrupted data, and time-consuming rework. Treat every export or import as a production-level operation.
Best practices
To ensure that SQL Server export table to SQL script successfully and in a repeatable way, follow these proven best practices:
- Use script version control with Git: Track changes to your .sql files to maintain a clear audit trail and enable rollbacks when needed.
- Automate export with PowerShell or dbForge CLI: Eliminate manual steps and reduce errors by using tools like PowerShell or the dbForge command-line interface.
- Test import scripts in a staging environment: Never run an untested script in production. Validate the full execution flow using staging data.
- Avoid exporting unnecessary columns: When using the SQL Server export table data to SQL script approach, limit exports to only the necessary columns. This keeps scripts lean, improves execution time, and reduces merge conflicts in version control.
- Use consistent formatting and encoding: Standardize on UTF-8 encoding and indentation style to avoid compatibility issues across environments.
- Disable triggers during large imports: This improves performance and prevents unintended logic execution on insert/update.
- Monitor execution time and resource usage: For large operations, track performance to avoid timeouts and spot potential bottlenecks.
- Use parameterized queries when building dynamic SQL: Avoid SQL injection risks by not hardcoding values into generated scripts.
Pro tip: Use dbForge Studio for SQL Server to generate export scripts and commit them automatically to Git using predefined templates. This ensures consistency and traceability across teams.
Conclusion
To summarize, this guide has covered the essential techniques for exporting and importing SQL Server data effectively. Here’s a recap:
- Export SQL Server data to SQL script files using SSMS, sqlcmd, or bcp for flexibility across environments.
- Automate SQL Server data exports with PowerShell, SQL Server Agent, or dbForge CLI to eliminate manual overhead.
- Apply proven best practices to prevent data loss, encoding issues, and schema mismatches during transfer.
Whether performing a one-time migration or needing mssql to export a database to SQL file regularly, a consistent, automated approach is key.
Want a faster, more reliable export workflow? Use dbForge Studio’s Export Wizard to script schema and data in just a few clicks, with built-in automation, versioning templates, and CLI support for DevOps pipelines.
Frequently asked questions
How do I export a SQL Server database to a SQL file?
The simplest way to handle a SQL Server export database to SQL file task is by using SQL Server Management Studio (SSMS). From the “Tasks” menu, choose “Generate Scripts,” select the database, and output the schema and data as a .sql file.
What is the best way to export SQL Server table data as a script?
You can perform a SQL Server export table data to SQL script using the “Generate Scripts” wizard in SSMS. This lets you export schema, indexes, constraints, and row data from individual tables into a reusable script.
Can I use command-line tools to export SQL Server data?
Yes. Utilities like sqlcmd or bcp can be used to export SQL Server to SQL file directly from the command line, which is useful for automation and DevOps workflows.
How does dbForge simplify SQL Server data export and import?
dbForge Studio offers a streamlined way to SQL Server export table to SQL script with a visual wizard. It reduces manual steps, provides flexible options for schema and data, and includes scheduling tools for recurring export/import jobs.
How do I export only one table to a SQL script in SQL Server?
You can export SQL table to SQL file by selecting just that table in the SSMS scripting wizard. This avoids generating scripts for the entire database when you only need one object.
How can I automate SQL export tasks using PowerShell or CLI?
Automation is possible with both sqlcmd and PowerShell modules. These tools support MSSQL export database to SQL file commands, allowing repeatable export jobs that can be integrated into CI/CD pipelines.
What’s the difference between BACPAC and SQL script export?
A BACPAC captures schema and data in a compressed package, useful for Azure deployments. In contrast, a MSSQL dump database to SQL file creates a plain-text .sql script that can be version-controlled or edited manually.
Can I version-control SQL Server data scripts using Git?
Yes. Many teams store their SQL Server export table to SQL script outputs in Git for version control. This ensures schema and data changes are traceable, reviewable, and aligned with DevOps practices.
How do I avoid common mistakes when exporting SQL Server data?
When you export SQL Server to SQL file, common mistakes include forgetting to script constraints, indexes, or triggers, and missing dependent objects. Always review options in the scripting wizard to capture everything needed.
What is the best practice for importing SQL scripts into a new database?
After a SQL Server export database to SQL file, best practice is to review the script for environment-specific details (like file paths and user mappings). Then execute it in SSMS or via sqlcmd against the target database.