
Database migration involves transferring data, schemas, and other database objects from one database system to another. How can you migrate data from SQL Server to Oracle with minimal disruption and maximum efficiency?
In this article, we will explore the key reasons why companies might choose to migrate from SQL Server to Oracle and how to tackle migration challenges. Also, we’ll provide step-by-step guides on how to execute this migration using the following tools:
Table of contents:
- Why migrate from SQL Server to Oracle?
- Migration tools
- How to migrate from SQL Server to Oracle using dbForge Studio and ODBC Driver
- Prerequisites
- Step 1. Setting up the connection
- Step 2. Open the Data Import wizard
- Step 3. Selecting the data source and destination
- Step 4. Set ODBC data provider options
- Step 5. Set the import destination
- Step 6. Configuring data import settings
- Step 7. Check the mapping of the columns
- Step 8. Select the import mode
- Step 9. Generating SQL scripts with data import
- Step 10. Configure error handling and logging
- Step 11. Executing data migration
- How to migrate from SQL Server to Oracle using SQL Developer and SourceForge JTDS Driver
- Prerequisites
- Step 1. Add JTDS Driver to SQL Developer
- Step 2. Connect to Oracle and SQL Server databases
- Step 3. Retrieve the data you want to migrate
- Step 4. Generate INSERT statements to export the data
- Step 5. Copy the generated INSERT statements to the Oracle database
- Step 6. Create a target table in Oracle
- Step 7. Migrate data to the created Oracle table
- Step 8. Verify the migration
- Challenges in database migration and how to overcome them
- Conclusion
Why migrate from SQL Server to Oracle?
When you consider a migration from SQL Server to Oracle Database, it’s crucial to understand how these database platforms differ in their core capabilities and operational strengths.
Here are some of Oracle’s benefits over SQL Server:
- Platform support and compatibility. SQL Server is optimized for Windows environments, with recent support for Linux. In contrast, Oracle offers cross-platform capabilities, running on Unix, Linux, and Windows. This flexibility enables deployment in hybrid and cloud-based environments, allowing organizations to adopt a diverse range of infrastructures.
- Scalability and performance. SQL Server is a good choice for small to medium-sized businesses, but Oracle is better for large enterprise environments. Oracle’s Real Application Clusters (RAC) provide high availability and scalability across multiple servers, and its Autonomous Database uses AI to improve performance in complex operations.
- Advanced Features. Oracle provides features like query optimization, transaction rollback, and data partitioning, making it great for handling complex data. It also supports schemas with instance configurations for better resource management and tenant isolation—features not found in SQL Server.
- Security and Compliance. Oracle delivers advanced security capabilities like encryption, auditing, and data masking, which are critical for compliance in industries like healthcare and finance. These features go beyond the strong but limited security options in SQL Server.
- Cost and complexity. SQL Server is more affordable and simpler to set up initially, but Oracle’s ability to handle large-scale tasks can lead to lower overall costs for enterprise operations, making its higher upfront price worthwhile.
Given these advantages, you might consider migrating from SQL Server to Oracle if your organization:
- Is experiencing rapid data growth or requires multi-server scalability. Oracle’s Real Application Clusters (RAC) and advanced resource management features offer reliable performance and support of system growth, making it ideal for managing growing demands.
- Manages complex data structures, multi-tenant environments, or high-performance analytics. Oracle’s advanced capabilities, such as query optimization, partitioning, and resource isolation, are designed to manage complex operations efficiently.
- Operates in highly regulated industries like finance or healthcare. Oracle’s compliance tools, such as encryption, auditing, and data masking, help organizations meet strict data protection and privacy requirements.
- Is adopting hybrid or cloud-first infrastructures. Oracle’s platform flexibility and seamless integration with cloud environments make it an excellent choice for businesses moving toward modern infrastructure solutions.
Migration tools
You can migrate from SQL Server to Oracle using tools like Oracle SQL Developer with SourceForge JTDS Driver and dbForge Studio along with Devart ODBC Driver.
While SQL Developer is Oracle’s free native tool, its interface and workflow can be less intuitive for users unfamiliar with Oracle tools.
dbForge Studio offers a more user-friendly interface and automates key steps in the migration process which reduces the time needed for migration. The distinguishing feature of dbForge Studio is its ability to import data from various sources, including ODBC data. This significantly enhances users’ capabilities, both in terms of directly converting data stored on different platforms and facilitating the development of database-adjacent objects such as ETL procedures, reports, and more.
In combination with dbForge Studio, the ODBC Driver acts as a bridge between the source and target databases, allowing them to interact with each other. In this way, using the platform-independent interface of the ODBC Driver, you can migrate data between SQL Server and Oracle without the need to rewrite code for each system. Additionally, Devart ODBC drivers help speed up the transfer of large volumes of data between databases, reduce downtime, and improve overall efficiency.
In this article, you can find step-by-step guides on how to perform the migration using both dbForge Studios (for SQL Server and Oracle) along with Devart ODBC Driver and Oracle SQL Developer with SourceForge JTDS Driver.
Migration using dbForge Studio and ODBC Driver
Prerequisites
Before you can begin the migration, download and install the following tools:
- dbForge Studio for SQL Server and dbForge Studio for Oracle. Instead of downloading them separately, you can opt for dbForge Edge which includes Studios for SQL Server, Oracle, MySQL, and PostgreSQL. dbForge Edge is a perfect solution for those developers who often work with multiple database management systems simultaneously. You can download dbForge Edge via the following link.
- Devart ODBC Driver for SQL Server. ODBC Drivers are available for multiple database platforms and operating systems. In this article, we will use ODBC Driver for Windows as an example. For more information, see How to Install and Configure ODBC Drivers on Windows.
Step 1. Setting up the connection
Let us begin by configuring a data source name (DSN) for the ODBC Driver, which will serve as a connection to SQL Server during data import using dbForge Studio for Oracle, which is a part of dbForge Edge.
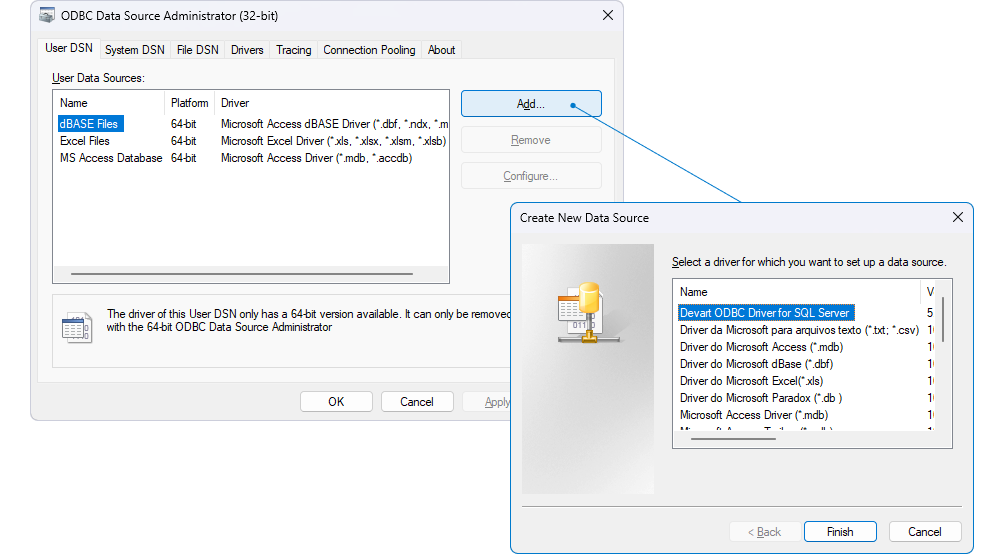
To proceed, open the Data Source Administrator utility. In our example, we use the 64-bit version of the ODBC Data Source Administrator to create a DSN for our ODBC Driver.
In the dialog that opens, navigate to User DSN to limit access to DSN only to the user who created it in the system, or go to System DSN to make it accessible to any user logged in to the system. Then, click Add to select a driver you want to set up a data source. In the window that opens, choose Devart ODBC Driver for SQL Server and click Finish.
This will open the Devart ODBC Driver for SQL Server Configuration dialog, where you need to enter a name for the data source and specify the SQL Server hostname or IP address, port number, database name, username, and password.
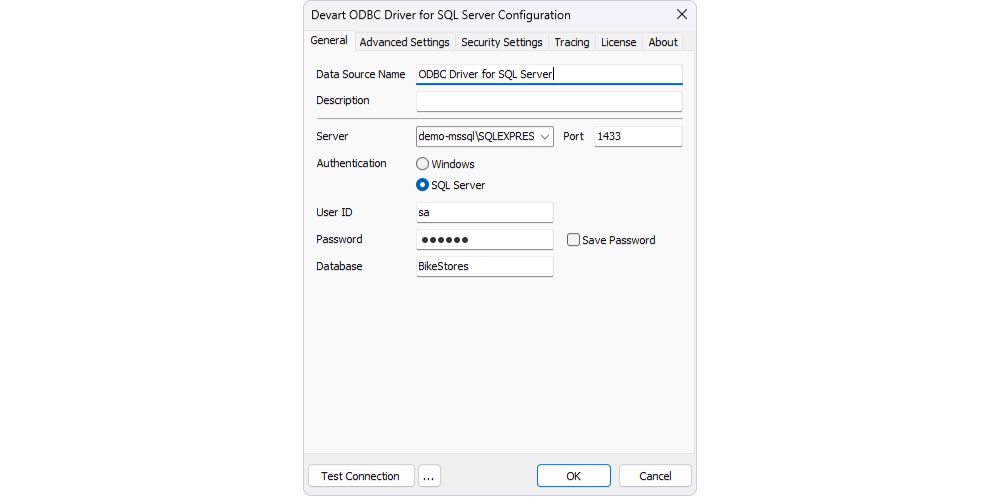
To verify that the connection has been correctly installed and configured, click Test Connection. To save the DSN, click OK.
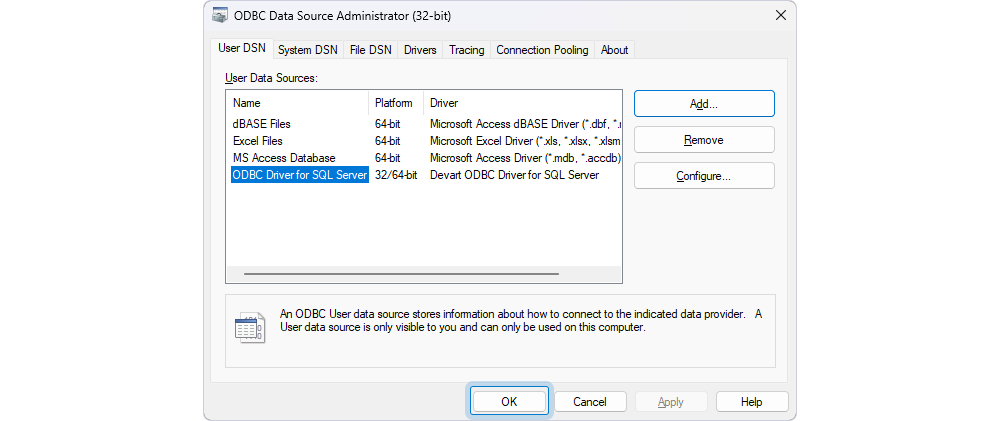
The DSN you created will appear in the ODBC Data Source Administrator utility. Click OK to close the dialog.
We have set up the connection, and now we can proceed with the data import process. In this article, we’ll use two Studios from dbForge Edge: dbForge Studio for SQL Server and dbForge Studio for Oracle. Within the Studio for SQL Server, we’ve already set up and populated a sample source table – production.brands – from which we’ll import data.
Meanwhile, the Studio for Oracle will be used for the whole process of data migration from SQL Server to the target sakila database.
Step 2. Open the Data Import wizard
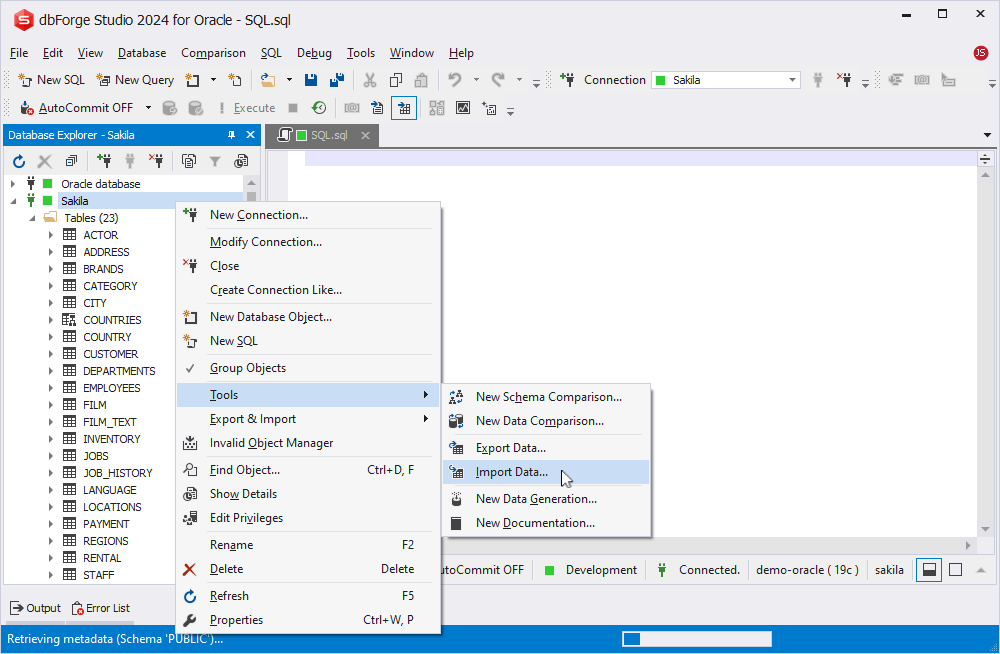
To proceed, open dbForge Studio for Oracle. In Database Explorer, right-click the database into which you want to import data and select Tools > Import Data to open the Data Import wizard.
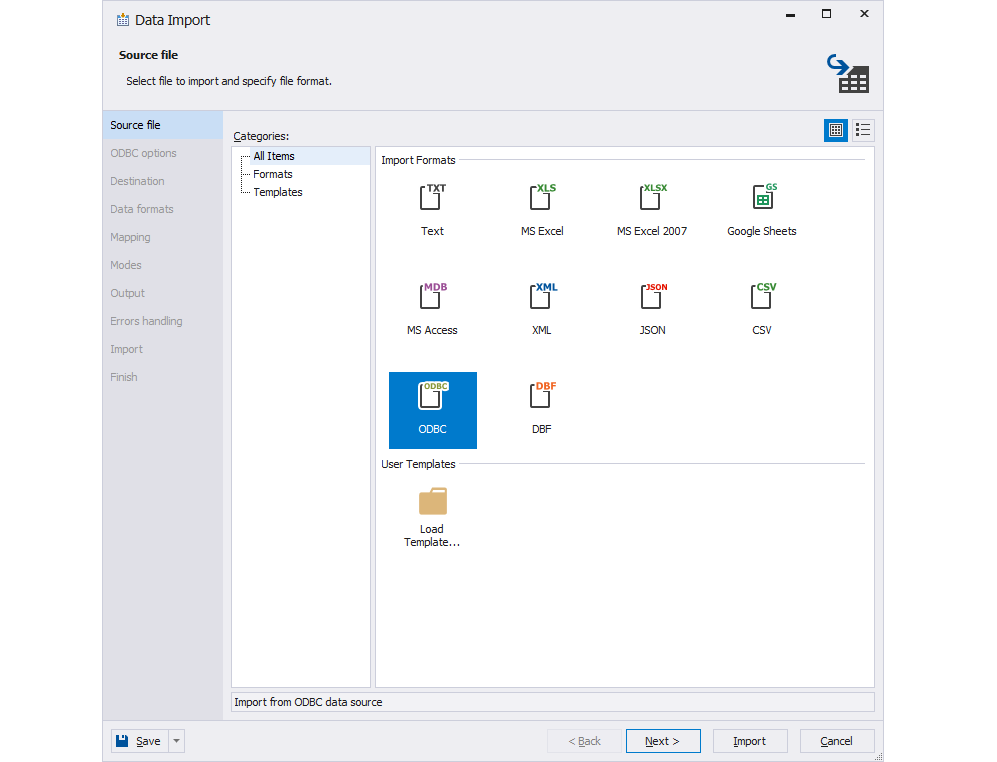
Step 3. Selecting the data source and destination
On the Source file page of the wizard that opens, select the ODBC file format and click Next. For the configured ODBC source to be displayed in the list, the 64-bit version of the ODBC Driver must be installed.
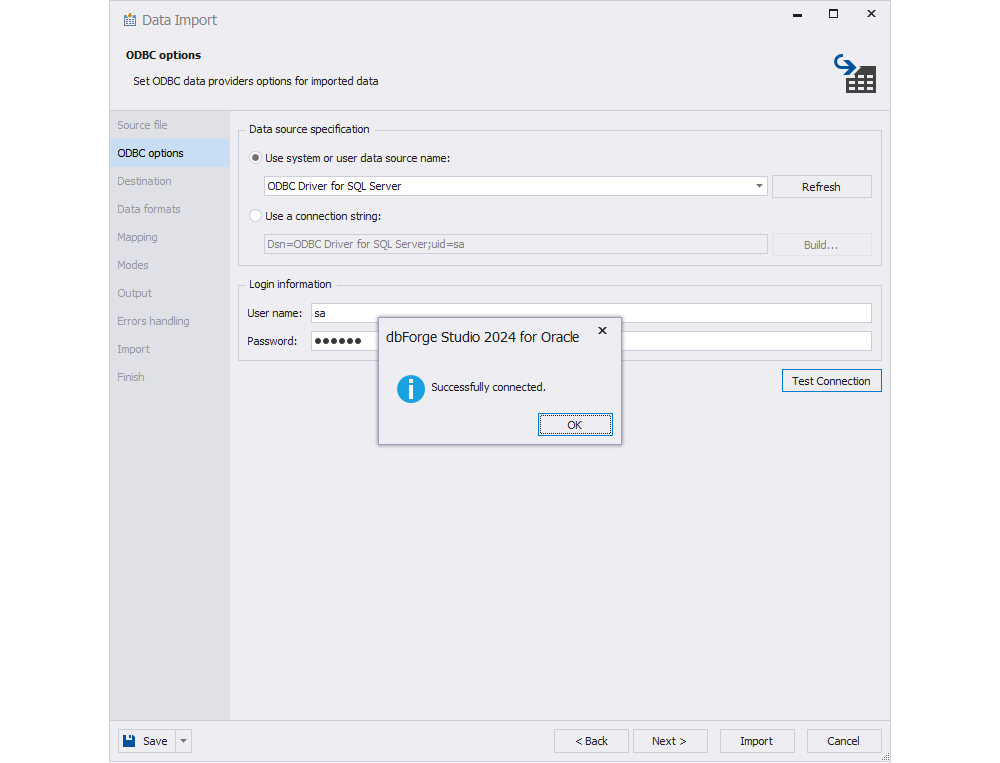
Step 4. Set ODBC data provider options
On the ODBC options page, set ODBC data provider options for imported data:
- Under Data source specification, select Use system or user data source name and then select the ODBC Driver you’ve configured from the dropdown list.
- Under Login information, enter the username and password to SQL Server to which ODBC Driver is connected.
- Click Test Connection to verify that the connection has been successfully established. Then, click OK to close the pop-up window.
- Click Next to switch to the next page.
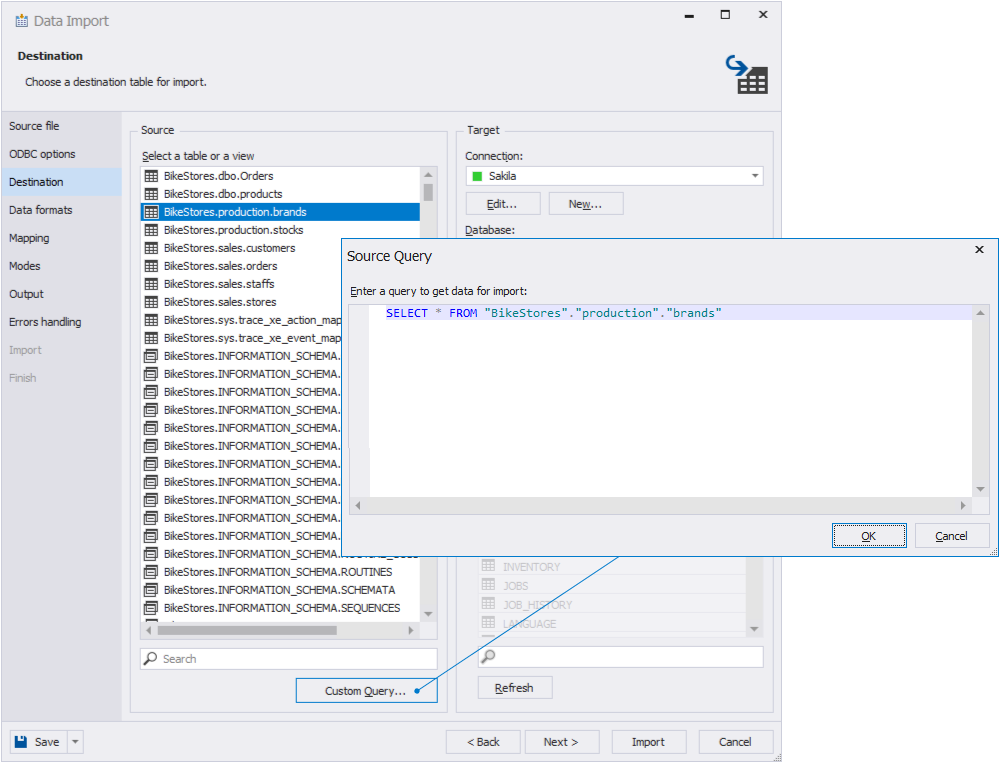
Step 5. Set the import destination
On the Destination page, choose a target table for data import:
- Under Source, select the SQL source table from which you want to import data.
- Under Target, specify the connection, database, and new or existing table to which you want to transfer data from the source table. Note that if you invoked the Data Import wizard from Database Explorer, the connection and database will be set by default.
- Click Next.
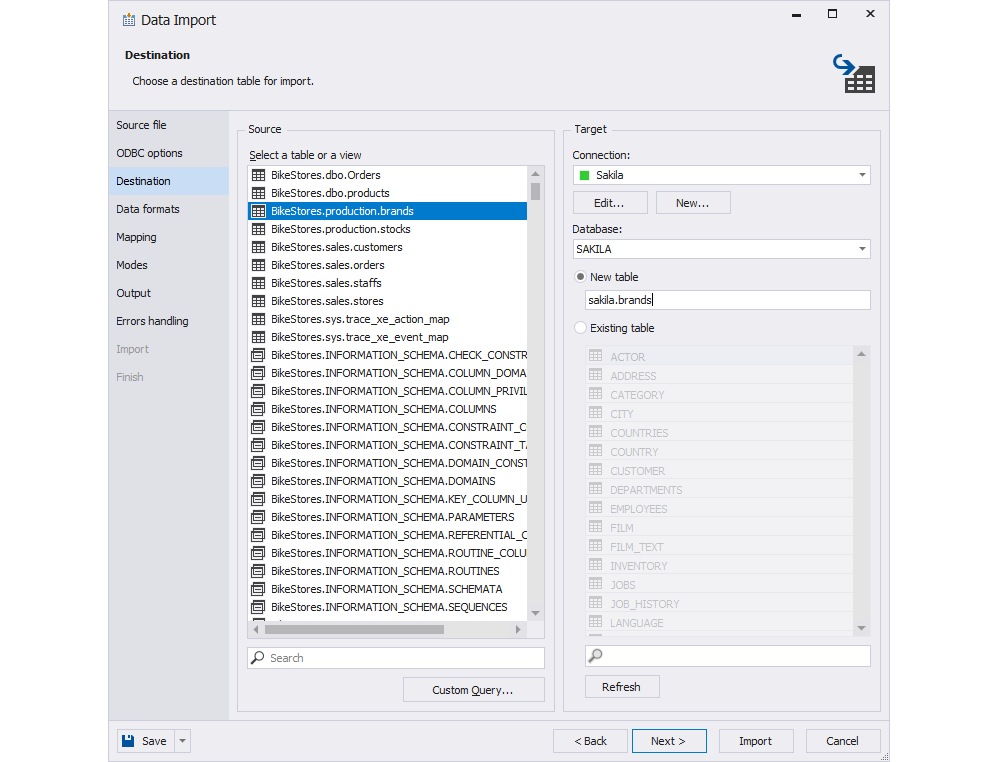
If you need to import only specific fields from a table, use the Custom Query button to enter a query.
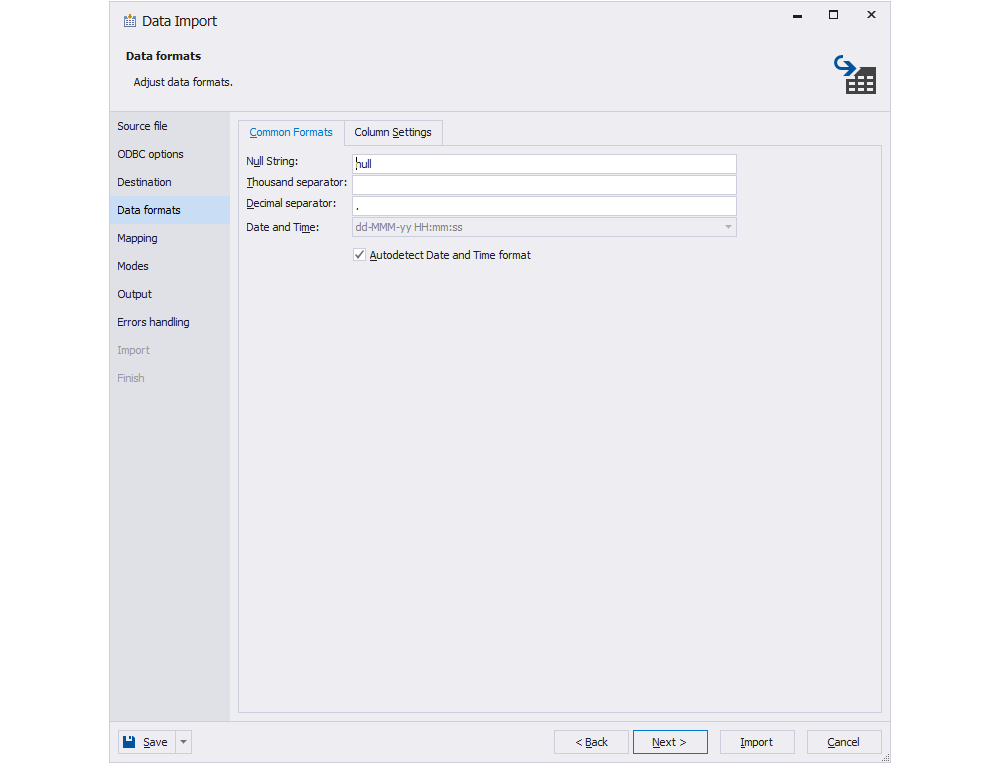
Step 6. Configuring data import settings
On the Data formats page, you can adjust data formats or column settings:
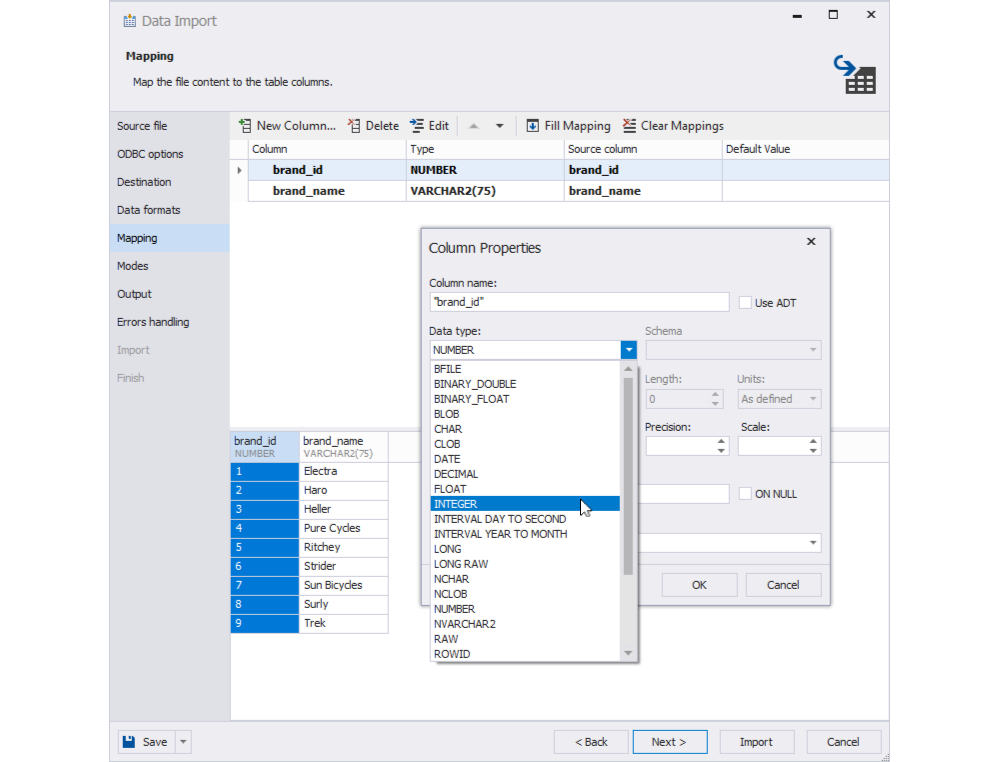
Step 7. Check the mapping of the columns
On the Mapping page, dbForge Studio automatically maps the columns with the same names. If they are different, you’ll have to map them manually. Since we are migrating the data to a new table, dbForge Studio automatically creates and maps all the columns.
On this page, you can also view the mapped columns with the assigned data types and preview the table with the data to be imported.
If you want to modify the data type, double-click the required column. In the Column Properties window that opens, choose the required data type and click OK to save the changes. For example, double-click the brand_id column, change the number data type to the integer data type, and click OK. Here you can also assign a primary key or unique values.
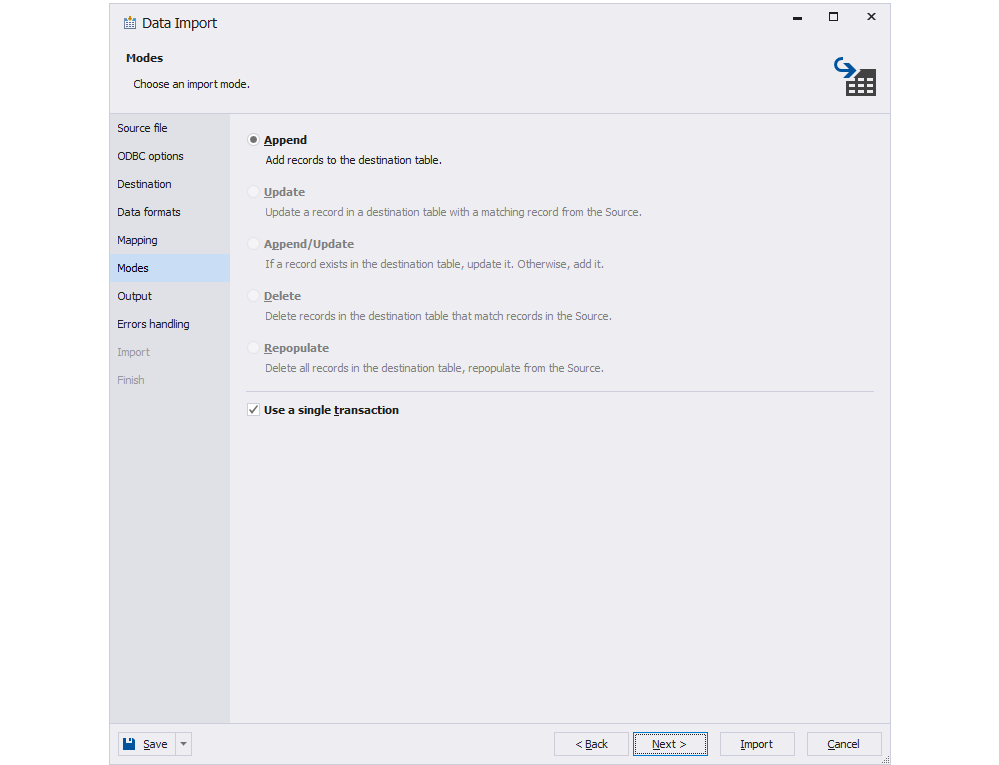
Step 8. Select the import mode
When the data types are mapped, you can specify the import mode on the Modes page, which will define how the data will be imported. If you migrate data to a new table, only the Append mode will be available.
When you transfer data to an existing table, you can choose one of the following modes to import data:
- Append, which adds records to the target table.
- Update, which updates a record in the target table with a matching record from the source table.
- Append/Update, which updates a record if it exists in the target table; otherwise, it adds a record.
- Delete, which deletes records in the target table that match records in the source table.
- Repopulate, which deletes all records in the target table and repopulates them from the source.
Step 9. Generating SQL scripts with data import
Next, you need to decide on the data output method. The Data Import wizard allows you to either instantly transfer data to the table or generate SQL scripts for future use without immediately modifying the database.
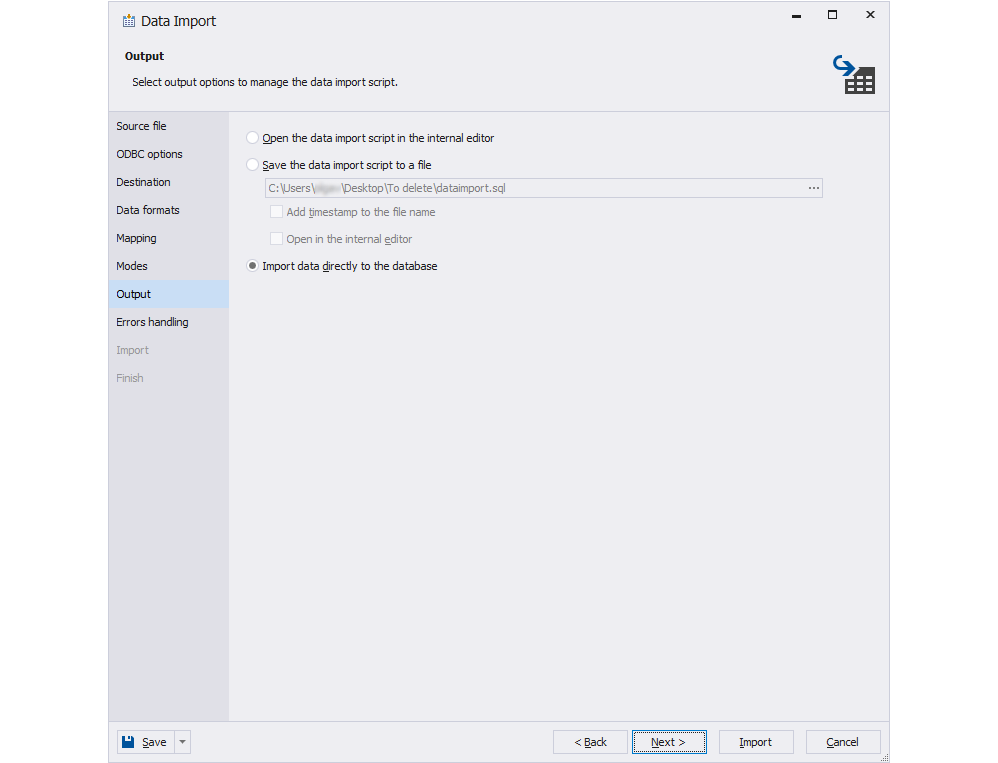
On the Output page of the wizard, you can choose from three options for handling the import output:
- Open the data import script in the internal editor: After the data import is complete, the tool will open the script generated for data migration in the editor, which you can view, edit, or save for later use.
- Save the data import script to a file: This option will save the generated script to a specified folder. Here you can also add date and time to the file name or open the script in the internal editor after the data import is ended.
- Import data directly to the database: The target table gets populated directly with data from the source table.
Step 10. Configure error handling and logging
Finally, you need to specify how you want errors to be processed and select a destination for the log file:
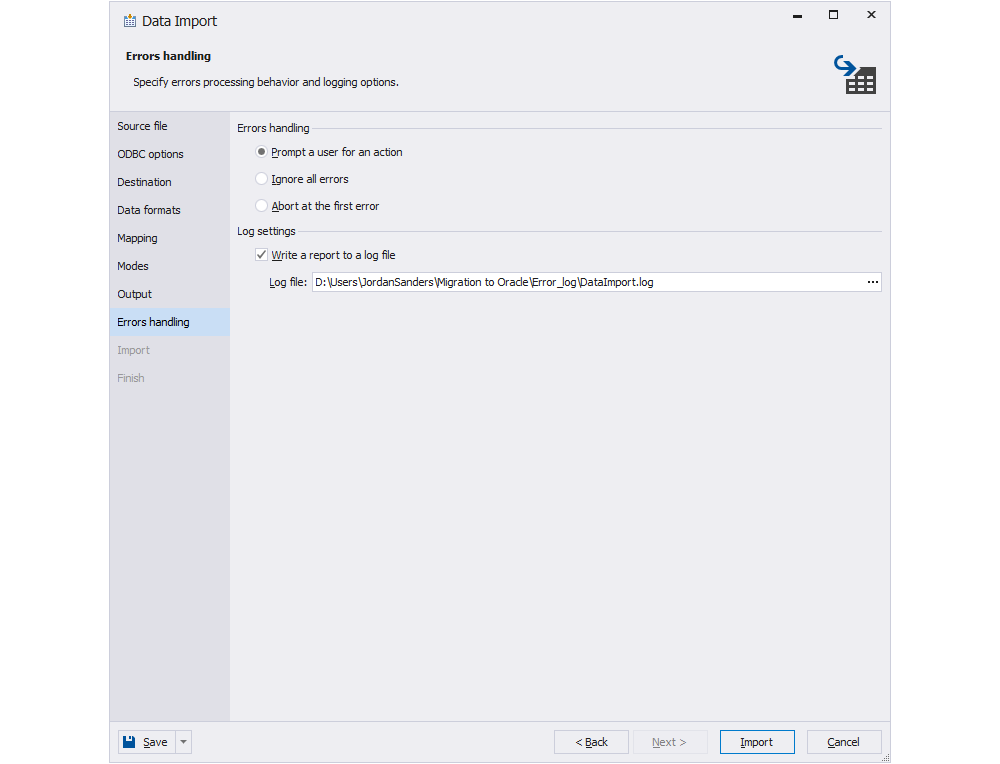
After you have configured error and logging parameters, click Import to run the data import process.
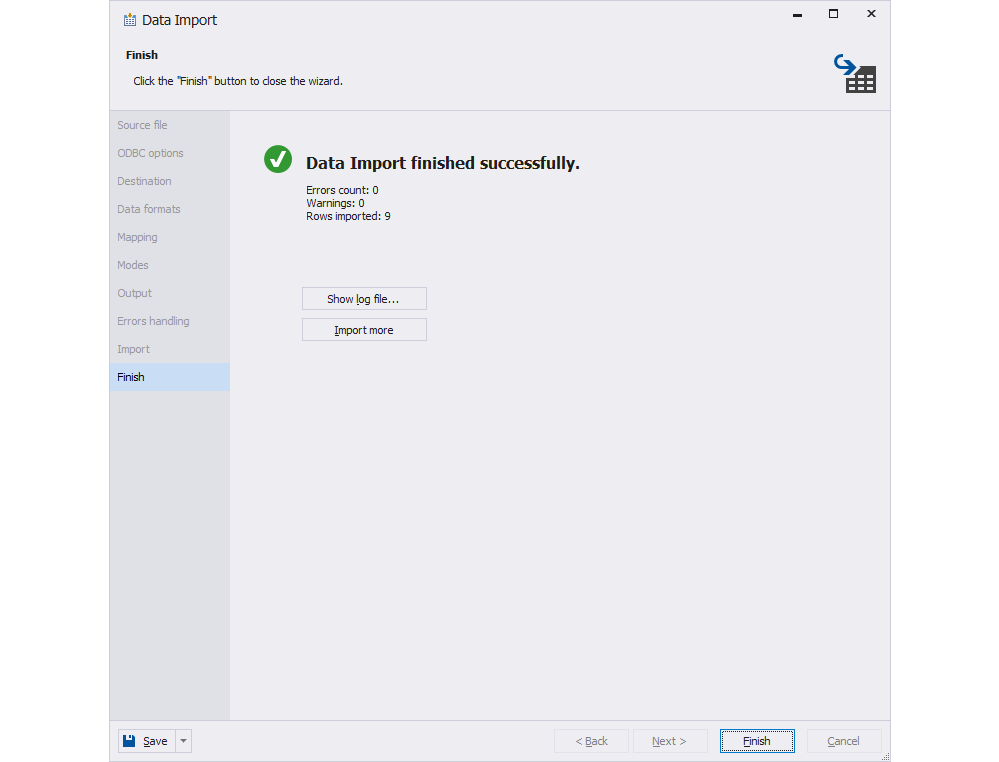
Step 11. Executing data migration
When the data import is over, you’ll see the result, including the number of errors and warnings that might occur and the number of rows imported into the table. Click Finish to close the wizard.
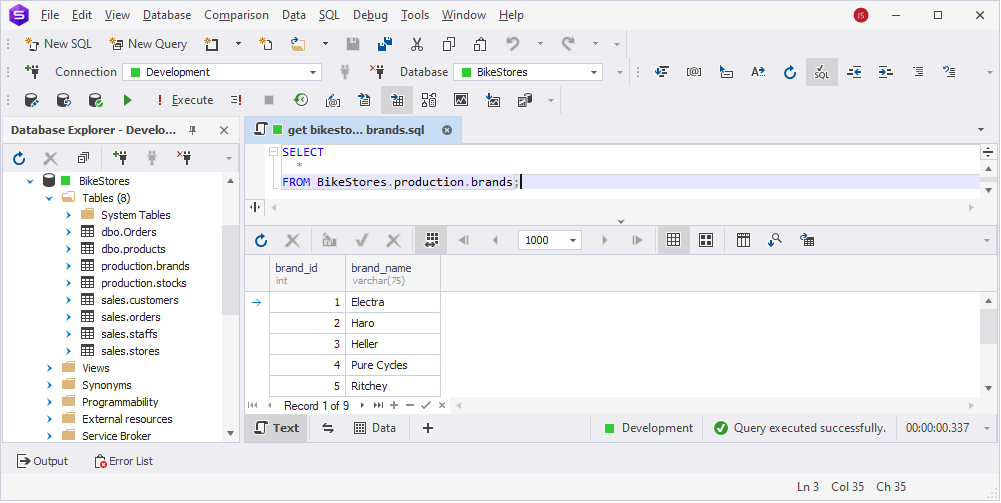
Let us now retrieve the data from the sakila.brands table in the Oracle database to make sure that it has been successfully migrated.

Great! The results grid displays the data transferred from the SQL Server table.
How to migrate from SQL Server to Oracle using SQL Developer and SourceForge JTDS Driver
Next, we’ll explore the process of migrating from SQL Server to Oracle using SQL Developer and SourceForge JTDS Driver.
Prerequisites
- Download and Install SQL Developer. You can download the latest version from the Oracle website.
- Download JTDS Driver from SourceForge and extract it to a known location. JTDS Driver is required for Oracle SQL Developer to communicate with SQL Server because SQL Developer does not natively support connections to SQL Server databases. The driver translates the SQL Server communication protocols into a format SQL Developer can understand, allowing the two systems to connect and communicate.
- Determine SQL Server IP address and port. To connect to SQL Server in SQL Developer, you need the server’s IP address and port. You can retrieve them by running the following query in dbForge Studio or other SQL Server management tool:
SELECT DISTINCT local_net_address AS IPAddress, local_tcp_port AS Port
FROM sys.dm_exec_connections
WHERE local_net_address IS NOT NULL;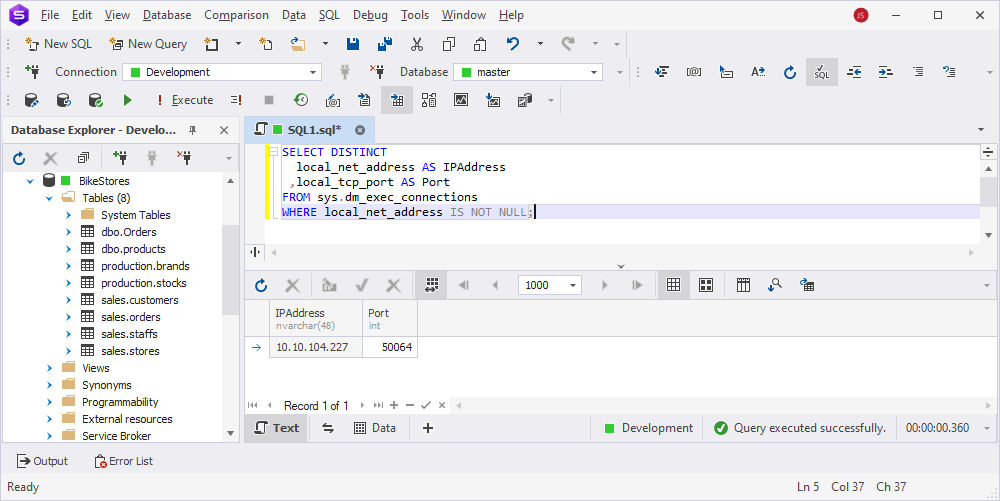
Step 1. Add JTDS Driver to SQL Developer
Let us begin by adding JTDS Driver to the database preferences in SQL Developer. This will allow Oracle SQL Developer to connect to a SQL Server database.
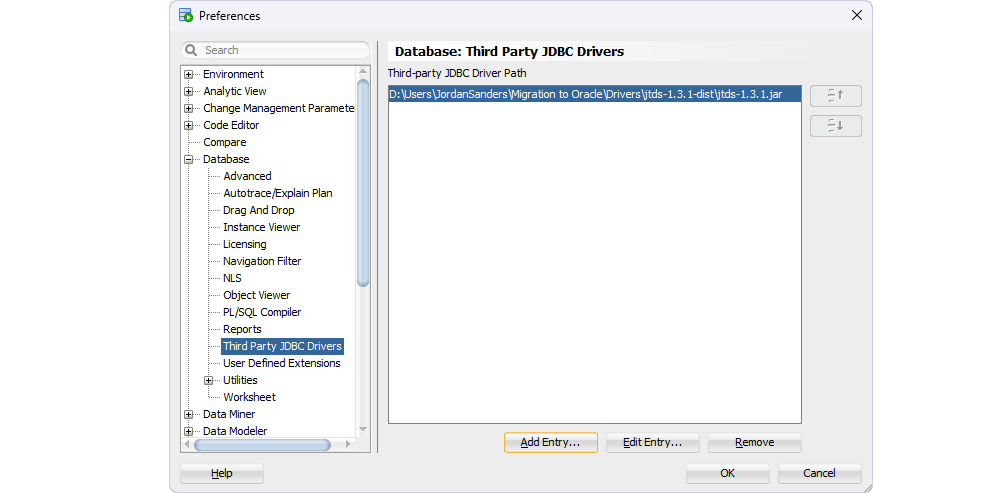
In SQL Developer, go to Tools > Preferences > Database > Third Party JDBC Drivers, click Add Entry, and select the JTDS .jar file.
Steps 2. Connect to Oracle and SQL Server databases
Now you are ready to connect to SQL Server. Let’s connect to both SQL Server and Oracle databases.
Go to Connections and add a connection by clicking the plus sign (+). For SQL Server, specify the following connection settings:
- Connection name—for example, SQL Server.
- Database type—SQLServer.
- Username—the username of your SQL Server account.
- Password—the password for the specified user.
- Hostname—the IP address of the server.
- Port—the port number of the SQL Server instance.
- Retrieve database—the database you want to connect.
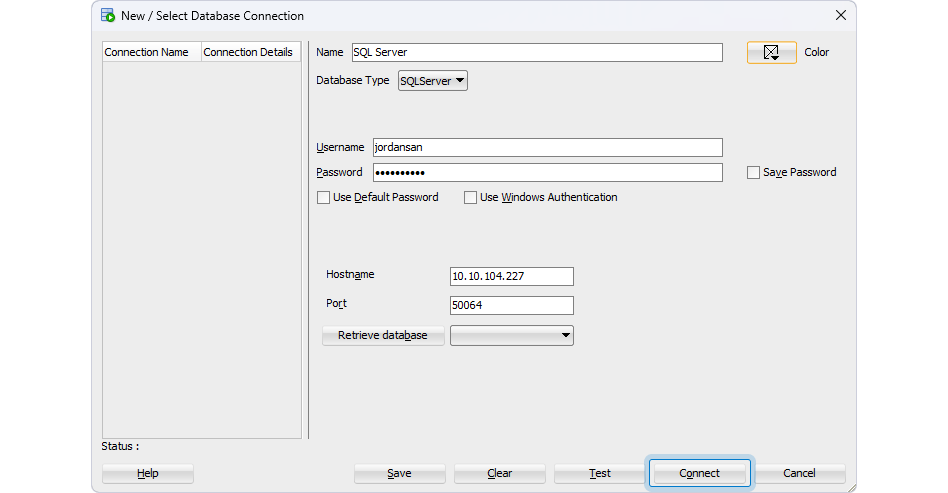
Click Connect to create the connection.
Similarly, connect to the Oracle database by adding another connection and configuring connection parameters.
Step 3. Retrieve the data you want to migrate
Run the needed SELECT query in SQL Server to retrieve the data you want to migrate. For example:
SELECT * FROM BikeStores.production.brands;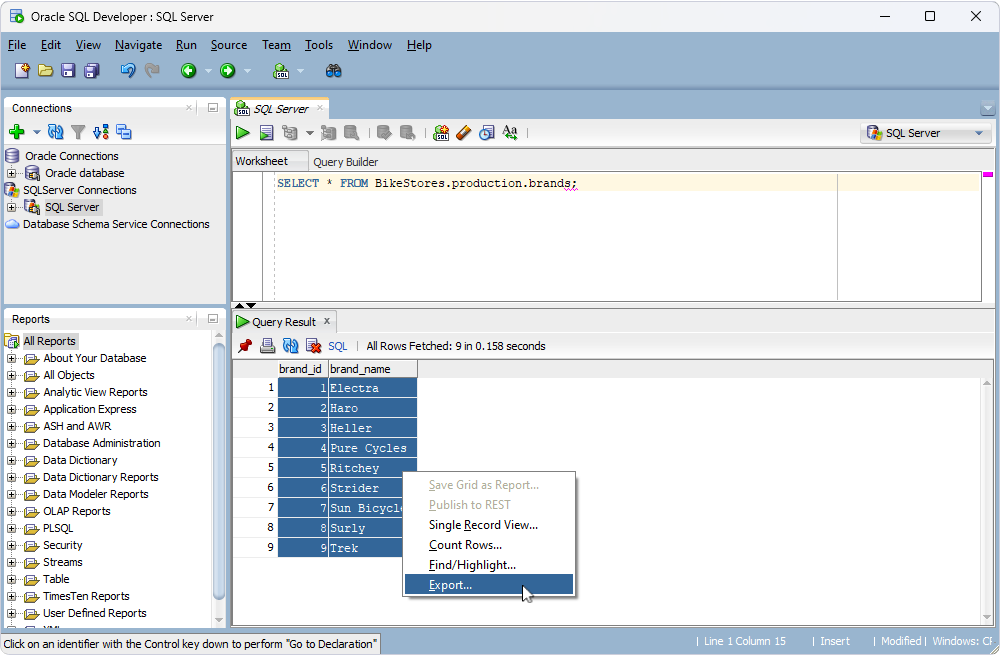
Right-click the query results and select Export.
Step 4. Generate INSERT statements to export the data
You need to generate INSERT statements for the data you want to export to Oracle in the following way.
In the Export Wizard, on the Source/Destination page, select the insert export format, provide a file name and destination. Also, remember to select the Show Schema checkbox to include the schema along with the table name in INSERT statements. After you have configured generation of INSERT statements, click Next.
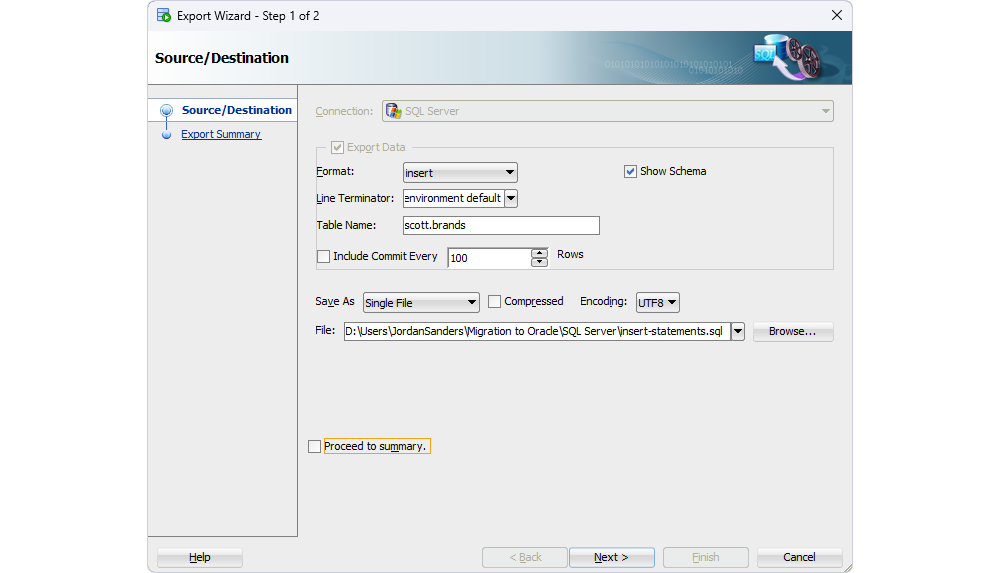
On the Export Summary page, click Finish.
Step 5. Copy the generated INSERT statements to the Oracle database
Once the INSERT statements are ready, open a new SQL worksheet connected to the Oracle database. For this, go to Connections panel, right-click the needed connection name, and then click Open SQL Worksheet.
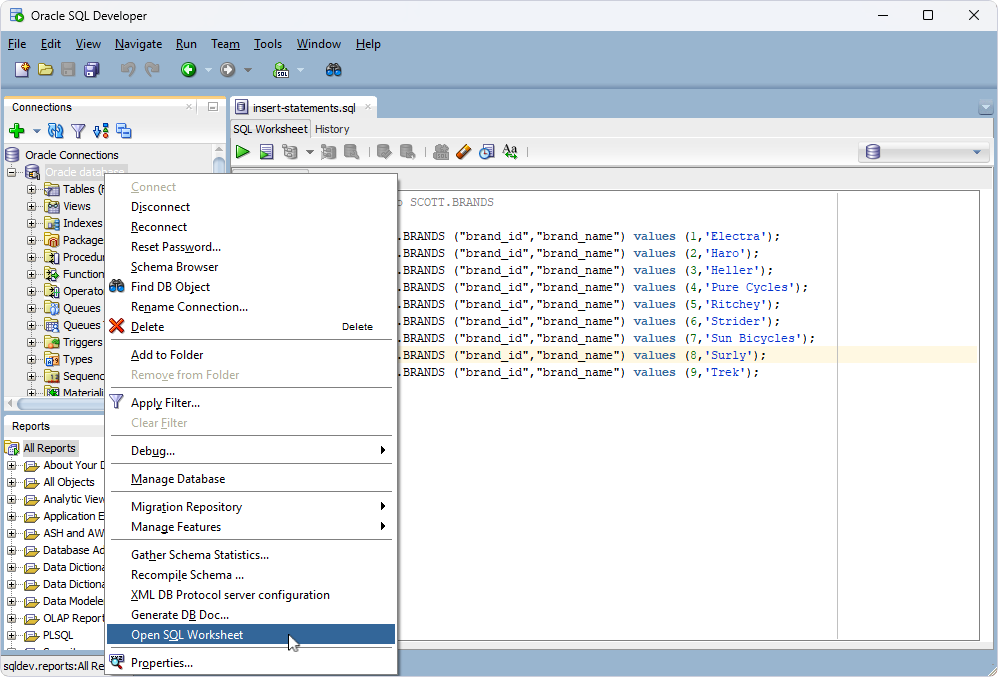
After that, copy the INSERT statements from the SQL sheet that opens to a sheet in the Oracle database.
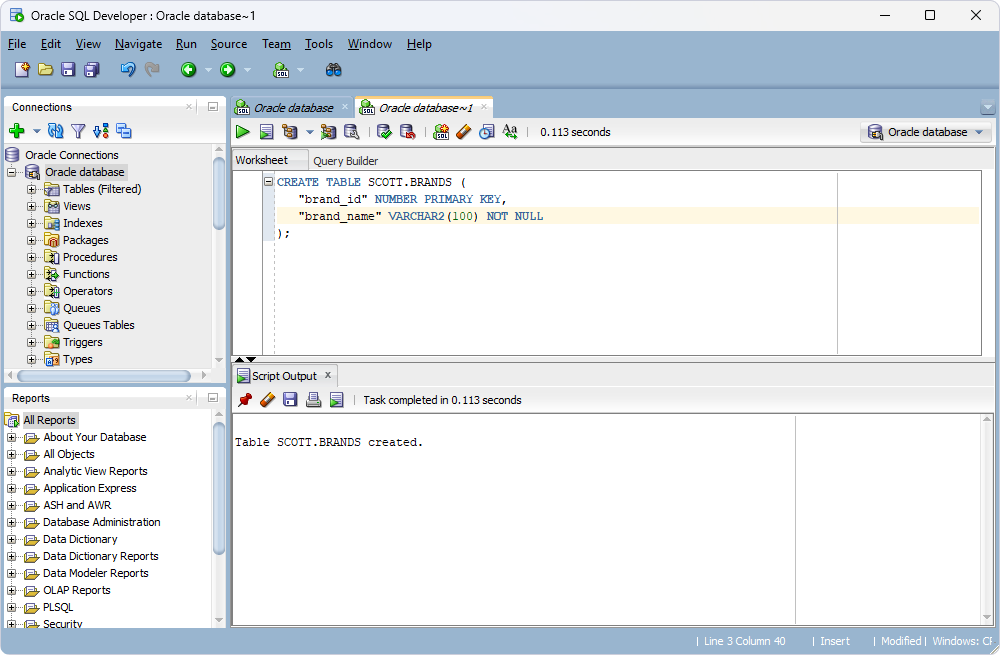
Step 6. Create a target table in Oracle
You need to create a table in the Oracle database where the data exported from SQL Server will be imported. The structure of this table should match the structure of the source table in SQL Server. In our case, we will use the following script to create a matching table in Oracle:
CREATE TABLE SCOTT.BRANDS (
   "brand_id" NUMBER PRIMARY KEY,
   "brand_name" VARCHAR2(100) NOT NULL
);
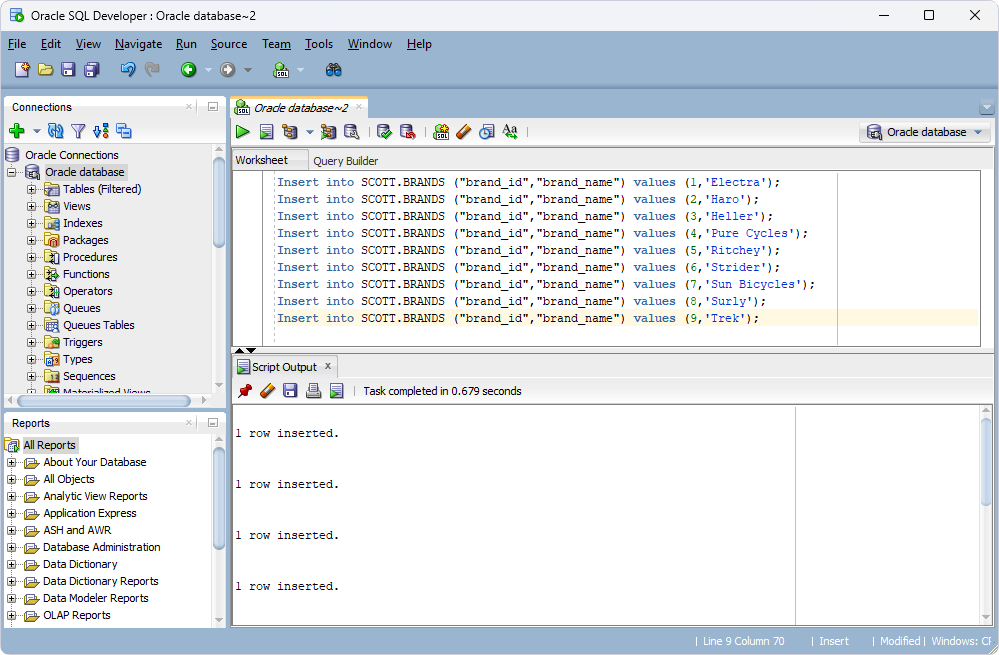
Step 7. Migrate data to the created Oracle table
Run the INSERT statements to populate the Oracle table.
Step 8. Verify the migration
Run a SELECT query on the Oracle table to make sure the data has been migrated successfully:
SELECT * FROM SCOTT.BRANDS;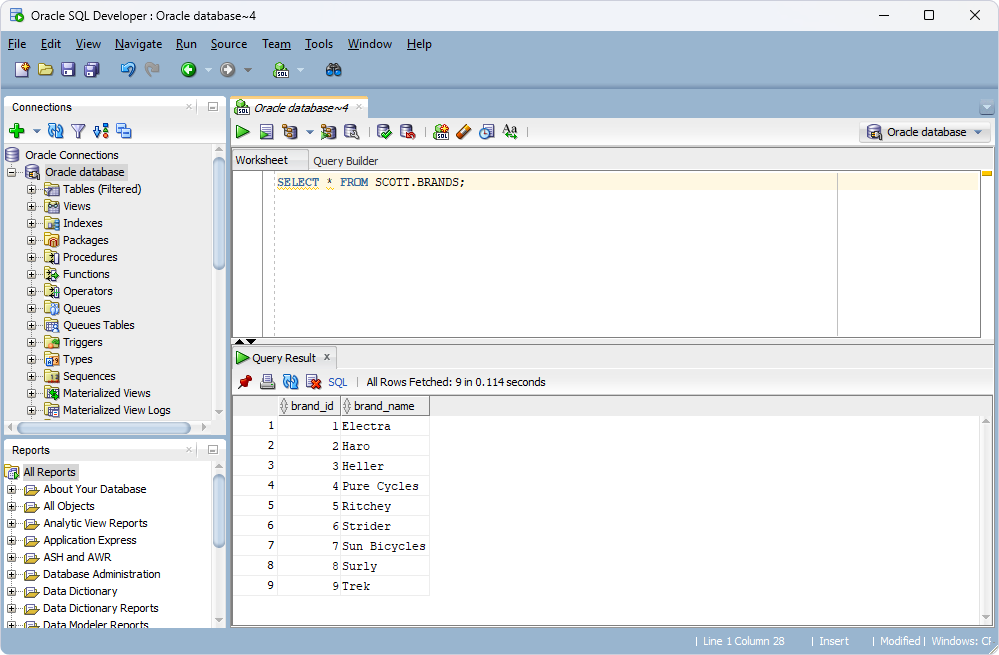
Challenges in database migration and how to overcome them
When you decide to migrate a database from SQL Server to Oracle, you can face several challenges, but knowing the challenges and applying the right strategies will help you to achieve success.
Here are some challenges you may encounter when migrating data from SQL Developer to Oracle, along with suggested solutions:
- Data type mismatches.
SQL Server’s data types, such as NVARCHAR(MAX) or DATETIMEOFFSET, may not directly align with Oracle equivalents. To address this, create a data type mapping guide outlining how each SQL Server type translates to Oracle and plan for any adjustments needed. - Schema differences.
The structure, constraints, and syntax in SQL Server and Oracle can vary significantly.
You can handle this by performing a thorough schema analysis before migration. Document the differences and plan mapping rules in advance. After that, test schema conversion with a smaller pilot migration to fine-tune your approach. - Stored procedures and functions.
SQL Server uses T-SQL, while Oracle relies on PL/SQL, which makes migrating procedural logic challenging. Start by documenting all stored procedures, focusing on critical ones first. Simplify the process by breaking down complex logic into smaller, manageable pieces for easier translation and thorough testing. - Constraints and indexes.
Adjusting indexes and constraints to match Oracle’s standards often requires careful planning.
To address this, start by documenting relationships in your SQL Server database. Adapt these constraints to fit Oracle’s syntax and validate them rigorously to make sure data integrity remains intact. - Data migration volume and integrity.
Migrating large datasets can result in delays or potential data loss. You can reduce the risk of delays, system slowdowns, or data loss by transferring data in smaller batches, scheduling migrations during off-peak hours, and using checksum or hash-based methods to confirm data consistency before and after the process.
While addressing these challenges with targeted solutions is important, following best practices can make the migration process more effective and successful. Consider the following key actions:
- Create a detailed migration plan with clear rollback procedures
- Perform multiple test migrations with production-like data
- Test thoroughly at every stage to validate your schema, data, and application functionality
- Document all configuration changes and custom solutions
- Maintain clear communication channels with all stakeholders
- Make use of the best features of your tools, such as dbForge’s flexible data type mapping and synchronization, ability to migrate large datasets efficiently or the ODBC Driver’s connectivity
Conclusion
Switching from SQL Server to Oracle offers big advantages, like better scalability, stronger security, and powerful database tools. But it takes careful planning, attention to detail, and the right tools to deal with challenges like different data types, schema changes, and converting stored procedures.
Oracle SQL Developer is great for handling schema and stored procedure migration, while dbForge Studio and Devart ODBC Driver make data transfer easy and accurate. dbForge Studio’s simple interface and real-time features, combined with the fast and reliable connectivity of Devart ODBC Driver, make these tools essential for smooth and successful migration.