
This tutorial explores how to install 32-bit and 64-bit ODBC drivers in Windows 10 and create a DSN for an ODBC data source.
Table of contents
- What is an ODBC driver and a data source?
- Installing an ODBC driver on Windows
- How to Configure Data Source Name (DSN) for the ODBC driver on Windows
- How to Check the ODBC Driver Version in Windows
- How to Test ODBC Connection
- How to Uninstall or Remove ODBC Driver from Windows
What is an ODBC driver and a data source?
Open Database Connectivity (ODBC) is a standard application programming interface that allows external applications to access data from diverse database management systems. The ODBC interface ensures maximum interoperability by enabling applications to work independently of any specific database management system (DBMS). It enables access to data across different databases using an ODBC driver, which acts as a bridge between the application and the ODBC data source—whether it’s a local DBMS or a cloud-based service.
For example, you can use a PostgreSQL, SQL Server, or InterBase ODBC driver to connect to each respective database through third-party tools like Excel, Tableau, or Power BI.
The ODBC driver connection string is a parameterized string that consists of one or more name-value pairs separated by semicolons. Parameters may include information about the data source name, server address and port, username and password, security protocols, SQL dialects, and many more. The required information is different depending on the specific driver and database. Here’s an example of an ODBC connection string:
DRIVER={Devart ODBC Driver for Oracle};Direct=True;Host=127.0.0.1;SID=ORCL1020;User ID=John;Password=DoeDevart ODBC Drivers are powerful connectors for a host of database management systems and cloud services that allow you to connect to your data from virtually any third-party application or programming language that supports the ODBC API. By a third-party application, we mean tools like Power BI, Tableau, Microsoft Excel, etc. Whether you’re working with MySQL, PostgreSQL, or using a MongoDB ODBC driver, the setup remains similar.
See this page for the list of external applications tested for compatibility with our drivers.
Discover how to easily configure the preinstalled Windows ODBC driver manager.
Installing ODBC driver for Windows
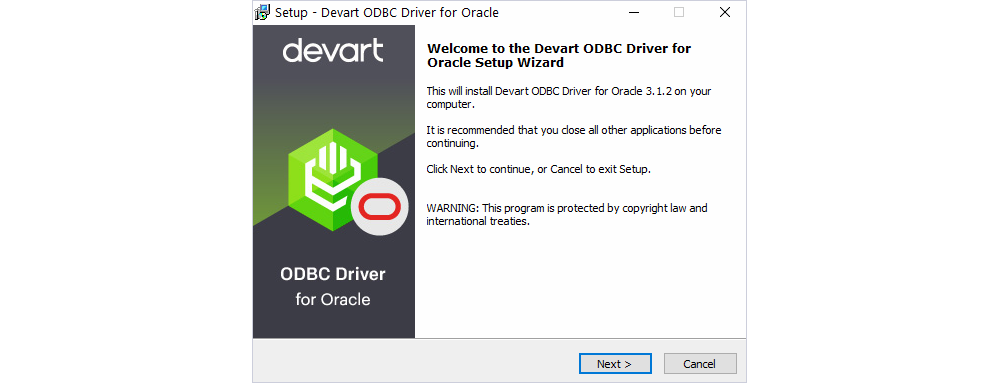
1. Run the downloaded installer file. If you already have another version of the driver installed in the system, you will get a warning—click Yes to overwrite the old files, though it’s recommended to first uninstall the old version. If this is the first time you are installing the Devart ODBC driver, just click Next.
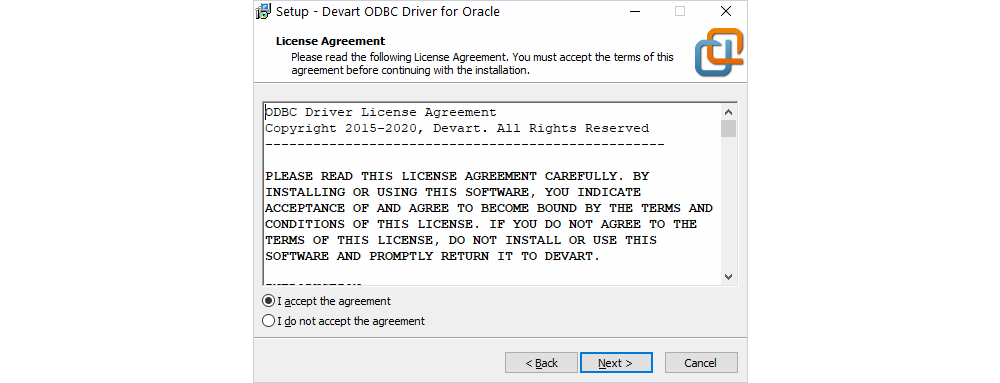
2. Read and accept the license agreement, then click Next.
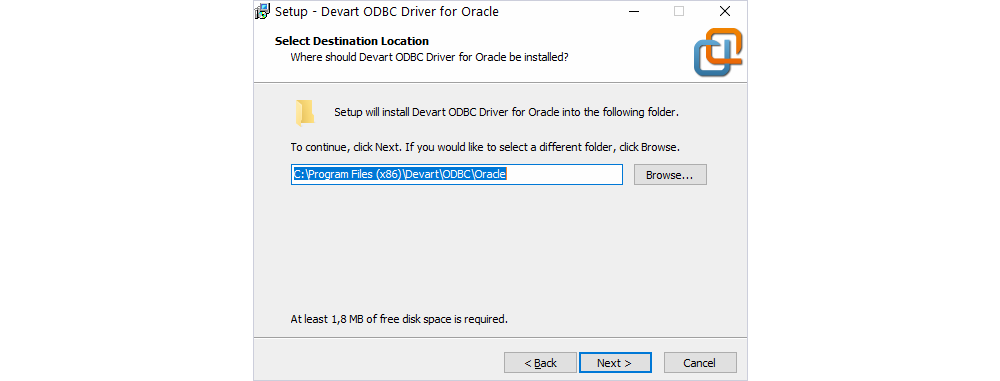
3. Select the installation directory for the ODBC driver and click Next.
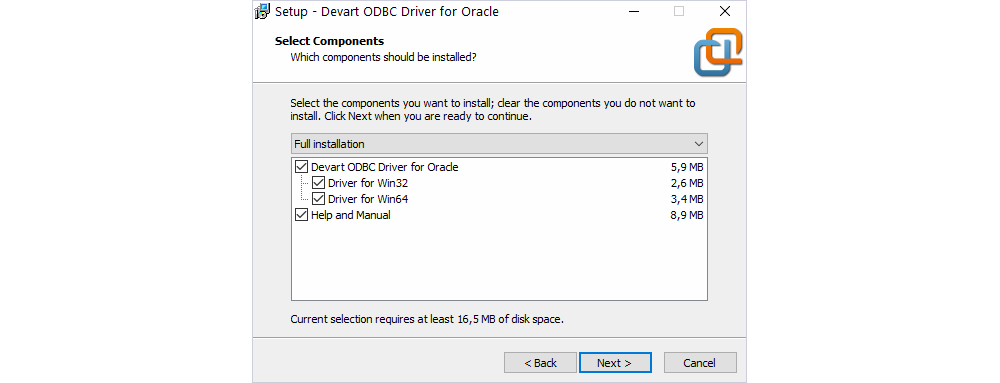
4. In the Select Components tab, select which version of the driver to install (64-bit / 32-bit), and whether to include the help files.
5. Confirm or change the Start Menu Folder and click Next.
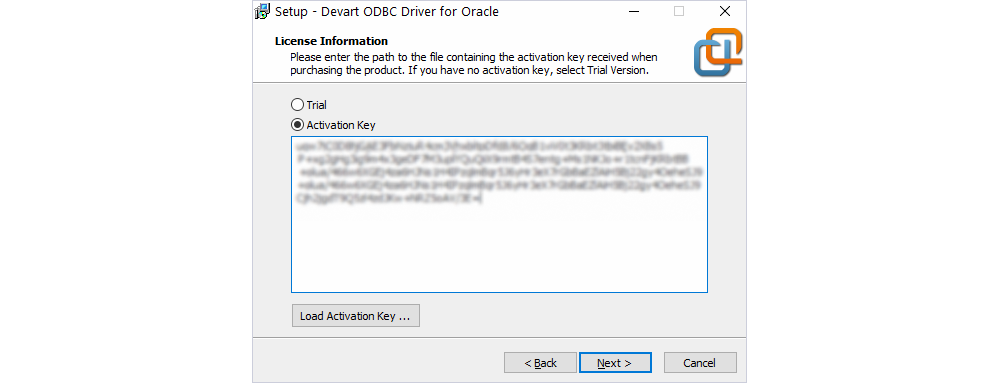
6. Input your activation key or choose Trial if you want to evaluate the product before getting a license. You can load the activation key by clicking Load Activation Key and selecting the license file from your machine. Click Next and then Install.
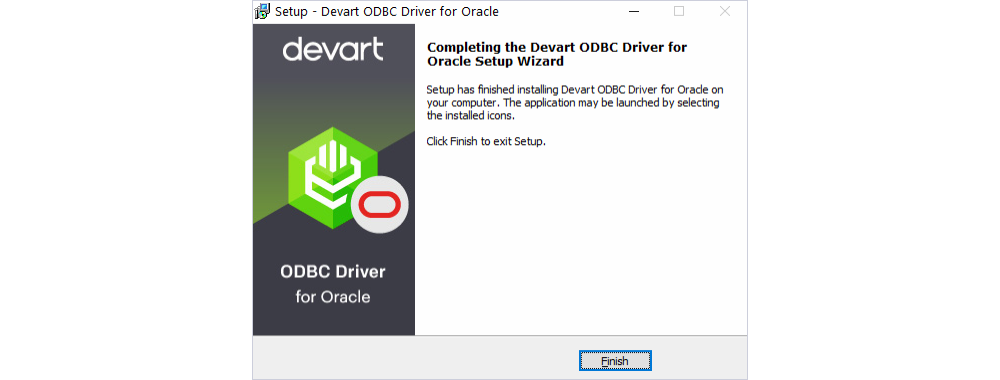
7. After the installation is completed, click Finish.
The table below provides detailed instructions on how to install the ODBC driver
| Step | Purpose | Instructions | Tool/Location |
|---|---|---|---|
| 1. Install ODBC Driver | Set up the driver on your system | – Search for “ODBC Data Sources” in Start Menu – Choose the correct version (32-bit or 64-bit) | Devart ODBC Installer |
| 2. Open ODBC Administrator | Access interface to manage data sources | – Choose User DSN or System DSN – Click “Add” – Select the installed driver – Enter connection details | ODBC Data Source Administrator (Windows) |
| 3. Add New DSN | Create a new connection profile for a database | – Run the installer – Accept the license agreement – Follow the on-screen steps to complete the installation | ODBC Administrator → User/System DSN Tab |
| 4. Test Connection | Verify that the DSN can successfully connect to the DB | – Run the installer – Accept the license agreement – Follow the on-screen steps to complete installation | ODBC Administrator |
| 5. Check Driver Version | Ensure the correct driver is installed and active | – In the DSN configuration window, click “Test Connection” – Check for a success message | ODBC Administrator → Drivers Tab |
To learn more, see How to Install and Configure ODBC Drivers on macOS and How to Install and Configure ODBC Drivers on Linux.
How to configure Data Source Name (DSN) for the ODBC driver on Windows
Before connecting a third-party application to a database or cloud source through ODBC, you need to set up a data source name (DSN) for the ODBC driver in the Data Source Administrator. A 64-bit version of the Microsoft Windows operating system includes both the 64-bit and 32-bit versions of the Open Database Connectivity (ODBC) Data Source Administrator tool (odbcad32.exe):
- The 32-bit version of odbcad32.exe is located in the C: \Windows\SysWoW64 folder.
- The 64-bit version of odbcad32.exe is located in the C: \Windows\System32 folder.
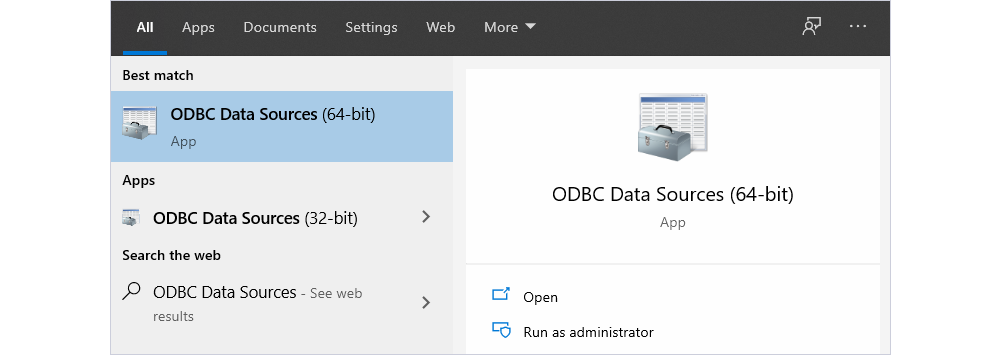
1. In your Windows Search bar, type ODBC Data Sources. The ODBC Data Sources (64 bit) and ODBC Data Sources (32 bit) apps should appear in the search results.
Alternatively, you can open the Run dialog box by pressing Windows+R, type odbcad32 and click OK.

Yet another way to open the ODBC Data Source Administrator is via the command prompt: enter cmd in the search bar and click the resulting Command Prompt button. Enter the command odbcad32 and hit Enter.

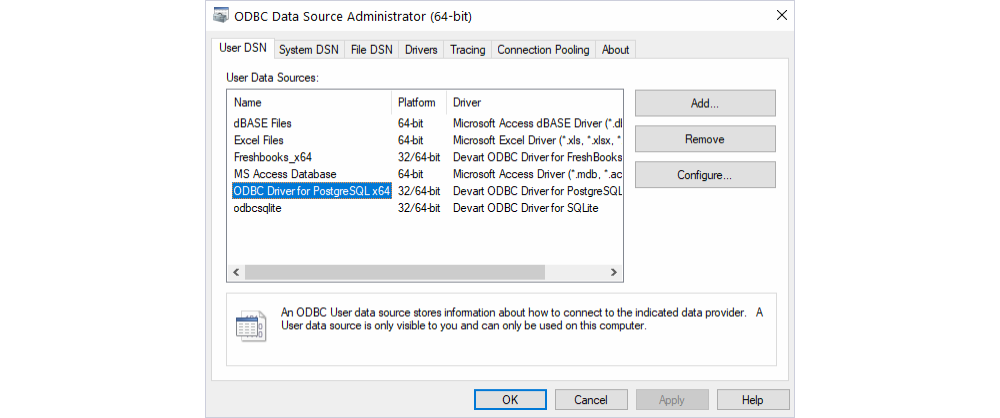
2. Since most modern computer architectures are 64-bit, we’ll select the 64-bit version of the ODBC Data Source Administrator to create a DSN for our ODBC driver. The odbcad32.exe file displays two types of data source names: System DSNs and User DSNs. A User DSN is only accessible to the user who created it in the system. A System DSN is accessible to any user who is logged in into the system. If you don’t want other users on the workstation to access your data source using the DSN, choose a User DSN.
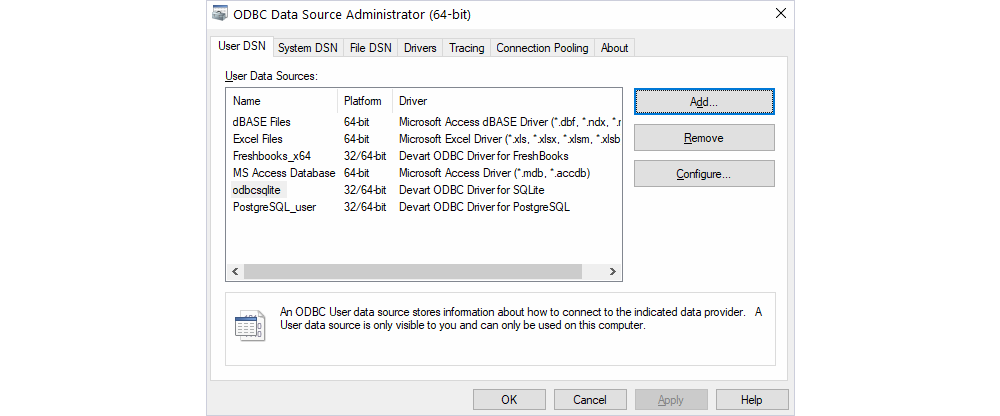
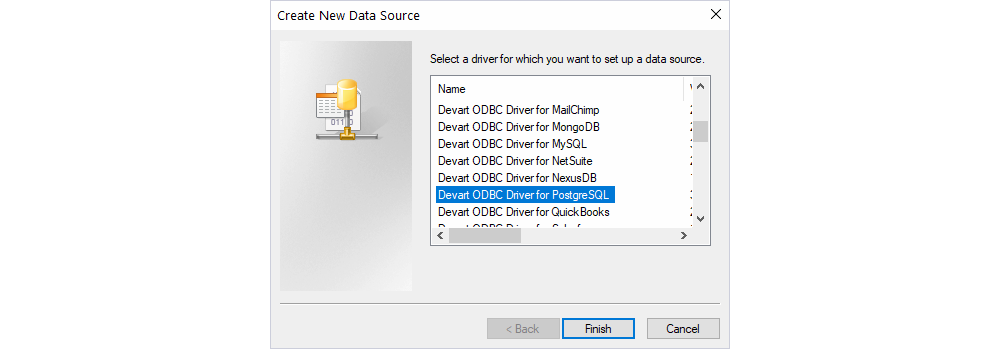
3. In the administrator utility, click Add. The Create New Data Source dialog will display the list of installed ODBC drivers in the system. Choose the needed driver from the list. The choice of the driver is determined by the data source you are trying to connect to — for example, to access a PostgreSQL database, choose Devart ODBC Driver for PostgreSQL. Among the most reliable ODBC drivers for PostgreSQL, it enables secure and direct connectivity. Click Finish.
4. Enter a name for your data source in the corresponding field. Fill in the parameters for the ODBC connection string, which is driver-specific. In most of our ODBC drivers for databases, a connection string with basic parameters requires the user to only input their server address, port number, and login credentials, since Devart ODBC drivers allow direct access to the database without involving additional client libraries.
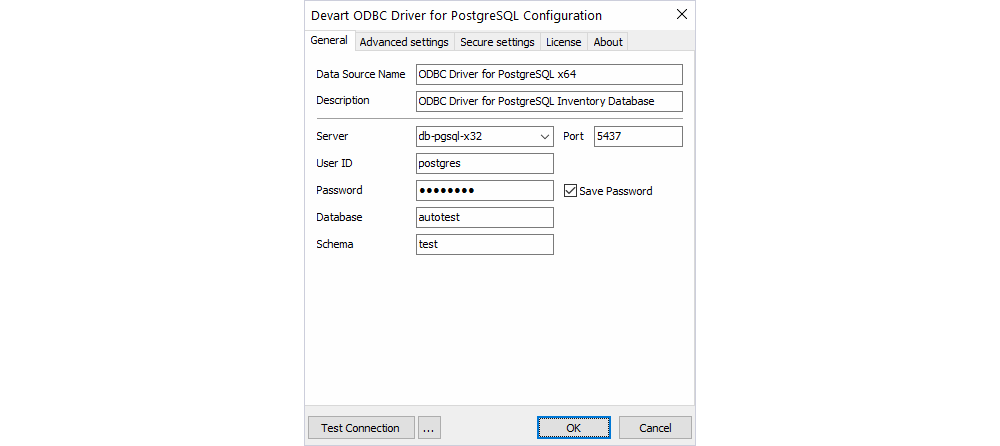
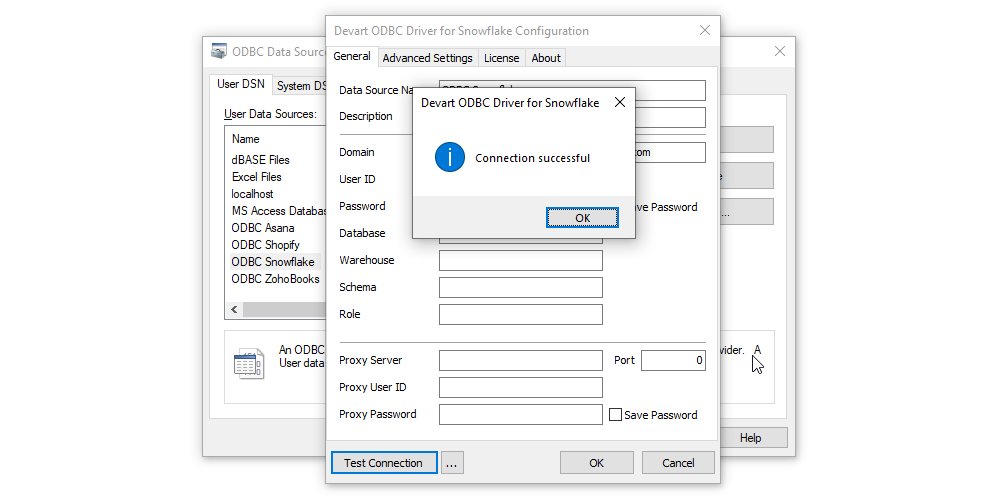
5. Click Test Connection to verify connectivity. If you see the Connection Successful message, click OK to save the DSN. You should now see your new DSN in the User DSN tab of the ODBC Data Source Administrator tool.
How to check the ODBC driver version in Windows
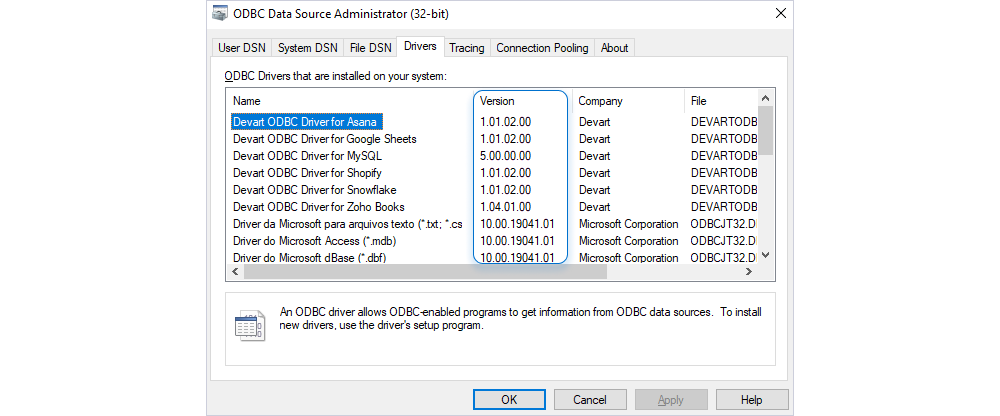
To verify the version of the installed ODBC driver on Windows, follow these steps:
- Open ODBC Data Source Administrator dialog by searching for it in the Windows Start menu.
- In the ODBC Data Source Administrator, navigate to the Drivers tab.
- Locate and select the installed ODBC driver from the list.
- Once the desired ODBC driver is selected, look for the Version column in the same row. This column displays the version of the installed ODBC driver.
How to test ODBC connection
Ensure your ODBC driver is functioning correctly by performing the following steps:
- Open the ODBC Data Source Administrator dialog.
- Switch to the User DSN or System DSN tab, depending on where your data source is configured.
- Select the configured data source, such as an ODBC driver for SQL Server, and click Configure or Test Connection.
- Follow the on-screen instructions to test the ODBC connection.
- Once the test is complete, a success message will indicate that the ODBC connection is working.
Learn how to test ODBC connection to ensure its reliability and secure the stability of data flow.
How to uninstall or remove ODBC driver from Windows
If you need to uninstall or remove an ODBC driver from your Windows system, follow these steps:
- Open the ODBC Data Source Administrator dialog.
- Navigate to the User DSN tab.
- Select the ODBC driver you want to uninstall.
- Click Remove or Uninstall.
- Follow the on-screen prompts to complete the uninstallation process.
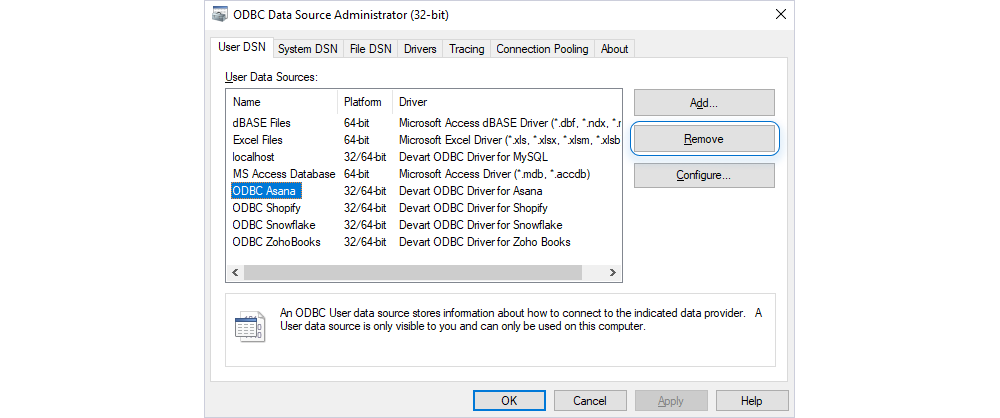
6. The driver has been successfully uninstalled, as shown by the dialog window on the screen.

If you want to test our ODBC connectors, visit the ODBC drivers page.
FAQ
1. What is an ODBC driver?
An ODBC driver is a software component that allows applications to connect to a database using the Open Database Connectivity (ODBC) standard.
2. Where is the ODBC driver installed?
ODBC drivers are typically installed in C:\Windows\System32 for 64-bit drivers and C:\Windows\SysWOW64 for 32-bit drivers.
3. What is the difference between ODBC and JDBC?
ODBC is language-independent and commonly used on Windows, while JDBC is Java-specific and used for Java applications.
4. How do you install the ODBC Access driver?
You can install the ODBC Access driver by downloading the Microsoft Access Database Engine or installing it via Windows features or Office setup.
5. What is the difference between 32-bit and 64-bit ODBC drivers?
32-bit drivers work with 32-bit applications; 64-bit drivers are for 64-bit applications. They cannot be used interchangeably.
6. How do I choose the right ODBC driver for my database?
Choose the driver that matches your database type (e.g., SQL Server, MySQL) and your application’s architecture (32-bit or 64-bit).
7. What are User DSNs vs. System DSNs, and when should I use each?
User DSNs are available only to the current user; System DSNs are available to all users on the machine. Use System DSNs for shared access.
8. How do I test if my ODBC connection is working correctly?
Use the “Test Connection” button in the ODBC Data Source Administrator after configuring your DSN.
9. What should I do if the “Test Connection” fails in the ODBC setup?
Check your credentials, server address, database name, driver version, and network connectivity.
10. How can I view the version of my installed ODBC driver?
Open the ODBC Data Source Administrator and check the “Drivers” tab for driver names and version numbers.