
This article provides a comprehensive guide on installing and configuring Devart ODBC drivers on macOS. Understanding this process is crucial for macOS users who need to establish reliable and efficient database connectivity in their applications, ensuring seamless data access and integration across diverse systems.
Table of contents
- Prerequisites
- Installing an ODBC Driver on macOS
- Configuring an ODBC Driver on macOS
- How to Test ODBC Connection on macOS
- How to Check the ODBC Driver Version on macOS
- How to Uninstall or Remove an ODBC Driver from macOS
Prerequisites
Before installing the driver, you need to make sure that your system has a driver manager installed. Our drivers for macOS are compatible with the iODBC driver manager. iODBC is a free and open-source driver manager widely used on macOS, Linux, and Unix systems.
Ready to install ODBC driver manager on macOS, or need instructions how to do it on Linux and Windows? Get the step-by-step guide to make the process easy!
Most Macs do not come with a driver manager as part of the operating system, so you need to install it yourself. You can download the latest version of iODBC from the iODBC website. The driver manager is installed with its own GUI tool for creating a DSN, the iODBC Administrator.
To install iODBC:
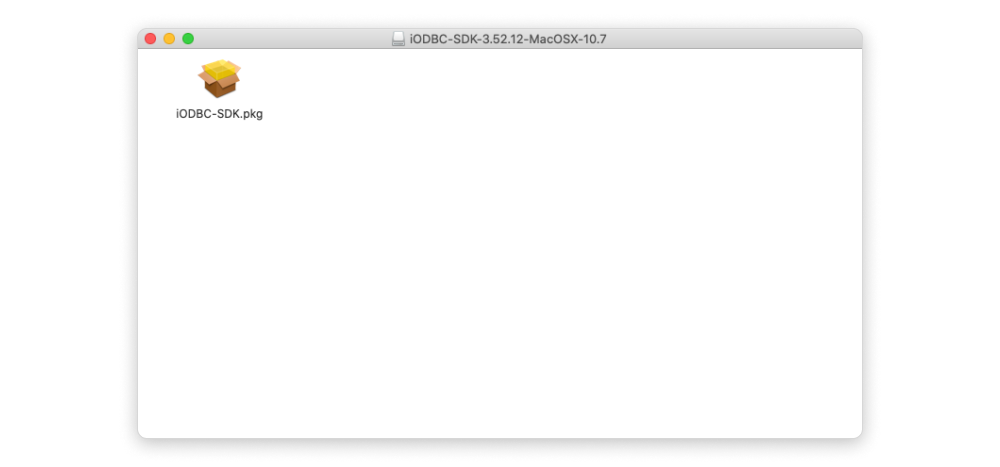
- Download iODBC and double-click the mxkozzzz.dmg file.
- Double-click the iODBC-SDK.pkg file and follow the instructions.
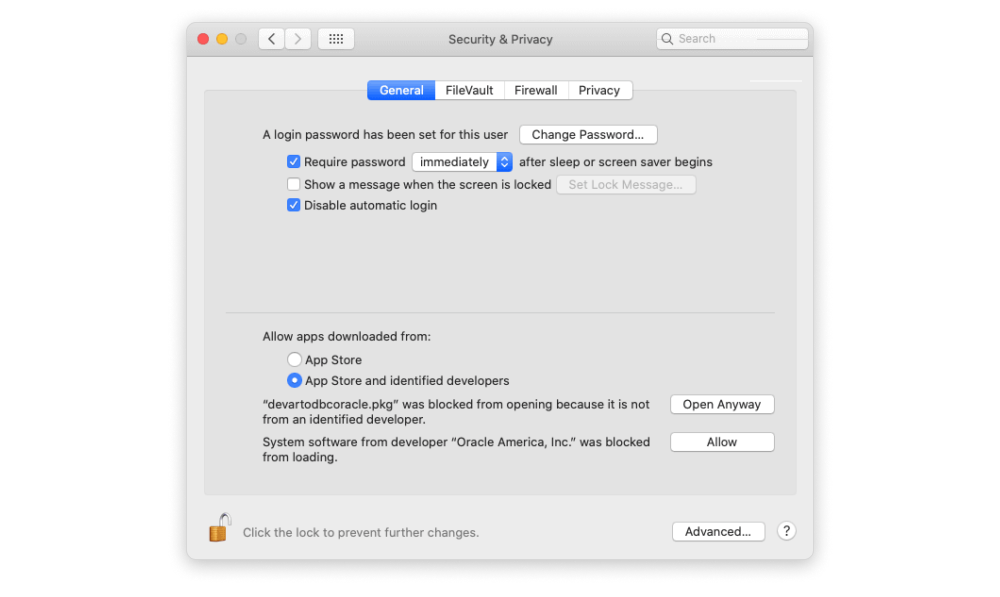
You might get an error that says “iODBC-SDK.pkg can’t be opened because it is from an unidentified developer”. To resolve the issue, open System Preferences and choose Security & Privacy. Under the General tab, click the lock icon in the bottom left corner to unlock the settings. You should see that the installer you tried to open was blocked from opening. Click Open Anyway to open the app.
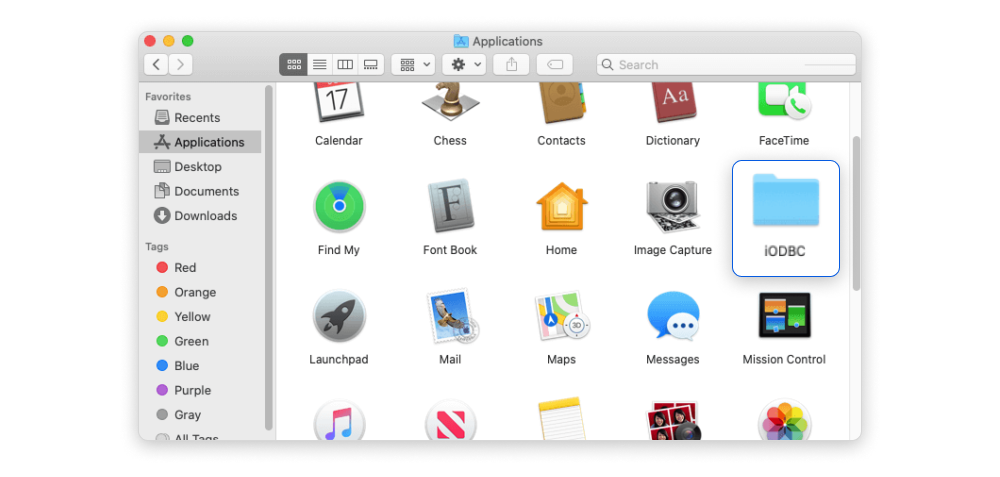
You will be guided through the steps necessary to install the iODBC Driver Manager. After the successful installation, you should be able to see the iODBC folder in the Applications folder.
Installing an ODBC Driver on macOS
For the purposes of this article, we will install the ODBC Driver for Oracle on macOS. You can find Devart ODBC drivers for macOS and download the needed driver as a .pkg file on our ODBC drivers page. A .pkg file is installed with the Apple Installer. Devart drivers are compatible with 32-bit and 64-bit ODBC-compliant applications.
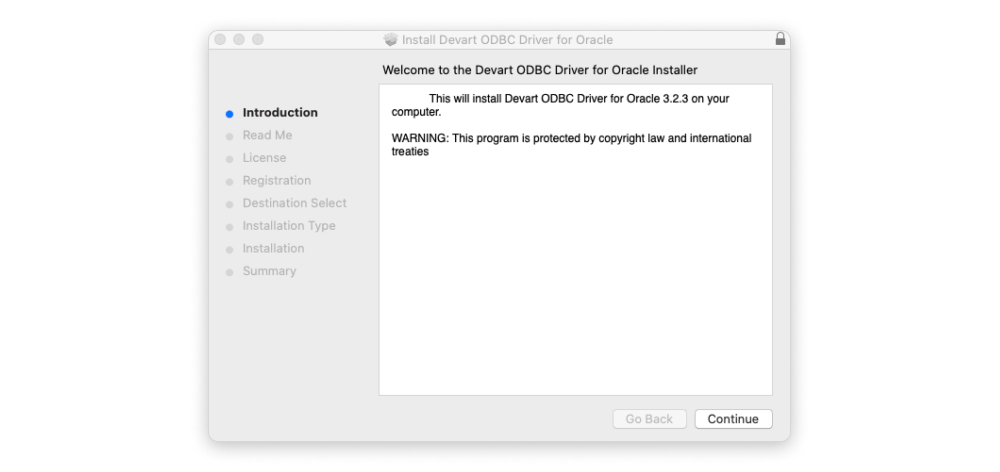
1. Double-click the installer file and follow the prompts. You will need to go to System Preferences > Security & Privacy and allow opening the file by clicking Open Anyway on the General tab.
Now you can proceed to the installer. On the first two pages, Introduction and Read Me, click Continue.
2. After reading the license agreement, click Continue, then Agree to proceed with the installation.

3. On the Registration page, you can either enter your license code in the Activation Key field or select Trial if you would like to first evaluate the software. Click Continue.

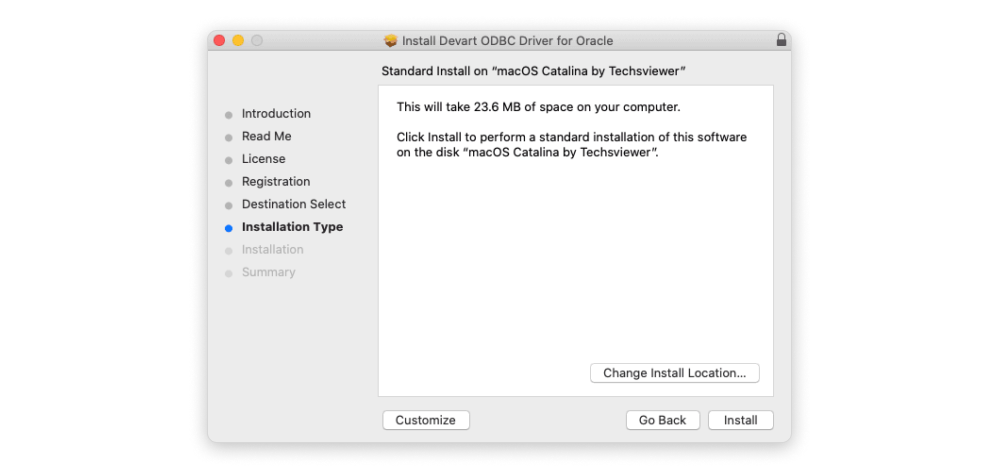
4. On the Installation Type page, click Install.
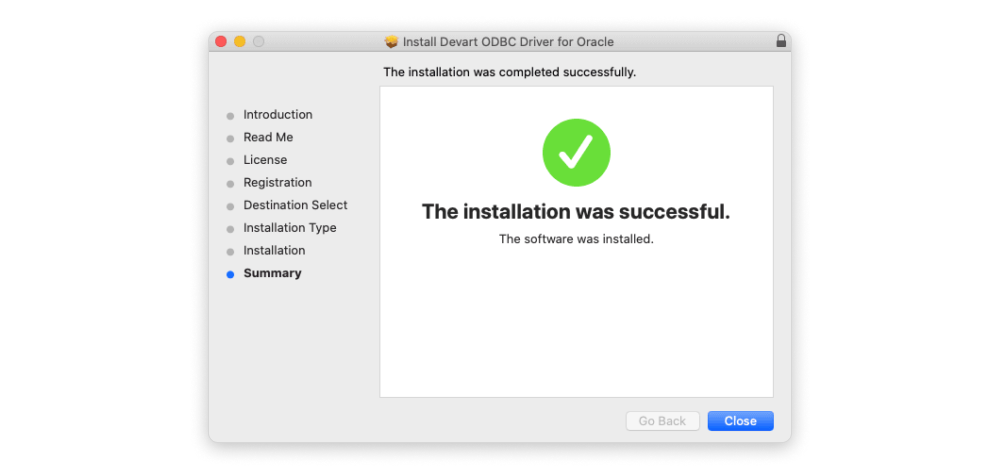
5. Once the installation has been successfully completed, you will see the corresponding message.
Configuring an ODBC Driver on macOS
To configure the installed ODBC driver on macOS, you can use a sample System DSN (data source name), which is created during the driver installation (for example, Devart_Oracle for Devart ODBC Driver for Oracle), or create your own DSN. There are two major types of DSN: the user DSN and the system DSN. The user DSN is created for a specific user and only the user who created it can see and use the DSN. The system DSN can be used by any user in the system who has proper rights.
See the Connection String options in the driver’s documentation for details about the parameters that can be set for each DSN.
The odbc.ini file contains information about DSNs and is stored under the following path:
- User DSNs: ~/.ODBC.ini
- System DSNs: /Library/ODBC.ini
To create or modify a DSN, you can either use the GUI iODBC Administrator app or edit the appropriate odbc.ini file.
Creating a DSN Using iODBC Administrator (64-bit)
- Run iODBC Administrator64 from Applications > iODBC.
- Go to the User DSN or System DSN tab.
- Click Add.
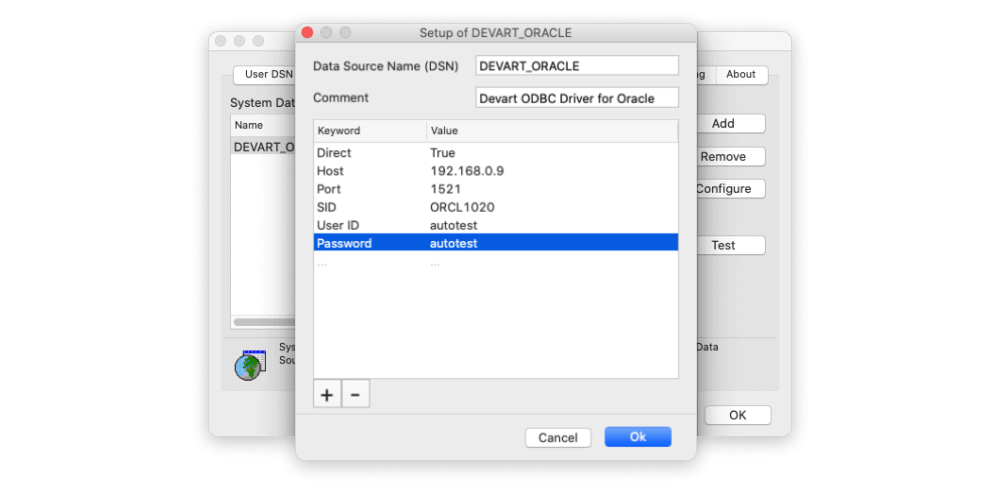
- Select the driver (e.g., Devart ODBC Driver for Oracle), then click OK.
- Specify a name for the DSN and, optionally, a description.
- Specify connection string parameters and their values:
- Click the plus sign to create a Keyword/Value pair
- Double-click the Keyword field and specify the parameter name
- Double-click the Value field and specify the value for the parameter
- Click Ok to save the DSN.
If this is the first time that you are creating a user DSN, the iODBC manager creates the odbc.ini file in the home directory. The odbc.ini file and parameters for a sample system DSN were created during the driver installation, so you can create a new system DSN or specify connection information in the existing DSN.
Creating a DSN by Adding Connection Information to the odbc.ini File
You can configure the odbc.ini file using vi or a similar text editor, such as nano. For this article, vi is used to edit odbc.ini. To create a DSN, open Terminal and run the command sudo vi /Library/ODBC/odbc.ini for the system DSN or sudo vi ~/.odbc.ini for the user DSN. This will either open the odbc.ini file that already exists in the corresponding directory or create a new file if this is your first DSN for the driver. To enter the insert mode, type i.
Enter [ODBC Data Sources] at the beginning of the file. Parameters in the odbc.ini file are specified as parameter_name = parameter_value.
To create a DSN and specify connection information, insert the following information:
- Under [ODBC Data Sources], specify the DSN name and the driver name (e.g. Devart ODBC Driver for Oracle), in the form of dsn_name = driver_name.
- Under the DSN declaration, specify the DSN name, in the form of [dsn_name].
- Under [dsn_name], specify connection parameters and any additional parameters, such as the server address, database name, user credentials, character set, etc., in the form of parameter_name = parameter_value.
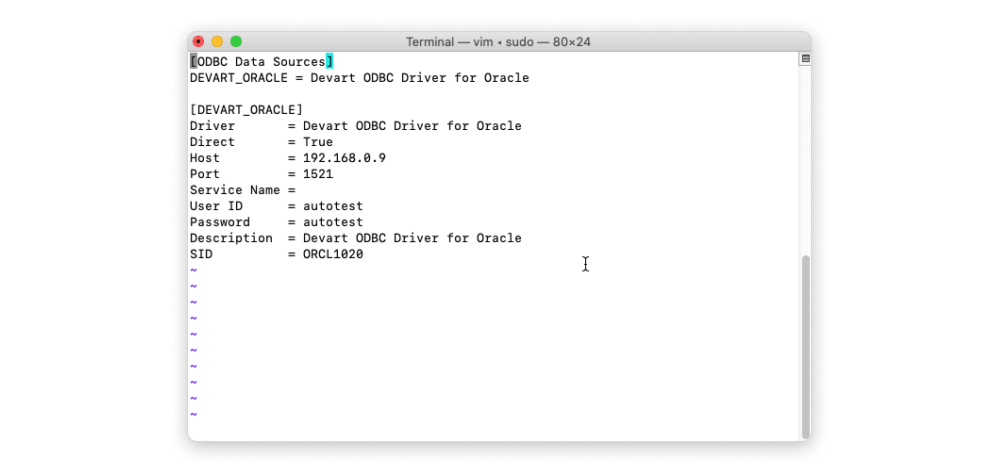
To save the changes to the odbc.ini file, press the Esc key, then press Shift + :, type wq, and press Enter.
How to Test ODBC Connection on macOS
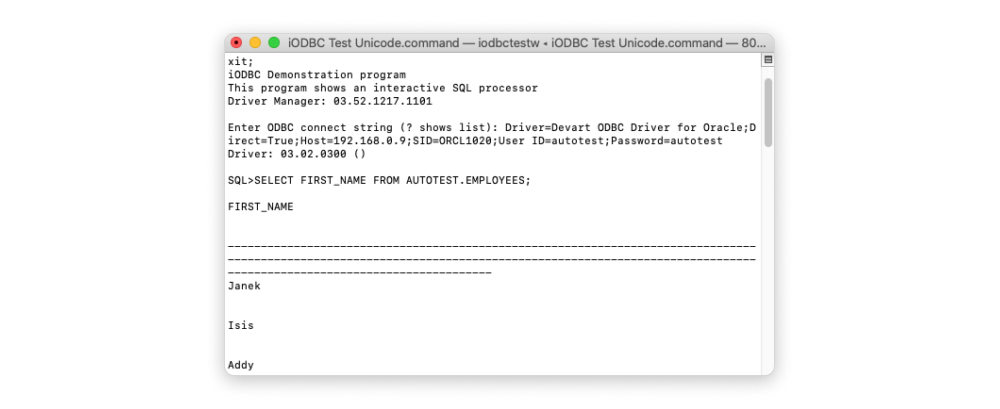
To test the ODBC data source connection, you can use the GUI iODBC Administrator64 app or the iODBC command line utilities iodbctest / iodbctestw (Applications > iODBC > iODBCTest.command / iODBCTestUniCode.command).
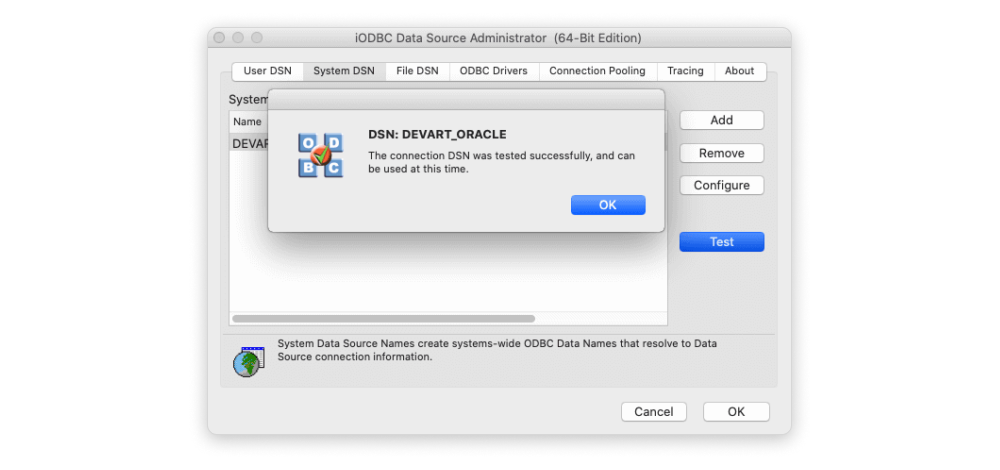
To test the connection in Administrator64, select the DSN and click Test.
The GUI Administrator app only tests the connection to the server, whereas iodbctest and iodbctestw allow you to issue SQL commands and retrieve results. iodbctest retrieves all results in the ASCII mode, while odbctestw retrieves all results in the Unicode mode.
Run the utility and, when prompted for the ODBC connection string, enter the required connection parameters (the driver name, server address, database name, user credentials, etc.). If you set the connection parameters and their values in the DSN, simply specify the DSN name in the form of dsn=dsn_name.
The connection string takes parameters in the form of parameter_name=value, with each parameter delimited by a semi-colon (;), no spaces. Once connected, you can issue an SQL command to retrieve data from the data source.
To download free full-featured 30-day trial versions of any Devart ODBC Driver, select the necessary driver on the driver listing and navigate to the download page.
Learn more methods to check ODBC connection in terms of its reliability to ensure the stability of data flow.
How to Check the ODBC Driver Version on macOS
Along with the driver, you can install a console application, for example PostgreSQL ODBC Activator, the application is located in the folder with the driver.
This application can activate/deactivate a license, show license/trial information, create DSN templates, and provide information about the current version.
This simple application ensures you are using the correct version of the ODBC driver and helps you troubleshoot any potential compatibility issues.
How to Uninstall or Remove an ODBC Driver from macOS
If you need to uninstall or remove an ODBC driver from your macOS, follow these steps to ensure a clean removal.
- Open Terminal: Launch the Terminal application on your macOS.
- Execute Uninstall Command: Type the following command and press Enter:
sudo rm -rf /Library/ODBC/{Your_ODBC_Driver_Name}
Replace “Your_ODBC_Driver_Name” with the actual name of your ODBC driver. - Enter Administrator Password: You will be prompted to enter your administrator password. Type the password and press Enter.
- Verify Removal: After the command is executed, the ODBC driver files will be removed from the system. Verify the removal by checking for any remaining driver-related files or folders.
By following these steps, you can successfully uninstall the ODBC driver from your macOS system, ensuring a clean slate for any future installations or updates.

Conclusion
Mastering the installation and configuration of Devart ODBC drivers on macOS is an essential skill for users navigating the dynamic landscape of database connectivity. This comprehensive guide equips macOS users with the knowledge and steps necessary to seamlessly integrate Devart ODBC drivers, empowering them to establish robust connections with databases.

By following these instructions, users can ensure a smooth and efficient data access experience in their applications, fostering a harmonious integration of information across diverse systems. With this newfound proficiency, macOS users are well-equipped to overcome the challenges of database connectivity, unlocking a world of possibilities for their projects and ensuring a reliable foundation for future endeavors.