
Creating tables is perhaps the most popular task in database development. In this article, we will review the ways of creating MySQL tables.
There are two main ways of creating tables in MySQL databases:
- Executing a query that includes the CREATE TABLE statement
- Using the corresponding functionality of MySQL-related tools and IDEs, such as Table Editor for MySQL
The first approach is helpful when you need to create tables specifically via a script. For example, you want to create a table at a very specific time, but you won’t be able to do it manually due to being away at that moment. So, you can schedule the table creation process using the Windows Scheduler – this is where the table creation query will help.
The second method is great for creating tables on the spot. It can also be more convenient in many cases as it’s very visual and intuitive. There are many tools that provide this functionality, and we will take a look at one of them—dbForge Studio for MySQL. This solution is a powerful MySQL DB manager used by developers for visual database design and management.
Let’s learn more about these two methods in detail.
Contents
- Create a table in MySQL with syntax examples
- What data types are available?
- Create a duplicate table
- Create a temporary table
- Create a MySQL table from CSV
- Common errors when creating tables in MySQL
- Best practices for designing MySQL tables
- Conclusion
Create a table in MySQL with syntax examples
Connect to MySQL
To connect to a MySQL server, open dbForge Studio for MySQL and proceed with the following steps:
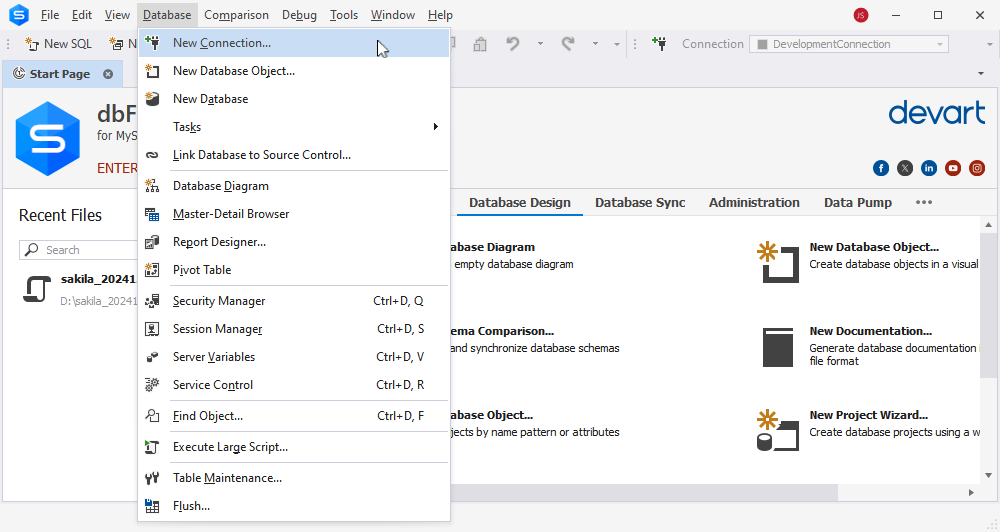
1. To open the Database Connection Properties dialog, navigate to Database > New Connection:
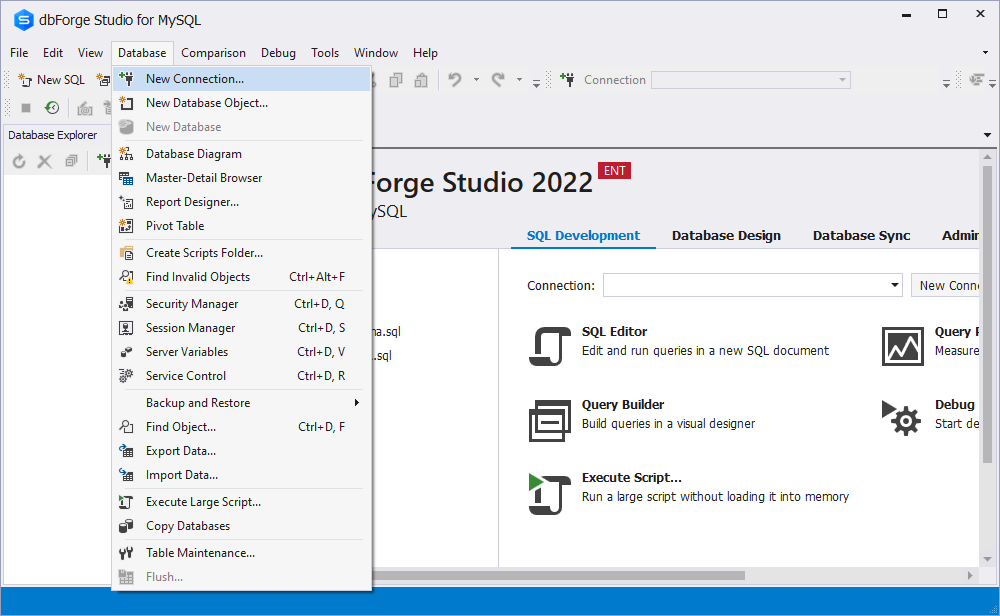
Alternatively, you can click New Connection:
2. Configure connection properties in the dialog:
- Type: select the connection type (TCP/IP, Named pipe)
- Host: enter a hostname
- Port: if you have selected TCP/IP from the Type drop-down menu, enter a port of a host you want to connect to
- User and Password: enter your credentials for a host you are connecting to
- Database: you can leave this field by default
- Connection Name: the value of this field is generated automatically after you have entered a hostname. However, you can change it manually if required
- Environment Category: optionally, you can select an environment category (Development, Production, Sandbox, and Test)
3. After you set up the connection properties, click Connect.
You should see a new connection in the Database Explorer:
Create a MySQL database
To create a database in MySQL, you can use this command:
CREATE DATABASE <database_name>;There are several ways for creating databases in MySQL, but in this example, we’re going to create the car_sale database with dbForge Studio for MySQL:
CREATE DATABASE car_sale;To see the created database in the Database Explorer, click Refresh Object:

Also, you can check whether the database has been successfully created with the following command:
SHOW DATABASES;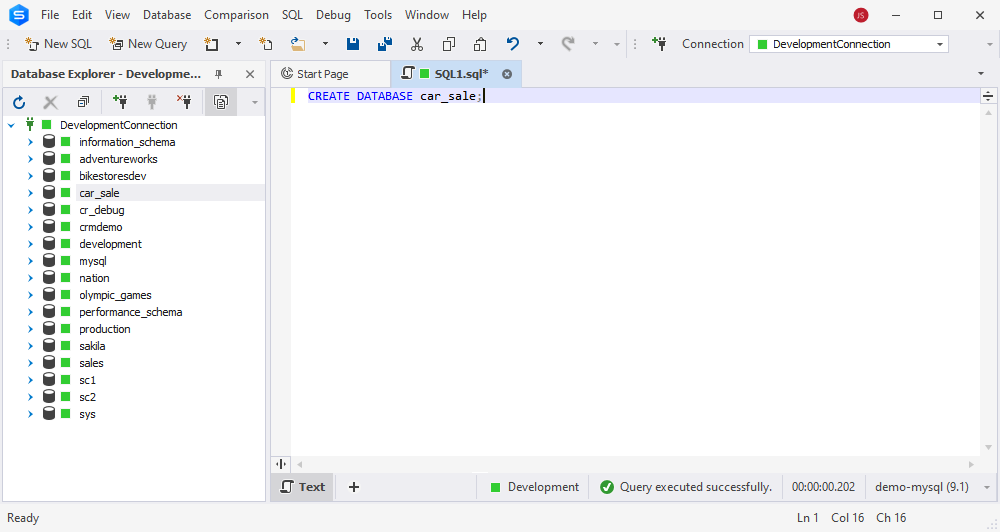
To view the tables inside a specific database, use the SHOW TABLES command. It’s a simple way to learn how to view tables in MySQL after creating them.
Create a MySQL table
Now, that we have created the database, it’s high time to create the first table in it. We’ll create a small table called Managers with the Primary Key that is required for data integrity:
| MANAGER_ID | FIRST_NAME | LAST_NAME | LAST_UPDATE |
| 08276 | Brad | Craven | 11/29/1976 |
| 19222 | Kraig | Boucher | 10/10/1990 |
| 23003 | Enrique | Sizemore | 5/26/1990 |
| 80460 | Letha | Wahl | 3/9/1971 |
| 86849 | Harlan | Ludwig | 1/11/1997 |
Learn what is primary key in MySQL and how to use it in this article.
In dbForge Studio for MySQL, it’s possible to do it in two ways:
- Using the
CREATE TABLEstatement - Using the New Database Object option
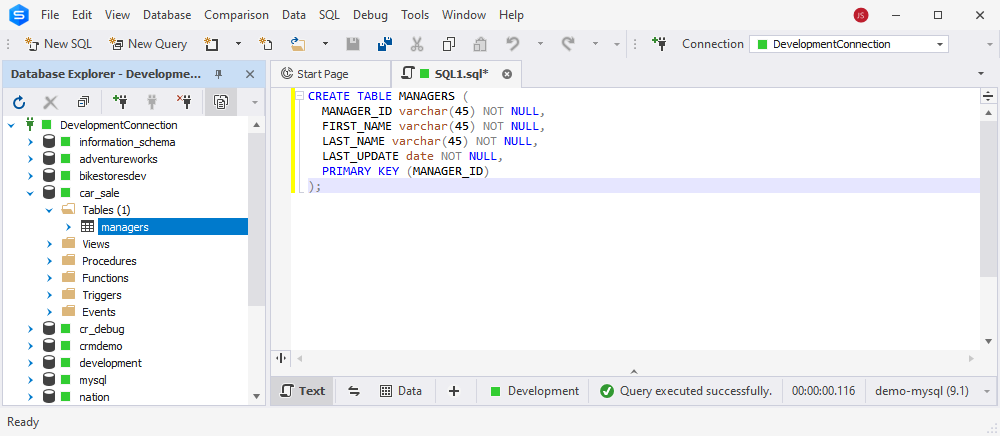
Way 1 – using the CREATE TABLE statement
Run this MySQL statement and click Execute:
CREATE TABLE MANAGERS (
  MANAGER_ID varchar(45) NOT NULL,
  FIRST_NAME varchar(45) NOT NULL,
  LAST_NAME varchar(45) NOT NULL,
  LAST_UPDATE date NOT NULL,
  PRIMARY KEY (MANAGER_ID)
);
And then click Refresh Object:
Let’s populate the table with data:
INSERT INTO MANAGERS(MANAGER_ID,FIRST_NAME, LAST_NAME, LAST_UPDATE)
VALUES
(08276,'Brad','Craven',11/29/1976),
(19222,'Kraig','Boucher',10/10/1990),
(23003,'Enrique','Sizemore',5/26/1990),
(80460,'Letha','Wahl',3/9/1971),
(86849,'Harlan','Ludwig',1/11/1997);
To check if data has been added, execute the following statement:
SELECT *
FROM MANAGERS;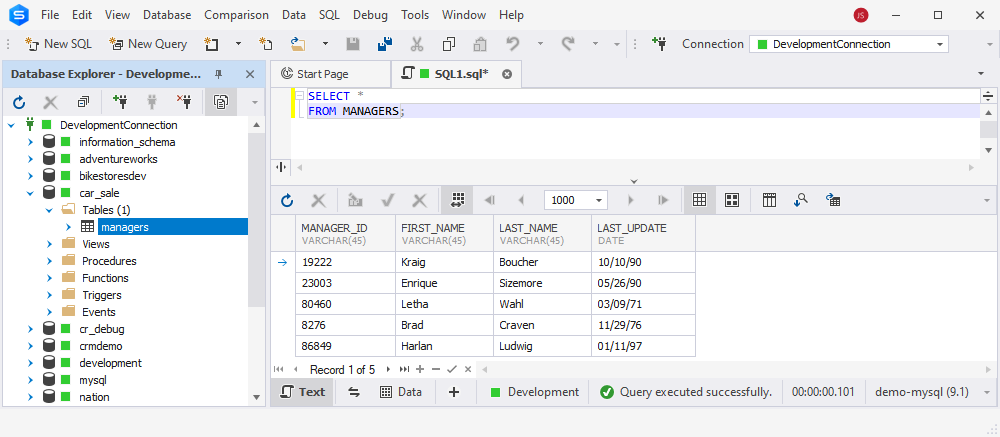
Way 2 – using the New Database Object option
1. Navigate to Database > New Database Object:
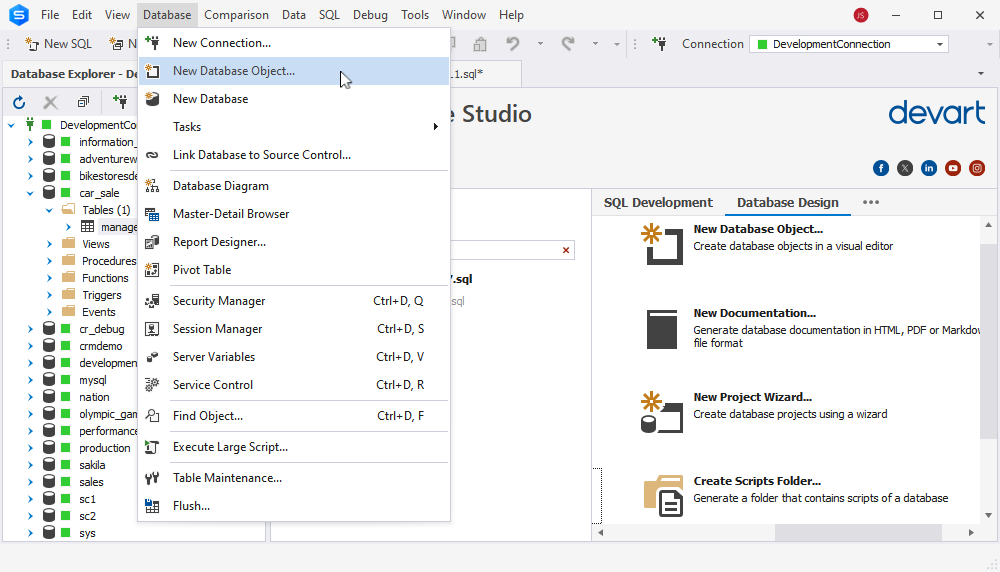
2. Choose a database where you want to create a new table and select Table in the list of object types on the right, and then click Create.
3. A tab will be opened that allows you to design and configure the table you want to create. Essentially, the functionality lets achieve the same results as you can get with the CREATE TABLE query, but in a visually comprehensive and convenient way:
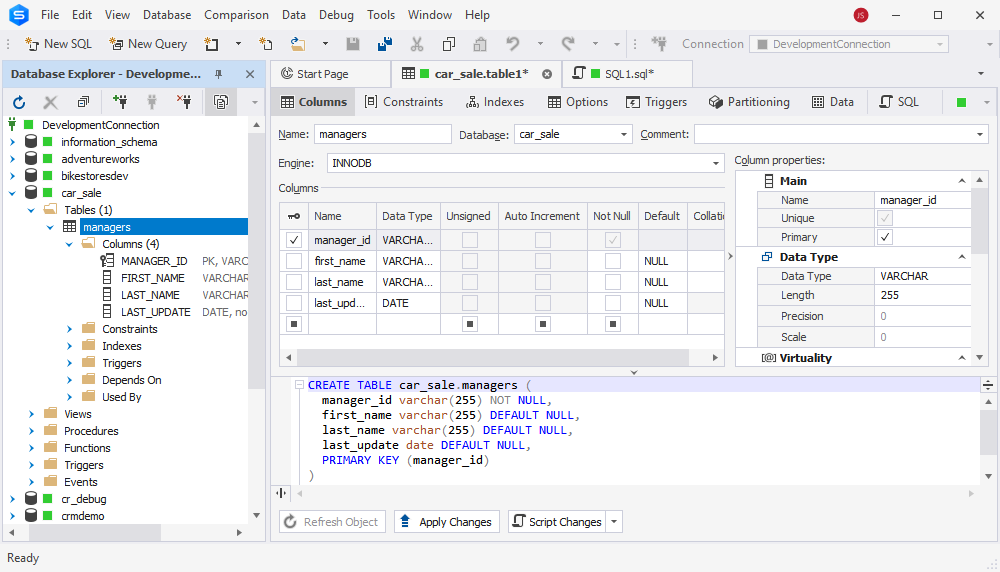
4. After you’ve adjusted all the necessary columns and settings, click Apply Changes. That’s it, the table will be created in the specified database. If you need to update some settings of the table, just change the corresponding options and click Refresh Object.
In our exploration of the MySQL database, we also present a clear-cut tutorial on how to show or list tables, giving you an additional tool in your database navigation toolkit.
What data types are available?
When you create a new table in MySQL, you must specify a type of data for each column. It’s required for SQL to determine how to cooperate with stored data.
MySQL supports such categories of data types:
- String
- Numeric
- Date and time
- Spatial
- JSON
We have described MySQL data types in our topic Data Types in MySQL: Tutorial and Full List with Examples of Data Formats. Feel free to read it to get more details.
Create a duplicate table
With dbForge Studio for MySQL, you can quickly and easily copy a table in MySQL:
1. Right-click the required table and click Duplicate Object:
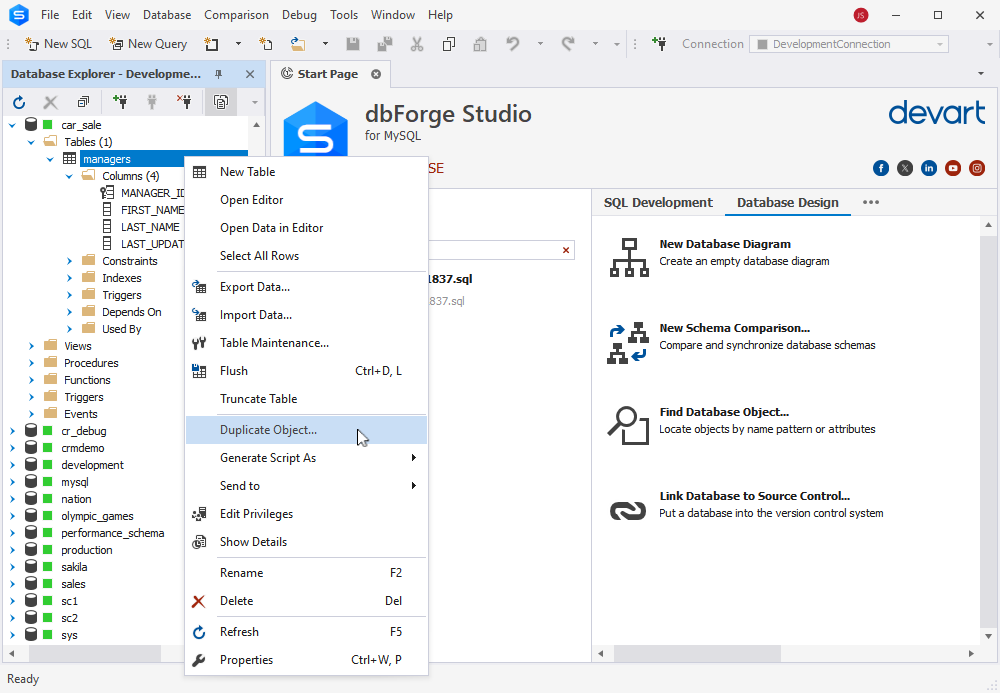
2. Choose the database where you want to create the table copy from the Destination database drop-down menu.
3. Enter a name for the table copy or leave it by default in the New object name field.
4. If you want to copy both the table structure and data, select Copy data.
5. Finally, click OK. Do not forget to click Refresh Object. The duplicate table will be created in the specified database.
Create a temporary table
In some cases, database developers might need to create a temporary table, for example, for storing temporary data. This will allow using these data multiple times by calling a stored procedure in MySQL.
Before you create a temporary table, learn the following rules:
- A user must be granted the “create temporary table” privilege
- If you work with the InnoDB database engine, you cannot create temporary tables
- You can name temporary tables in the same way as MySQL typical tables
- Temporary tables have a separate relationship with a database schema. Thus, if you delete a database, temporary tables will not necessarily be deleted within the database
- The
CREATE TEMPORARY TABLEstatement doesn’t invoke the implicit commit
Let’s create a temporary table Car_model:
CREATE TEMPORARY TABLE CAR_MODEL
  (CAR_ID varchar(45) NOT NULL,
  LAST_UPDATE DATE NOT NULL,
  PRIMARY KEY(CAR_ID)
);
And add some data to the created table. In this statement, we convert the type of data with the STR_TO_DATE function:
INSERT INTO CAR_MODEL(CAR_ID,LAST_UPDATE)
VALUES
(08266,STR_TO_DATE('11/29/1976','%m/%d/%Y')),
(19622,STR_TO_DATE('10/10/1990','%m/%d/%Y')),
(23003,STR_TO_DATE('5/26/1990','%m/%d/%Y')),
(80568,STR_TO_DATE('3/9/1971','%m/%d/%Y')),
(76849,STR_TO_DATE('1/11/1997','%m/%d/%Y'));
Note that the table with data will be deleted after you have closed the session. To check if you have created the table and added data, execute this query:
SELECT *
FROM CAR_MODEL;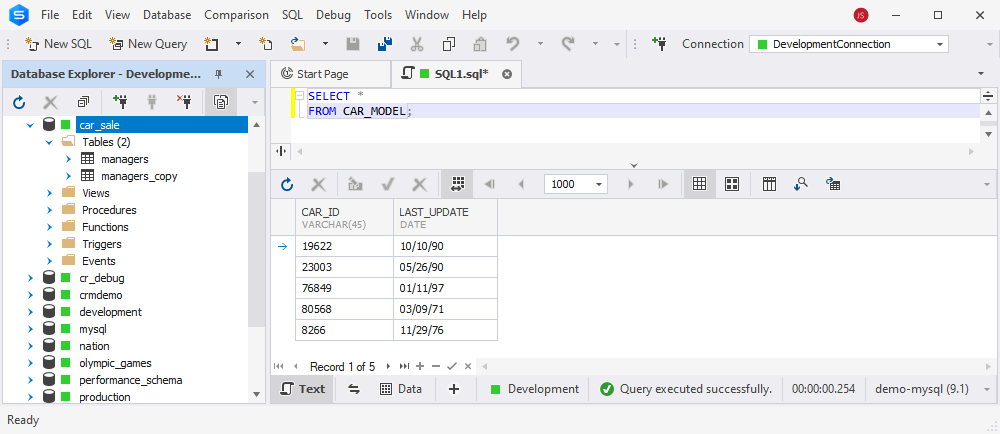
Create a MySQL table from CSV
There is another way to create a table in dbForge Studio for MySQL – import it from a CSV file:
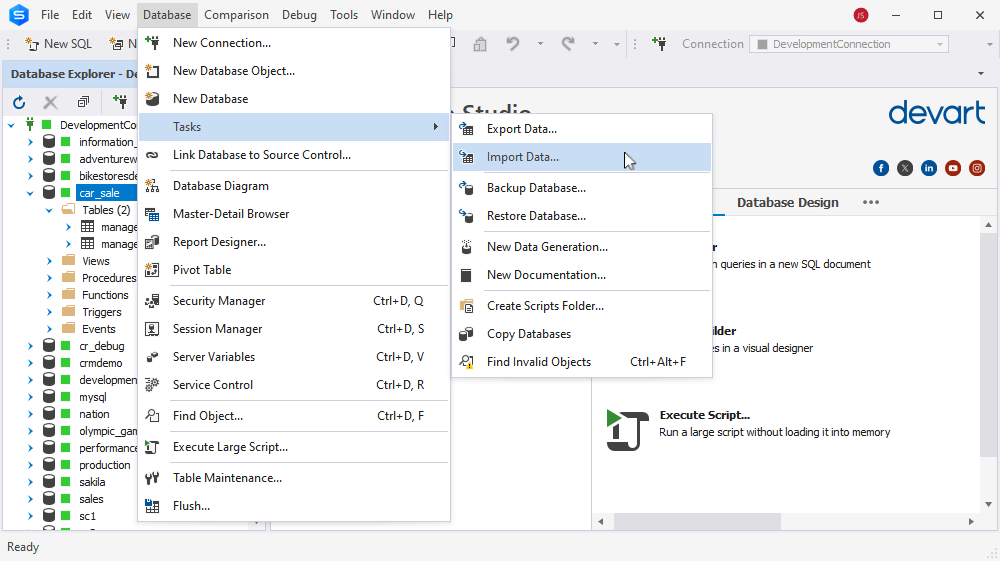
1. Navigate to Database > Import Data:
2. Click CSV and click three dots next to the File name field to select the required file.
3. Click Next and then choose a database where you want to import the table from the Database drop-down menu.
4. Select New table and enter the name of the table you want to import data to.
5. To customize other options, click Next. To import immediately, click Import.
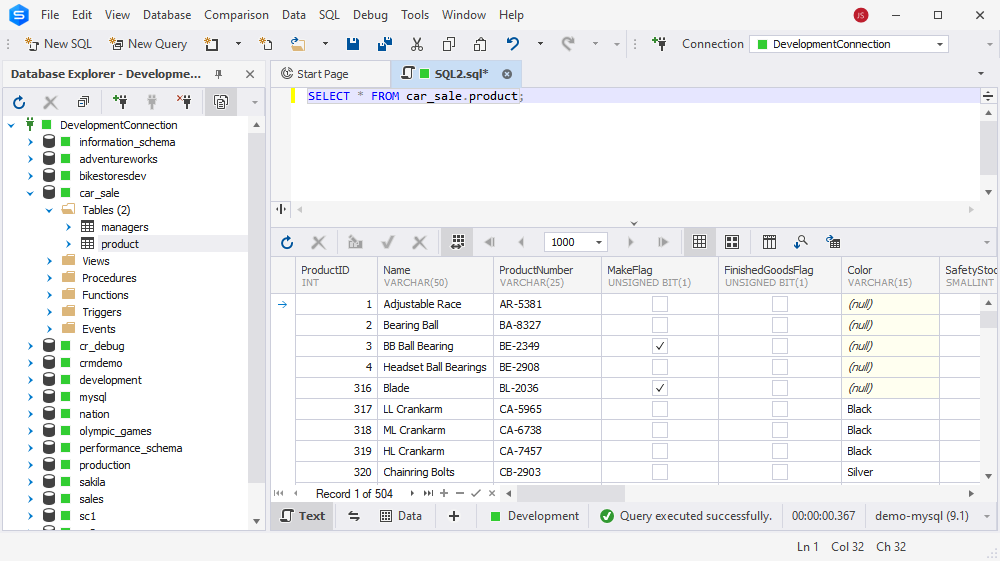
6. Click Refresh Object. You can check the imported table in the specified database:
CSV is not the only data import format supported by dbForge Studio for MySQL. You can also import JSON to MySQL to get tables that can be managed using standard MySQL workflows.
Common errors when creating tables in MySQL
1. Syntax errors
If you’ve ever worked with MySQL, you’ve likely encountered syntax errors when creating tables. These errors can arise from various mistakes—misplaced or missing parentheses, accidentally using single quotes (‘ ‘) instead of backticks (`) for identifiers, or specifying an incorrect data type for a field.
Unfortunately, there’s no universal fix for all syntax errors, but you can make MySQL table creation much easier with the right tools. For instance, dbForge Studio for MySQL offers an advanced visual query designer and editor that simplifies table design. With its intuitive drag-and-drop interface, you can effortlessly build, arrange, and manage complex tables, create JOINs, and define conditions—all without getting lost in syntax issues.
2. Choosing inappropriate field type and length
Selecting an appropriate data type is crucial in MySQL table creation. A poorly chosen field type can lead to performance issues, storage inefficiencies, or system failures.
Take numeric fields, for example — using an INT for an ID column in a high-volume event log might seem fine at first, but it can quickly reach its limit, causing critical failures. Planning for growth by choosing a BIGINT instead could prevent such issues.
Text fields require the same careful consideration. If you attempt to insert a 300-character string into a VARCHAR(255) column, MySQL will reject it (if strict mode is on) or truncate the data. As a result, some parts of the data might be lost.
Here’s what to keep in mind:
- Text fields (VARCHAR, CHAR) store characters, so define lengths accordingly (VARCHAR(16) for usernames of 5–12 characters).
- Numeric fields (INT, BIGINT) are measured in bytes (e.g., INT uses 4 bytes, BIGINT uses 8 bytes), so choose types that accommodate growth.
By carefully planning ahead, when you create table in MySQL, you can avoid costly database modifications down the line.
3. Exceeded number of indexed fields
Indexes can significantly improve query performance in MySQL, but too many indexes can do more harm than good. When designing a table, it’s essential to evaluate the data volume and query patterns before deciding how many indexes to create.
When to use indexes and when to avoid them:
- If your table has only a few thousand rows, indexing may not be necessary.
- For larger datasets, if there are fields with query conditions, it is generally necessary to create indexes.
- Avoid over-indexing, since too many indexes consume storage, slow down INSERT and UPDATE operations, and increase maintenance overhead. Generally, keeping fewer than five indexes per table is a good practice.
- Some fields, like gender, have low distinctiveness and won’t benefit much from indexing.
Optimizing index usage
If you find yourself creating too many indexes, consider:
- Composite indexes, to combine multiple columns and improve efficiency.
- Covering indexes, which store all necessary columns for a query, reducing lookups.
- Leftmost prefix matching, which allows MySQL to use a multi-column index more efficiently.
Smart indexing ensures your database stays fast, scalable, and easy to maintain.
4. RENAME TABLE does not work with temporary tables
If you need to rename a TEMPORARY table in MySQL, using RENAME TABLE won’t work—it’s not supported for temporary tables. Instead, use ALTER TABLE:
ALTER TABLE old_name RENAME new_name;
This ensures a smooth rename operation without running into errors. Keep this in mind when working with temporary tables to avoid unexpected issues in your queries.
5. The same name is used for temporary and non-temporary tables
In MySQL, if you create a TEMPORARY table with the same name as an existing non-TEMPORARY table, the non-temporary table becomes hidden until the temporary one is dropped. This happens regardless of whether the tables use different storage engines.
To avoid confusion and unintended behavior, always use unique names for temporary tables or include a session-specific identifier in their names. This ensures smooth table management without accidental conflicts.
Best practices for designing MySQL tables
Essential common fields for every table
Every table should have the following common fields:
- id: The primary key, which is mandatory for every table.
- create_time: creation time (useful for tracking record creation).
- modified_time: The modification time, which needs to be updated when records are updated. It’s useful for tracking updates.
- version: The version number of the data record, used for optimistic locking (optional).
- remark: A remark or comment for the data record (optional).
- modified_by: The person who made the modification (optional).
- creator: The person who created the record (optional).
Normalization in MySQL tables
Normalization is the process of structuring tables efficiently by eliminating redundant data and dependencies. The goal is to ensure that each table represents a single, well-defined entity and avoids unnecessary null values or update anomalies.
Why is normalization necessary?
Imagine an EMPLOYEE table that includes department names alongside employee details:
EMPLOYEE ( <employee_id>, name, social_security, department_name )
At first glance, this might seem fine, but what happens if a department name changes? You’d have to update every related row, increasing the risk of inconsistencies. And what about employees who haven’t been assigned a department yet? You’d end up with null values.
Instead of storing the department name directly in the employee table, it’s better to split it into separate tables:
EMPLOYEE ( <employee_id>, name, social_security )

DEPARTMENT ( <department_id>, department_name )

EMPLOYEE_DEPARTMENT ( <employee_id>, department_id )
This structure ensures:
- No redundant department names — changes only need to be made in one place.
- Better data integrity — employees can exist without a department, and departments can be managed separately.
- Easier scalability — new relationships or attributes can be added without restructuring the entire database.
While database theory introduces multiple normal forms, the key takeaway is to normalize as much as needed for clarity and efficiency without overcomplicating the design.
Use indexing best practices
Efficient indexing is key to improving query performance in MySQL. However, poor indexing choices can lead to wasted storage, slower updates, and inefficient queries. Here’s how to optimize your indexes for the best results:
1. Focus on high-impact queries
Identify queries that run frequently and involve filtering, sorting, or joining large datasets. These are the best candidates for indexing as they often consume the most resources.
2. Choose proper columns for indexing
Prioritize columns used in WHERE, ORDER BY, and JOIN clauses. Indexing these fields speeds up data retrieval by allowing MySQL to locate records more efficiently.
3. Avoid over-indexing
As we have discussed before, having more indexes doesn’t always mean better performance. Each index adds storage overhead and slows down INSERT, UPDATE, and DELETE operations. Stick to indexing columns that are frequently used in queries and have high selectivity.
4. Monitor index performance
Use MySQL’s Performance Schema and slow query log to track index usage. Remove unused indexes and optimize underperforming ones to keep your database efficient.
5. Optimize data types for indexing
Choose compact data types for indexed columns. Use INTEGER for numeric values, VARCHAR for variable-length strings, and DATE/DATETIME for timestamps. Avoid indexing large text or binary fields unless absolutely necessary.
7. Maintain index health
Run ANALYZE TABLE periodically to update statistics, especially after significant data changes, to help the optimizer choose efficient query plans. For details, refer to MySQL ANALYZE TABLE. Use OPTIMIZE TABLE to reduce fragmentation, but note that this is more relevant for MyISAM tables than for InnoDB, where fragmentation is typically managed automatically. Avoid running these commands unnecessarily, as they can lock tables and impact performance.
By following these best practices, you can balance query speed with storage efficiency while keeping your MySQL database responsive and scalable. Also, feel free to check an advanced table designer tool within dbForge Studio for MySQL and explore the best ways of handling indexes.
Conclusion
In this article, we’ve explained how to create tables in MySQL using the CREATE TABLE statement and via an IDE. In this walkthrough, we were using dbForge Studio for MySQL.The second method actually allows you to get the same results as with the first one, but in a way that can be more convenient and intuitive in many cases.
You can try dbForge Studio for MySQL by downloading its free 30-day trial version.
For more information, you can watch the following video tutorial: