
The article is dedicated to the SQL Server DELETE statement. Here you will find detailed information about how to use the query in order to remove one or several rows from one or several tables. Also, we will compare DELETE with TRUNCATE because at first glance they may seem to perform the same task.
Contents
- What is the SQL DELETE command?
- The basic syntax of the DELETE query
- SQL DELETE statement example
- Delete a single record
- Delete multiple records
- Delete all records from a table
- Delete related rows from multiple tables
- Difference between SQL Server TRUNCATE and DELETE
- Use DELETE query in dbForge Studio for SQL Server
What is the SQL DELETE command?
To begin with, let’s determine the statement definition and purpose.
DELETE is a query that deletes one or multiple records from a table in SQL Server. With the statement, it is also possible to delete all data or specific data based on a condition specified in the WHERE clause. It is recommended to be careful and attentive while using DELETE, as it removes data permanently.
The basic syntax of the DELETE query
Typical syntax of the DELETE query in SQL Server looks as follows:
DELETE FROM <table_name>
WHERE <condition>;
Parameters:
- <table_name>: a table name you want to delete rows from
- <condition>: a condition for filtering and fetching only necessary records to be deleted
If you want the query to return deleted records, you can use RETURNING *. Thus, the statement will look like this:
DELETE FROM <table_name>
WHERE <condition>
RETURNING *;
Thinking of ways to make a backup copy before making any changes? Check a detailed guide on the best way to backup a SQL Server database.
SQL DELETE statement example
Let’s review how we can use the DELETE query to drop a row from a table on the following example.
Imagine that you have the Birthdays table.
This table will be used in the queries examples provided in the next sections.
| id | last_name | first_name | date |
| 1 | Crawford | Tom | 1976-09-28 |
| 2 | Chesterfield | Mia | 1990-10-05 |
| 3 | Colland | Sally | 1987-10-10 |
| 4 | Cromwell | Peter | 1995-03-07 |
| 5 | Nutter | Olivia | 1986-04-23 |
To delete a record from the table, you need to execute the query:
DELETE FROM birthdays
WHERE id=1;
After you have done it, the row with the id equal to 1 will be deleted from the table and the following data will be preserved:
| id | last_name | first_name | date |
| 2 | Chesterfield | Mia | 1990-10-05 |
| 3 | Colland | Sally | 1987-10-10 |
| 4 | Cromwell | Peter | 1995-03-07 |
| 5 | Nutter | Olivia | 1986-04-23 |
Delete a single record
You can delete one record from a table using DELETE by specifying some condition in the WHERE clause. Thus, the query will look as follows:
DELETE FROM birthdays
WHERE id=4;
The record with the id equal to 4 will be deleted from the Birthdays table.
Delete multiple records
To remove multiple rows from a table, you can use the IN operator, for instance:
DELETE FROM birthdays
WHERE id IN (1, 3, 5);
This query will delete all rows with ids equal to 1, 3, 5 from the Birthdays table.
Also, you can delete a number of rows within a range with the help of BETWEEN and AND operators. For example, you want to remove rows that have ids 3, 4 with 2, 5 inclusive:
DELETE FROM birthdays
WHERE id BETWEEN 2 AND 5
Delete all records from a table
In order to delete all data from a table, you simply need to execute the DELETE query and specify the name of the table you want to delete records from. In this case, the WHERE clause isn’t appropriate:
DELETE FROM birthdaysThis will delete all records from the Birthdays table.
Delete related rows from multiple tables
Related rows from different tables are deleted by using the JOIN operators. In this section, we will review a deletion example with the help of the INNER JOIN statement.
Suppose you need to delete related rows from two tables: Birthdays and Vacations. You can perform the task by running the following DELETE query:
DELETE b, v
 FROM birthdays b
 INNER JOIN vacations v
   ON b.id = v.birthdays_id
 WHERE b.date = 1976-09-28;
The statement will delete all rows matching the b.date = 1976-09-28 condition from the Birthdays and Vacations tables.
Difference between SQL Server TRUNCATE and DELETE
DELETE is not the only way to remove data in SQL. There is also the TRUNCATE statement. Both are used for deleting data from a table, but each query has its own nuances.
For better visual perception, we have collected the essential differences in “TRUNCATE vs DELETE” table below:
| DELETE | TRUNCATE |
| DML (Data Manipulation Language) command. | DDL (Data Definition Language) command. |
| Removes all data and specific data using the WHERE clause. | Removes all data from a table. |
| Deletes records one by one at a time. | Deletes all the data at a time. |
| Requires DELETE permission on a table. | Requires ALTER permission on a table. |
| Locks each row in a table to be deleted. | Locks a whole table for deleting. |
| Makes an entry for each deleted record in the transaction log. Therefore, it’s slower than TRUNCATE. | Has minimal logging. That’s why it’s much faster than DELETE. |
| Returns all deleted rows from a table. | Doesn’t return all deleted rows from a table. |
| Can remove records with foreign key constraints. | Cannot remove records with foreign key constraints. |
Here is the typical syntax for TRUNCATE in SQL:
TRUNCATE TABLE <table_name> Parameters:
- <table_name>: a table name you want to delete rows from.
Learn how to use SQL remove column (DROP COLUMN) statement efficiently.
Use DELETE query in dbForge Studio for SQL Server
Now let’s see how easily we can execute the DELETE query in dbForge Studio for SQL Server. Actually, the tool suggests three alternative ways to use the statement for removing data from a table.
Way 1 – Using the Code completion feature:
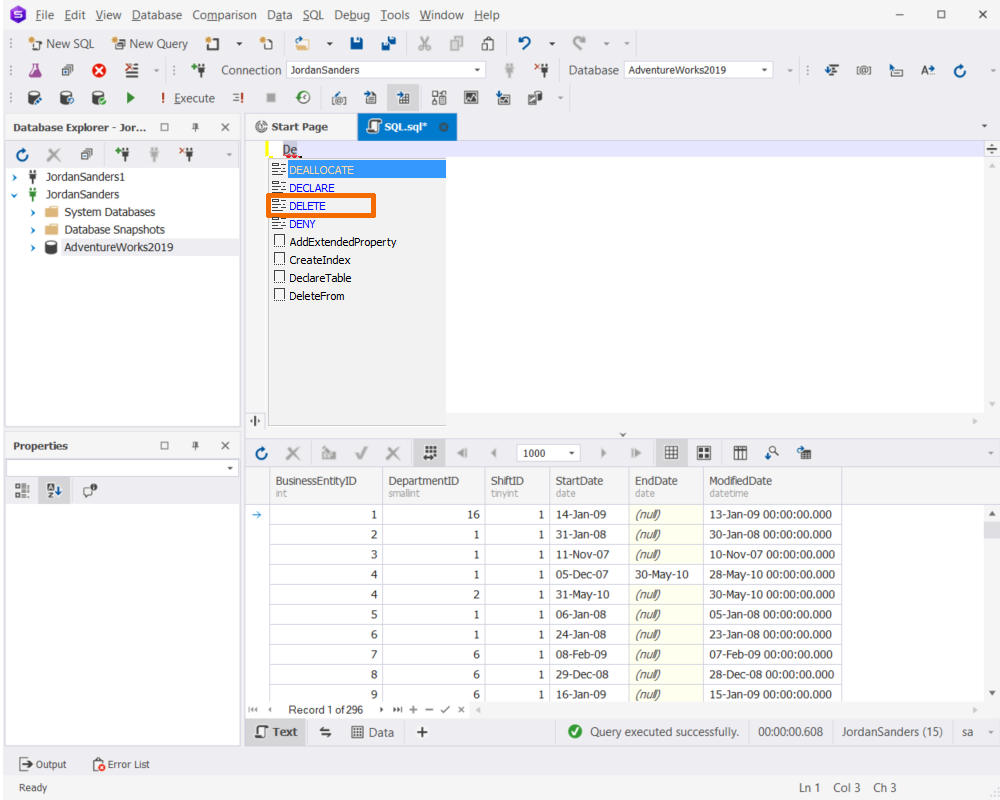
1. In the SQL Editor, start typing DELETE. The drop-down menu will appear.
2. Double-click DELETE:
3. Fill the query and click Execute on the standard toolbar.
Way 2 – Using the Code snippets functionality:
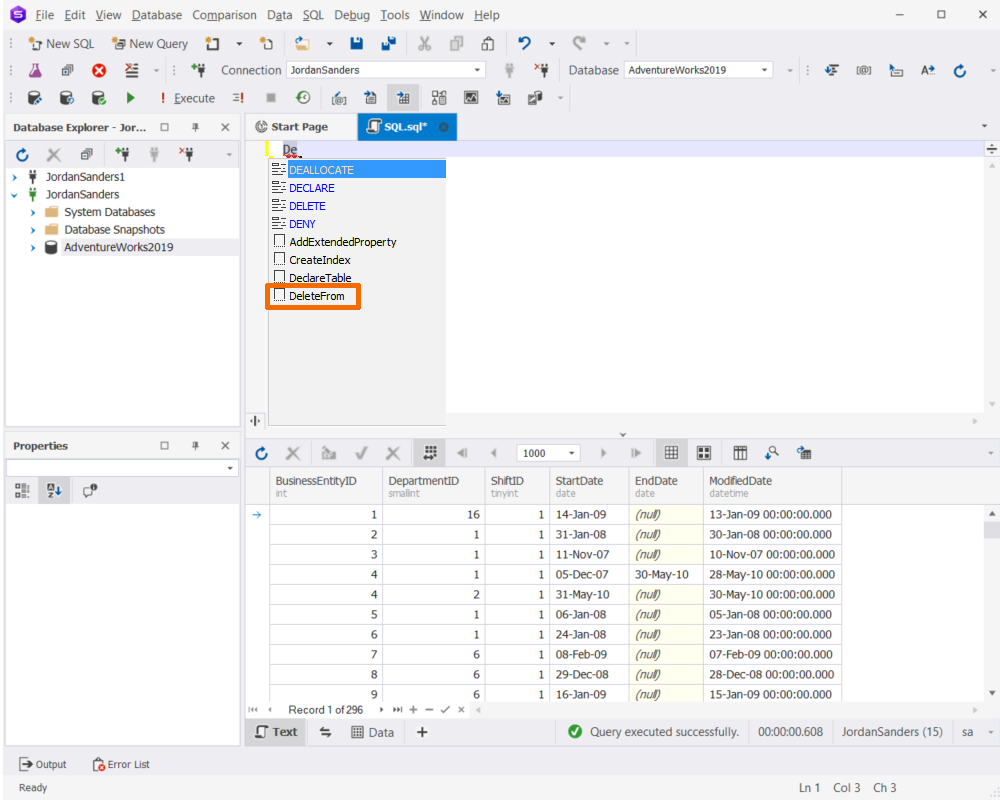
1. In the SQL Editor, start typing DELETE. The drop-down menu will appear.
2. Double-click DeleteFrom:
3. Just modify the query to match your requirements and click Execute on the standard toolbar.
Way 3 – Using the Generate Script As option:
1. In Database Explorer, right-click the necessary table and navigate to Generate Script As > DELETE > To New SQL Window:

2. In the open SQL document, adjust the query and click Execute on the standard toolbar.
Conclusion
We have demonstrated the most common use cases of the DELETE statement. As you can see, dbForge Studio for SQL Server lets you write SQL queries quickly, easily, and effectively. To test-drive the tool, download its 30-day trial version and check all its advanced features for yourself.