
One of the standout features of dbForge Studio is its ability to import data from various sources, including ODBC data. This significantly expands your capabilities, both for direct conversion of data stored on different platforms and for the convenient development of database-related objects such as ETL procedures, reports, and more.
By following this guide, you’ll learn how to effectively migrate your SQL Server database to MySQL, whether you’re dealing with a small dataset or a large, complex database structure. Moreover, this process will help you understand the intricacies of database migration.
Before we dive into the step-by-step process, let’s address some common questions about Microsoft SQL Server to MySQL migration:
Why migrate from SQL Server to MySQL?
You may choose to migrate from Microsoft SQL Server to MySQL due to cost considerations, open-source flexibility, or specific project requirements.
Is there a tool to migrate SQL Server to MySQL?
Yes, there are several SQL Server to MySQL migration tools available. In this guide, we’ll focus on using dbForge Studio for MySQL and ODBC drivers from Devart, which provide a powerful and flexible solution for your migration needs.
Can I use MySQL Workbench to migrate from SQL Server?
While MySQL Workbench does offer migration capabilities, the process we’ll describe using dbForge Studio for MySQL provides more control and flexibility, especially for complex migrations.
How do I migrate a Microsoft SQL Server database to MySQL?
The process involves setting up connections to both databases, selecting the data you want to migrate, and then using a tool like dbForge Studio to transfer the data. We’ll cover this in detail in the following sections.
Contents
- Prerequisites
- Connection setup
- Adding ODBC Driver for SQL Server
- Configuring ODBC Driver for SQL Server
- Importing data
- The one tool to rule them all: dbForge Edge
- Conclusion
Prerequisites
To follow this guide, you’ll need access to both SQL Server and MySQL databases. Also, you’ll need an ODBC driver to establish a connection with SQL Server. To ensure a smooth migration from SQL Server to MySQL, you’ll need to download and install the following tools:
- dbForge Edge – A multidatabase solution with SQL Server tools for queries, schema comparison, and reporting, plus full support for MySQL, MariaDB, Oracle, PostgreSQL, and other cloud databases. This comprehensive suite simplifies your workflow by providing a unified interface for multiple database management systems, making it ideal for developers who frequently work across different database platforms.
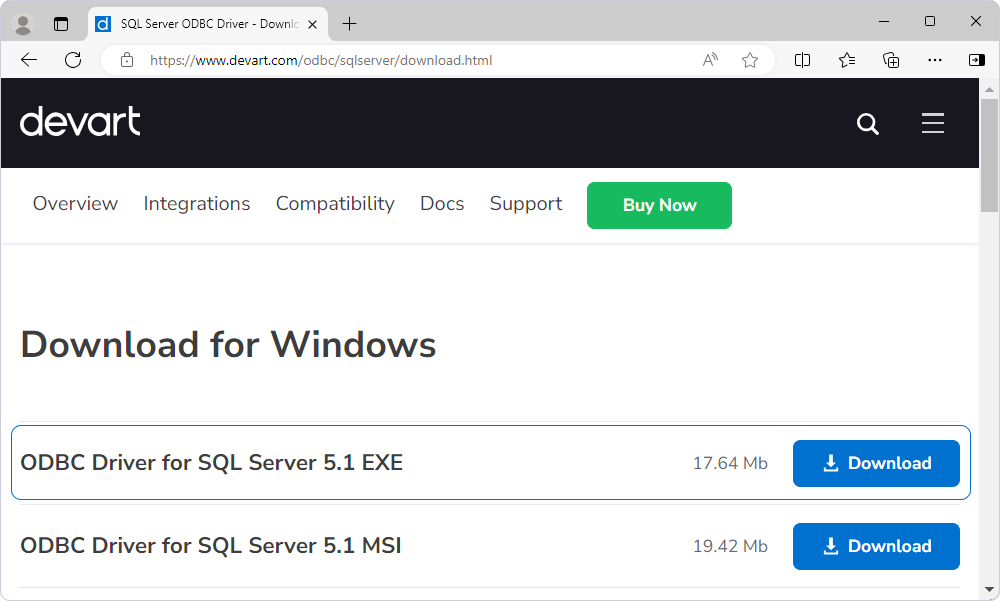
- Devart ODBC Driver for SQL Server – A high-performance tool that enables seamless connectivity between SQL Server databases and ODBC-compatible applications. It supports 32-bit and 64-bit Windows, macOS, and Linux systems, ensuring wide compatibility across various environments.
To install the ODBC Driver, follow the detailed instructions from our blog post How to Install and Configure ODBC Drivers on Windows. If you’re on macOS and haven’t installed MySQL yet, see our quick-start guide on installing MySQL on Mac using Homebrew or the native DMG installer.
By using these tools together, you’ll have everything you need to efficiently migrate your data from SQL Server to MySQL, with the added flexibility to work with a wide range of database systems in the future.
Connection setup
Before you start the migration process, you need to establish connections between your tools and databases. This setup involves three main components:
- The source SQL Server database (accessed through ODBC Driver for SQL Server).
- The Devart ODBC Driver for SQL Server.
- The destination MySQL database (accessed through dbForge Studio for MySQL which is part of dbForge Edge).
The connection setup is essential because it creates the bridge that allows data to flow from SQL Server to MySQL. Think of it as building a secure pipeline between two data reservoirs. If you’re using macOS and need a local SQL Server environment for testing or migration, check out our step-by-step guide on how to install SQL Server in Mac. It covers available options for running SQL Server in a macOS environment.
Devart offers a wide range of ODBC drivers, providing advantages over standard drivers.
The ODBC Driver for SQL Server will be crucial for this migration process. It’s available for multiple operating systems, but for this example, we’ll use the ODBC Driver for Windows.
Adding ODBC Driver for SQL Server
The first step is to set up the ODBC connection to your SQL Server database. This connection allows dbForge Studio for MySQL to communicate with SQL Server and retrieve the data you want to migrate.
Follow these steps to install ODBC Driver for SQL Server on Windows. After installing the driver, you need to add it to your Windows ODBC Data Sources. Here’s how:
1. Search for ODBC Data Sources (64-bit) in your Windows Search.
2. Select it in the search results to open ODBC Data Source Administrator (64-bit).
3. Select the System DSN tab.
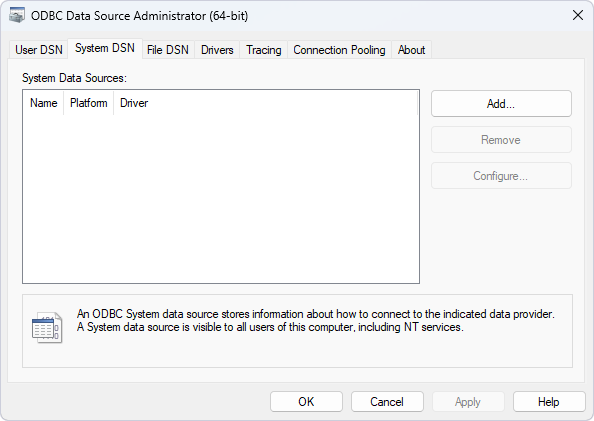
4. Click Add and select Devart ODBC Driver for SQL Server.
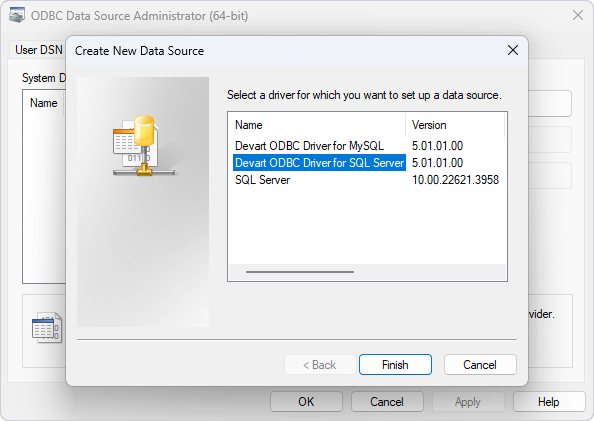
5. Click Finish.
Configuring ODBC Driver for SQL Server
Once you’ve added ODBC Driver for SQL Server, configure it by selecting Configure and entering:
- Data Source Name
- Server
- User ID
- Password
- The source SQL Server database you want to use for importing data to the target MySQL database
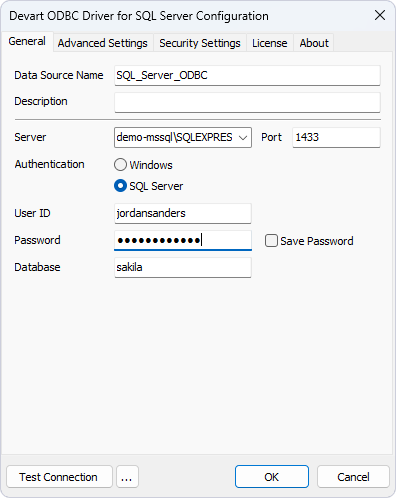
For convenience in selecting tables and displaying only the necessary data, you can specify a particular database when configuring ODBC Driver for SQL Server. In our example, we’re interested in the sakila database from SQL Server.
For detailed instructions on setting up the Driver, refer to our guide on How to Install and Configure ODBC Drivers on Windows. Additionally, you may find useful these detailed instructions in the Compare and sync data with a SQL ODBC Linked Server as the source documentation article.
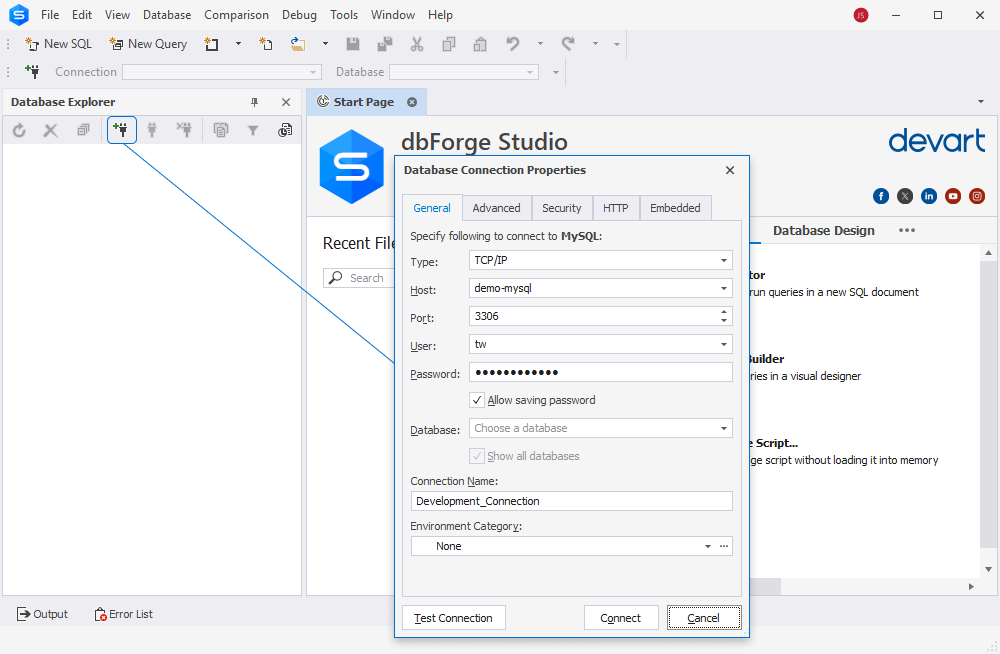
Once the ODBC connection is established, you need to set up the connection to your destination MySQL database within dbForge Studio for MySQL. This will be where you import your data from a SQL Server database.
By carefully setting up these connections, you ensure a smooth and efficient data migration process. Let’s move on to the next steps, where you’ll use these connections to import your data.
Importing data
When migrating data from SQL Server to MySQL, you have the flexibility to import into either a new database or an existing one. For this tutorial, we’ll create a new database for clarity and ease of management. Let’s walk through the process step by step using dbForge Studio for MySQL.
First, launch dbForge Studio for MySQL and connect to the database by entering:
- Host
- User
- Password
- Database
- Connection Name
To verify the available schemas, use the command SHOW DATABASES;—this MySQL show all databases command helps confirm connectivity and proper database creation.
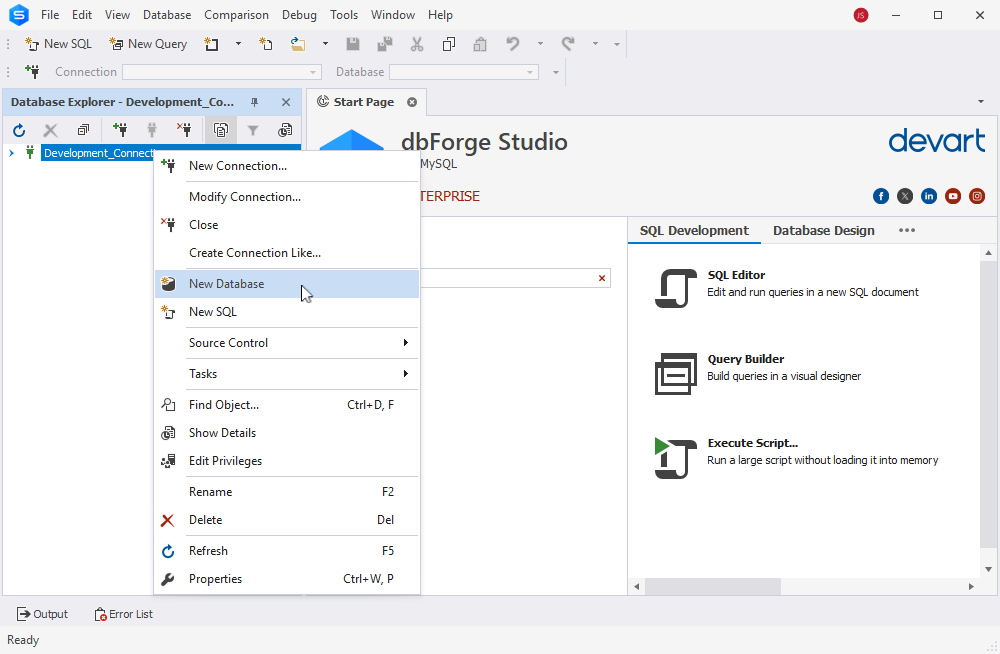
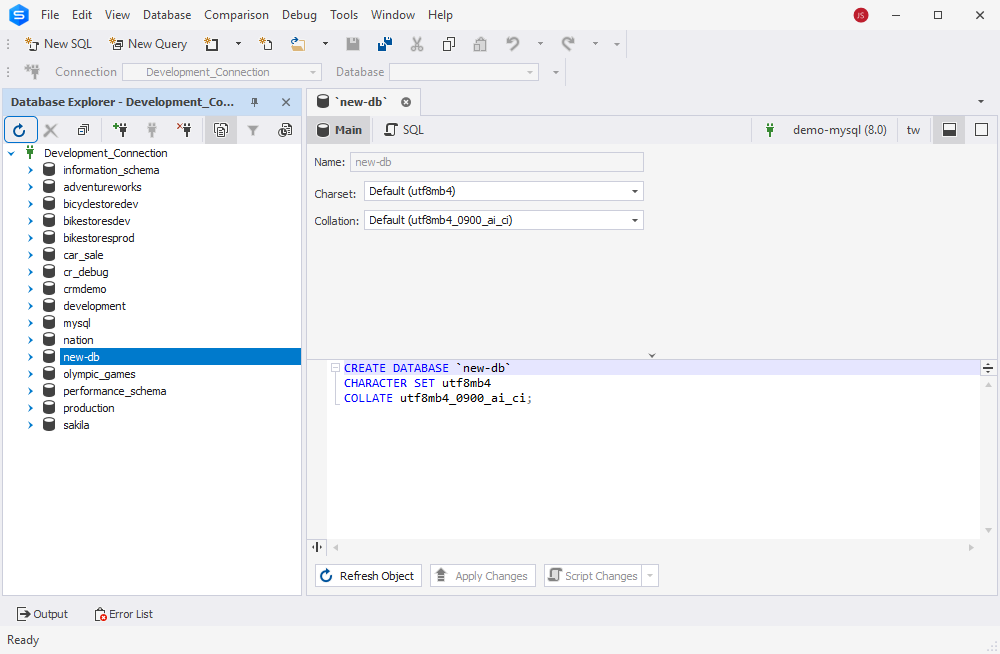
1. In dbForge Studio for MySQL, create a new database for the data you want to migrate from Microsoft SQL Server:
1.1 In Database Explorer, right-click your connection.
1.2 Select New Database.
2. Enter a name for your new database and click Apply Changes.
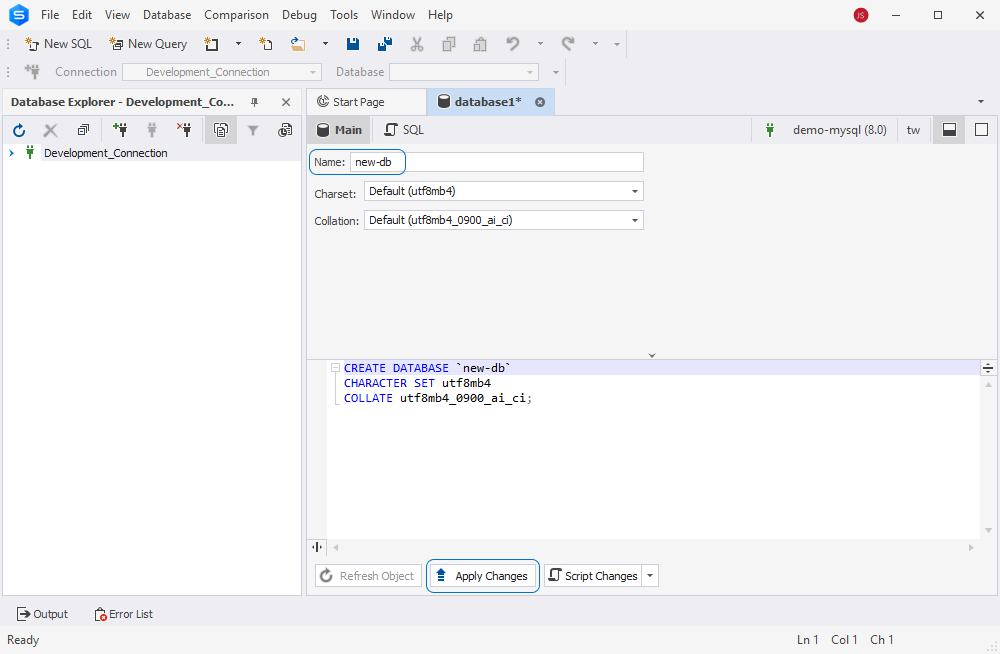
3. In Database Explorer, expand the list of databases under your connection.
4. Click the Refresh button. Your newly created database appears in the list of databases.
Once connected, you can run simple SQL commands like SHOW TABLES; to show all tables in MySQL and confirm that the migration was successful.
Selecting data import source
With your new database selected, initiate the import process:
1. Right-click the selected database and go to Tasks > Import Data.
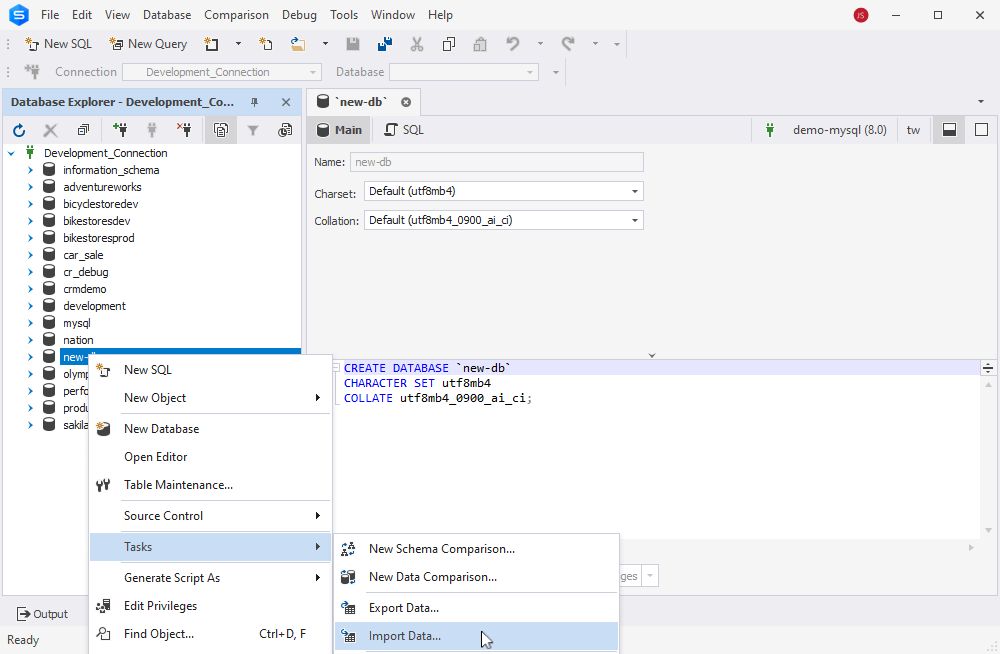
2. Select ODBC to import from an ODBC data source and click Next.
Note that for the configured ODBC source to appear in the list, it must be set up as a 64-bit ODBC. For more information, see How to Install and Configure ODBC Drivers on Windows.
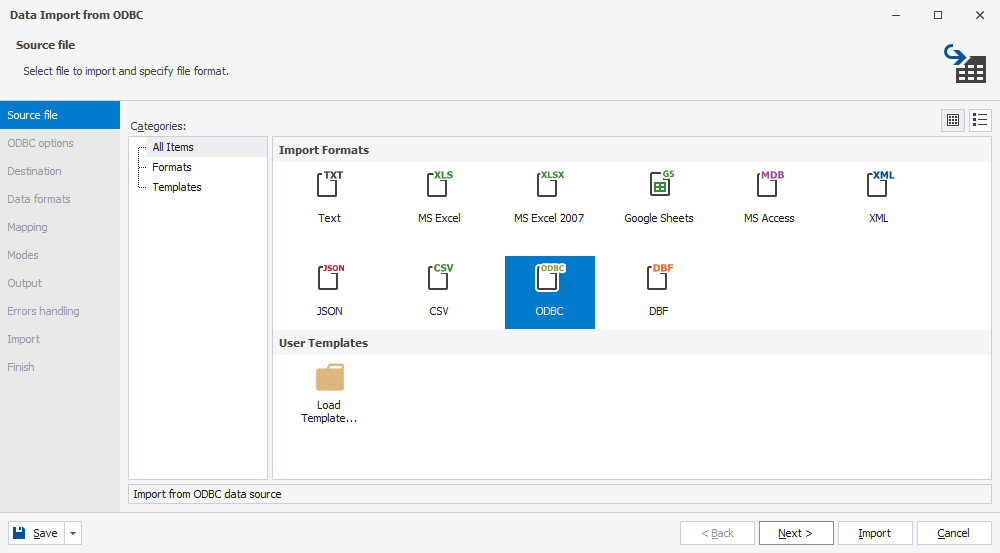
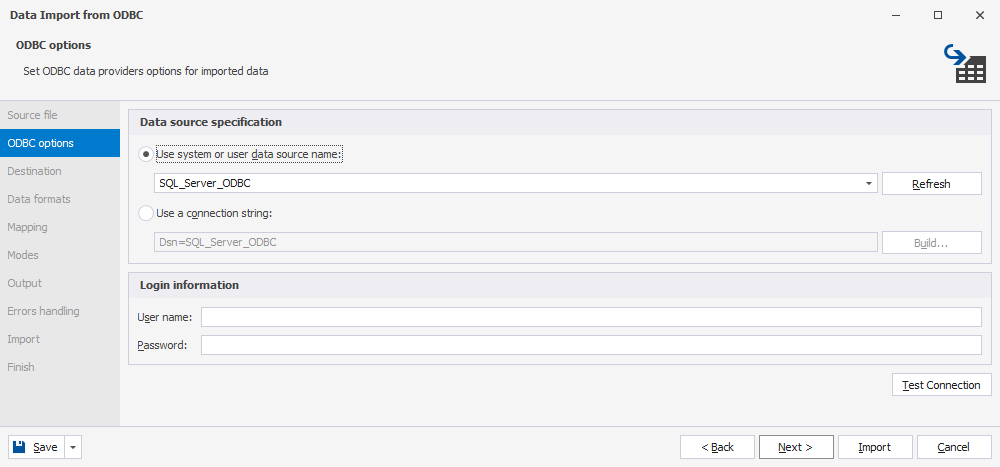
3. Select the configured ODBC source for a SQL Server database from the dropdown list and click Next.
Selecting SQL Server tables
For convenience in selecting tables and displaying only the necessary data, we specified a particular database when configuring ODBC Driver for SQL Server. In our example, we’re interested in the sakila database from SQL Server.
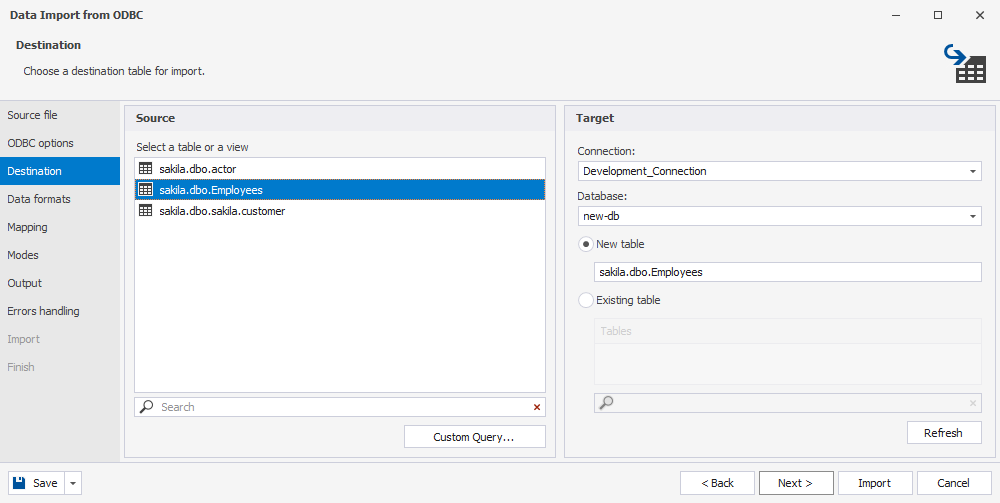
In the Source list, you’ll see all the available tables from your SQL Server database. These are your source tables. Here’s how to proceed:
- Browse through the list of SQL Server tables.
- Select the tables you want to import into your new MySQL database.
- In the Target pane, specify the new MySQL database and the location where you intend to migrate the data.
You have two options for importing data:
- Import into existing MySQL tables.
- Create new tables in MySQL to receive the data.
For this example, create new tables in the MySQL database to match your source SQL Server tables.
Note that dbForge Studio for MySQL provides additional flexibility at this stage. Use the Custom Query button to:
- Apply custom SQL queries to filter or transform data during import. This is useful if you need to import only specific fields or rows from a source table.
- Preview the data before import to ensure you’re selecting the correct tables and data.
Next, configure the data formats.
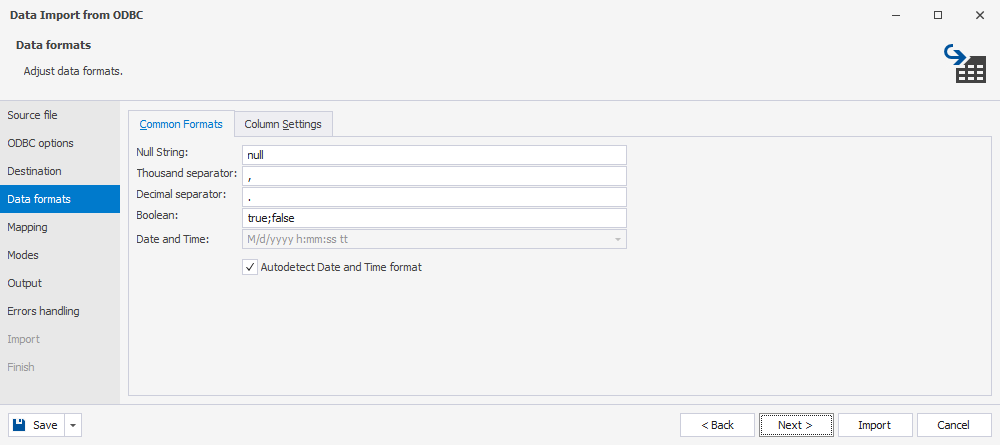
Configuring data formats for new MySQL tables
After selecting your tables, you’ll need to configure the data formats for the new MySQL tables. dbForge Studio for MySQL will suggest appropriate MySQL data formats based on the SQL Server table structure, but you may need to review and adjust these to ensure compatibility.
You can enter Common Formats:
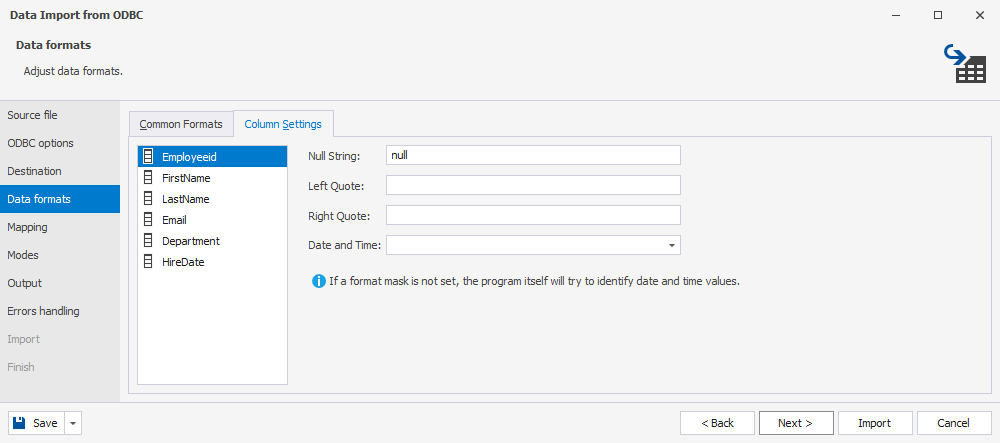
In the Column Settings tab, configure formats for each column:
Mapping data in tables
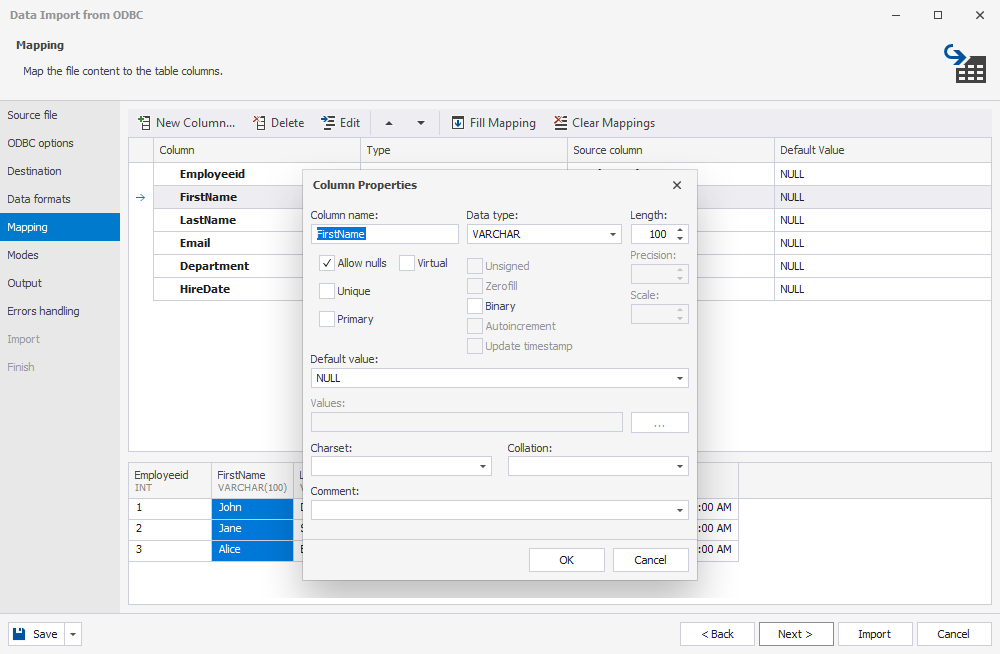
On the Mapping page, the Data Import wizard automatically maps the columns with the same names. If they are different, you’ll have to map them manually. Since we’re migrating the data to a new table, the Data Import wizard automatically creates and maps all the columns.
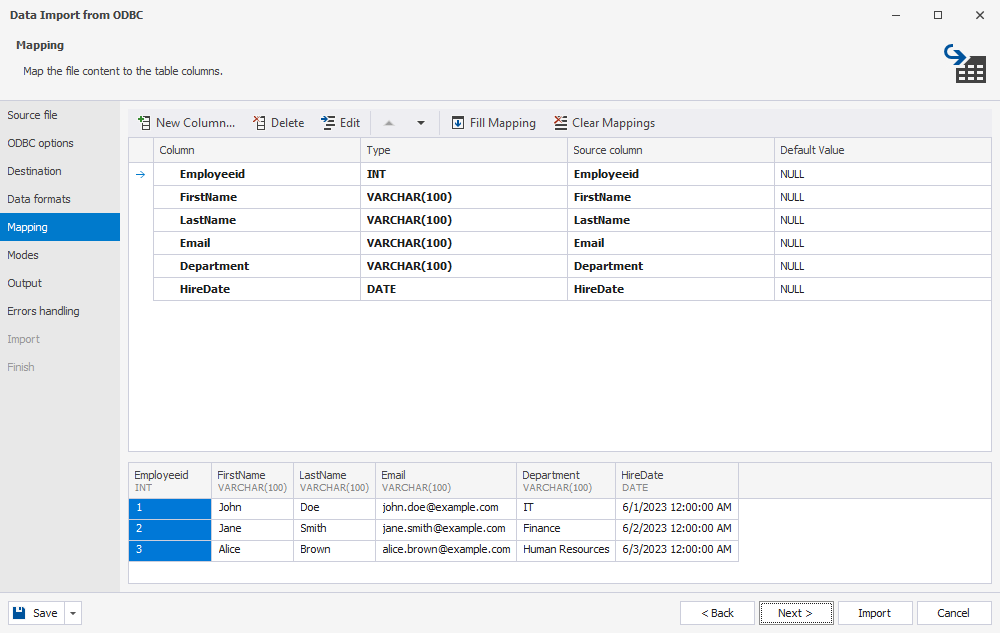
On this page, you can also view the mapped columns with the assigned data types and preview the table with the data to be imported.
If you want to modify the data type, double-click the required column. In the Column Properties window that opens, choose the required data type and click OK to save the changes.
Configuring data import settings
When the data types are mapped, you can specify the import mode on the Modes page, which will define how the data will be imported. If you migrate data to a new table, only the Append mode will be available.
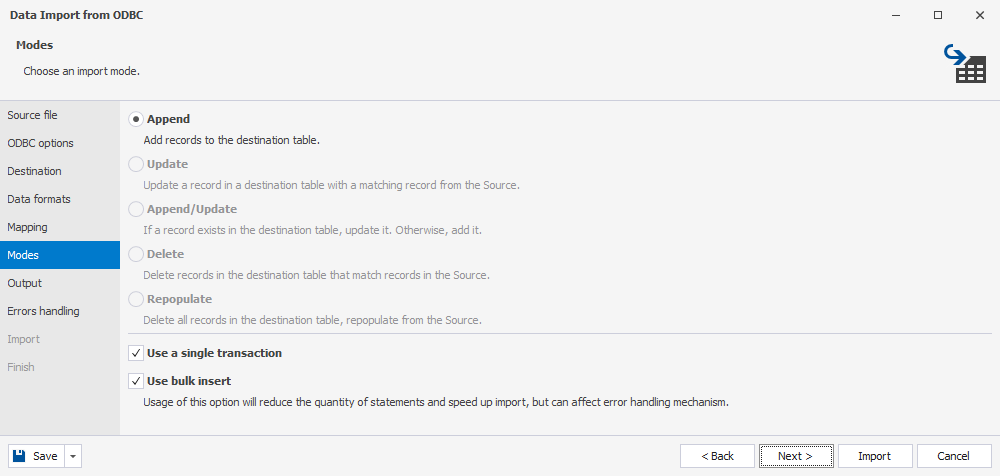
However, when you transfer data to an existing table, you can choose one of the following modes to import data:
- Append, which adds records to the target table.
- Update, which updates a record in the target table with a matching record from the source table.
- Append/Update, which updates a record if it exists in the target table; otherwise, it adds a record.
- Delete, which deletes records in the target table that match records in the source table.
- Repopulate, which deletes all records in the target table and repopulates them from the source.
Generating SQL scripts with data import
The Data Import wizard allows you to load data into the database,and to generate SQL scripts with data (without making changes to the database). dbForge Studio also includes a built-in SQL query formatter to help clean up and standardize your migration scripts before execution or export. This feature is convenient for complex compilation of data loading from multiple tables or different databases.
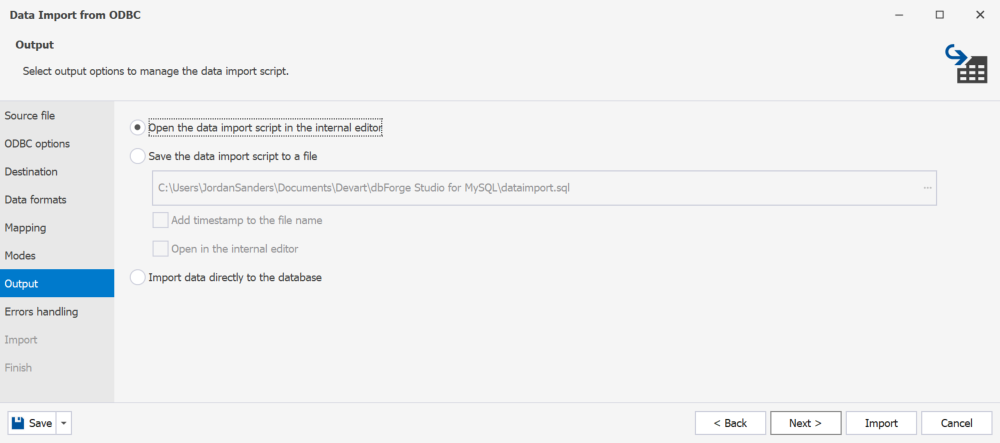
On the Output page of the wizard, there are three options to populate the table with data:
- Open the data import script in the internal editor: After the data import is complete, the tool will open the script generated for data migration in the editor, which you can view, edit, or save for later use.
- Save the data import script to a file: This option will save the generated script to a specified folder. Here you can also add date and time to the file name or open the script in the internal editor after the data import is ended.
- Import data directly to the database: The target table gets populated directly with data from the source table.
Select one of the options and click Next to configure how you want to handle errors:
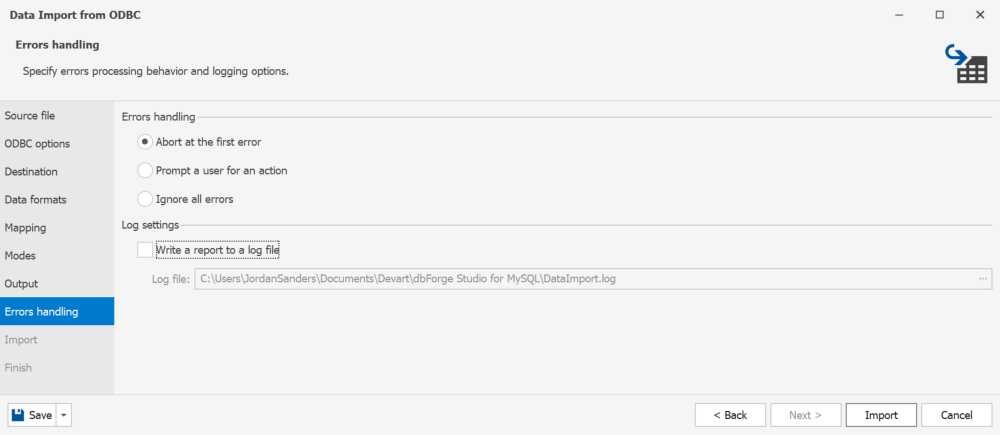
That’s it. Now you can click Import to start the migration. When the data import is over, you’ll see the result, including the number of errors and warnings that might occur and the number of rows imported into the table. Click Finish to close the wizard.
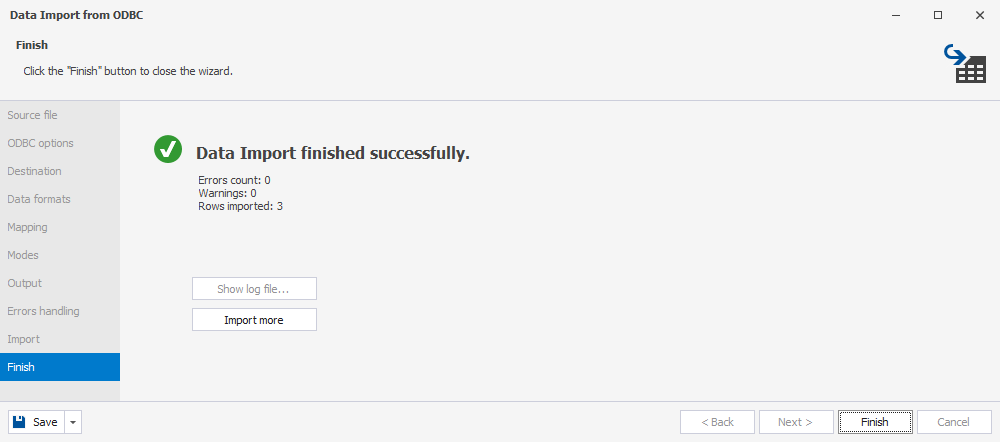
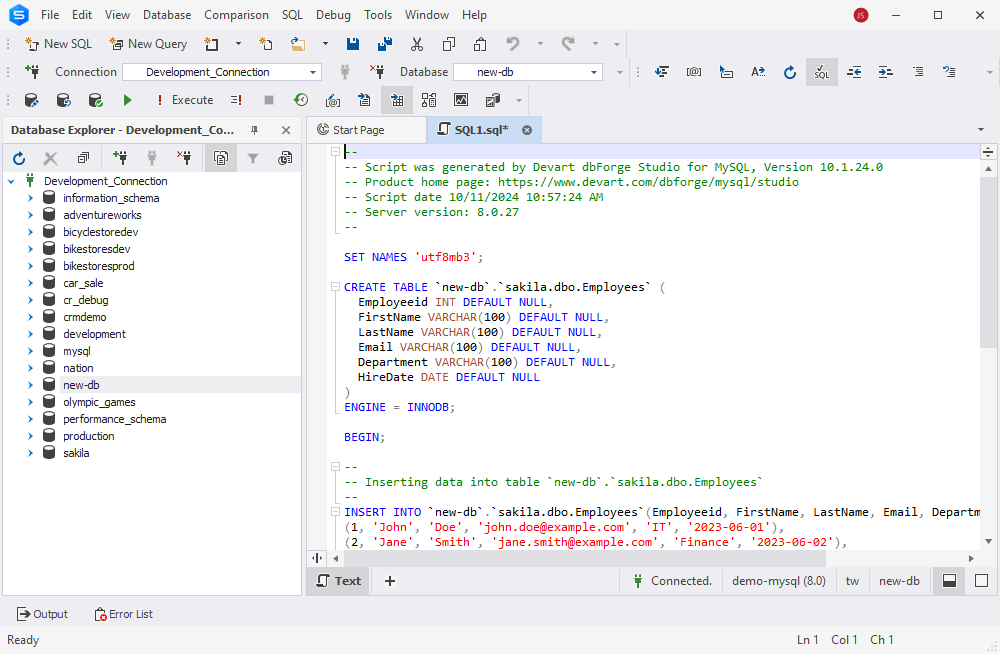
After completing the migration process, dbForge Studio for MySQL generates an SQL script that represents the structure and data of your migrated table.
In the Data Import wizard, click Import more to migrate other tables from the selected SQL Server database. Repeat these steps for other tables as needed.
See also: How to Import an SQL File Into MariaDB
The one solution to rule them all: dbForge Edge
dbForge Edge is the master key that unlocks the full potential of all four dbForge Studios: for SQL Server, MySQL, Oracle, and PostgreSQL. When you install dbForge Edge, this multidatabase solution uses one setup wizard to install all these Studios at one time or select individual Studios, for example, dbForge Studio for SQL Server and dbForge Studio for MySQL.
With dbForge Edge, you get the Swiss Army knife of database management, providing a unified experience across various database platforms. Whether you’re migrating data from SQL Server to MySQL, as we’ve discussed in this article, or working with Oracle and PostgreSQL, dbForge Edge is your trusty companion on the journey.
Conclusion
In conclusion, the combination of the Devart ODBC Driver and dbForge Studio, one of the most advanced database tools for MySQL, offers a highly flexible migration solution. Thanks to the rich functionality of the Data Import wizard, everything can be thoroughly tested and debugged. The functionality allows not only direct data transfer/import but also the preparation of templates for SQL scripts.
For an even more comprehensive solution, consider dbForge Edge. This powerful suite combines four specialized tools: dbForge Studio for MySQL, SQL Server, Oracle, and PostgreSQL. Experience the full range of features with a 30-day free trial. It’s an ideal solution if you’re exploring free SQL software options before committing to a commercial license. Give it a try today and streamline your database management across multiple platforms!