This article explains how to establish an SSL connection to MySQL from Delphi with UniDAC and SecureBridge.
UniDAC has had MySQL SSL (using certificates) connection support for years. Earliest I remember is as early as 5.0.1 version released on year 2013.
During years, requirements and connection methods evolved. So does UniDAC. However, some requirements are so specific that they are not easy to “unify” among all database specific features. Devart for that reason has separate solutions for some specific needs. Devart’s SecureBridge Delphi components are such a solution which you can use to establish SSL/SSH connections to MySQL databases from Delphi without any need for an external library or software. We all know widely used OpenSSL is using external DLL files.
In this article, you will see a demonstration of how to use these two products – UniDAC and SecureBridge – for establishing SSL connections to a MySQL database.
MySQL is a commercial product provided by Oracle at the time of writing this article. There is community (GPL) downloads. On the other hand, there is almost identical MariaDB which is a fork from latest freely available MySQL source codes before Oracle changed MySQL to a commercial product. This article will be using MariaDB in its examples as this is the new distribution spreading fast and widely available in recent Linux distributions. However, most people still refer/call MariaDB as MySQL. I will be one of them and call “MySQL” instead of MariaDB throughout the article.
Please note that this article does not include instructions for installing any flavor of MySQL server, modifying MySQL configuration files, or installing OpenSSL (it is included by default on most existing systems, yet there are some systems like Windows which do not contain it by default) or other SSL libraries that MySQL supports.
This article also assumes that SecureBridge and UniDAC are already installed and ready to use with Delphi edition you have. This article will be using the following versions:
- Debian v10.4 Linux distribution
- MariaDB v10.3.22
- Delphi v10.3.3
- UniDAC v8.1.3
- SecureBridge v9.2.4
Preparing MySQL for SSL Connection
If your server runs on a Virtual Private Server (VPS) or is already installed by an admin, you can skip this section and go directly to the section on preparing UniDAC for using with SecureBridge.
Although I wanted to include detailed instructions on setting up a MySQL SSL connection in here, I find it will be repeating almost identical instructions already existing on the Internet. Instead, I just point you to the FAQ for setting up your own MySQL server for SSL connection.
Even if you precisely follow everything as explained in the FAQ above, at some point you may encounter an error in your /var/log/mysql/error.log file as below:
SSL error: Unable to get private key from ‘/etc/mysql/ssl/server-key.pem’
By default, OpenSSL on Linux systems creates certain PEM files (key files) with file permission 600 (only readable by owner). MySQL fails to read them on startup due to file permission restrictions. In order to fix this error, you must change your certificate file permissions using a shell command as following:
root@debian:~# chmod 644 /etc/mysql/ssl/*
Other than this, provided FAQ is verbose and helps you to setup MySQL for SSL enabled connections.
Preparing UniDAC for Using with SecureBridge
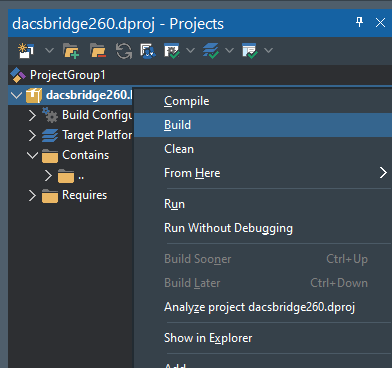
UniDAC installation automatically registers database components in Delphi. However, it does not automatically register everything it installs. This is because some of these components are specific. For example, using UniDAC with SecureBridge requires the TCRSSLIOHandler component. The component’s source code and installation packages are installed by default in your user’s Document directory. On my system, the installation paths are:
“C:\Users\Ertan\Documents\Devart\UniDAC for RAD Studio 10.3\Demos\TechnologySpecific\SecureBridge\Delphi26\dacsbridge260.dpk”
“C:\Users\Ertan\Documents\Devart\UniDAC for RAD Studio 10.3\Demos\TechnologySpecific\SecureBridge\Delphi26\dcldacsbridge260.dpk”
The first file above is run-time and the second one is a design-time package. You need to open these files in given order using Delphi and build them one by one. For the second package, you also need to do the installation after compiling. That compiling and installing can be done using Projects on the top right of the Delphi default screen layout. Please note that the “Install” option is not displayed on the popup menu for the run-time package. You are going to have only Compile and Build for that package.
You will most likely need to start Delphi using “Run as Administrator” before you can actually build and install the above packages. That is because UniDAC is installed by default in the “C:\Program Files (x86)\Devart\UniDAC for RAD Studio 10.3” directory where only an application with Administrator rights can modify files.
To make the TCRSSHIOHandler and TCRSSLIOHandler components work on Windows x64, macOS, iOS simulator, iOS device, Android, and 64-bit Linux, a run-time package must be compiled for each of these platforms (can be selected in “Target Platforms” of the project package).
Preparing Your Project for MySQL SSL Connection over SecureBridge
You will be needing certificate files for your SSL connection to MySQL server. If you are using self-signed certificate files you should have generated them while preparing MySQL for SSL connection. If you have paid certificates from certificate authorities, these files are likely provided to you for download or by email.
You must know the certificate where these certificate files are located on your disk.
Run Delphi normally and place the following components on the form/data module:
- TUniConnection
- TMySQLUniProvider
- TCRSSLOIHandler
- TScFileStorage
Your use case may vary and you can change TScFileStorage to TScMemoryStorage or TScRegStorage. Even though this article uses TScFileStorage, provided code samples apply to all these components. It is enough just to change the component name in the provided code examples.
Setup UniConnection1 so that it is ready to connect to your MySQL server directly (without SSL). You just have to set SpecificOptions.Protocol to mpSSL for initiating a secure connection. If that specific option is not set, the connection will be a regular plain connection so it is important to remember turning it on. Then, components must be connected to each other in the order as below.
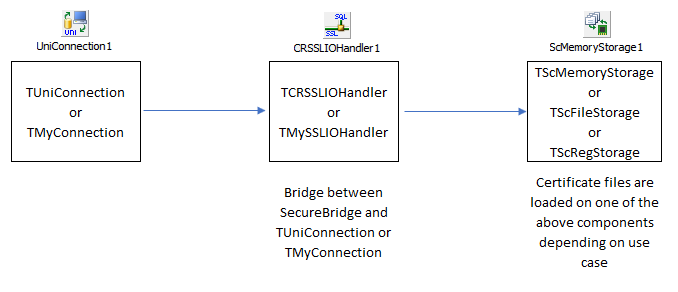
UniConnection1.IOHandler -> CRSSLIOHandler1
CRSSLIOHandler1.Storage -> ScFileStorage1
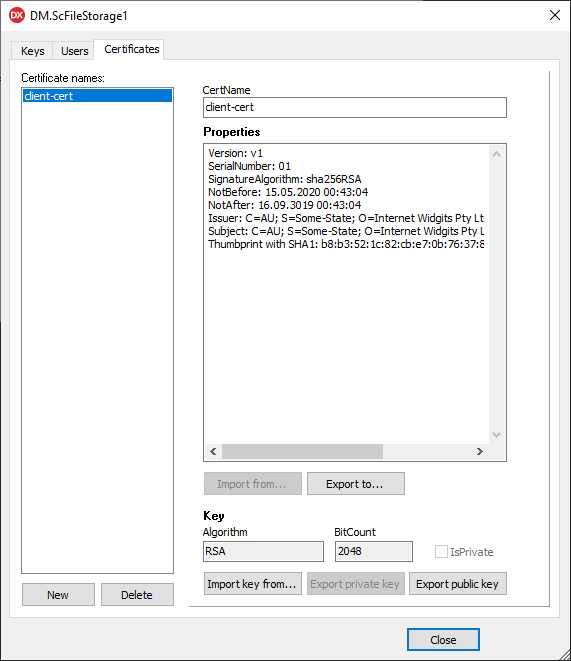
Now, we must load our certificate files to the ScFileStorage1 component. In order to do that you should follow the steps:
- Double-click ScFileStorage1.
- Switch to the Certificates tab in the window that appears.
- Click the New button.
- Type ca-cert in CertName and click the Import from… button.
- Select your CA certificate file from your file system.
- Click the New button.
- Type client-cert in CertName and click the Import from… button.
- Select your client certificate file from your file system.
Please note that some SSL connections may not require you to provide a CA certificate and you may not have a CA certificate at all. In that case, it is fine not to load any CA certificate at all.
In my case, I did not need any CA certificate and after I loaded my client certificate, the above-mentioned window looked like the following.
Now, you can click the Close button and select the CRSSLIOHandler1 component. Using Object Inspector, set CertName to “client-cert” and if you have a CA certificate also set CACertName to “ca-cert”. Lastly, set SecurityOptions.TrustServerCertificate to True. This last part is especially important if you are not using a paid certificate from trusted certificate authorities which can be checked online for validity. This online validity check is common for all kinds of certificates.
Finally, we should set UniConnection1.Options.KeepDesignConnected to False. That is required for loading the run-time certificate key file before trying to establish a connection.
At this point we finished setting our design time parameters. Now, we need to load the key file (certificate key) during run-time.
You must load the certificate key file before you try to establish a connection to your server. I choose to do that on my DataModule.OnCreate() using the following code:
procedure TDM.DataModuleCreate(Sender: TObject);
var
  Cert: TScCertificate;
begin
  Cert := ScFileStorage1.Certificates.FindCertificate('client-cert');
  if Cert <> nil then
  begin
    Cert.Key.ImportFrom('C:\Users\Ertan\Desktop\mysql sertifikalar\client-key.pem');
    UniConnection1.Open();
    UniQuery1.Open();
  end;
end;
The above code first looks for “client-cert” named certificate in the ScFileStorage1 component and if found, imports the client certificate key file from the disk file.
At this point we are ready to establish an SSL connection to our MySQL server. We do that by simply calling the Open method.
Uniconnection1.Open();
Finally, we open a query which actually is to check if we actually have an SSL connection to our server. It can be done by using the SQL LIKE operator.
SHOW STATUS LIKE ‘Ssl_cipher’;
The above SQL will show us active SSL ciphers in our connection. This query returns an empty value if the connection is not secure. Otherwise, you are provided with details of the secure connection which is actually defined by certificate files.
Please note that CRSSLIOHandler1 has the CipherSuite and Protocols properties which help you to turn on/off them if you have such a need. By default, almost all commonly used ciphers are turned on and all of the Protocols are turned on. Most of the times, you will not be having a need to modify these properties. It is just additional information to let you know that SecureBridge has such detailed fine-tuning capabilities.
Now you can run your Delphi application and see if you actually have an SSL connection to your MySQL server. In my case, I got the below screen.
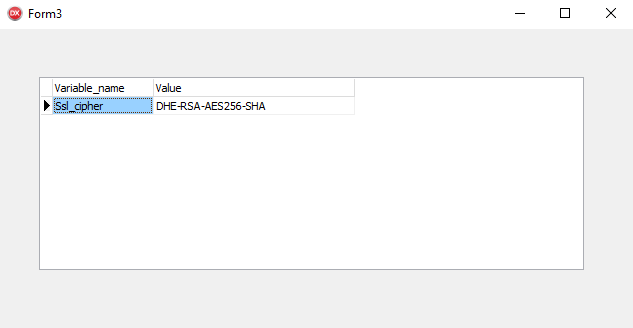
The query result in the above figure tells us that we have a secure connection to the server using DHE-RSA-AES256-SHA. If for any reason we have a regular, plain connection to the server, the value column would be empty. This is MySQL way to identify secure connections.
If you would like to know details of what value column data in the result means, each dash separates a method. Further details of each method can be read on Wikipedia: DHA, RSA, AES256, SHA.
Further Details About SecureBridge
SecureBridge is a tool that allows you to distribute just your EXE file. It does not depend on any external DLL or software. As such, you can easily use it in your FMX applications targeting Android or iOS.
SecureBridge allows you to load certificate files not directly from a disk file, but, for example, from a stream like a resource. It is also possible to have encrypted constant data in your source code. Decrypt it at run-time and load that certificate & key files at run-time. Such an edge case might very well be a requirement from a customer who has their own security requirements. I have received such an edge case for my part.
It is possible for you to use TUniConnection.SpecificOptions for providing on disk certificate file information. For that, perform the steps:
- Set the property CRSSLIOHandler1.Storage to nil (delete what is written in that property in Object Inspector);
- UniConnection1.SpecificOptions.Values[‘SSLOptions.SSLCACert’] := ‘Disk file full name’;
- UniConnection1.SpecificOptions.Values[‘SSLOptions.SSLCert’] := ‘Disk file full name’;
- UniConnection1.SpecificOptions.Values[‘SSLOptions.SSLKey’] := ‘Disk file full name’;
- Set the property UniConnection1.IOHandler to CRSSLIOHandler1 ;
- Set the property CRSSLIOHandler1.Storage to nil (delete what is written in that property in Object Inspector) ;
- Set the property CRSSLIOHandler1.CACertName to nil (delete what is written in that property in Object Inspector) ;
- Set the property CRSSLIOHandler1.CertName to nil (delete what is written in that property in Object Inspector).