Summary
This article elaborates on the HTTP Tunneling connection method and explains how to configure it by means of dbForge Studio for MySQL.
Introducing HTTP Tunneling
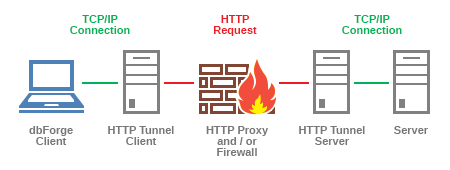
HTTP tunneling is a method of connecting to a MySQL Server through HTTP protocol and via the port that is used by a web server. The method may come in useful when a direct connection to MySQL Server, that utilizes port 3306, is problematic for certain reasons, e.g. it is closed by security reasons, or firewall blocks access from all network protocols, except HTTP. Since port 80, that is used by web server, cannot be blocked, HTTP tunneling seems to be the ultimate technique to solve a range of MySQL connection issues.
The HTTP tunneling mechanism, established in dbForge Studio for MySQL, includes the following stages:
- dbForge Studio for MySQL sends data as encrypted requests through HTTP protocol to a web server with PHP 5 support where the tunnel.php script is located.
- The script decrypts the requests and sends data to the MySQL Server.
- When the script receives data from the MySQL Server, it transforms it into encrypted requests and sends them back to dbForge Studio.
Therefore, to start using HTTP tunneling, two principal actions must be undertaken:
- Uploading the Tunneling script.
- Setting up HTTP tunneling.
Uploading the Tunneling script
- In Windows Explorer, and type the following in the address line: ftp://web_server_name|ip address:port/. This will move you to the folders on the web server.
- Enter the login information, if required.
- Locate the tunnel.php script in the \Program Files\Installed Provider folder\dbForge Studio for MySQL\ folder (it is provided along with a distribution package of dbForge Studio for MySQL) and upload it to the required folder on the web server.
Setting Up HTTP Tunneling
When the tunneling script is uploaded, set up HTTP tunneling to connect to the database.
To set up HTTP tunnel:
-
- On the Database Explorer toolbar, click the New Connection button. The Database Connection Properties dialog box opens.
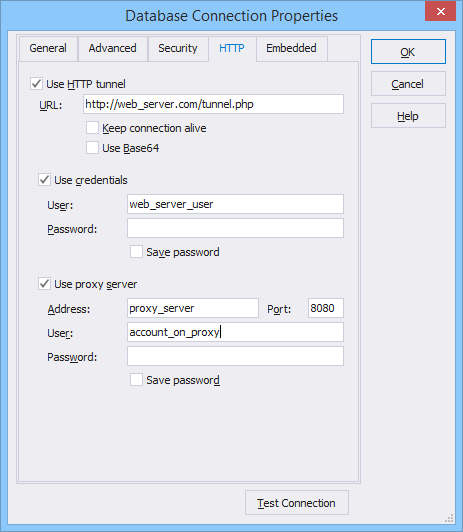
- Switch to the HTTP tab and select Use HTTP tunnel.
- Enter the URL of the tunnel.php script uploaded to the web server. Note, if the web server is located on the port different from default 80, you should enter an URL like this: http://_web_server_name:port/script_location.
- Select Keep connection alive to make the web server preserve the created connection open between requests.
-
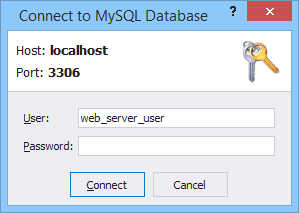
- (Optional) Select Save password, otherwise while opening the connection, the Connect to MySQL Database dialog box will appear and dbForge Studio will ask you to enter the password again.
- If you can not access the web server directly, but only through a proxy server, select Use Proxy and specify proxy settings.
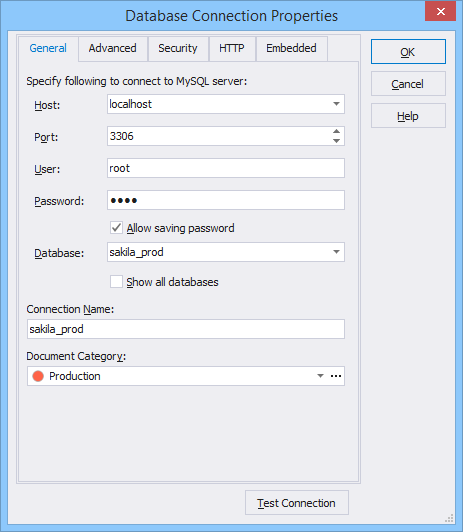
- On the General tab set login information required to connect to the MySQL Server. Specify the following:
Host — the host name of the remote MySQL Server located on the web server.
Port — the TCP/IP port to connect to the remote MySQL Server. By default, it is 3306.User – the name of the user account on the remote MySQL Server.
Password — the password of the user account on the remote MySQL Server
- If the tunneling script is located on the password-protected server, select Use Credentials and input login information (user, password) required to connect to the web server.
- Specify the default database of the MySQL Server. To see all available databases in Database Explorer, select Show all databases, otherwise you will see only the selected one.
- (Optional) To test the created connection, click the Test Connection button.
- Click OK to establish the database connection.
Tip: To see a more appropriate name for the created connection in Database Explorer, change the default connection name. By default, the generated name looks like this: <selected database>.<MySQL Server host>.
Conclusion
With the HTTP tunneling mechanism, implemented in dbForge Studio for MySQL, you can solve a range of MySQL connection issues when direct connection is not an option to use.
In addition to HTTP tunneling technique support, dbForge Studio for MySQL also has broad compatibility and connectivity options, which you can find here.


