
With the help of dbForge Source Control tool that comes as an add-in for Microsoft SQL Server Management Studio and is included in dbForge Studio for SQL Server, you can quickly connect databases you’re working on to your version control system of choice and easily switch between different branches.
This can significantly speed up the database development process by allowing you to version-control the changes in your data and table structure right from SSMS or our IDE. As it is often necessary to work with a few branches in parallel or in close succession, let’s take a look at how this can be done with the help of the dbForge Source Control add-in for SSMS.
How Source Control implements interaction with multiple branches
Source Control is used as a client for your chosen version control system. In this article, we provide a worked example of how to quickly connect a database to Git and easily switch between branches with the help of dbForge Source Control. With the tool, you can connect a database to a specific repository retrieved by connecting to a version control system and then select a branch in this repository. After the database is linked to a target repository, you will be able to commit changes to the current repository branch, pull the latest commits from the remote repository, and view change history for any file from this database – all of this can be done right in Microsoft SQL Server Management Studio.
However, you will not be able to create new branches and delete obsolete ones using Source Control. Instead, this should still be done using the standard version control system commands in the command line or through a dedicated app of your preferred VCS.
Linking a database to a version control system
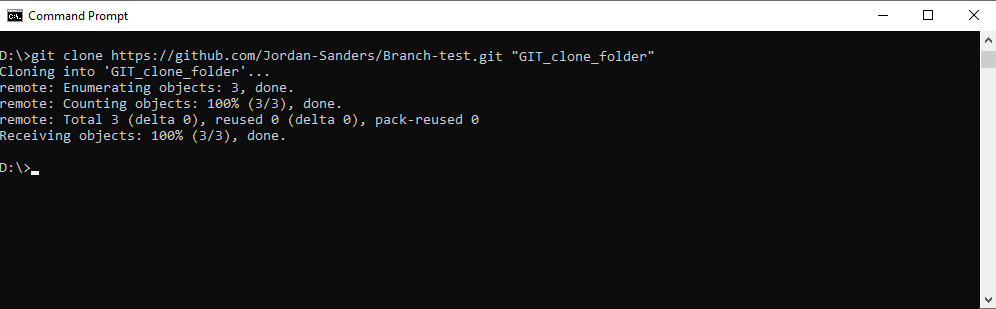
If you want to link a database to a new branch, you will first need to clone the remote repository to a local folder. One of the ways to do this is by installing Git and using standard Git console commands:
- Create a folder in which you would like to store the local copy of the repository
- Open the command line and execute the following command:
git clone https://remote_repository_url “local_repository_folder”
Here, you need to replace https://remote_repository_url with the actual URL of your target repository and local_repository_folder with the full path to the folder you created in the previous step.
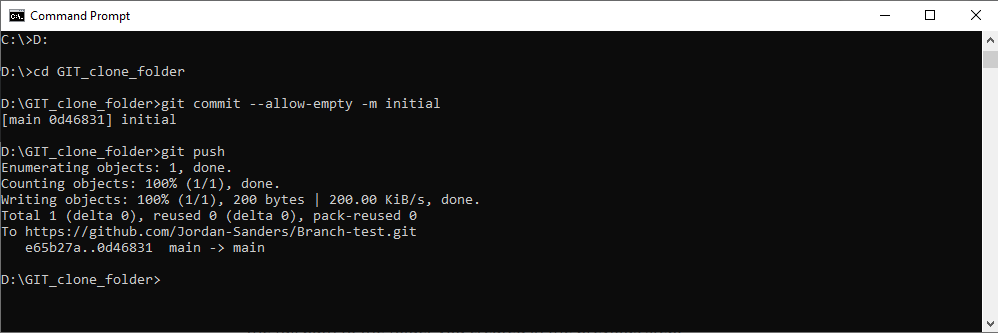
Note: If you have not initialized the repository while creating it in the Git account, execute the following commands after cloning the repository:
git commit --allow-empty -m initial
git push
If the process is successful, you will see an output similar to the following in the command line:
After cloning the repository, you can link a database to a version control system using Source Control.
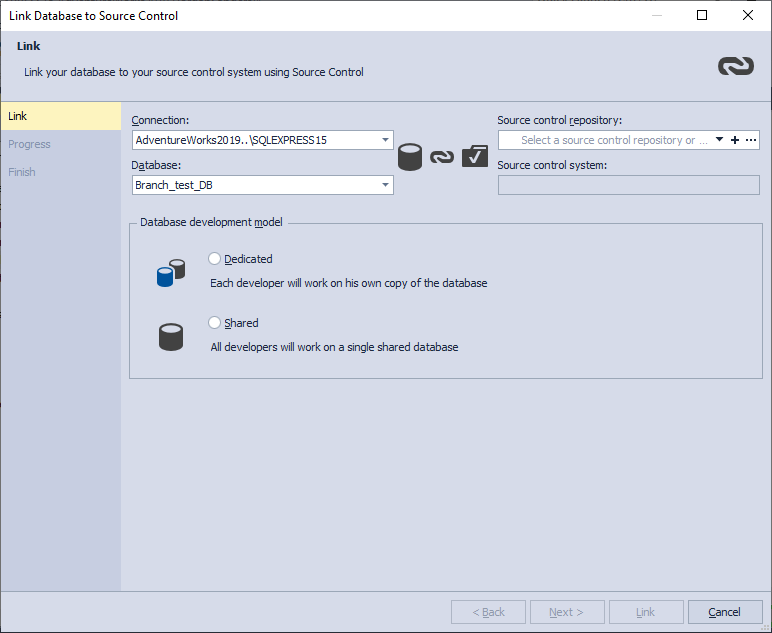
For demo purposes, we are going to link the database to the Git source control system with the dedicated database development model.
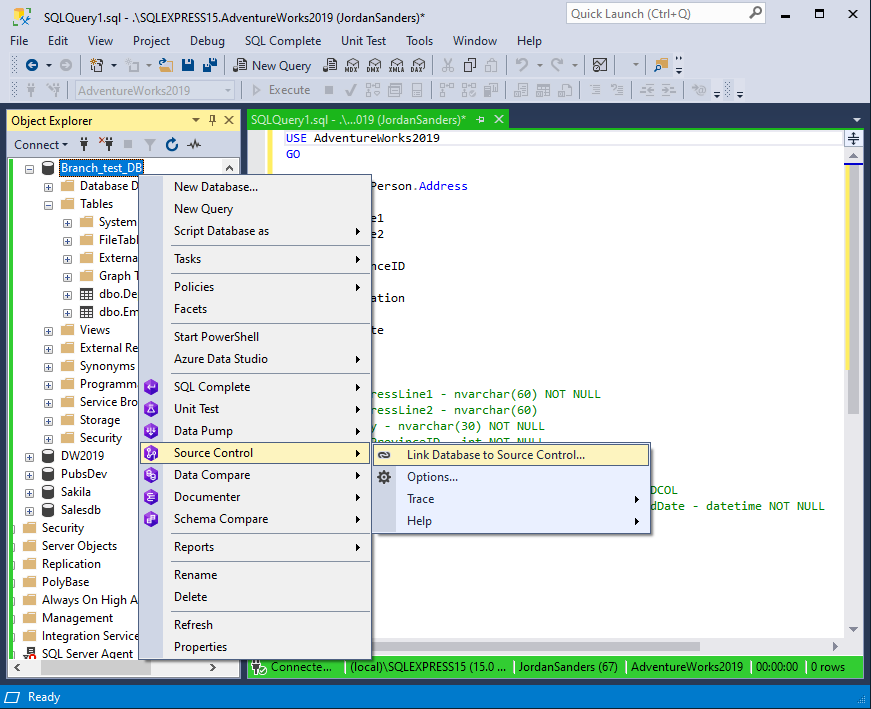
In the SSMS Object Explorer, right-click the database you want to link and select Source Control > Link Database to Source Control:
In the Link Database to Source Control wizard that opens, click + Add in the Source control repository field:
The Source Control Repository Properties window opens. In the Source control system drop-down list, select the version control system type, specify the directory to the folder with your Git repository clone, and click OK:

Note: To verify that the connection to the remote repository was successfully established, click Test.
Then, in the Link Database to Source Control wizard, select the database development model and click Link:

When the process is complete, Source Control Manager opens allowing you to commit local changes, get the latest changes from the remote repository, and resolve conflicts if any. In Object Explorer, the database linked to the version control system will be marked with a blue source control sign.
Basic Git commands and branches in Source Control
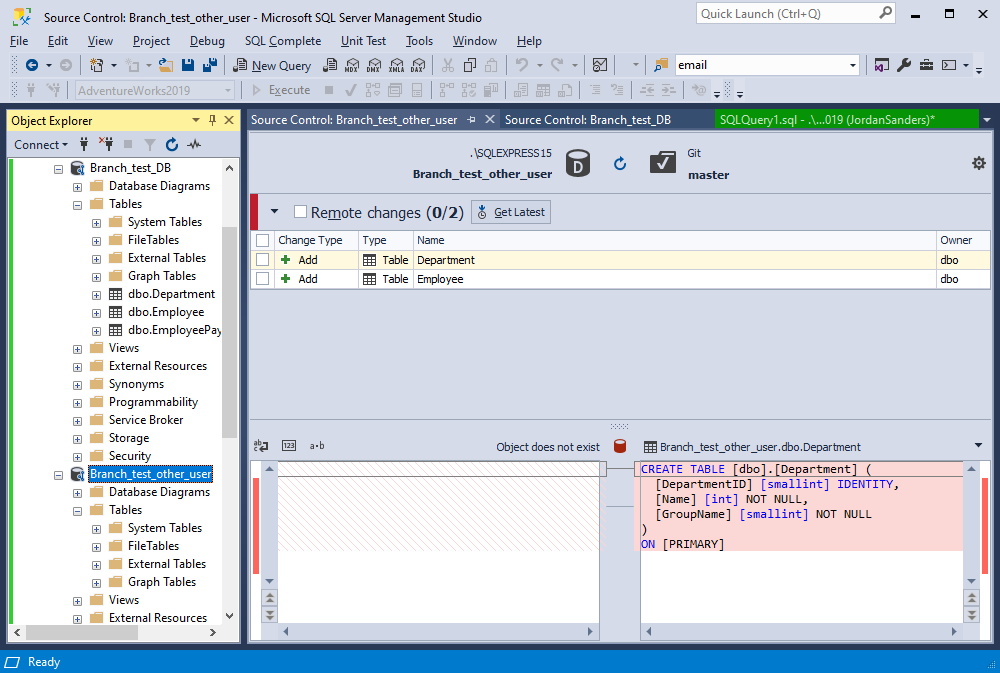
Suppose that in the remote repository there is a database we want to work with. First, we need to create an empty local database and link it to the remote repository in question. Having done that, we’ll see the following:
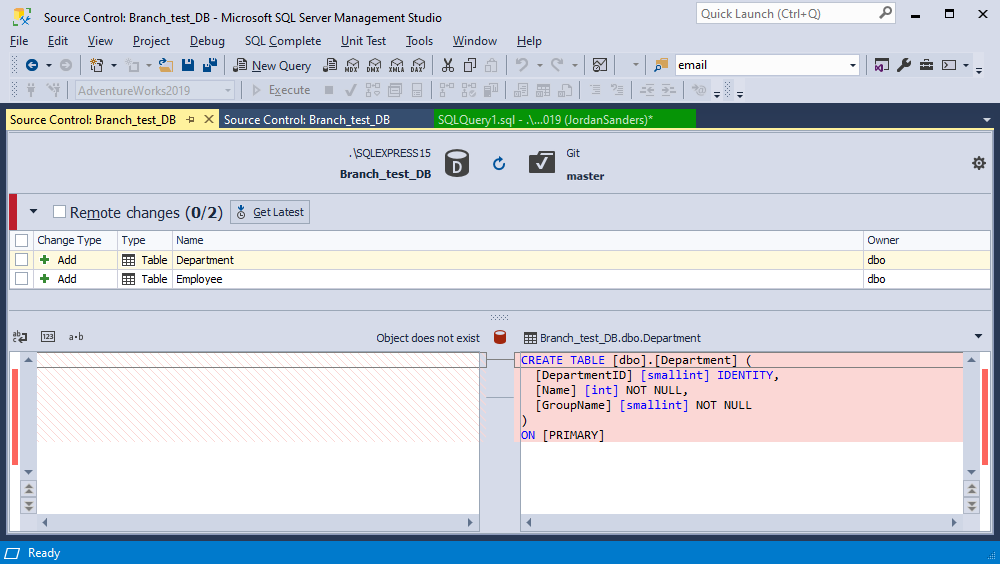
To synchronize the dedicated database with the Git repository, select the Remote changes check box and click Get Latest. After that, your local database will be a 100% copy of the database in the repository.
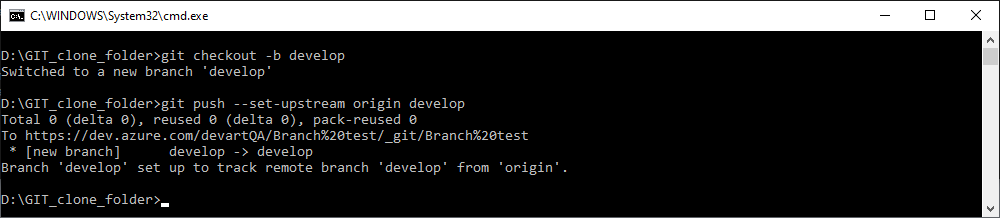
Suppose that we need to create a table in the database but we want to work in a separate branch, not in the master one. To create a branch and prepare it for work, execute the following Git commands:
create a local branch and switch to it
git checkout -b developThis command checks out a branch called develop based on master, and the -b flag tells Git to create the branch if it doesn’t already exist.
prepare your new branch for work
git push --set-upstream origin developThis command pushes the develop branch to the central repository (origin).
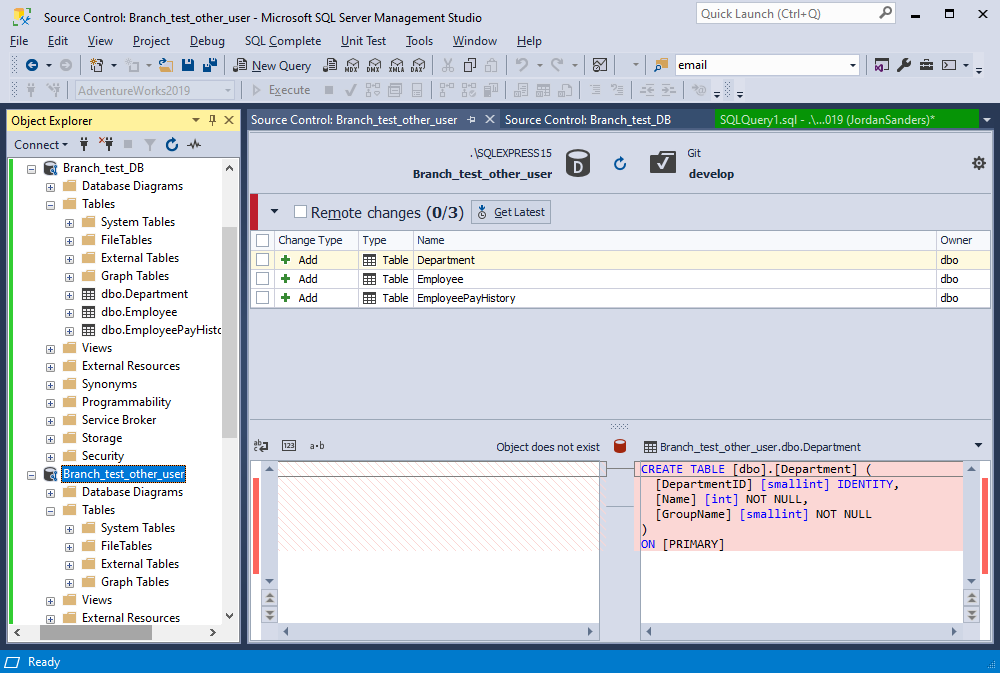
Having created and prepared the branch for work, we can proceed to create a table. After that, click Refresh in Source Control.
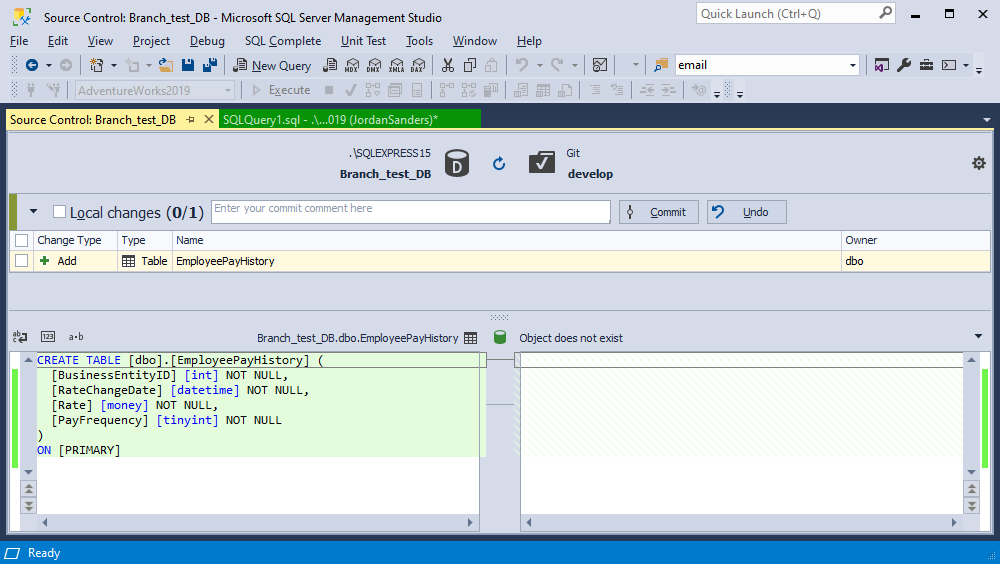
After writing the comment and clicking Commit, the selected changes will be committed to the develop branch and published on a server.
Let’s say a new developer wants to join the work. They create the repository clone on their local machine, create an empty database, and link it to the cloned repository, as described earlier in the article.
Having done all this, they will see the following:
As you can see, the current branch is master, and there is no third table in remote changes. To get the latest changes, our new developer needs to execute the following command:
git checkout developThis command checks out a branch called develop based on master. As you remember, we created a table in this branch.

All, refresh Source Control.
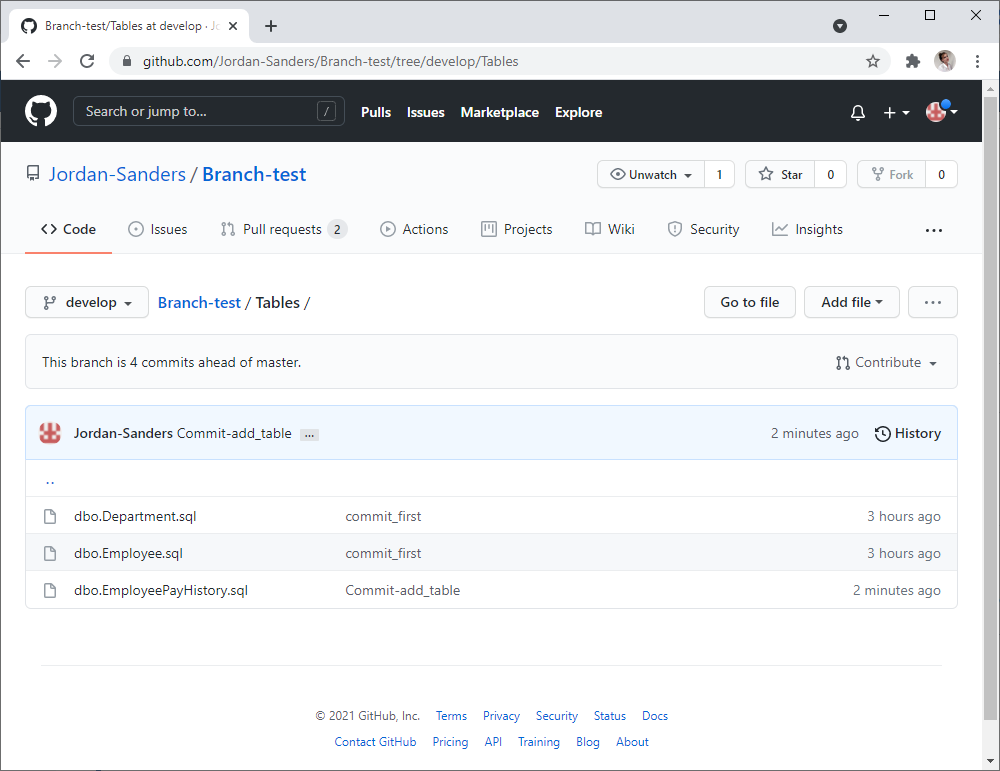
As you can see, the current branch is develop and the third table we created in this branch appeared in remote changes.
By clicking Get Latest, the second developer will synchronize their dedicated database with the develop branch and will be able to get into gear.
Also, feel free to watch this video to explore how to use SQL Source Control in teamwork.
Conclusion
The Source Control functionality allows you to commit changes to your current version control branch, fetch recent changes, and view change history right from Microsoft SQL Server Management Studio. This can help with speeding up and simplifying your development process. To switch the branch you’re committing to, you will need to use your version control system’s app or console commands. Download dbForge Source Control add-in and check this functionality for yourself with a free 30-day trial.
