")
Frequently enough, MS SQL Server open transactions are incompleted and their initiators forget about them. This is quite a commonly encountered situation in routine database development. The most striking example is when one uses SQL Server Management Studio to run a script that starts an explicit transaction with the BEGIN TRANSACTION statement, but then the batch is canceled in the middle of a transaction without issuing a COMMIT or ROLLBACK statement to complete the transaction and the transaction is left open.
That leads to the situation where the locks acquired during that transaction continue to be held. Meanwhile, a person who launched the transaction either forgets about it or puts it aside for some time. As a result, a large number of locks are held and users are blocked.
This article discusses deleting lost transactions using the SQL Complete tool.
The incomplete transaction term is used to refer to an active (running) transaction that doesn’t have any active (running) queries for a sufficiently long period of time T.
A general algorithm for finding and deleting incomplete SQL Server transactions
Follow the steps below to find open transactions that are not complete and delete them
1. First, let’s create two tables: one table to keep and analyze information about current open transactions and the second one to archive the selected from the first table transactions for further analysis.
2. Collect information about transactions and their sessions that have no queries (transactions launched and left unfinished within a certain period of time T).
3. Update the table containing the list of currently active transactions from step 1 (if an incomplete transaction acquires an active request, it is no longer considered to be lost and has to be deleted from the table).
4. Determine the sessions to be killed (a session has at least one incomplete transaction mentioned in the table from step 1 and no queries are running for that session).
5. Archive the data you are going to delete (information about the transactions, sessions, and connections that will be killed).
6. Kill the sessions.
7. Delete the processed entries and those entries that cannot be deleted and have been in the table from step 1 for a long time.
Below is the worked example of how to implement step 1 of that algorithm. We’ll demonstrate how to create a table to list and archive incomplete transactions.
Create a table to list and check lost transactions
Applying Code formatting
With the help of dbForge SQL Complete, we can quickly and easily create a table to store information about current lost transactions.
1. The tool helps you speed up your routine coding with multiple embedded prompts for the T-SQL code. It takes just a few clicks to make a table.
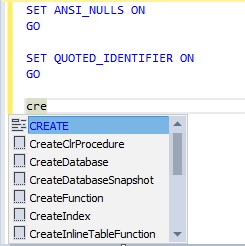
Fig. 1. An autocomplete drop-down list
2. The letters in a string are converted into uppercase.
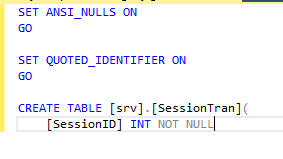
Fig. 2. Lowercase commands converted to uppercase
This way, we continue to polish the table creation script:
SET ANSI_NULLS ON
GO

SET QUOTED_IDENTIFIER ON
GO

CREATE TABLE [srv].[SessionTran](
[SessionID] INT NOT NULL,
[TransactionID] BIGINT NOT NULL,
[CountTranNotRequest] TINYINT NOT NULL,
[CountSessionNotRequest] TINYINT NOT NULL,
[TransactionBeginTime] DATETIME NOT NULL,
[InsertUTCDate] DATETIME NOT NULL,
[UpdateUTCDate] DATETIME NOT NULL,
 CONSTRAINT [PK_SessionTran] PRIMARY KEY CLUSTERED
(
[SessionID] ASC,
[TransactionID] ASC
)WITH (PAD_INDEX = OFF, STATISTICS_NORECOMPUTE = OFF, IGNORE_DUP_KEY = OFF, ALLOW_ROW_LOCKS = ON, ALLOW_PAGE_LOCKS = ON, FILLFACTOR = 95) ON [PRIMARY]
) ON [PRIMARY]
GO

ALTER TABLE [srv].[SessionTran] ADD  CONSTRAINT [DF_SessionTran_Count] DEFAULT ((0)) FOR [CountTranNotRequest]
GO

ALTER TABLE [srv].[SessionTran] ADD  CONSTRAINT [DF_SessionTran_CountSessionNotRequest]  DEFAULT ((0)) FOR [CountSessionNotRequest]
GO

ALTER TABLE [srv].[SessionTran] ADD  CONSTRAINT [DF_SessionTran_InsertUTCDate]  DEFAULT (getutcdate()) FOR [InsertUTCDate]
GO

ALTER TABLE [srv].[SessionTran] ADD  CONSTRAINT [DF_SessionTran_UpdateUTCDate]  DEFAULT (getutcdate()) FOR [UpdateUTCDate]
GO
In this script:
1) SessionID identifies a session
2) TransactionID identifies a lost transaction
3) CountTranNotRequest stands for the number of times the transaction was recorded as lost
4) CountSessionNotRequest stands for the number of times the session was recorded as one that has no active queries and contains a lost transaction
5) TransactionBeginTime refers to the start date and time of the lost transaction
6) InsertUTCDate identifies the date and time (UTC) when the record was made
7) UpdateUTCDate identifies the date and time (UTC) when the record was updated.
How to Format the Document with SQL Complete
Applying Formatting to the current document
It doesn’t matter which editor you used to create a SQL document, you can still format it with the help of the SQL Complete Format Document option.
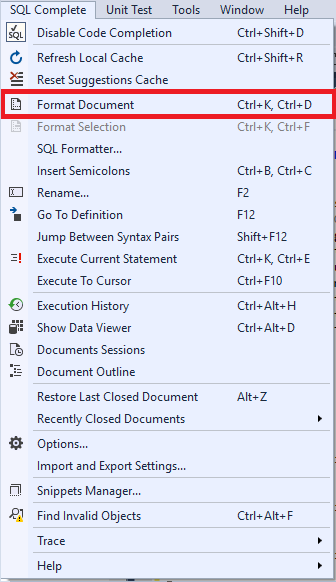
Fig. 3. The Format Document command on the SQL Complete menu
Before formatting, the script looked as follows:
create table [srv].[SessionTran](
[SessionID] int not null, [TransactionID] bigint not null, [CountTranNotRequest] tinyint not null, [CountSessionNotRequest] tinyint not null,
[TransactionBeginTime] datetime not null, [InsertUTCDate] datetime not null, [UpdateUTCDate] datetime not null,
 constraint [PK_SessionTran] primary key clustered ([SessionID] asc, [TransactionID] asc)
 with (pad_index = off, statistics_norecompute = off, ignore_dup_key = off, allow_row_locks = on, allow_page_locks = on, fillfactor = 95) ON [PRIMARY]
) on [PRIMARY]
GO
Below is the script we got after applying formatting:
CREATE TABLE [srv].[SessionTran] (
[SessionID] INT NOT NULL
   ,[TransactionID] BIGINT NOT NULL
   ,[CountTranNotRequest] TINYINT NOT NULL
   ,[CountSessionNotRequest] TINYINT NOT NULL
   ,[TransactionBeginTime] DATETIME NOT NULL
   ,[InsertUTCDate] DATETIME NOT NULL
   ,[UpdateUTCDate] DATETIME NOT NULL
   ,CONSTRAINT [PK_SessionTran] PRIMARY KEY CLUSTERED ([SessionID] ASC, [TransactionID] ASC)
WITH (PAD_INDEX = OFF, STATISTICS_NORECOMPUTE = OFF, IGNORE_DUP_KEY = OFF, ALLOW_ROW_LOCKS = ON, ALLOW_PAGE_LOCKS = ON, FILLFACTOR = 95) ON [PRIMARY]
) ON [PRIMA
GO
The differences can be seen with half an eye:
- The indentation was employed
- The T-SQL keywords got capitalized
- Line breaks were added before every column name.
That significantly enhances code readability and comprehensibility leading to more accurate perception and decision-making.
Applying Formatting to external documents
The SQL Complete tool also allows applying formatting only to a selected fragment of your script. Please, note that the Format Selection option gets enabled only after you select the fragment to be formatted either with a mouse or a cursor.
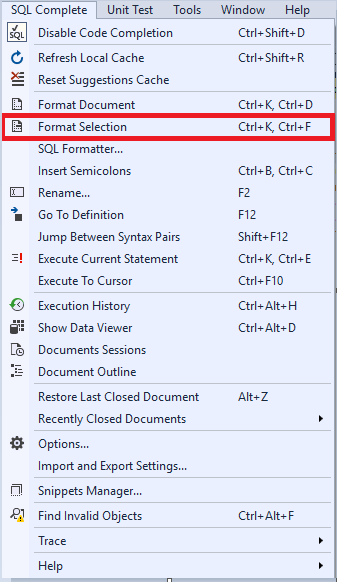
Fig. 4. The Format Selection command on the SQL Complete menu
The figure below shows the script fragment before formatting.

Fig. 5. The code fragment before applying formatting
Study the following figure to see how the code fragment looks like after formatting.
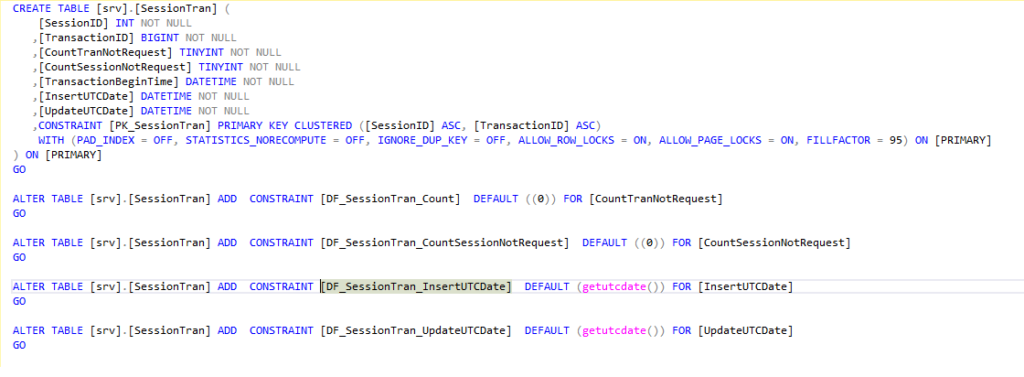
Fig. 6. The formatted code fragment
The SQL Formatter functionality should also be mentioned. With its help, you can seamlessly format scripts written previously.
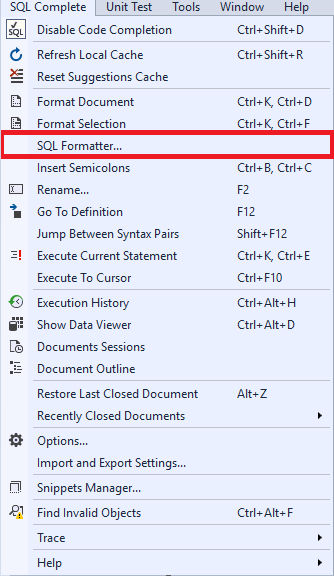
Fig. 7. The SQL Formatter command
After selecting the SQL Formatter command from the SQL Complete menu, the window offering to select the formatting mode appears. You can choose to format either the selected files or all files within a certain folder. In our worked example, we select Files. Click Next to proceed.
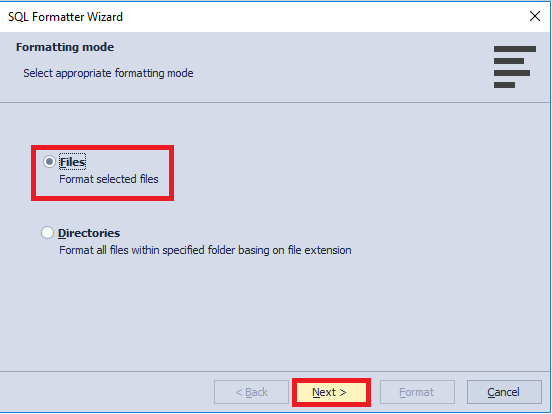
Fig. 8. SQL Formatter Wizard
Now you need to select files to format.
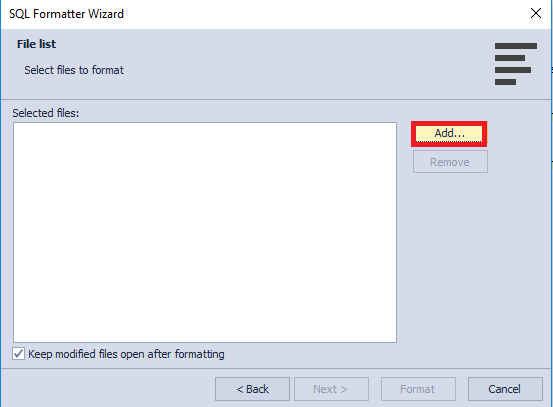
Fig. 9. Adding files to format
Having compiled a list of files to be formatted, click Format.
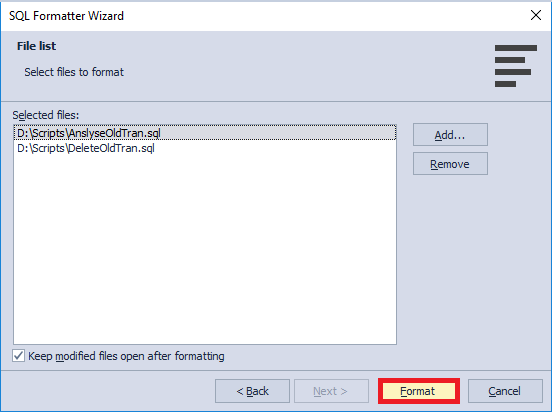
Fig. 10. Starting the formatting process
Thus, the formatting is launched.
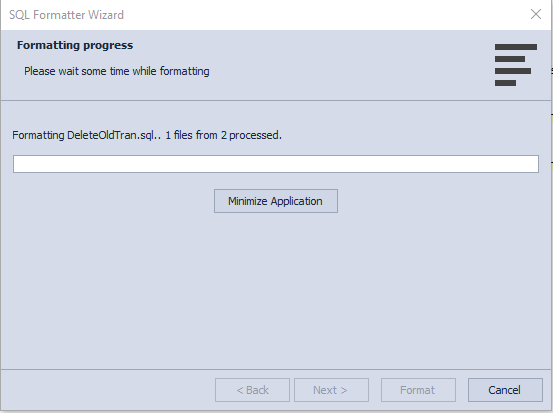
Fig. 11. Formatting the files
On completion of the formatting process, the window appears displaying the number of files that have been modified, and these files open in SQL Server Management Studio.
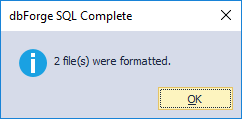
Fig. 12. Completion window in SQL Formatter
In the same manner, we can refactor the code of all the files in the Scripts directory. To format all files in the specified folder, in the SQL Formatter Wizard, select the Directories option.
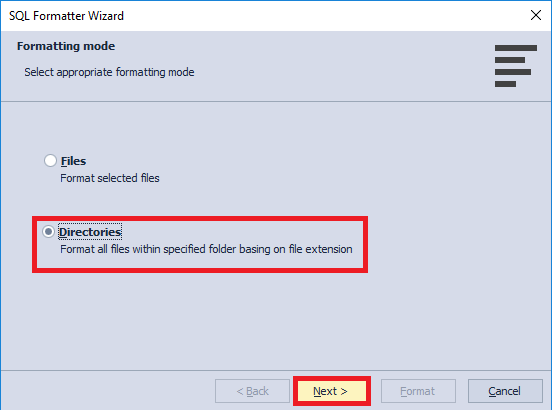
Fig. 13. The Directories option in the SQL Formatter Wizard
Having selected the Directories mode, click Next to proceed. In the next window, click Add to select the required folder. It is worth mentioning that in the SQL Formatter Wizard you can specify file extensions to be formatted as well as select to keep modified files open after formatting and include sub-folders.
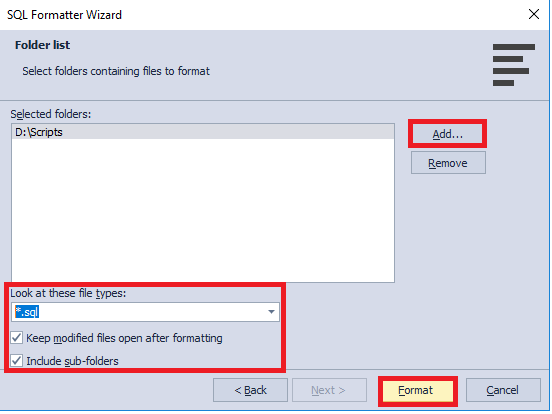
Fig. 14. The Folder list window of the SQL Formatter Wizard
In this case, when the formatting process finishes, the files that have been modified also open in SSMS.

Fig. 15. Completion window in SQL Formatter
Please note, that by default, those files are not saved, but open in a modified form instead. If you want to change that, you need to clear the checkbox Keep modified files open after formatting. After unselecting the checkbox, the modified files won’t open in Management Studio and the changes will be applied and saved straightway.
Advanced Formatting options
Providing that, you need deeper customization options, navigate to the Options window of SQL Complete. That can be easily done from the main menu.
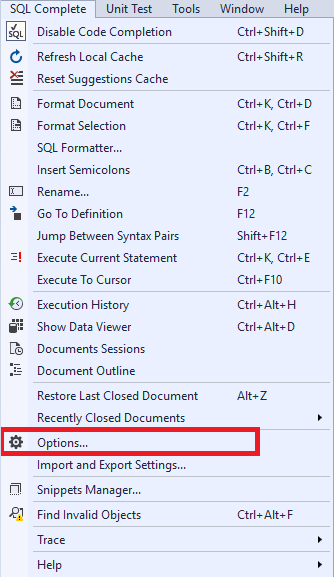
Fig.16. The Options command on the SQL Complete menu
Next, in the sidebar, navigate to Formatting.
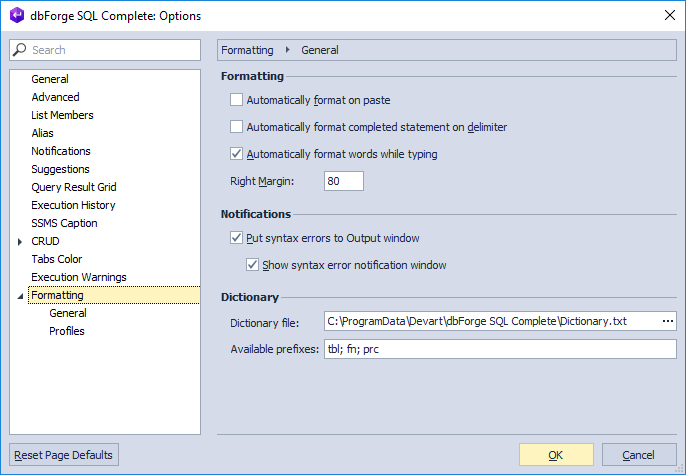
Fig. 17. Formatting Options
The Formatting tab has two sub-tabs. On the General sub-tab you can:
- make basic formatting adjustments
- customize notifications settings
- select an editable dictionary file to tune up capitalization and specify available prefixes for exceptions.
On the Profiles sub-tab, you will find a list of formatting profiles. On this tab, you can also edit the existing profile, create a new one, activate the required profile, or open the folder containing formatting profiles.
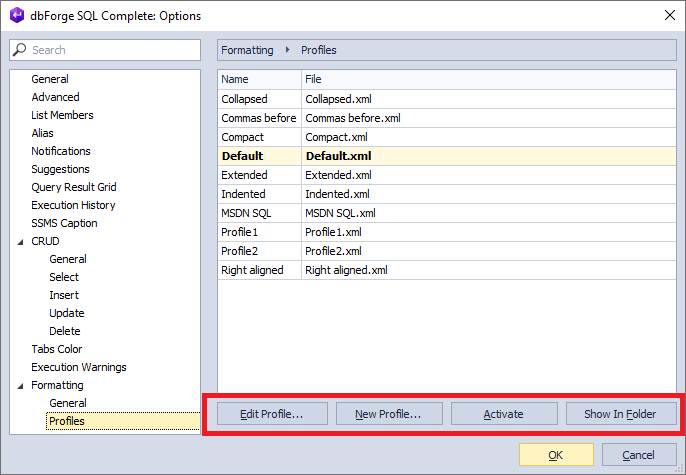
Fig. 18. The Profiles sub-tab
If you want either to edit a profile or check the profile rules, you need to highlight the required profile and then click Edit Profile. Alternatively, you can double-click the desired profile.
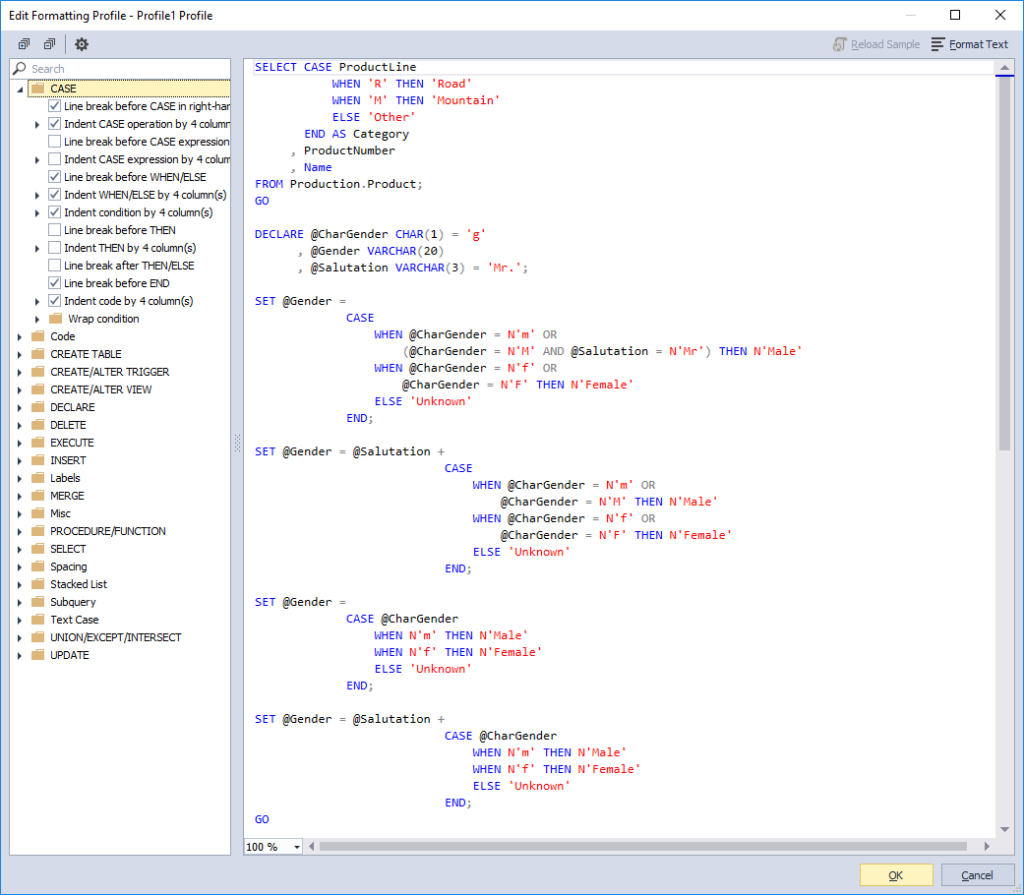
Fig. 19. Editing a profile
The Code Formatting functionality of SQL Complete helps transform illegible SQL code into a layout readable for most users. It significantly facilitates code development and maintenance. To find more about code formatting follow this link.
How to enable or disable dbForge SQL Complete
One may encounter situations where it is required to disable the tool as the SSMS gets way too slow. This can be done in a few clicks. Just click Disable Code Completion on the main menu of the tool.
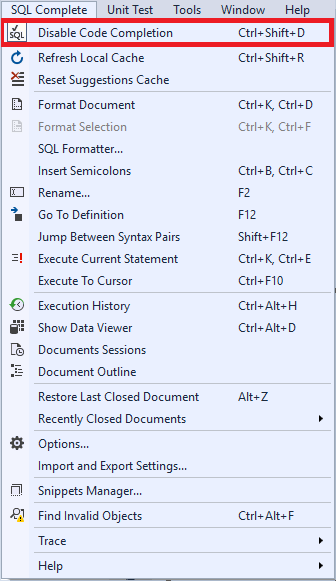
Fig. 20. Disabling SQL Complete
Correspondingly, click Enable Code Completion if you want to enable the tool.
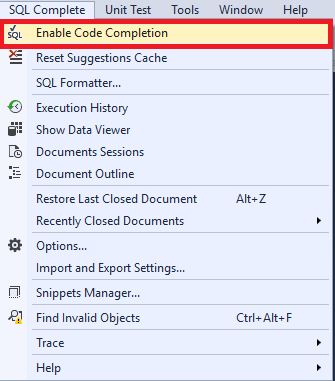
Fig. 21. Enabling Code Completion
Getting back to the point, we have created the table srv.SessionTran to record killed sessions for lost transactions.
How to create a table to archive lost transactions according to delete actions
Now, in a similar way, we will create a table to archive open transactions selected from the first table according to the delete actions.
SET ANSI_NULLS ON
GO

SET QUOTED_IDENTIFIER ON
GO

CREATE TABLE [srv].[KillSession](
[ID] [int] IDENTITY(1,1) NOT NULL,
[session_id] [smallint] NOT NULL,
[transaction_id] [bigint] NOT NULL,
[login_time] [datetime] NOT NULL,
[host_name] [nvarchar](128) NULL,
[program_name] [nvarchar](128) NULL,
[host_process_id] [int] NULL,
[client_version] [int] NULL,
[client_interface_name] [nvarchar](32) NULL,
[security_id] [varbinary](85) NOT NULL,
[login_name] [nvarchar](128) NOT NULL,
[nt_domain] [nvarchar](128) NULL,
[nt_user_name] [nvarchar](128) NULL,
[status] [nvarchar](30) NOT NULL,
[context_info] [varbinary](128) NULL,
[cpu_time] [int] NOT NULL,
[memory_usage] [int] NOT NULL,
[total_scheduled_time] [int] NOT NULL,
[total_elapsed_time] [int] NOT NULL,
[endpoint_id] [int] NOT NULL,
[last_request_start_time] [datetime] NOT NULL,
[last_request_end_time] [datetime] NULL,
[reads] [bigint] NOT NULL,
[writes] [bigint] NOT NULL,
[logical_reads] [bigint] NOT NULL,
[is_user_process] [bit] NOT NULL,
[text_size] [int] NOT NULL,
[language] [nvarchar](128) NULL,
[date_format] [nvarchar](3) NULL,
[date_first] [smallint] NOT NULL,
[quoted_identifier] [bit] NOT NULL,
[arithabort] [bit] NOT NULL,
[ansi_null_dflt_on] [bit] NOT NULL,
[ansi_defaults] [bit] NOT NULL,
[ansi_warnings] [bit] NOT NULL,
[ansi_padding] [bit] NOT NULL,
[ansi_nulls] [bit] NOT NULL,
[concat_null_yields_null] [bit] NOT NULL,
[transaction_isolation_level] [smallint] NOT NULL,
[lock_timeout] [int] NOT NULL,
[deadlock_priority] [int] NOT NULL,
[row_count] [bigint] NOT NULL,
[prev_error] [int] NOT NULL,
[original_security_id] [varbinary](85) NOT NULL,
[original_login_name] [nvarchar](128) NOT NULL,
[last_successful_logon] [datetime] NULL,
[last_unsuccessful_logon] [datetime] NULL,
[unsuccessful_logons] [bigint] NULL,
[group_id] [int] NOT NULL,
[database_id] [smallint] NOT NULL,
[authenticating_database_id] [int] NULL,
[open_transaction_count] [int] NOT NULL,
[most_recent_session_id] [int] NULL,
[connect_time] [datetime] NULL,
[net_transport] [nvarchar](40) NULL,
[protocol_type] [nvarchar](40) NULL,
[protocol_version] [int] NULL,
[encrypt_option] [nvarchar](40) NULL,
[auth_scheme] [nvarchar](40) NULL,
[node_affinity] [smallint] NULL,
[num_reads] [int] NULL,
[num_writes] [int] NULL,
[last_read] [datetime] NULL,
[last_write] [datetime] NULL,
[net_packet_size] [int] NULL,
[client_net_address] [nvarchar](48) NULL,
[client_tcp_port] [int] NULL,
[local_net_address] [nvarchar](48) NULL,
[local_tcp_port] [int] NULL,
[connection_id] [uniqueidentifier] NULL,
[parent_connection_id] [uniqueidentifier] NULL,
[most_recent_sql_handle] [varbinary](64) NULL,
[LastTSQL] [nvarchar](max) NULL,
[transaction_begin_time] [datetime] NOT NULL,
[CountTranNotRequest] [tinyint] NOT NULL,
[CountSessionNotRequest] [tinyint] NOT NULL,
[InsertUTCDate] [datetime] NOT NULL,
 CONSTRAINT [PK_KillSession] PRIMARY KEY CLUSTERED
(
[ID] ASC
)WITH (PAD_INDEX = OFF, STATISTICS_NORECOMPUTE = OFF, IGNORE_DUP_KEY = OFF, ALLOW_ROW_LOCKS = ON, ALLOW_PAGE_LOCKS = ON) ON [PRIMARY]
) ON [PRIMARY] TEXTIMAGE_ON [PRIMARY]
GO

ALTER TABLE [srv].[KillSession] ADD  CONSTRAINT [DF_KillSession_InsertUTCDate]  DEFAULT (getutcdate()) FOR [InsertUTCDate]
GO
In this script:
sys.dm_exec_sessions and sys.dm_exec_connections refer to the system views
InsertUTCDate identifies UTC date and time when the record was created.
Conclusion
In this article, we presented the general algorithm for deleting lost transactions in SQL Server and explored how to implement step 1 of that algorithm with the help of SQL Complete. Along with that obvious strengths of the tool were demonstrated. IntelliSense-style code completion, highly customizable and sharable code-formatting, efficient code refactoring, and a bunch of other useful features were designed to take care of your code letting you focus exclusively on how it actually works. The second part of the series of articles can be found here.
