Components in Delphi save the essential time it often takes for developers to write code from scratch, providing pre-built options you can continuously reuse to assemble software, create a smooth user interface, and handle complex data connectivity tasks. Streamlined development, reduced number of errors, and consistency are only some of the advantages that you get when using components while you work with Delphi.
This article will help you understand how to install components in Delphi IDE to boost application development. Follow our step-by-step guide to find and prepare the component files, create or select a design package, add the component files to the package, and compile it for installation. Lastly, we will also look into common issues you might face and explain how to fix them.
- Step-by-step guide to installing components in Delphi IDE
- Why you should use UniDAC components
- Common Delphi components installation issues
- Conclusion
Step-by-step guide to installing components in Delphi IDE
There is a wide range of components one can use to facilitate the development process and get the most out of the available features. In this article, we will showcase the installation process of data access components for Delphi by Devart. By adding these components to your project, you’ll be able to set up your application’s connectivity without the need to code. However, you can use the same workflow to add more components if you need them for your Delphi programming project.
Locating and preparing component files
First, let’s find the required Delphi components to prepare them for installation. You can either import components from your hard drive if you have downloaded them previously or get them from the Delphi component providers. Either way, you need to locate the components (in .pas format.) Also, you can download some of the Delphi components using the GetIt package manager.
For our tutorial, feel free to download UniDAC data access components by Devart. UniDAC comprises multiple component libraries that provide access to various databases such as MongoDB, PostgreSQL, Oracle, etc., letting you connect the data to your application smoothly.
You can also click here to download the same package that is used in this tutorial.
Once you have prepared the components, let’s install them in the new or existing packages.
Creating or selecting a package
Creating a new package is pretty straightforward.
Click the File button in the top left corner. Hover over the New option and select Package.
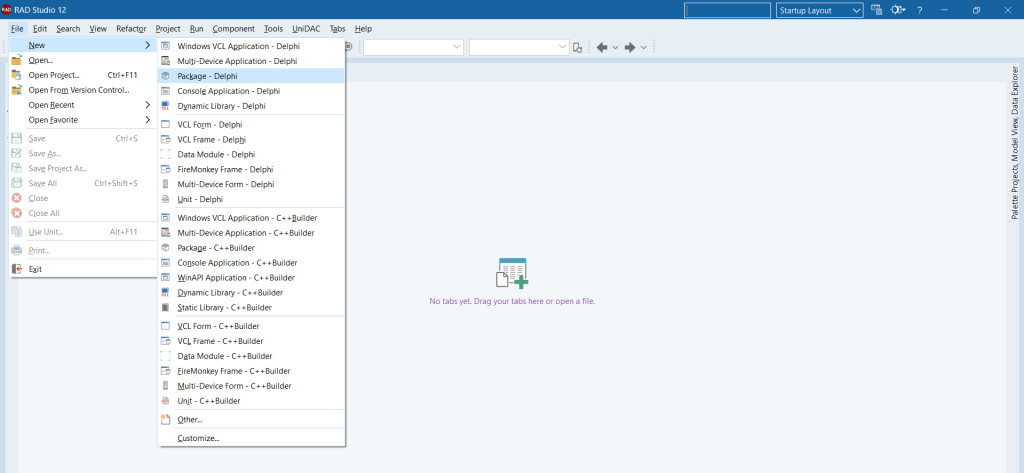
Once you click it, a project and a new package inside it will be created.
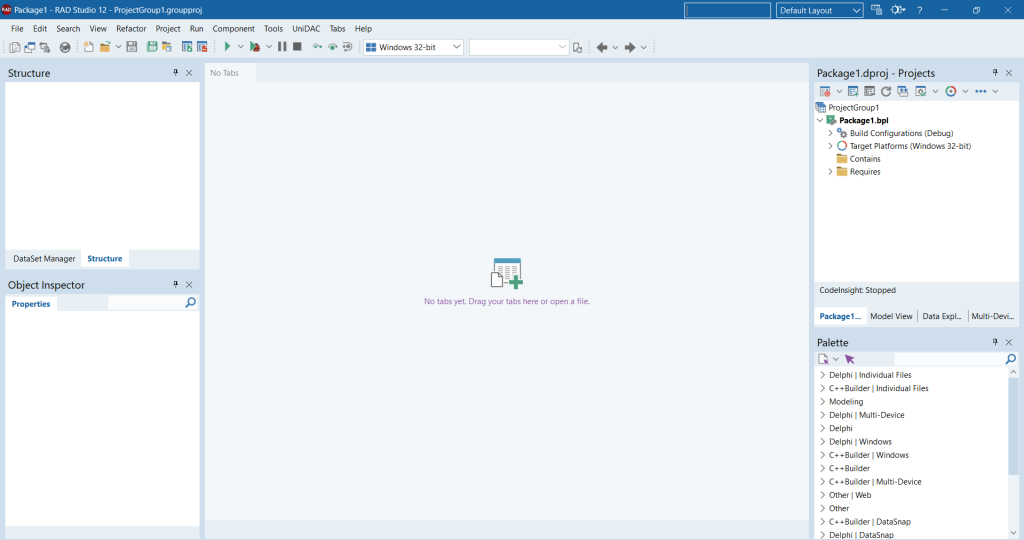
Adding component files to the package
Now that you have created a new package let’s learn how to add the Delphi components to the packages.
If you do not have any components, then we can create a new component by following the steps below.
1. Click the New Component button.

2. Select VCL for Delphi as the platform for the component.
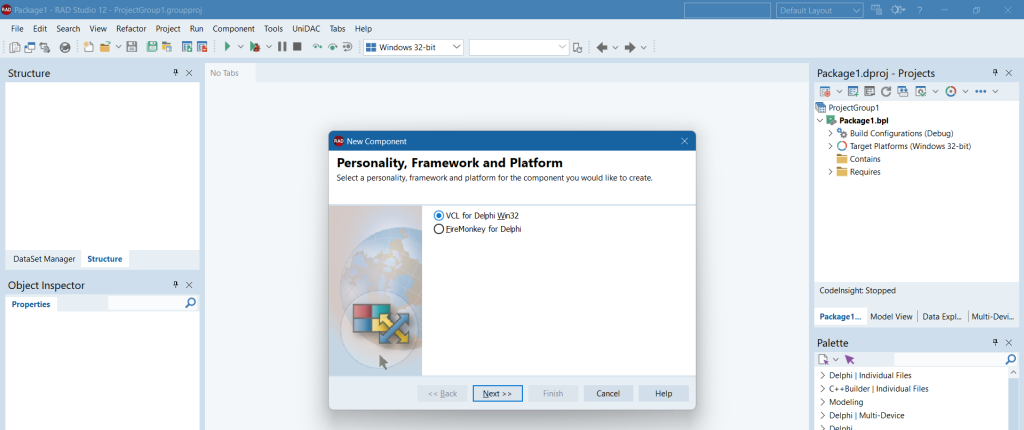
3. Choose one of the parent components shown in the list. You can also use other UniDAC database components. It supports many databases, enabling you to connect to any of them as you need.
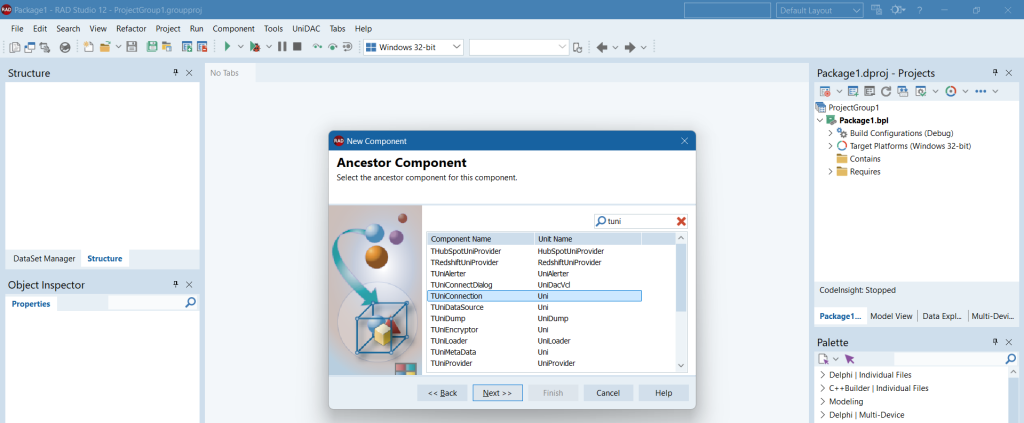
4. Enter details like Class and Unit Name and click Next.
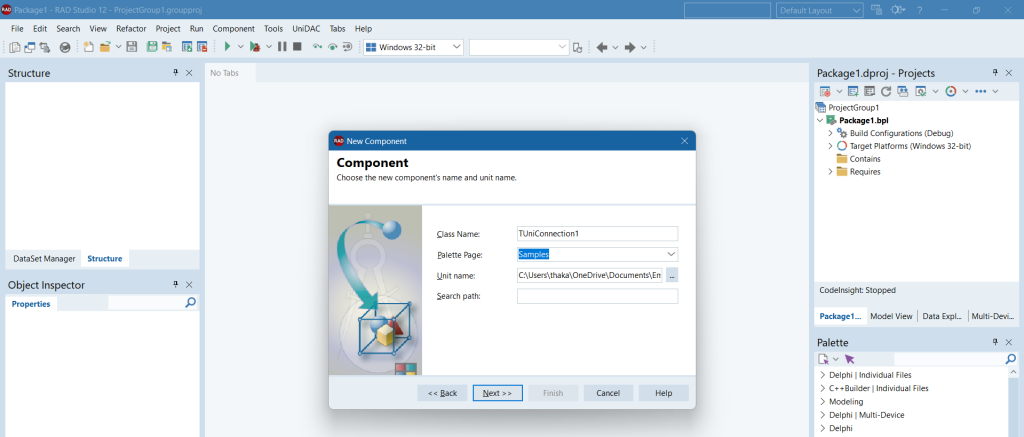
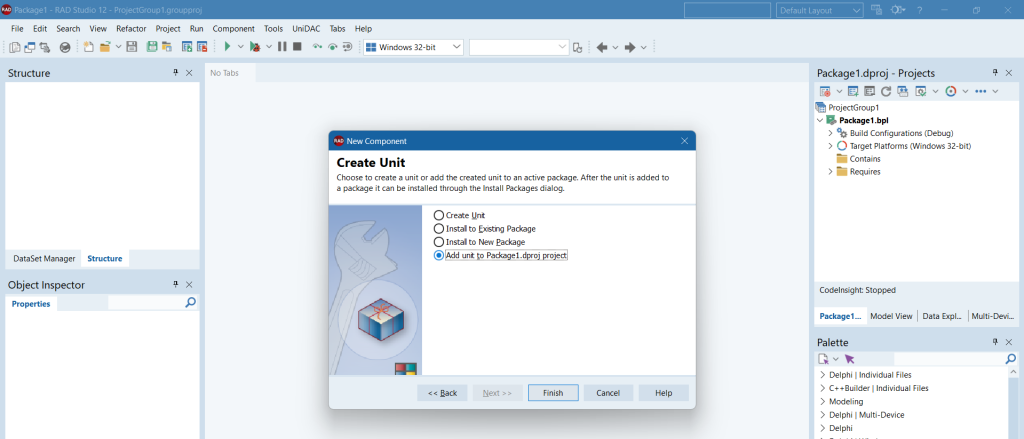
5. We can add this component to a new, existing, or already opened package or create it and not add it to any package.
Note that if you select a new package, you must enter details like the package name, path, etc. For an existing package, you need to enter the path of that package. If you have opened a package, you can add the component by selecting the option, as shown in the screenshot below.
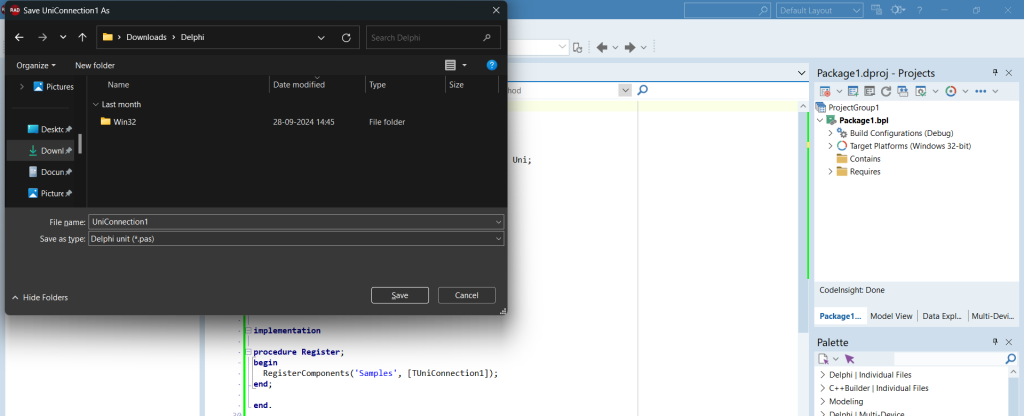
6. Save the newly created component to the working directory.
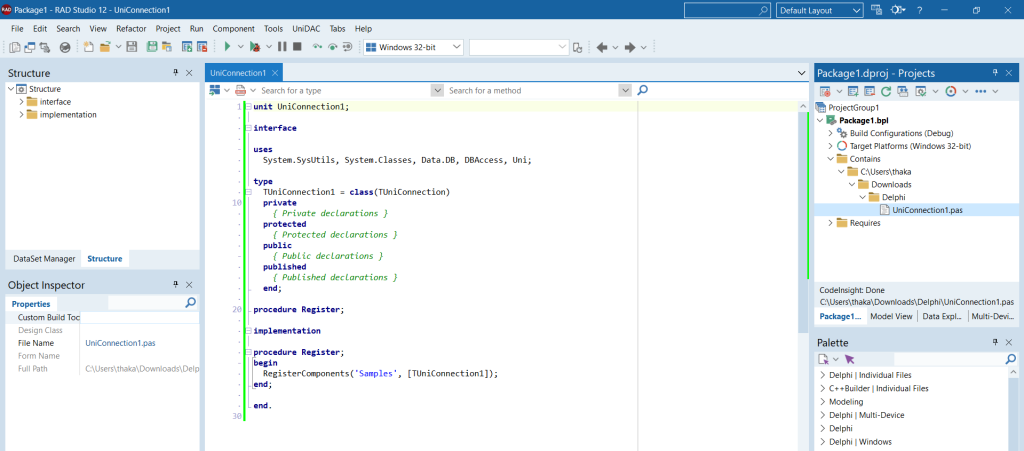
Once these steps are complete, you will see the newly created component on the screen. This means the component has been added to the package, and you can find it in the Contains folder in the Project section.
Compiling and installing the package
After all the components are added to the package, you can use them. The next step would be compiling and installing the package.
1. Right-click the package that is already open in Delphi IDE.
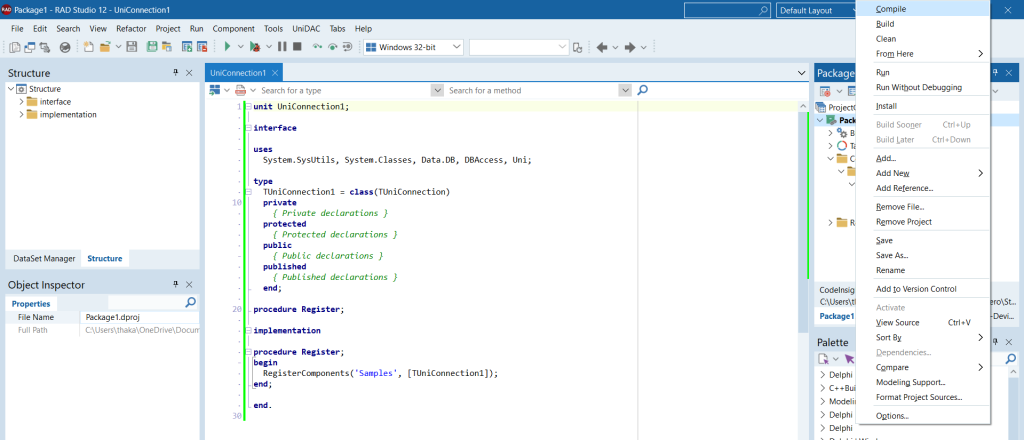
2. Click the Compile option.
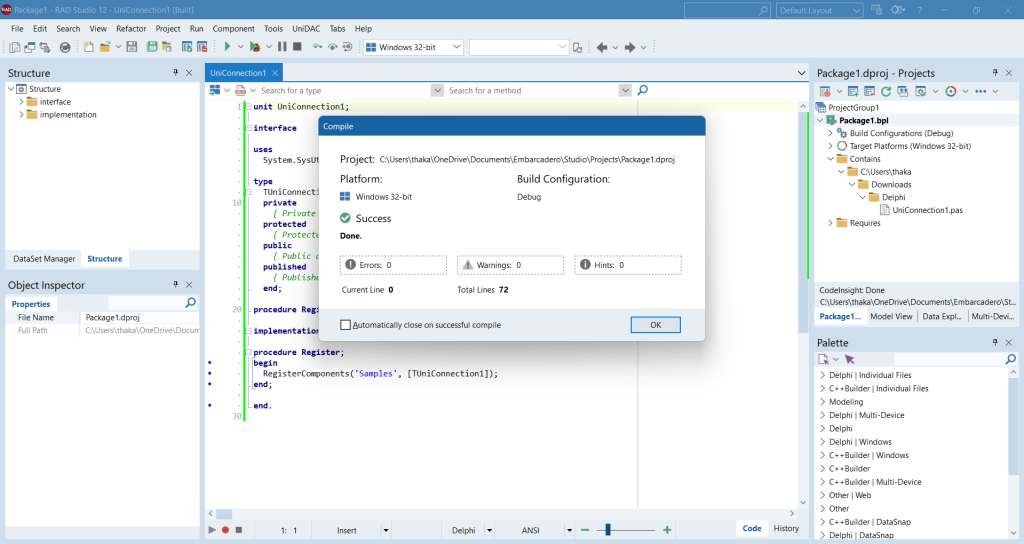
If there are any errors while compiling, you will see them in the console log at the bottom. Otherwise, you will get a success message, as shown in the screenshot above.
Why you should use UniDAC components
UniDAC components provide easy-to-use server-independent interfaces that assist in working with different databases. As you start with UniDAC, you find out soon, that these components let you change the client engine for a certain type of server by changing single connection option. As a result, you can build a cross-database application with minimum effort.
Among the other benefits of UniDAC, you get:
- Server-specific native connectivity, with all the operations performed automatically with consideration of the database server peculiarities.
- Cross-platformity, with support for Delphi, C++Builder, LazarusIDE, and FireMonkey.
- Server-independent SQL support, as the powerful macros engine produces dynamic SQL by replacing parts of the query statements with user-defined code.
All these unique features make UniDAC stand out among other connectivity solutions and make the components perfect choice for projects that involve data from multiple databases.
Try UniDAC for seamless connectivity in your Delphi projects!

Common Delphi components installation issues
Sometimes, you might find it difficult to install or use the packages and components you need. In the list below, you’ll find some common issues that might arise and steps on how to fix them.
Missing components or packages
If you notice that certain Delphi components or packages are missing and have to be included, you need to understand the underlying cause of this case. Here are the possible reasons for the issue:
- Third-party libraries might be missing because they weren’t installed yet
- The library paths might be set incorrectly
- Some components may not have been included during installation
Try the following ways to resolve the issues at hand:
- Install Third-Party Libraries. Make sure to download and install any third-party Delphi components or libraries your project needs.
- Configure Library Paths. Check if the Library path in Delphi includes the directories for all the installed components. If some paths are missing, you can add them manually.
Environment configuration issues
If the IDE isn’t working correctly, it could be due to configuration issues that lead to compilation or runtime errors.
The possible causes for this issue are listed below.
- System path variables might be incorrect
- IDE settings might be misconfigured
- The IDE may not be able to find the necessary compiler
Try the following steps to troubleshoot the issue.
- Check the environment configurations. In Delphi, go to Tools and select Options under Environment Options, check the settings for Library, Library Path, and Compiler.
- Refer to the community forums. If you’re still having trouble, you can refer to the Delphi community forums.
Generally, most of the issues arise from the cases described above. However, it is always a good practice to refer to the Delphi documentation to ensure that you implemented it correctly. Delphi has also collated a list of community forums that we can use for support in case you have encountered a unique issue you cannot solve.
Conclusion
Installing components in the Delphi IDE is an essential process that enhances your software development capabilities. While challenges may arise during installation, having a clear understanding of the process will help you navigate these obstacles effectively. With a bit of practice, you’ll find that Delphi offers a powerful environment for bringing your ideas to life — all you need to do is use the right tools and resources to streamline your development process and create versatile applications across different platforms.
Choose from numerous Delphi components to build applications consistently and explore extensive Delphi data access components collection for streamlined connectivity provided by Devart.


