
In today’s data-centric era, the ability to establish effective connections to databases is crucial for any Java developer. SQL Server stands as one of the most popular database management systems, powering numerous enterprise applications worldwide. For Java developers, mastering the skill of seamlessly connecting to SQL Server isn’t just an advantage—it’s absolutely essential.
Traditional relational database management systems, such as Microsoft SQL Server, offer robust encryption and security measures to safeguard the sensitive data of companies and their applications. For organizations seeking secure automated data access and transaction processing, integrating Microsoft SQL Server with Java proves to be a reliable choice. Java, a widely-used programming language known for its versatility, complements SQL Server’s security features. Thus, the integration of Java with Microsoft SQL Server databases is widely adopted for developing secure applications.
In this article, we will explore how to use the JDBC driver to connect Java applications to Microsoft SQL Server databases.
Contents
- Prerequisites
- Connect to Microsoft SQL Server in Java
- Authentication methods
- Best practices and security considerations
- Limitations of connecting Java to Microsoft SQL Server
- FAQ
- Conclusion
Prerequisites
Java Development Kit (JDK)
Ensure Java is installed on your system. You can download it from the official Oracle website or use an open-source alternative like OpenJDK.
SQL Server
Make sure you have SQL Server installed and running. You can download the free SQL Server Express edition from the Microsoft SQL Server website for development and small-scale projects or use a licensed version for enterprise-level applications.
Integrated Development Environment (IDE)
Choose and install an Integrated Development Environment (IDE) such as Eclipse, IntelliJ IDEA, or NetBeans to facilitate the writing and management of your Java code.
Connect to Microsoft SQL Server in Java
Java is a flexible programming language, ideal for creating sophisticated interactive applications and games. Due to its strong security features, many businesses rely on Java SQL Server connections, often through JDBC (Java Database Connectivity), to link their databases and servers with web applications.
JDBC (Java Database Connectivity) is a Java API (Application Programming Interface) that enables Java applications to interact with databases. It provides a standard interface for Java applications to perform database operations such as querying data, inserting records, updating data, and deleting records.
Step 1: Download and integrate Microsoft JDBC Driver
To begin connecting Java applications with Microsoft SQL Server, the first step is to get the Microsoft JDBC Driver.
1.1 Navigate to the Microsoft JDBC Driver for SQL Server webpage.
Download and extract the archive files.
Add the mssql-jdbc-8.2.0.jreVERSION.jar file to the classpath of your project.
If you’re using Maven, declare the following dependencies:
<dependency>
    <groupId>com.microsoft.sqlserver</groupId>
    <artifactId>mssql-jdbc</artifactId>
    <version>8.2.1.jre11</version>
</dependency>
Step 2: Build the connection URL
The syntax for the database URL to connect Java to Microsoft SQL Server is as follows:
jdbc:sqlserver://[serverName[\instanceName][:portNumber]][;property=value[;property=value]]Where:
serverName: Refers to the name of the host or IP address of the device where SQL Server is currently running.instanceName: Specifies the instance name to connect to the server.portNumber: Indicates the port number of the server. The default value is typically 1433.property=value: Defines the connection settings.
Step 3: Register the driver and specify the connection details
In Java, before establishing a connection to the Microsoft SQL Server database, you need to register the JDBC driver and specify the connection details.
Here’s how you can do it:
// Register the JDBC driver
Class.forName("com.microsoft.sqlserver.jdbc.SQLServerDriver");

// Specify the connection URL, username, and password
String url = "jdbc:sqlserver://serverName\\instanceName:portNumber;databaseName=yourDatabase";
String username = "yourUsername";
String password = "yourPassword";

// Create the connection
Connection connection = DriverManager.getConnection(url, username, password);
Replace serverName, instanceName, portNumber, databaseName, yourUsername, and yourPassword with your actual server, instance, port, database name, username, and password, respectively.
Once you’ve registered the driver and specified the connection details, you can establish a connection to the SQL Server database using the DriverManager.getConnection() method.
Step 4: Establish a connection to the SQL Server database
To establish a Java SQL Server connection to the required database, follow these steps:
- Call the
getConnection()method from theDriverManagerclass. - Pass the username and password as parameters to the method.
- Use the
java.util.Propertiesobject to store connection properties. - Ensure integrated security is set to true for authentication mode, and include
sqljdbc_auth.dllin the classpath.
Here’s how you can achieve this:
import java.sql.Connection;
import java.sql.DatabaseMetaData;
import java.sql.DriverManager;
import java.sql.SQLException;

public class ConnectToServer {

    public static void main(String[] args) throws ClassNotFoundException {

        Connection conn = null;

        try {

            DriverManager.registerDriver(new com.microsoft.sqlserver.jdbc.SQLServerDriver());

            String dbURL = "jdbc:sqlserver://demo-mssql\SQLEXPRESS02;encrypt=true;trustServerCertificate=true;databaseName=DemoDatabase";
            String user = "sa";
            String pass = "12345";
            conn = DriverManager.getConnection(dbURL, user, pass);

            if (conn != null) {
                System.out.println("The connection has been successfully established.");

                DatabaseMetaData dm = conn.getMetaData();
                System.out.println("Driver name: " + dm.getDriverName());
                System.out.println("Driver version: " + dm.getDriverVersion());
                System.out.println("Product name: " + dm.getDatabaseProductName());
                System.out.println("Product version: " + dm.getDatabaseProductVersion());
            }

        } catch (SQLException ex) {
            System.out.println("An error occurred while establishing the connection:");
            ex.printStackTrace();
        } finally {
            try {
                if (conn != null && !conn.isClosed()) {
                    conn.close();
                }
            } catch (SQLException ex) {
                ex.printStackTrace();
            }
        }
    }
}
Replace SQL Server’s server and instance name, database name, username, and password values in the script with your actual credentials.
Step 5: Execute basic SQL commands
Once you’ve successfully established a connection to SQL Server within your Java application, you can proceed to execute SQL queries for a variety of database operations. Below is an example illustrating how to insert data into a table:
import java.sql.Connection;
import java.sql.DriverManager;
import java.sql.PreparedStatement;
import java.sql.ResultSet;
import java.sql.SQLException;

public class InsertMultipleData {
    public static void main(String[] args) {
        String dbURL = "jdbc:sqlserver://demo-mssql\SQLEXPRESS02;encrypt=true;trustServerCertificate=true;databaseName=DemoDatabase";
        String user = "sa";
        String pass = "123";

        int totalRowsAffected = 0;

        try {
            Connection connection = DriverManager.getConnection(dbURL, user, pass);

            // Data set to be inserted
            Object[][] data = {
                    {10, "Smith", "James", "Riddle Hill", "Chicago"},
                    {20, "Johnson", "Charlie", "North Church", "Chicago"},
                    {30, "Williams", "Oscar", "Red Lake", "Chicago"}
            };

            String insertQuery = "INSERT INTO Persons (PersonID, LastName, FirstName, Address, City) VALUES (?, ?, ?, ?, ?)";
            PreparedStatement preparedStatement = connection.prepareStatement(insertQuery);

            for (Object[] row : data) {
                preparedStatement.setInt(1, (int) row[0]);
                preparedStatement.setString(2, (String) row[1]);
                preparedStatement.setString(3, (String) row[2]);
                preparedStatement.setString(4, (String) row[3]);
                preparedStatement.setString(5, (String) row[4]);

                int rowsAffected = preparedStatement.executeUpdate();

                if (rowsAffected > 0) {
                    totalRowsAffected += rowsAffected;
                } else {
                    System.out.println("Failed to insert data.");
                }
            }

            // The output message regarding the total number of rows added.
            System.out.println("Data has been successfully added. Total number of rows added: " + totalRowsAffected);

            // Displaying the outcome
            String selectQuery = "SELECT * FROM Persons";
            PreparedStatement selectStatement = connection.prepareStatement(selectQuery);
            ResultSet resultSet = selectStatement.executeQuery();

            System.out.println("Outcome:");
            System.out.printf("%-10s %-20s %-20s %-30s %-20s%n", "PersonID", "LastName", "FirstName", "Address", "City");

            while (resultSet.next()) {
                System.out.printf("%-10s %-20s %-20s %-30s %-20s%n",
                        resultSet.getInt("PersonID"),
                        resultSet.getString("LastName"),
                        resultSet.getString("FirstName"),
                        resultSet.getString("Address"),
                        resultSet.getString("City"));
            }

            selectStatement.close();
            preparedStatement.close();
            connection.close();
        } catch (SQLException e) {
            e.printStackTrace();
        }
    }
}
This code inserts new records into the Persons table. Replace SQL Server’s server and instance name, database name, username, and password values in the script with your actual credentials.
Creating an application, yet still need to populate its database with the test data? Discover SQL Server Data Generator, a powerful tool to empower your development workflow.
Let’s check whether the data has been successfully inserted. For this task, we’ll use a GUI tool tailored for SQL Server – dbForge Studio for SQL Server. This comprehensive integrated environment is specifically crafted to address all kinds of database development, management, and administration tasks efficiently.
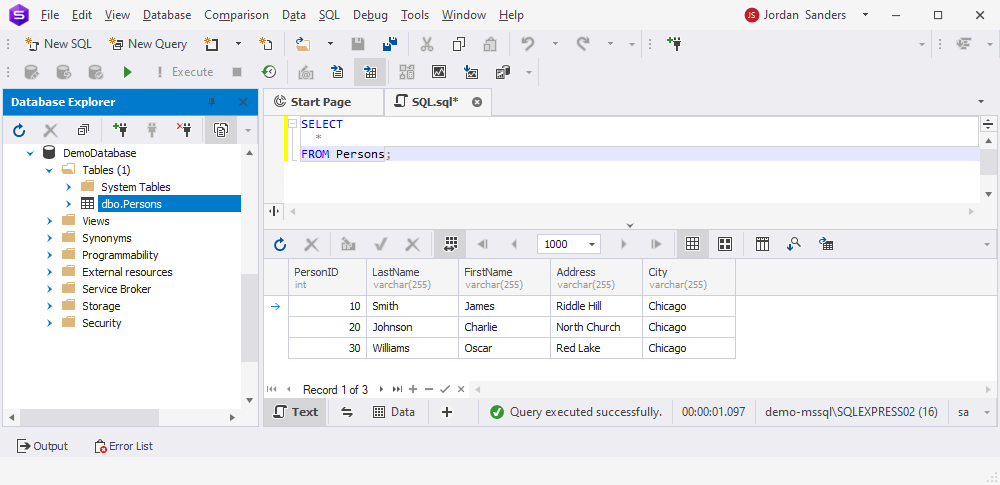
You can see that our data insertion efforts have been successful.
| Step | Description | Key Consideration |
|---|---|---|
| Step 1: Download JDBC Driver | Download the Microsoft JDBC Driver from the official website and add it to your project’s classpath. | Ensure the driver version matches your Java version. |
| Step 2: Build Connection URL | Create a connection URL using the syntax: jdbc:sqlserver://[serverName\instanceName][:portNumber][;property=value]. | Default port is 1433; ensure correct server and instance details. |
| Step 3: Register Driver | Use Class.forName(“com.microsoft.sqlserver.jdbc.SQLServerDriver”) to register the driver. | Handle ClassNotFoundException if the driver is not found. |
| Step 4: Establish Connection | Use DriverManager.getConnection() with URL, username, and password to connect to the database. | Secure credentials and use encrypted connections for security. |
| Step 5: Execute SQL Commands | Use PreparedStatement or Statement to execute SQL queries like SELECT, INSERT, UPDATE, or DELETE. | Always use parameterized queries to prevent SQL injection. |
| Step 6: Close Connection | Close the database connection using conn.close() to release resources. | Ensure connections are closed in a finally block to avoid leaks. |
Authentication methods
Authentication plays a crucial role in establishing secure connections to SQL Server from Java applications. When configuring the authentication method, developers have two primary options: Windows authentication and SQL Server authentication.
- Windows Authentication (integratedSecurity=true):
- With Windows authentication, the credentials of the currently logged-in Windows user are used to authenticate against the SQL Server instance.
- This method leverages the security mechanisms of the Windows operating system, such as Active Directory, to verify the user’s identity.
- It offers seamless authentication for users who are already logged into the Windows domain, eliminating the need to provide additional credentials.
- Windows authentication is often preferred in environments where centralized user management and authentication are enforced through Active Directory.
- SQL Server Authentication:
- SQL Server authentication requires providing a username and password explicitly when establishing the connection.
- Users authenticate directly against SQL Server with a username and password stored within the SQL Server instance.
- This method allows for greater flexibility, as credentials can be managed independently of the Windows domain, making it suitable for scenarios where centralized user management is not feasible or desired.
- SQL Server authentication is commonly used in scenarios such as web applications or third-party integrations, where users may not have Windows domain accounts or where cross-platform compatibility is required.
Best practices and security considerations
- Use parameterized queries or prepared statements: Instead of directly concatenating user inputs into SQL queries, use parameterized queries or prepared statements to prevent SQL injection attacks. This approach helps sanitize user input and avoids potential vulnerabilities.
- Implement connection pooling: Use connection pooling to manage database connections efficiently. This helps improve performance and scalability by reusing existing connections instead of creating new ones for each request.
- Encrypt database connections: Use SSL/TLS encryption to secure database connections and protect data transmitted between the Java application and SQL Server. This helps prevent eavesdropping and tampering with sensitive information.
- Apply the principle of least privilege: Follow the principle of least privilege when configuring database user accounts. Grant only the necessary permissions required for the Java application to perform its intended operations. Avoid using privileged accounts for regular application tasks.
- Store database credentials securely: Avoid hardcoding database credentials in the source code. Instead, use secure methods such as environment variables, encrypted configuration files, or credential vaults to store and retrieve database credentials.
- Enable firewall and IP whitelisting: Configure firewall rules and IP whitelisting to restrict access to the SQL Server from specific IP addresses or network ranges. This helps prevent unauthorized access and protects against external threats.
- Update dependencies regularly: Keep your Java application and database drivers up to date with the latest security patches and updates. This helps address known vulnerabilities and ensures that your application remains secure against emerging threats.
- Monitor and audit database activity: Implement logging and monitoring mechanisms to track database activity and detect suspicious behavior or unauthorized access attempts. Regularly review logs and audit trails to identify potential security incidents and take appropriate action.
- Limit exposed database interfaces: Minimize the exposure of database interfaces such as JDBC endpoints to reduce the attack surface. Consider implementing network segmentation or using a VPN to restrict access to internal database resources.
- Perform input validation and sanitization: Validate and sanitize user input before processing it in SQL queries to prevent malicious input from causing unintended behavior or compromising data integrity.
By adhering to these best practices and security considerations, you can help mitigate risks and ensure the secure integration of your Java application with SQL Server.
Limitations of connecting Java to Microsoft SQL Server
One potential limitation when connecting Java to Microsoft SQL Server is the possibility of encountering version incompatibility issues. For example, if you’re using Java 8 to execute your program with a Microsoft JDBC driver designed for Java 11 or higher.
In such cases, attempting to load the SQL Server driver for Java 11 with Java 8 will result in an error. To resolve this issue, you’ll need to either download the appropriate Java 8 version of the driver or upgrade your Java software to version 11 for seamless execution.
Considering other data export and import methods applicable to SQL Server? Check data import and export tools available in dbForge for SQL Server.
FAQ
Can I use JDBC to connect to SQL Server?
Yes, you can connect Java applications to SQL Server using JDBC. The process requires a compatible JDBC driver, such as the Microsoft JDBC Driver for SQL Server, along with the correct connection string.
Can you use SQL and Java together?
Yes, Java and SQL work together using JDBC, allowing Java applications to connect and send SQL queries to SQL Server. This makes possible such database operations as inserting, updating, deleting, and retrieving data.
How do you retrieve data from the SQL Server in Java?
First of all, you need to set up a working connection. This is done through JDBC: create a Statement or PreparedStatement, execute a SELECT query, and afterward process the returned ResultSet. When all is finished, Java applications will be able to utilize the retrieved data.
What is required to connect to SQL Server in Java?
You need the following:
- A Java Development Kit (JDK) installed.
- A JDBC driver (Microsoft JDBC Driver).
- SQL Server must be running and allow TCP/IP connections.
- A valid connection string with authentication credentials.
Which JDBC driver should be used to connect Java applications to the SQL Server?
The Microsoft JDBC Driver for SQL Server is the official option. It’s a Type 4 driver that provides database connectivity through standard JDBC APIs.
How can I connect to SQL Server using Windows Authentication in Java?
To use Windows Authentication, configure the Microsoft JDBC Driver with integrated security by adding integratedSecurity=true to the connection string. Ensure the JDBC driver .dll files are correctly added to the system path.
Conclusion
In this article, we’ve explored the correct usage of JDBC drivers in how to connect Java to SQL Server, specifically focusing on connecting Java applications to Microsoft SQL Server databases. By following the outlined steps and best practices, developers can ensure secure integration of their Java applications with SQL Server, mitigating risks and safeguarding sensitive data effectively.
With Devart’s dbForge product line, which includes powerful database tools for all major database management systems such as SQL Server, MySQL, MariaDB, Oracle, and PostgreSQL, developers gain access to robust tools designed to streamline database development, management, and administration tasks.
We invite you to download dbForge Studio for SQL Server for a 30-day free trial to test its extensive functionality. Discover how its functionality can improve your workflow and broaden your database management experience.