")
In the article, we are going to examine how to create a new user account and grant/revoke permissions and roles on a database object, as well as how to check SQL Server user permissions on the database using T-SQL, SQL Server Management Studio, and dbForge Studio for SQL Server.
When it comes to protecting sensitive data and keeping the database environment secure, the management of database permissions and privileges takes center stage. For example, you want a specific person to be able to modify and manipulate personal data, while others can only view this data. In this case, database administrators will need to create a new user or role with specific permissions that can be assigned at the server, database, or schema levels. To implement this task, they can use T-SQL statements provided by SQL Server or third-party tools.
To move on, we are going to dig deeper into the following how-tos:
- Create a new login in SQL Server
- Create a new user in SQL
- Grant permissions in SQL
- Check user and login permissions in dbForge Studio for SQL Server
- Revoke privileges in SQL
- Deny permissions in SQL
- Assign roles in SQL
- Why to choose dbForge Studio
Create a new login in SQL Server
Before creating a database user, you should create a new login based on Windows Authentication, SQL Server authentication, a certificate, or an asymmetric key.
To add a new login, use the CREATE LOGIN statement. It creates a login connected to a SQL Server instance. The login will then be mapped to the specified user account. The syntax is as follows:
Windows Authentication
CREATE LOGIN login_name
   FROM WINDOWS
[ WITH DEFAULT_DATABASE = database_name
| DEFAULT_LANGUAGE = language_name ];
SQL Server authentication
 CREATE LOGIN login_name
  WITH PASSWORD = { 'password' | hashed_password HASHED } [ MUST_CHANGE ]
[ , SID = sid_value
  | DEFAULT_DATABASE = database_name
  | DEFAULT_LANGUAGE = language_name
  | CHECK_EXPIRATION = { ON | OFF }
  | CHECK_POLICY = { ON | OFF }
  | CREDENTIAL = credential_name ];
Certificate
CREATE LOGIN login_name
FROM CERTIFICATE certificate_name;
Asymmetric key
CREATE LOGIN login_name
FROM ASYMMETRIC KEY asym_key_name;
The table describes the arguments used in the CREATE LOGIN statements.
| Argument | Description |
| login_name | Name of the login connected to the server. |
| database_name | Name of the default database to which the login will be assigned. |
| language_name | Default language for the login you create. |
| password | Password for the login you create. |
| hashed_password | Hashed value of the password for the login you create. |
| MUST_CHANGE | Prompts to change the password upon the connection. |
| sid_value | Value used to recreate a login. It can be used only for logins with SQL Server authentication. If sid_value is not set, SQL Server will assign a new SID. |
| CHECK_EXPIRATION | Defines whether the password expiration policy is applied. It should be set to ON if you use the MUST_CHANGE option. |
| CHECK_POLICY | When the argument is set to ON, it indicates that Windows password policy of the computer on which SQL Server is running should be applied to the login as well. |
| credential_name | Name of the credential to be assigned to the SQL Server login. |
| certificate_name | Name of the certificate to be mapped to the SQL Server login. |
| asym_key_name | Name of the asymmetric key to be mapped to the SQL Server login. |
CREATE LOGIN statement using Windows Authentication
To add a SQL Server user based on Windows authentication, run the CREATE LOGIN statement with the following arguments:
CREATE LOGIN JordanS
FROM WINDOWS;
This will create a new login JordanS on a SQL Server instance using Windows authentication.
Create a SQL Server Authentication login
For example, let’s create a login JordanS with the password ‘pass123’ using SQL Server authentication. For this, run the following command:
CREATE LOGIN JordanS
WITH PASSWORD = 'pass123';
If you want to change the password at the first login, add the MUST_CHANGE argument with enabled CHECK_EXPIRATION to the CREATE LOGIN statement:
CREATE LOGIN JordanS
WITH PASSWORD = 'pass123' MUST_CHANGE,
CHECK_EXPIRATION = ON;
Create a login from a certificate
Now, let’s see how to create a login JordanS using a SQL Server certificate certificate123.
CREATE LOGIN JordanS
FROM CERTIFICATE certificate123;
Create a login from an asymmetric key
Finally, add a new login, JordanS, using an asymmetric key – key_123 – in SQL Server.
CREATE LOGIN JordanS
FROM ASYMMETRIC KEY key_123;
Create a new user in SQL
After creating the login, it is time to add a new user using one of the following methods:
- T-SQL
- SSMS
- dbForge Studio for SQL Server
Create a user using T-SQL
To create a new user account, use the CREATE USER statement:
CREATE USER <username> for login <login_name>where:
usernameis the name of the user you want to create. Note that the username must be unique for the user within the database.
login_nameis the existing login on the server with which you want to associate the user.
For example, create a new user – Manager associated with the login JordanM.To do this, execute the following CREATE USER query:
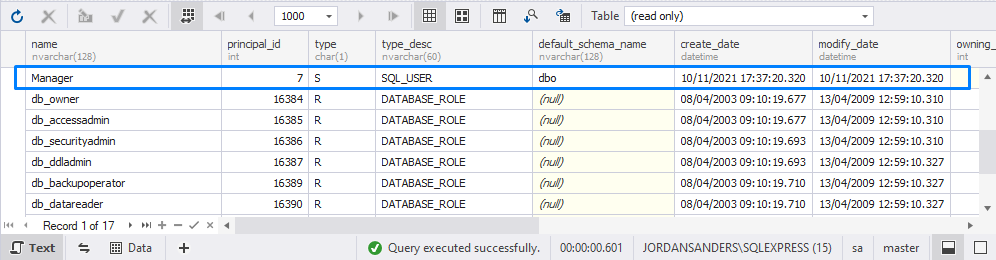
CREATE USER Manager FOR LOGIN JordanM;To check that the user has been created, execute the SELECT query on the sys.database_principals system view. The query retrieves a list of all users created in the SQL Server database.
SELECT *
FROM AdventureWorks2019.sys.database_principals;
The output should be as follows:
Create a user in SSMS
As an alternative, you can use SQL Server Management Studio (SSMS) to create a user.
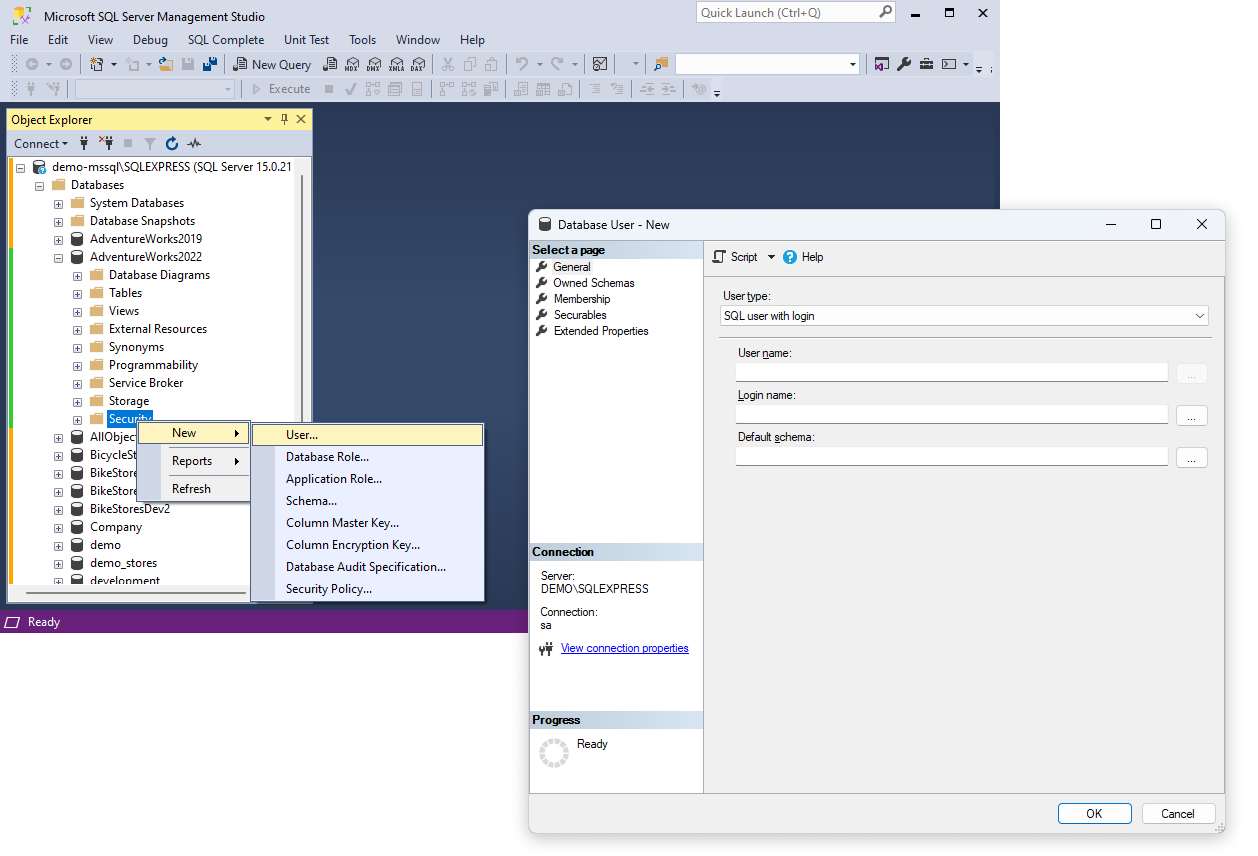
To begin, open SSMS and connect to the server on which you want to create a user. In Object Explorer, expand the Databases node and select the database where you want to create the user. Under the selected, right-click the Security folder and select New > User. This will open the Database User – New dialog, where you need to specify the following user details:
- User name: Enter the name of the user you want to create.
- Login name: Click the ellipsis icon to choose a login that will be tied to the user.
- Optional: Default schema: Specify the default schema for the user.
Then, click OK to create the user.
Create a user with dbForge Studio
Now, we are going to see how comfortable it is to deal with users using an ultimate SQL Server administration tool, Security Manager, built into dbForge Studio for SQL Server. It’s a perfect alternative to SQL Server Management Studio that you can use for most of the tasks.
Security Manager is a reliable tool that ensures a secure and efficient way to control access to database objects and data, to create and manipulate users and roles, and to grant and revoke privileges and permissions.
To get started, open Security Manager by using one of the following ways:
- On the Start Page, switch to the Administration tab and click Manage Server Security.
- On the Database menu, select Security Manager.
In the Security Manager, select Create User from the list. On the General page, fill in the following details:
- Name: Enter the name of the new user.
- Login name: Select an existing login from the list.
- Optional: Default schema: Select the default schema for the user.
Click OK to save the changes. Note that some parameters may vary depending on the type of user.
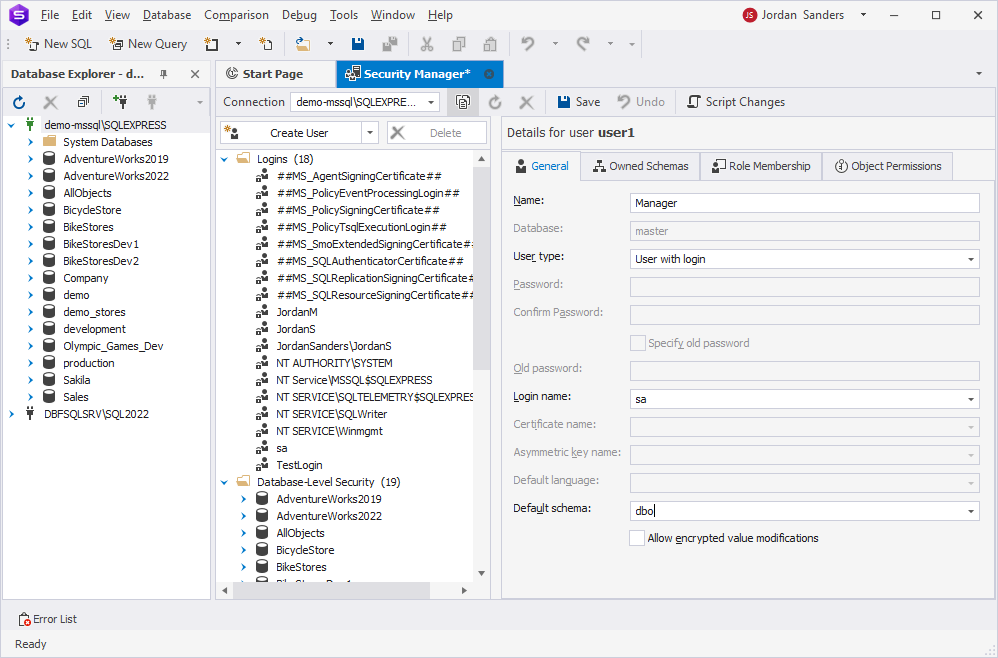
As you can see, thanks to its modern interface of the robust tool Security Manager available in the Studio, you get a user-friendly experience when creating users in SQL.
Next, we can proceed with assigning permissions and privileges.
Grant permissions in SQL
Permissions and privileges control the access to SQL Server data and database objects. You can grant user privileges to different database objects in SQL Server.
Privileges can be of two types:
- System privileges that allow users to create, alter or drop database objects.
- Object privileges that allow users to execute, select, insert, update, or delete data on database objects to which the privileges were assigned.
Note that only database administrators or owners of database objects can provide or revoke privileges.
In this section, we’ll consider how to grant permissions using T-SQL, SSMS, and dbForge Studio for SQL Server.
Grant permissions using T-SQL
The GRANT statement provides user access and permissions on database objects. The basic syntax is as follows:
GRANT privileges
  ON database_name.object
TO {user_name |PUBLIC |role_name}
[WITH GRANT OPTION];
The table describes the arguments used in the GRANT statements.
| Argument | Description |
| privileges | Permissions you want to grant. They include the SELECT, INSERT, UPDATE, DELETE, REFERENCES, ALTER, or ALL statements. |
| database_name | Name of the database to which the database object belongs. |
| object | Database object on which the specified privileges will be assigned. |
| user_name | Name of the user whom the privileges will be granted. |
| PUBLIC | Used to grant permissions to all users. |
| role_name | Set of privileges grouped in one category. |
| WITH GRANT OPTION | Used to grant permissions to other users. |
For example, let’s grant the SELECT, INSERT, and ALTER privileges on the HumanResources.Employee table to the user Manager that we created. To do this, execute the following query:
GRANT SELECT, INSERT, ALTER ON HumanResources.Employee TO Manager;Now, check that the permissions on the HumanResources.Employee table have been assigned to the user Manager. To do this, use the system view – fn_my_permissions – and execute the following query:
EXECUTE AS USER = 'Manager';
GO
USE AdventureWorks2019
GO
SELECT * FROM fn_my_permissions('HumanResources.Employee', 'OBJECT')
GO
The output is as follows:

Grant permissions in SSMS
Giving permissions to a user in SSMS involves several steps. In Object Explorer, expand the Databases node and select the database where you want to grant permissions. Then, navigate to the Security > Users folder. Right-click the user to whom you want to grant permissions and select Properties.
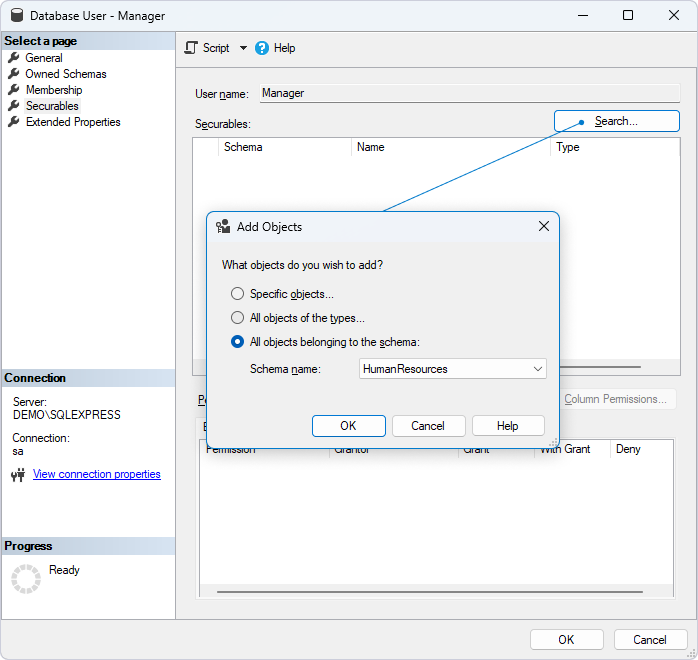
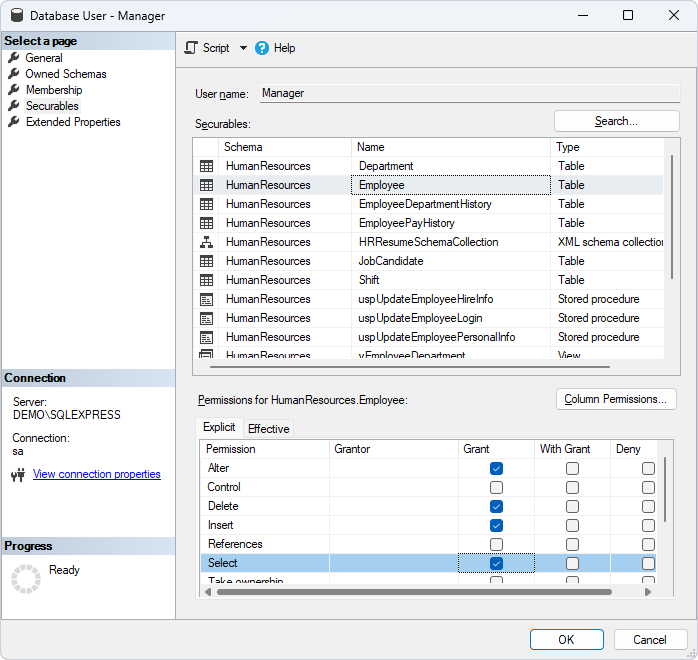
In the Database User dialog, select the Securables page from the left sidebar menu. On this page, you can grant permissions to the user for specific objects (e.g., tables, views, stored procedures).
To add the object, click Search. This will open the Add Objects popup with three options:
- Specific objects: Select this option to grant permissions to specific database objects.
- All objects of the types: Select this option to grant permissions to a specific type of database objects, such as tables, stored procedures, views, asymmetric keys, databases, etc.
- All objects belonging to the schema: Select this option to grant permissions all the database objects of the specified schema.
In our example, we select the last option and click OK.
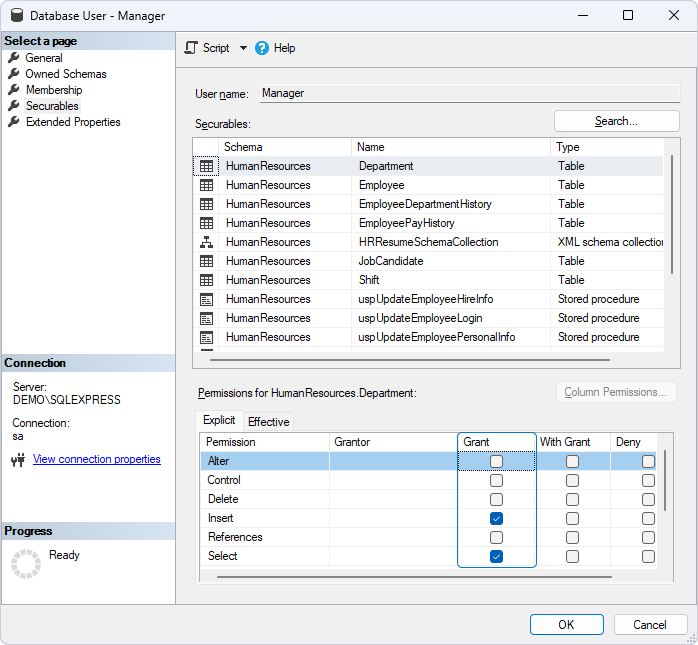
This will display all the database objects under this schema in the Securables section. Then, select the database object for which you want to assign permissions. Under Permissions for <Object>, select the checkboxes next to the required permission, and click OK to apply and save the changes.
Grant permissions in dbForge Studio for SQL Server
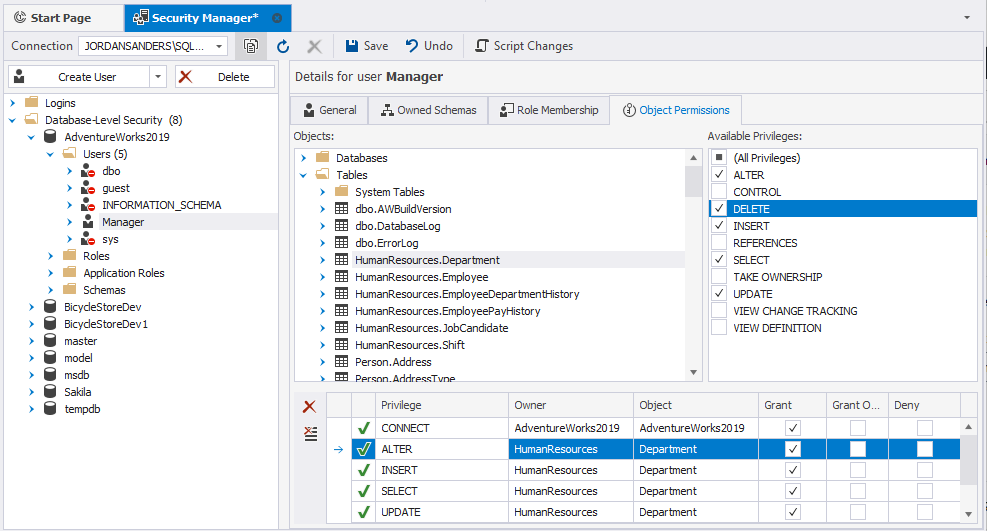
You can grant permissions for the user in Security Manager. On the left, select the required user and switch to the Object Permissions tab on the right. In the Objects section, select the database object on which you want to grant privileges. In the Available Privileges section, select the checkboxes next to the permissions to assign and click Save.
Check user and login permissions in dbForge Studio for SQL Server
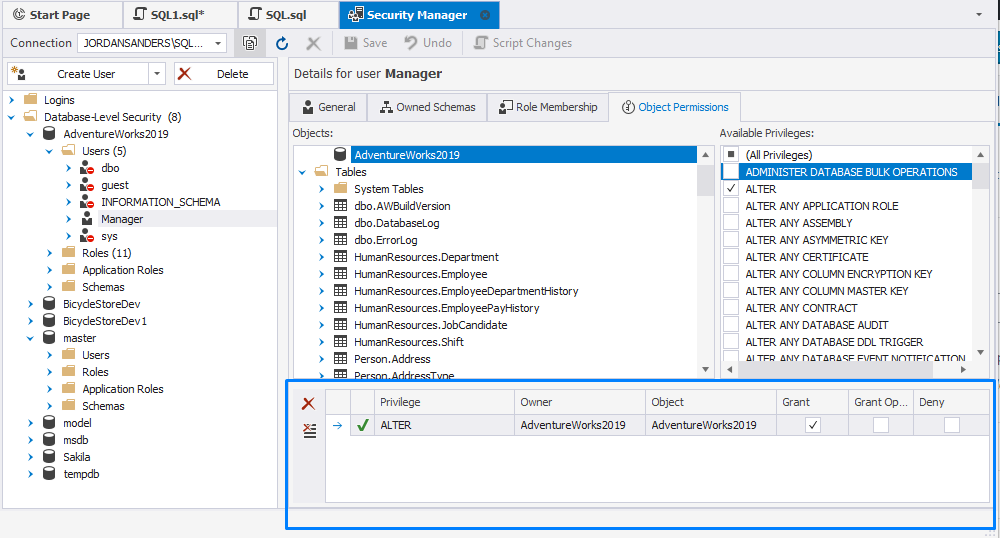
To get a list of object-level permissions assigned to the user, select the user in Security Manager and switch to the Object Permissions tab. Then, select the object and view the available permissions.
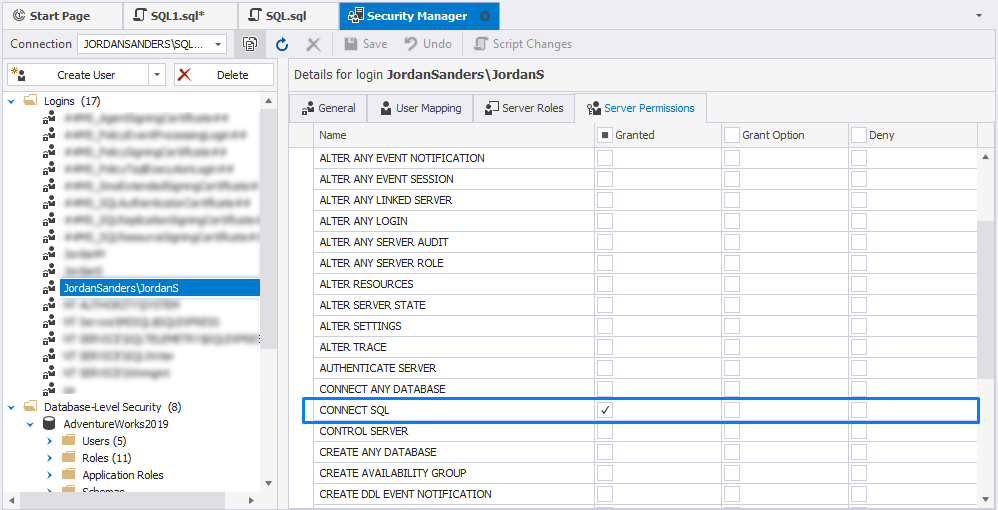
In addition, you can check the list of permissions granted to the login at the server level. For this, in Security Manager, select the login for which you want to view the permissions and switch to the Server Permissions tab. The selected checkbox will be next to the assigned permissions in the Granted column.
Revoke privileges in SQL
In this section, we’ll explore how to revoke privileges using T-SQL, SSMS, and dbForge Studio.
Revoke all privileges using T-SQL
If you want to remove the privileges on the database object from the user, you can use the REVOKE query:
REVOKE privileges
ON object
FROM {user_name |PUBLIC |role_name}
Replace privileges with SELECT, INSERT, UPDATE, DELETE, REFERENCES, ALTER, or ALL.
Let us remove the INSERT and ALTER permissions on the HumanResources.Employee table assigned to the user Manager by running the following query:
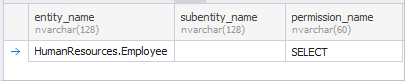
REVOKE INSERT, ALTER ON HumanResources.Employee TO Manager;To verify the permissions granted, execute the following query using the fn_my_permissions function. It returns a list of the permissions for the current or specified user on a specific securable, such as a database, table, or view:
EXECUTE AS USER = 'Manager';
GO
USE AdventureWorks2019
GO
SELECT * FROM fn_my_permissions('HumanResources.Employee', 'OBJECT')
GO
As you can see, the INSERT and ALTER permissions were removed, leaving only the SELECT permission still assigned.
Revoke permissions in SSMS
We have covered how to revoke permissions using T-SQL. Now, it is time to see how to do the same operation using SSMS. Permissions can be revoked on the Securables page of the Database User dialog.
In the Database User dialog, select the Securables page from the left-hand menu, which shows a list of objects and the permissions the user currently has. Then, select the required object and clear the checkboxes next to the permissions you want to revoke in the Grant column of the grid. To save the changes, click OK.
Revoke permissions in dbForge Studio
In contrast to SSMS, dbForge Studio allows you to revoke either specific or all permissions in Security Manager.
To revoke specific changes, select the privilege, click Revoke Selected Privilege and click Save to save the changes. To remove all the granted privileges, click Revoke All Privileges.

Deny permissions in SQL
The DENY permission explicitly blocks access to the database object and overrides any permissions that may have been granted previously.
For example, if the object has the GRANT and DENY permissions, the DENY permissions will prevail over the GRANT ones.
Deny permissions using T-SQL
In SQL, permissions can be denied using the DENY statement. The basic syntax is as follows:
DENY [permission] ON [database_object] TO [user_or_role];where:
permissionis the specific permission or privilege you want to deny, such asSELECT,INSERT,UPDATE,DELETE, etc.database_objectis the database object on which the permission should be denied. This could be a table, view, schema, or even the entire database.user_or_roleis the user or role to whom you want to deny the permission.
For example, execute the following query:
DENY INSERT ON HumanResources.Employee TO Manager;This command explicitly forbids the Manager user from inserting data into the Employee table, regardless of any other permissions that can be granted to Manager.
Deny permissions in SSMS
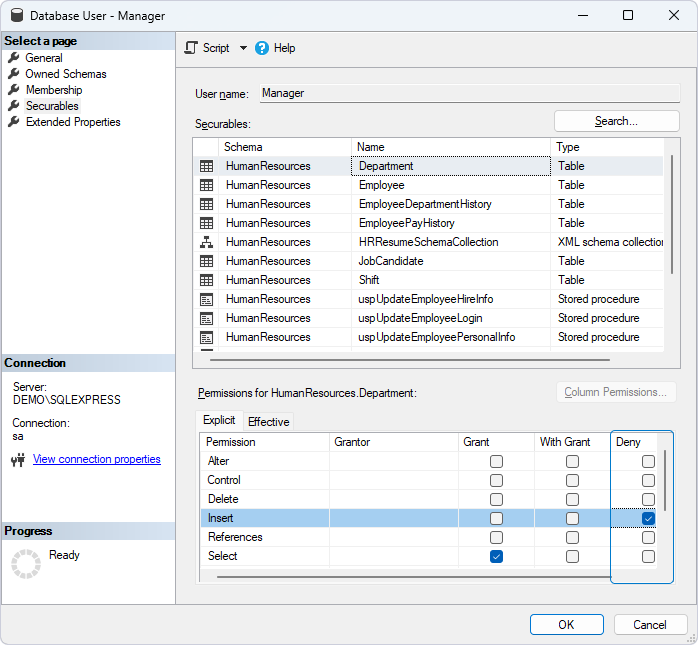
In SSMS, you can deny permissions in the Database User dialog on the Securables page. Select the database object and select the checkboxes next to the permissions you want to deny in the Deny column and click OK to save the changes.
Deny permissions in dbForge Studio
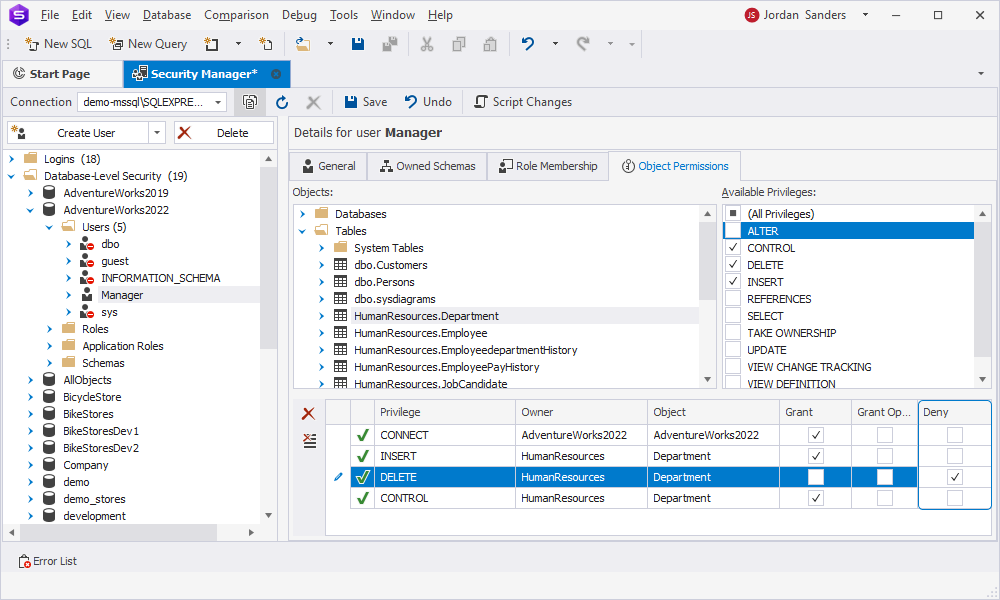
With dbForge Studio, you can easily manage permissions in Security Manager.
To deny a permission, start by selecting the required user from the left-side menu. Then, in the Objects section, choose the specific database object from which you want to deny permissions. In the bottom grid, select the checkbox next to the corresponding privilege in the Deny column. Finally, click Save on the toolbar to apply the changes.
Assign roles in SQL
What if you need to apply privileges to a group of users rather than to a single user? In this case, it would be better to define the role, a set of privileges and permissions. Thus, a user who is assigned to the role can access and manipulate the database objects with the same permissions as the role has.
Note that for role manipulation, you should have the ALTER permission on the role, ALTER ANY ROLE permission at a database level, and membership in the db_securityadmin fixed database role.
Assign roles using T-SQL
First, create the role by executing the CREATE ROLE query:
CREATE ROLE role_name;where role_name is the name of the role you want to create.
For example, we want to create the role Managers:
CREATE ROLE managers;Given that the role currently has no assigned privileges, the next step is to add privileges to the role using the GRANT command. It can assign privileges to roles on databases and database objects.
For example, apply the SELECT, UPDATE, ALTER, INSERT, DELETE privileges on the Person.Address table to the role Managers.
GRANT SELECT, UPDATE, ALTER, INSERT, DELETE ON Person.Address TO managers;After that, add users to the role by running the ALTER ROLE query. It adds or removes users to or from a database role or can be used to change the name of the role.
The syntax is as follows:
ALTER ROLE role_name
ADD MEMBER user_name;
where:
role_nameis the name of the role you want to modify or drop.user_nameis the name of the existing user you want to add to the role.
If you want to remove the user from the role, use the ALTER ROLE statement with the following properties:
ALTER ROLE role_name DROP MEMBER user_name;Note: user_name cannot be a fixed database role or a server principal.
To change the name of the role, run the following statement:
ALTER ROLE role_name WITH NAME = new_name;where new_name is the new name of the role. Keep in mind that the name of a fixed database role cannot be modified.
Assign roles in SSMS
Assigning roles to users in SSMS involves granting predefined or custom roles to a user, which then determines the permissions that user has within a database or the entire SQL Server instance. You can assign either a server-level or a database-level role.
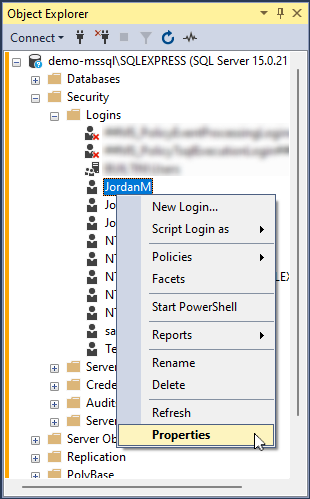
To grant a server-level role, in Object Explorer, expand the server tree and then expand the Security folder > Logins. Then, right-click the required login and select Properties.
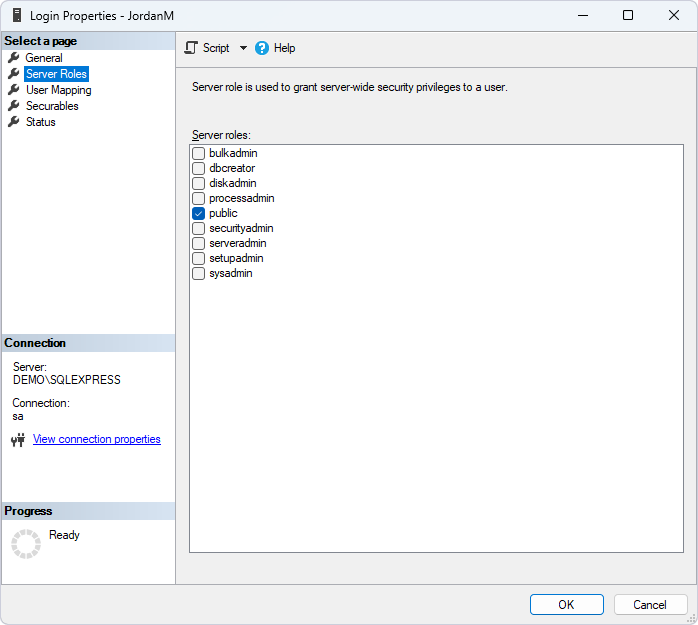
In the Login Properties dialog that opens, select the Server Roles page on the left. Then, select the checkbox next to the server roles you want to assign to the user, for example, sysadmin, dbcreator, securityadmin, etc.
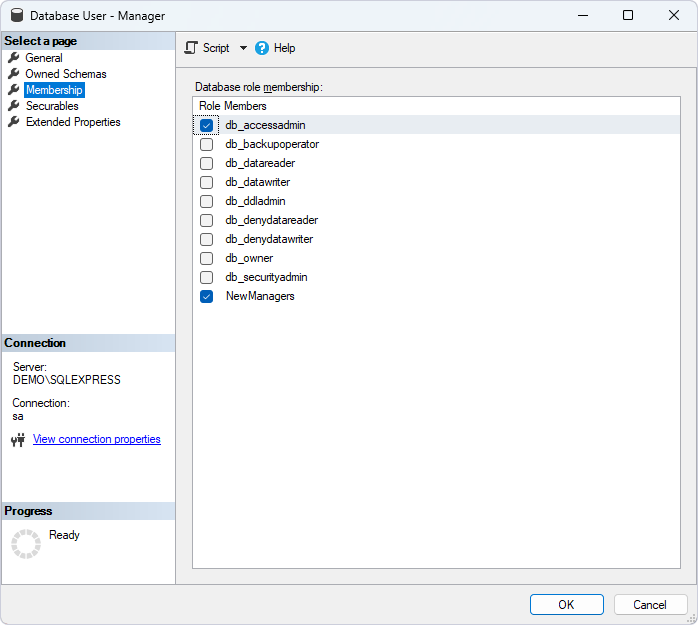
To assign a database-level role, in Object Explorer, expand the Databases folder and select the database where you want to assign the role. Then, expand the Security folder > Users. In the Users folder, right-click the user to whom you want to assign a role and select Properties. In the Database User dialog that appears, navigate to the Membership page and select the checkboxes next to the roles you want to assign. Click OK to save the changes.
Assign roles in dbForge Studio
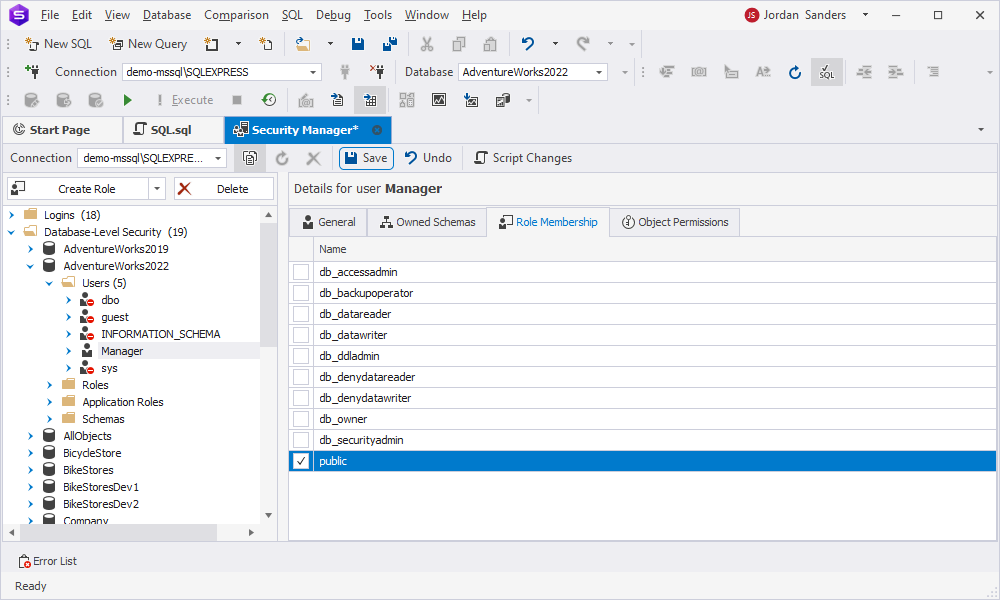
With dbForge Studio, you can assign roles visually using Security Manager. Select a user account for which you want to assign roles, navigate to the Role Membership tab on the right, and select the checkboxes next to the required roles. Click Save to save the changes.
Why to choose dbForge Studio
We have considered several methods for creating and managing users, privileges and roles, including T-SQL, SSMS and dbForge Studio for SQL Server. Which one you choose will largely depend on your specific needs, workflow preferences and the complexity of the tasks you are handling. However, we would like to draw your attention to several reasons why a lot of users find dbForge Studio for SQL Server to be the best tool compared to SSMS and direct T-SQL scripting:
- Intuitive and visual interface for managing users and roles.
- A single and easy-to-navigate view to handle all user, role, and permission management features without the need to switch between different windows.
- Security Manager displays all available permissions at a glance and lets you assign them in a few clicks without manually writing T-SQL GRANT, DENY, or REVOKE statements, which require precise syntax and can be error-prone.
- Script changes to create and reuse role and privilege templates.
Conclusion
In the article, we have described how to create a SQL Server user account on database objects, and assign or revoke privileges applied to the user using T-SQL, SSMS, and dbForge Studio for SQL Server. As you can see, with Security Manager available in dbForge Studio for SQL Server, it is much faster to perform these tasks with several clicks, thus, saving your time and increasing productivity.
To evaluate other excellent features and capabilities dbForge Studio for SQL Server provides, download a 30-day free trial version of the tool. After it expires, you feel like purchasing a full version of dbForge Studio for SQL Server – no doubt!