
Introduction
Both Dependency Injection (DI) and Inversion of Control (IoC) are widely used architectural patterns in software engineering to build applications that are loosely coupled, testable, scalable, and maintainable.
Dependency Injection is a first-class citizen in ASP.NET Core. Support for dependency injection is built into ASP.NET Core. You can leverage dependency injection to build applications that are loosely coupled, testable, and extendable.
This article talks about Dependency Injection, why it is important, its types, and how it can be implemented in ASP.NET Core applications. This article builds a simple application to demonstrate the concepts covered and uses PostgreSQL as the database to store data and dotConnect for PostgreSQL as the data provider for PostgreSQL.
In this article, we’ll connect to PostgreSQL using dotConnect for PostgreSQL which is high high-performance and enhanced data provider for PostgreSQL that is built on top of ADO.NET and can work on both connected and disconnected modes.
Pre-requisites
You’ll need the following tools to deal with code examples:
- Visual Studio 2022 Community Edition
- PostgreSQL
- dotConnect for PostgreSql
You can download PostgreSQL from here: https://www.postgresql.org/download/
You can download a trial version of dotConnect for PostgreSQL from here:

What Are We Building Here?
In this article we’ll explore the Inversion of Control (IoC) and Dependency Injection (DI) architectural principles and examine how we can implement them in ASP.NET 6. Here are the steps we’ll follow throughout this article to accomplish this:
- Gain an understanding of IoC and DI principles and why they are important
- Create an ASP.NET 6 Core Web API project in Visual Studio 2022
- Add the Devart.Data.PostgreSql NuGet package to the project
- Create a table named customer in a database in PostgreSql and insert a few records into it
- Create a Repository class named CustomerRepository to retrieve data from the database table
- Configure Program.cs file to enable an instance of CustomerRepository to be injected
- Create an ApiController class named CustomerController that would leverage dependency injection to retrieve data from the database table using the CustomerRepository class
- Execute the application
What is Inversion of Control (IoC)?
Inversion of Control (IoC) is a software architecture design principle that fosters coding against interfaces instead of implementation by inverting the control flow in an application. Per the IoC principle, high-level modules or components in an application should never depend on low-level modules or components; instead, they should depend on abstractions. In this case, instead of a component controlling the program flow using a component, the control flow is inverted or “controlled” by a framework or container.
Per the IoC design principle, an object should not create instances of objects it depends on. Instead, the dependent objects should be created by a framework or a container. Dependency injection (DI) is a strategy for implementing Inversion of control (IoC) in which a class’s dependencies (e.g., the objects on which it depends) are provided to it externally, rather than the class creating them itself. By enabling you to inject the dependencies externally, it removes internal dependencies from the implementation. Dependency injection facilitates loose coupling between the components of an application, hence making your source code modular and easier to maintain.
What is Dependency Injection?
Dependency injection is a technique for implementing IoC in which a class’s dependencies (e.g., the objects on which it depends) are provided to it externally, rather than the class creating them itself. By enabling you to inject the dependencies externally, it removes internal dependencies from the implementation. Dependency injection facilitates loose coupling between the components of an application, hence making your source code modular and easier to maintain.
Types of Dependency Injection
There are three types of dependency injection: constructor injection, method injection, and setter injection. When using constructor injection, you can inject an instance of a class to another class using a parameter constructor. The following code snippet shows how you can implement constructor injection in ASP.NET Core:
public class DemoController : Controller

{

    private readonly ILogger<DemoController> _logger;

    public DemoController(ILogger<DemoController> logger)

    {

        _logger = logger;

    }

}
In method injection, you can use the parameters of a method to pass the required dependencies. The following code snippet illustrates this:
public class DemoService

{

    private ILogger<DemoService> _logger;

    public void SetLogger(ILogger<DemoService> Logger)

    {

        _logger = Logger;

    }

    public void Log(string data)

    {

        _logger.LogInformation(data);

    }

}
You can pass the dependency using the SetLogger method as shown in the following piece of code:
ILogger logger = loggerFactory.CreateLogger<Program>();

DemoService demoService = new DemoService();

demoService.SetLogger(loggerFactory.CreateLogger<DemoService>());

demoService.Log("This is a sample text.");
In setter injection, the dependency is passed via a property. The code snippet given below demonstrates setter injection:
public class DemoService

{

    private ILogger<DemoService> _logger;

    public ILogger<DemoService> Logger

    {

        get

        {

            return _logger;

        }

        set

        {

            _logger = value;

        }

    }

    public void Log(string data)

    {

        _logger.LogInformation(data);

    }

}
You can pass the dependency using the following piece of code:
using var loggerFactory = LoggerFactory.Create(loggingBuilder => loggingBuilder

    .SetMinimumLevel(LogLevel.Trace)

    .AddConsole());

DemoService demoService = new DemoService();

demoService.Logger = loggerFactory.CreateLogger<DemoService>();

demoService.Log("This is a sample text.");
Understanding Dependency Injection Lifetimes in ASP.NET Core
Dependency injection lifetime refers to the time span of an instance, i.e., the duration till which the instance will be live after it is created in the container. ASP.NET Core provides support for the following lifetimes:
Transient
This specifies that a new instance will be created for each Http request. So, when you register a service with the container using a transient lifetime, a new instance of the service will be created with each each time you inject the instance. The following code snippet shows how you can register a service with the container using a transient lifetime:
builder.Services.AddTransient<ICustomerRepository, CustomerRepository>();
Singleton
This specifies that only one instance for the entire application will be created. The following code snippet shows how you can register a service with the container using a singleton lifetime:
builder.Services.AddSingleton<ICustomerRepository, CustomerRepository>();
Scoped
This specifies only one instance per scope will be created. Once the server receives an HTTP request from a client, it creates an HttpContext that includes details about the request. At this point, the application creates a scope for the current request. It should be noted that a scoped lifetime is analogous to the lifetime of an HTTP request. When you register a service instance using a scoped lifetime, all types in the application will use the same instance.
The following code snippet shows how you can register a service with the contain with a scoped lifetime:
builder.Services.AddScoped<ICustomerRepository, CustomerRepository>(); Start a new ASP.NET 6 Core Web API Project
In this section we’ll learn how to create a new ASP.NET 6 Core Web API project in Visual Studio 2022.
Now, follow the steps outlined below:
- Open Visual Studio 2022.
- Click Create a new project.
- Select ASP.NET Core Web API and click Next.
- Specify the project name and location to store that project in your system. Optionally, checkmark the Place solution and project in the same directory checkbox.
- Click Next.
- In the Additional information window, select .NET 6.0 (Long-term support) as the project version.
- Disable the Configure for HTTPS and Enable Docker Support options (uncheck them).
- Since we’ll not be using authentication in this example, select the Authentication type as None.
- Since we won’t use Open API in this example, deselect the Enable OpenAPI support checkbox.
- Since we’ll not be using minimal APIs in this example, ensure that the Use controllers (uncheck to use minimal APIs) is checked.
- Leave the Do not use top-level statements checkbox unchecked.
- Click Create to finish the process.
We’ll use this project in this article.
Install NuGet Package(s) into the API Project
In your API project, i.e., the project you just created, you should install the dotConnect for PostgreSql package in your project. dotConnect for PostgreSQL is a high-performance data provider for PostgreSQL built on ADO.NET technology that provides a comprehensive solution for building PostgreSQL-based database applications.
You can install this package either from the NuGet Package Manager tool inside Visual Studio or, from the NuGet Package Manager console using the following command:
PM> Install-Package Devart.Data.PostgreSql
Create the Database
You can create a database using the pgadmin tool. To create a database using this Launch this tool, follow the steps given below:
- Launch the pgadmin tool
- Expand the Servers section
- Select Databases
- Right-click and click Create -> Database…
- Specify the name of the database and leave the other options to their default values
- Click Save to complete the process
Alternatively, you can use the following script to create the database:
-- Database: demo

DROP DATABASE IF EXISTS demo;

CREATE DATABASE demo

    WITH

    OWNER = postgres

    ENCODING = 'UTF8'

    LC_COLLATE = 'English_India.1252'

    LC_CTYPE = 'English_India.1252'

    TABLESPACE = pg_default

    CONNECTION LIMIT = -1

    IS_TEMPLATE = False;
Create a database table
Select and expand the database you just created
Select Schemas -> Tables
Right-click on Tables and select Create -> Table…
The table script is given below for your reference:
CREATE TABLE customer (

    customer_id serial NOT NULL,

    first_name VARCHAR (255) NOT NULL,

    last_name VARCHAR (255) NOT NULL,

    address VARCHAR (255) NOT NULL,

    email VARCHAR (255) NOT NULL,

    phone VARCHAR (255) NOT NULL,

    CONSTRAINT customer_pk PRIMARY KEY (customer_id)

);
We’ll use this database in the subsequent sections of this article to demonstrate how we can work with Integration Tests in ASP.NET Core using dotConnect for PostgreSql.
Add a few records to the Customer table
Now, run the following script in your database to insert a few records in the customer table:
INSERT INTO customer (

    first_name,

    last_name,

    address,

    email,

    phone

)

VALUES

('Joydip', 'Kanjilal', 'Hyderabad, India', [email protected]','1234567890'),

('Debanjan', 'Banerjee', 'Kolkata,India', ’[email protected]','0987654321'),

('Rohit', 'Sharma', 'Bangalore, India', '[email protected]','5566778899');
Figure 1 below illustrates the pgAdmin editor where you can write and execute your scripts:
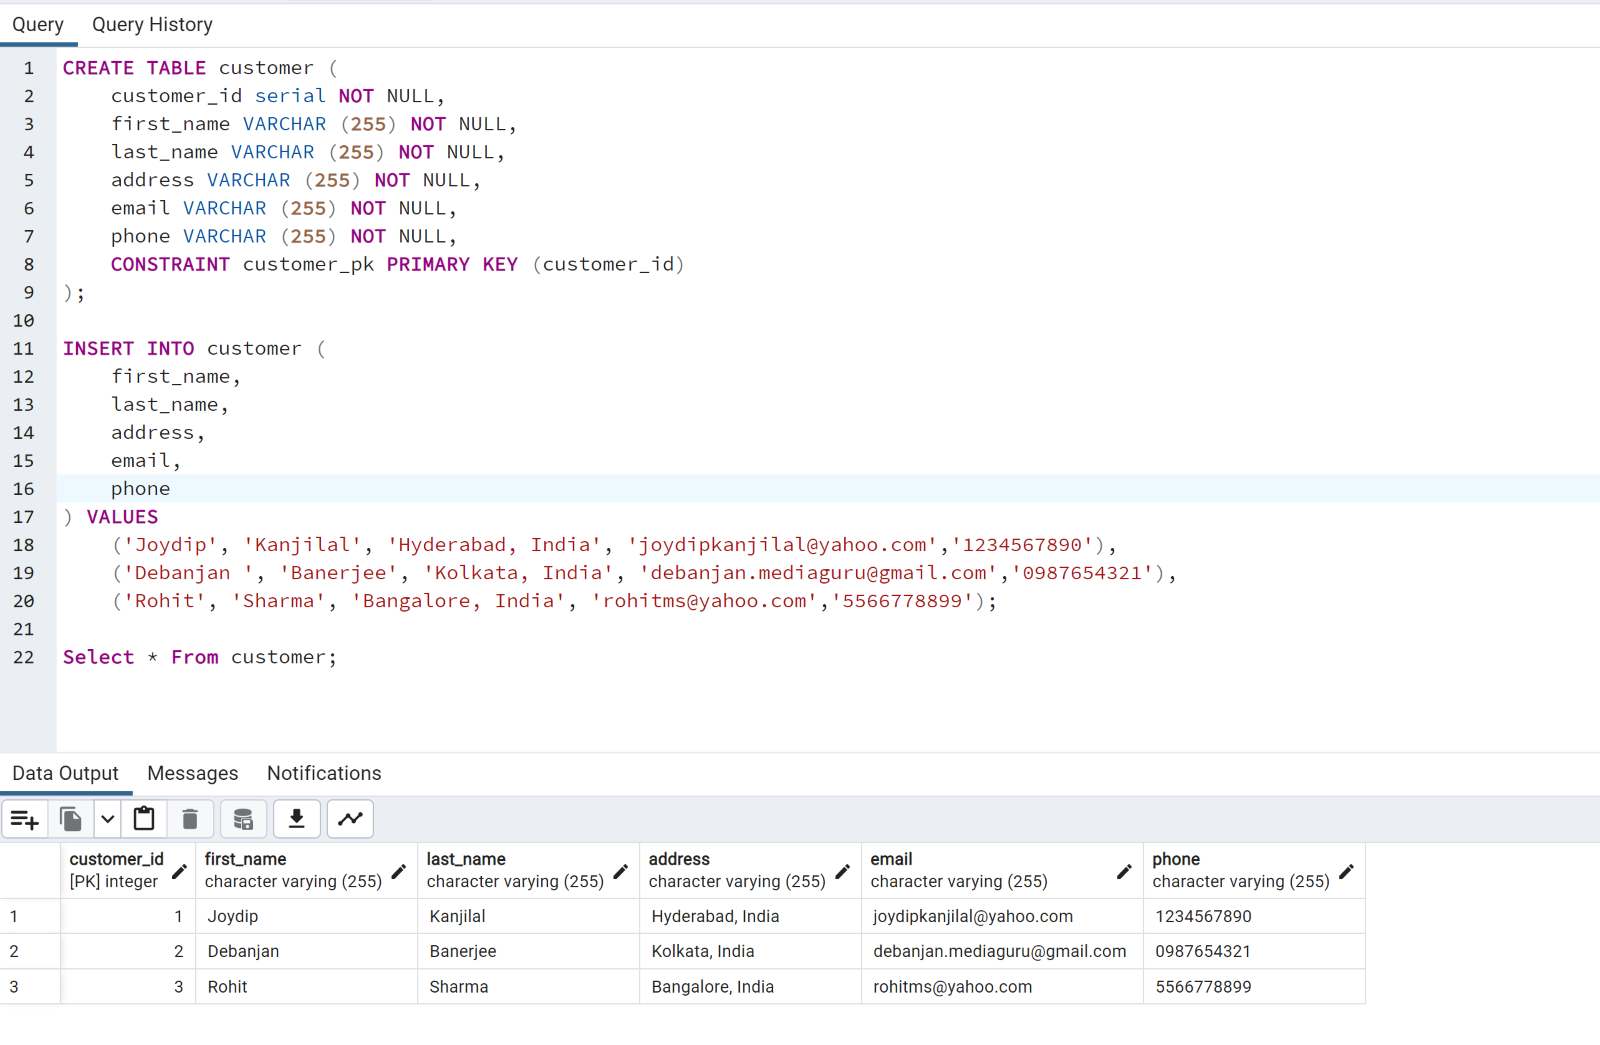
Figure 1: Displaying the records inserted into the customer table
Create the Model Class
Create a solution folder in the Solution Explorer window and name it as Models. Next, create a .cs file called Customer.cs with the following code in there:
public class Customer

    {

        public int Customer_Id { get; set; }

        public string First_Name { get; set; }

        public string Last_Name { get; set; }

        public string Address { get; set; }

   public string Email { get; set; }

   public string Phone { get; set; }

    }

Create the CustomerRepository Class

The ICustomerRepository interface would look like this:

    public interface ICustomerRepository

    {

        public List<Customer> GetCustomers();

    }
The CustomerRepository class implements the GetCustomers method of the ICustomerRepository interface and encapsulates all database operations.
public class CustomerRepository: ICustomerRepository

    {

     public List <Customer> GetCustomers()

     {

      try

      {

       List < Customer > customers = new List < Customer > ();

       using(PgSqlConnection pgSqlConnection =

        new PgSqlConnection("User Id = postgres;

        Password = Specify the Db password here" +

         "host=localhost;database=demo;

        License Key=Specify your license key here"))

       {

        using(PgSqlCommand pgSqlCommand = new PgSqlCommand())

        {

         pgSqlCommand.CommandText =

          "Select * From customer";

         pgSqlCommand.Connection = pgSqlConnection;

         if (pgSqlConnection.State !=

          System.Data.ConnectionState.Open)

          pgSqlConnection.Open();

         using(var pgSqlReader =

          pgSqlCommand.ExecuteReader())

         {

          while (pgSqlReader.Read())

          {

           Customer customer = new Customer();

           customer.Customer_Id =

            int.Parse(pgSqlReader.GetValue(0).ToString());

           customer.First_Name =

            pgSqlReader.GetValue(1).ToString();

           customer.Last_Name =

            pgSqlReader.GetValue(2).ToString();

           customer.Address =

            pgSqlReader.GetValue(3).ToString();

           customer.Email =

            pgSqlReader.GetValue(4).ToString();

           customer.Phone =

            pgSqlReader.GetValue(5).ToString();

           customers.Add(customer);

          }

         }

        }

       }

       return customers;

      }

      catch

      {

       throw;

      }

     }

    }
Create the CustomerController Class
Next, select and right-click on the Controllers solution folder and create a new controller class called CustomerController with the following code in there:
[Route("api/[controller]")]

    [ApiController]

    public class CustomerController: ControllerBase

    {

     private readonly ICustomerRepository _customerRepository;

     public CustomerController(ICustomerRepository customerRepository)

     {

      _customerRepository = customerRepository;

     }

     [HttpGet]

     public List <Customer> Get()

     {

      return _customerRepository.GetCustomers();

     }

    }
Note how an instance of type ICustomerRepository is injected in the constructor of the CustomerController class. Remember that you must add an instance of type ICustomerRepository to the services container using the following piece of code in the Program.cs file:
builder.Services.AddScoped<ICustomerRepository, CustomerRepository>(); When you execute the application and run the Http Get endpoint of the CustomerController class, you’ll see the records of the customer database table displayed in the web browser:
Figure 2: The records of the customer database table are displayed
License Key Validation Error
When you execute the application, you might run into license validation errors if no valid license key is available. If the license key validation fails, you will encounter a Devart.Common.LicenseException. To resolve this error, you must either have a license key and already be a user, or install the installation file which will install a trial key into the system.
Summary
Both Inversion of Control and Dependency Injection facilitate building applications that are loosely coupled, flexible, and easy to maintain. However, while DI can help you create classes with responsibilities separated, it adds a lot of complexity, and there is a learning curve involved before one can start using IoC and DI. Additionally, DI introduces a runtime penalty, which, although negligible and you can ignore in most of your applications, can become a challenge in performance-critical systems.